reset RENAULT MEGANE HATCHBACK 2016 X95 / 3.G Owners Manual
[x] Cancel search | Manufacturer: RENAULT, Model Year: 2016, Model line: MEGANE HATCHBACK, Model: RENAULT MEGANE HATCHBACK 2016 X95 / 3.GPages: 242, PDF Size: 3.54 MB
Page 49 of 242
air bagdeactivating the front passenger air bags ........ (current page)
front passenger air bag deactivation ..................... (current page)
child restraint/seat ................................ (up to the end of the DU)
child safety............................................ (up to the end of the DU)
child restraint/seat ................................ (up to the end of the DU)
transporting children ............................. (up to the end of the DU)
1.43
ENG_UD18912_4
Sécurité enfants : désactivation/activation airbag passager ava\
nt (X95 - B95 - D95 - Renault)
ENG_NU_837-8_BDK95_Renault_1
deactivating/activating the front passenger air bag
2
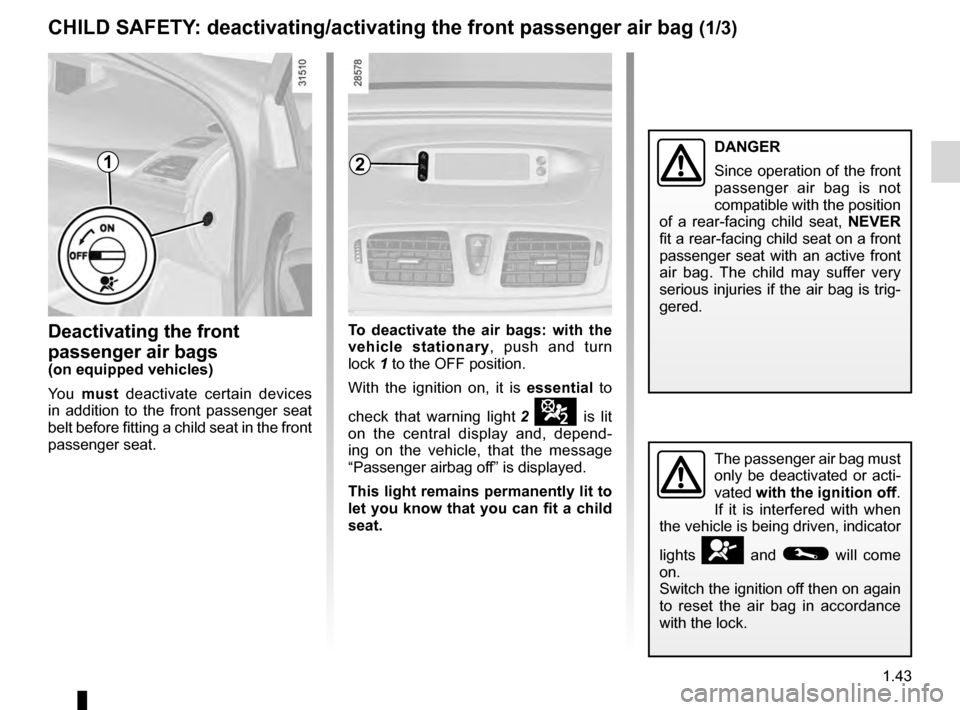
deactivating the front
passenger air bags
(on equipped vehicles)
You must deactivate certain devices
in addition to the front passenger seat
belt before fitting a child seat in the front
passenger seat. To deactivate the air bags: with the
vehicle stationary
, push and turn
lock 1 to the OFF position.
With the ignition on, it is essential to
check that warning light
2 ¹ is lit
on the central display and, depend-
ing on the vehicle, that the message
“Passenger airbag off” is displayed.
This light remains permanently lit to
let you know that you can fit a child
seat.
The passenger air bag must
only be deactivated or acti-
vated with the ignition off.
If it is interfered with when
the vehicle is being driven, indicator
lights
å and © will come
on.
Switch the ignition off then on again
to reset the air bag in accordance
with the lock.
cHILd sAfETY: deactivating/activating the front passenger air bag (1/3)
1dANgER
Since operation of the front
passenger air bag is not
compatible with the position
of a rear-facing child seat, NE
vE
R
fit a rear-facing child seat on a front
passenger seat with an active front
air bag. The child may suffer very
serious injuries if the air bag is trig-
gered.
Page 51 of 242
air bagactivating the front passenger air bags ............ (current page)
Jaune NoirNoir texte
1.45
ENG_UD18912_4
Sécurité enfants : désactivation/activation airbag passager ava\
nt (X95 - B95 - D95 - Renault)
ENG_NU_837-8_BDK95_Renault_1
cHILd sAfETY: deactivating/activating the front passenger air bag (3/3)
4
Operating faults
It is forbidden to fit a rear-facing child
seat to the front passenger seat if the
air bag activation/deactivation system
is faulty.
Allowing any other passenger to sit in
that seat is not recommended.
If warning lights
› and ¹ are
lit at the same time.
Contact your approved dealer as soon
as possible.
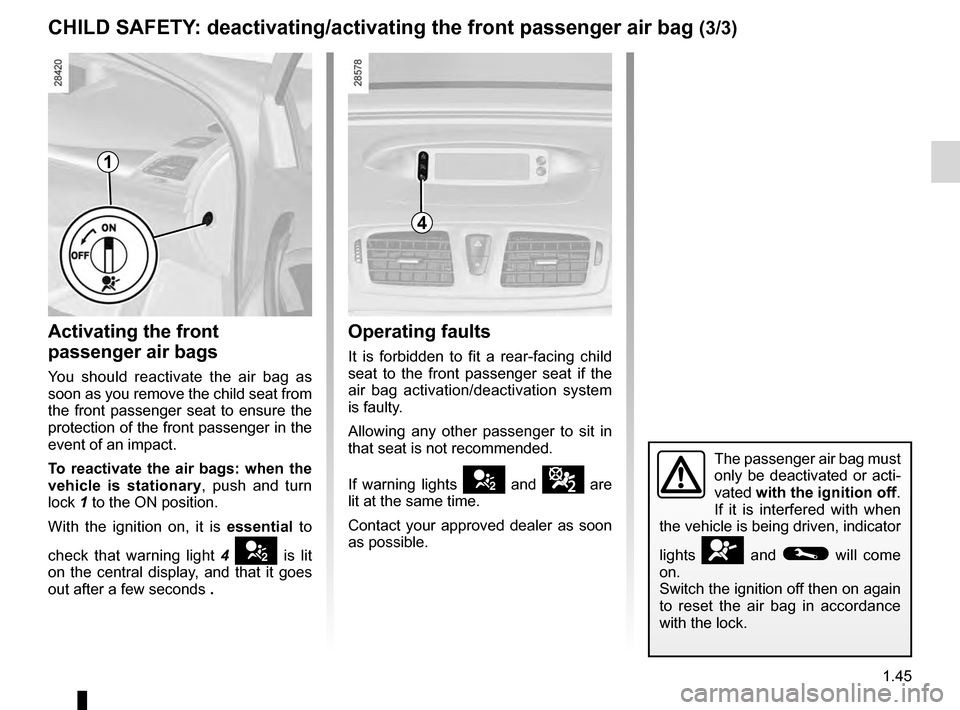
Activating the front
passenger air bags
You should reactivate the air bag as
soon as you remove the child seat from
the front passenger seat to ensure the
protection of the front passenger in the
event of an impact.
To reactivate the air bags: when the
vehicle is stationary , push and turn
lock
1 to the ON position.
With the ignition on, it is essential to
check that warning light
4 › is lit
on the central display, and that it goes
out after a few seconds .
1
The passenger air bag must
only be deactivated or acti-
vated with the ignition off.
If it is interfered with when
the vehicle is being driven, indicator
lights
å and © will come
on.
Switch the ignition off then on again
to reset the air bag in accordance
with the lock.
Page 63 of 242
JauneNoirNoir texte
1.57
ENG_UD23628_4
Ordinateur de bord : généralités (X95 - B95 - D95 - K95 - L38 \
- X38 - X32 - B32 - Renault)
ENG_NU_837-8_BDK95_Renault_1
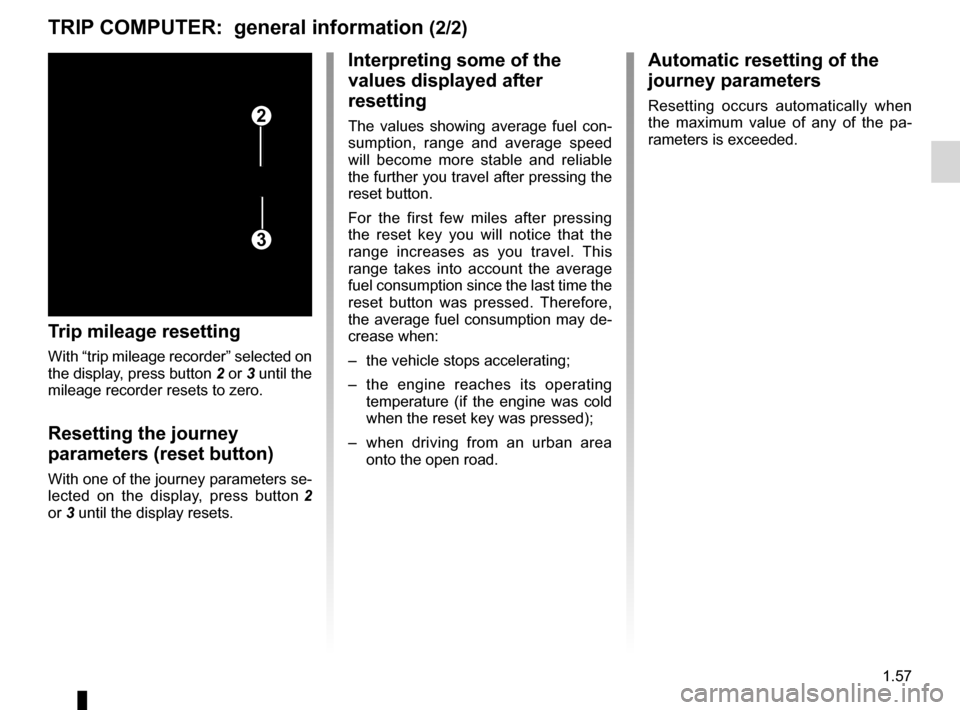
Trip mileage resetting
With “trip mileage recorder” selected on
the display, press button
2 or 3 until the
mileage recorder resets to zero.
Resetting the journey
parameters (reset button)
With one of the journey parameters se-
lected on the display, press button 2
or
3 until the display resets.
Interpreting some of the
values displayed after
resetting
The values showing average fuel con-
sumption, range and average speed
will become more stable and reliable
the further you travel after pressing the
reset button.
For the first few miles after pressing
the reset key you will notice that the
range increases as you travel. This
range takes into account the average
fuel consumption since the last time the
reset button was pressed. Therefore,
the average fuel consumption may de-
crease when:
–
the vehicle stops accelerating;
–
t
he engine reaches its operating
temperature (if the engine was cold
when the reset key was pressed);
–
w
hen driving from an urban area
onto the open road.
3
2
Automatic resetting of the
journey parameters
Resetting occurs automatically when
the maximum value of any of the pa-
rameters is exceeded.
TRIp c O mp UTER: general information (2/2)
Page 64 of 242
trip computer and warning system........ (up to the end of the DU)
warning lights........................................ (up to the end of the DU)
instrument panel messages.................. (up to the end of the DU)
instrument panel ................................... (up to the end of the DU)
1.58
ENG_UD23624_1
Ordinateur de bord : paramètres de voyage (X95 - B95 - D95 - K95 - R\
enault)
ENG_NU_837-8_BDK95_Renault_1
Jaune NoirNoir texte
The display of information shown below dEpENds ON THE vEHIcLE EQUIpmENT ANd cOUNTRY.
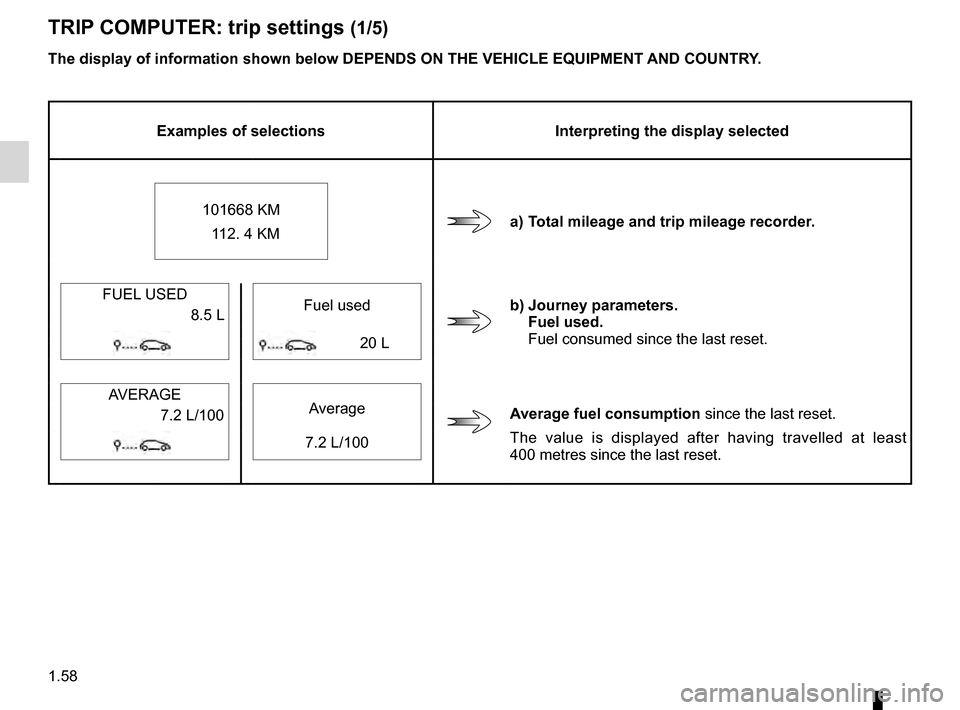
Examples of selections Interpreting the display selected
101668 KM 112. 4 KM
a) Total mileage and trip mileage recorder.
FUEL USED Fuel used
b) Journey parameters.f
uel used.
Fuel consumed since the last reset.
8.5 L
20 L
AVERAGE Average
Average fuel consumption since the last reset.
The value is displayed after having travelled at least
400
metres since the last reset.
7.2 L/100
7.2 L/100
TRIp
c O mp UTER: trip settings (1/5)
Page 65 of 242
JauneNoirNoir texte
1.59
ENG_UD23624_1
Ordinateur de bord : paramètres de voyage (X95 - B95 - D95 - K95 - R\
enault)
ENG_NU_837-8_BDK95_Renault_1
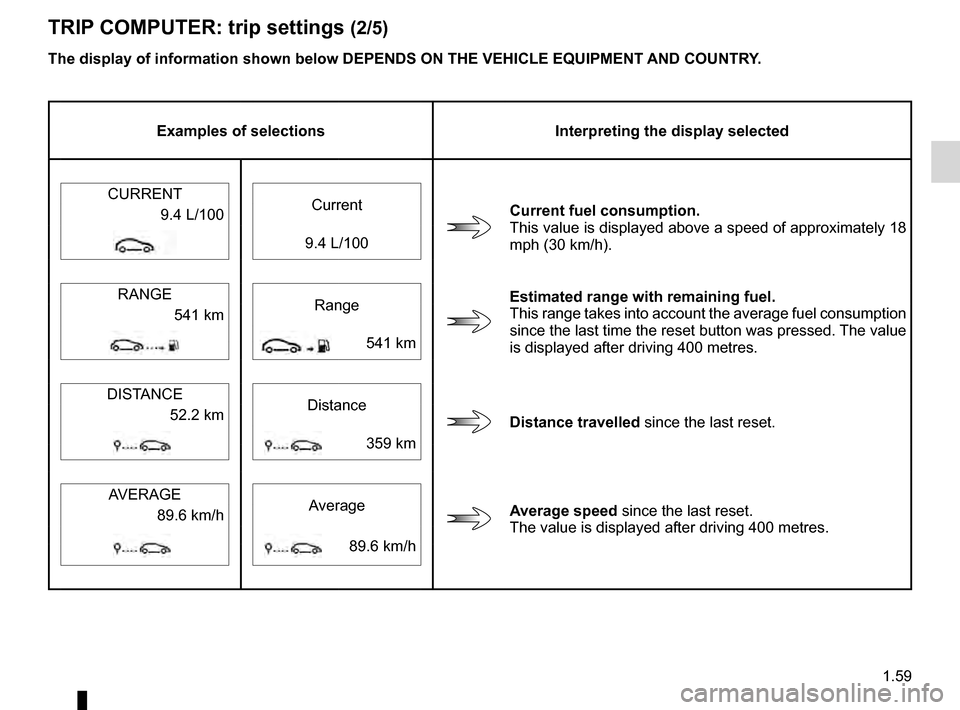
TRIp c O mp UTER: trip settings (2/5)
The display of information shown below dEpENds ON THE vEHIcLE EQUIpmENT ANd cOUNTRY.
Examples of selections Interpreting the display selected
CURRENT Current
current fuel consumption.
This value is displayed above a speed of approximately 18
mph (30 km/h).
9.4 L/100
9.4 L/100
Estimated range with remaining fuel.
This range takes into account the average fuel consumption
since the last time the reset button was pressed. The value
is displayed after driving 400 metres.
RANGE
Range
541 km
541 km
distance travelled since the last reset.
DIST
ANCE
Distance
52.2 km
359 km
Average speed since the last reset.
The value is displayed after driving 400 metres.
AVERAGE
Average
89.6 km/h
89.6 km/h
Page 66 of 242
1.60
ENG_UD23624_1
Ordinateur de bord : paramètres de voyage (X95 - B95 - D95 - K95 - R\
enault)
ENG_NU_837-8_BDK95_Renault_1
Jaune NoirNoir texte
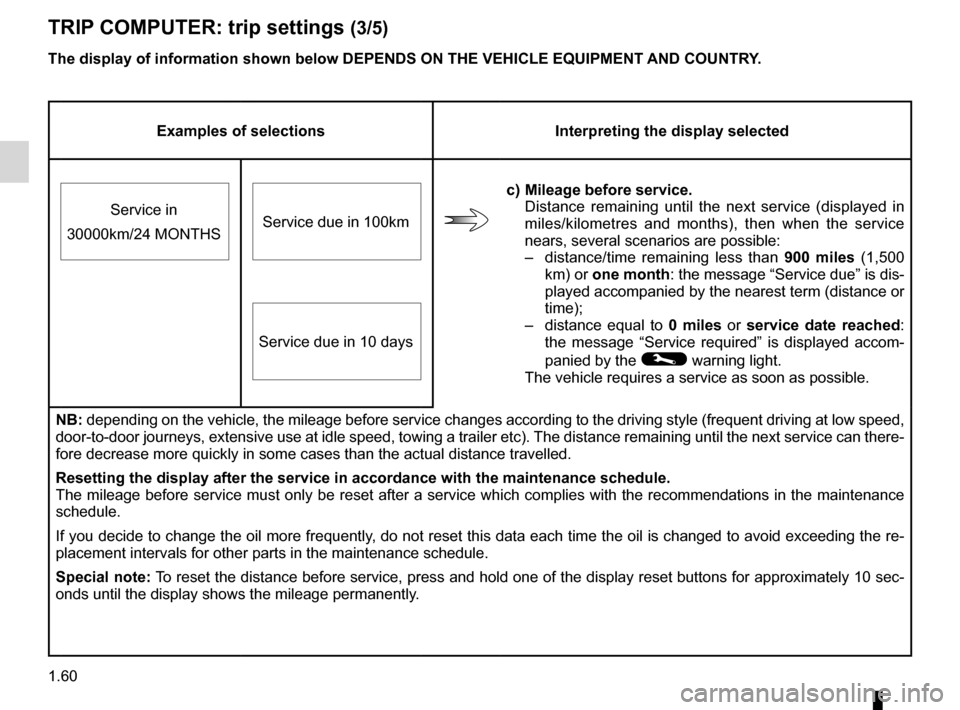
TRIp c O mp UTER: trip settings (3/5)
Examples of selections Interpreting the display selected
c) m ileage before service.
Distance remaining until the next service (displayed in
miles/kilometres and months), then when the service
nears, several scenarios are possible:
–
d
istance/time remaining less than 900 miles (1,500
km) or one month: the message “Service due” is dis-
played accompanied by the nearest term (distance or
time);
–
distance
equal to 0 miles or service date reached:
the message “Service required” is displayed accom-
panied by the
© warning light.
The vehicle requires a service as soon as possible.
Service in
30000km/24 MONTHS Service due in 100km
Service due in 10 days
NB: depending on the vehicle, the mileage before service changes according to the driving style (frequent driving at low speed,
door-to-door journeys, extensive use at idle speed, towing a trailer etc). The distance remaining until the next service can there-
fore decrease more quickly in some cases than the actual distance travel\
led.
Resetting the display after the service in accordance with the maintenan\
ce schedule.
The mileage before service must only be reset after a service which complies with the recommendations in the maintenance
schedule.
If you decide to change the oil more frequently, do not reset this data each time the oil is changed to avoid exceeding the re-
placement intervals for other parts in the maintenance schedule.
s
pecial note: To reset the distance before service, press and hold one of the display reset buttons for approximately 10 sec-
onds until the display shows the mileage permanently.
The display of information shown below
d E p EN ds ON THE v EHI c LE EQUI pm ENT AN d c OUNTRY.
Page 74 of 242
clock ..................................................... (up to the end of the DU)
clock ..................................................... (up to the end of the DU)
external temperature ............................ (up to the end of the DU)
indicators: exterior temperature indicator .......................... (current page)
1.68
ENG_UD6287_1
Heure et température extérieure (X95 - B95 - D95 - Renault)
ENG_NU_837-8_BDK95_Renault_1
Clock and external temperature
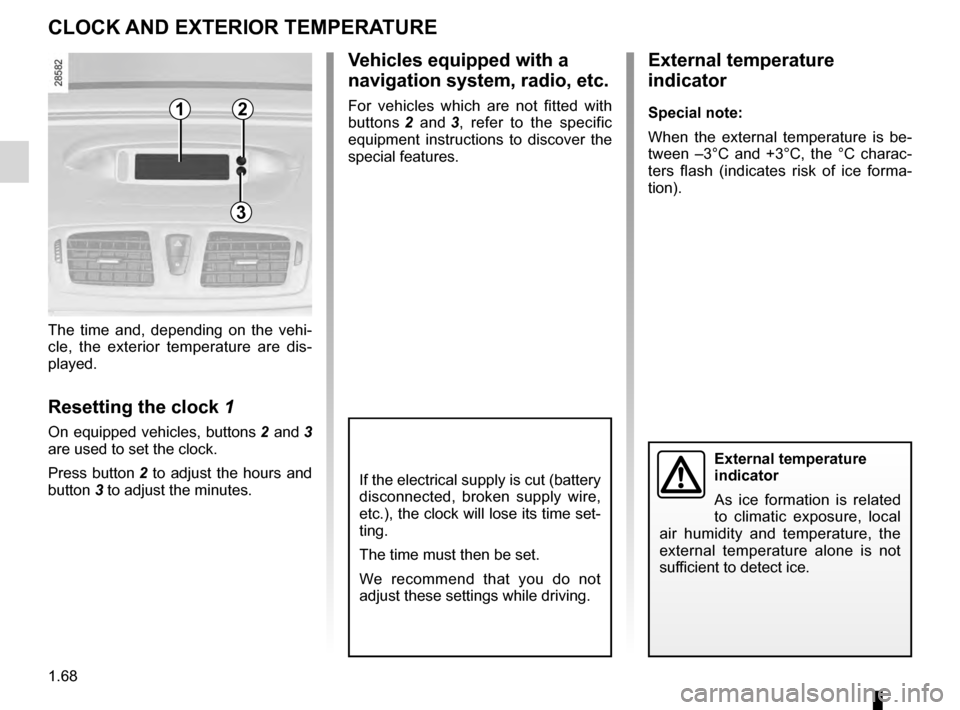
The time and, depending on the vehi-
cle, the exterior temperature are dis-
played.
Resetting the clock 1
On equipped vehicles, buttons 2 and 3
are used to set the clock.
Press
button 2 to adjust the hours and
button
3 to adjust the minutes.
External temperature
indicator
As ice formation is related
to climatic exposure, local
air humidity and temperature, the
external temperature alone is not
sufficient to detect ice.
cLOcK AN d EXTERIOR TE mp ERATURE
If the electrical supply is cut (battery
disconnected, broken supply wire,
etc.), the clock will lose its time set-
ting.
The time must then be set.
We recommend that you do not
adjust these settings while driving.
External temperature
indicator
special note:
W hen the external temperature is be-
tween –3°C and +3°C, the °C charac-
ters flash (indicates risk of ice forma-
tion).
vehicles equipped with a
navigation system, radio, etc.
For vehicles which are not fitted with
buttons 2
and 3,
refer to the specific
equipment instructions to discover the
special features.12
3
Page 102 of 242
tyres ...................................................... (up to the end of the DU)
tyre pressure monitor............................ (up to the end of the DU)
tyre pressure......................................... (up to the end of the DU)
driving ................................................... (up to the end of the DU)
2.16
ENG_UD6303_1
Système de surveillance de pression des pneumatiques (X95 - B95 - D9\
5 - Renault)
ENG_NU_837-8_BDK95_Renault_2
Jaune NoirNoir texte
This system monitors the tyre pressure.
Depending on the vehicle, the infor-
mation is displayed on the instrument
panel. In this case, they appear:
–
w
ith the ignition on, when scrolling
through the trip computer and warn-
ing system information by pressing
control
3
(refer to the information
on the “trip computer and warning
system” in Section 1);
–
o
r if there is a fault when driving
(refer to the following pages to find
out more about the warning mes-
sages).
Tyre pressure monitor
This function is an addi-
tional driving aid.
However, the function does
not take the place of the
driver. It cannot, therefore, under
any circumstances replace the vig-
ilance or the responsibility of the
driver.
Check the tyre pressures, including
the emergency spare wheel, once a
month.
TyRE PRESSURE MONITOR (1/3)
If the vehicle is equipped with the func-
tion, this system monitors the tyre pres-
sure.
Operating principle
Each wheel (except for the emergency
spare wheel) has a sensor in the infla-
tion valve which periodically measures
the tyre pressure.
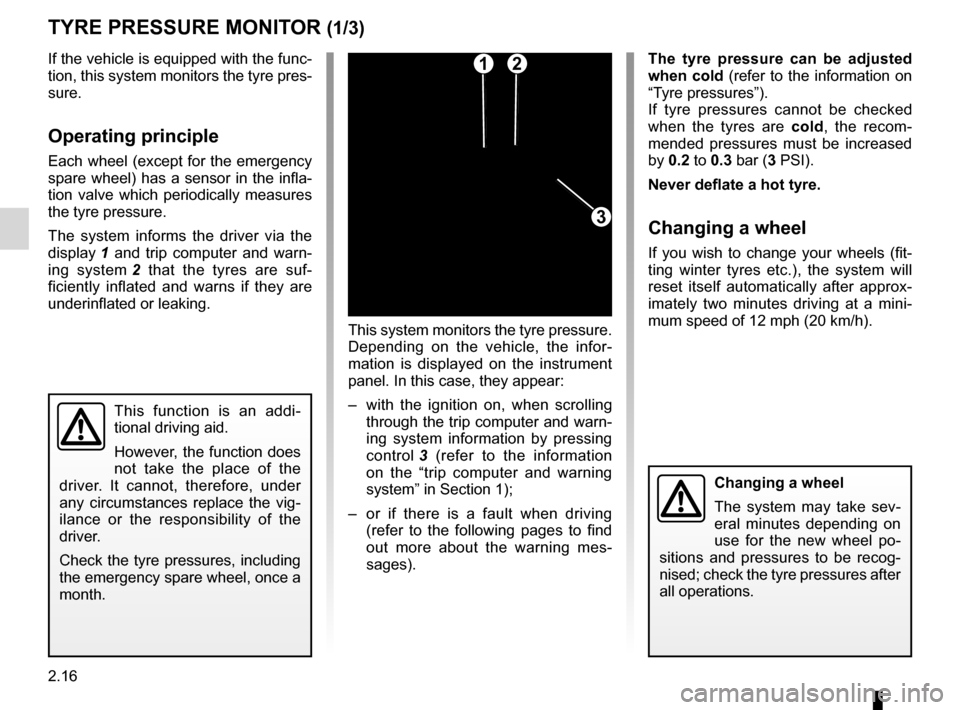
The system informs the driver via the
display
1
and trip computer and warn-
ing system
2
that the tyres are suf-
ficiently inflated and warns if they are
underinflated or leaking.
The tyre pressure can be adjusted
when cold (refer to the information on
“Tyre pressures”).
If tyre pressures cannot be checked
when the tyres are cold, the recom-
mended pressures must be increased
by 0.2 to 0.3 bar (3 PSI).
Never deflate a hot tyre.
Changing a wheel
If you wish to change your wheels (fit-
ting winter tyres etc.), the system will
reset itself automatically after approx-
imately two minutes driving at a mini-
mum speed of 12 mph (20 km/h).
12
Changing a wheel
The system may take sev-
eral minutes depending on
use for the new wheel po-
sitions and pressures to be recog-
nised; check the tyre pressures after
all operations.
3