page 8 RENAULT MEGANE RS 2012 X95 / 3.G Owner's Manual
[x] Cancel search | Manufacturer: RENAULT, Model Year: 2012, Model line: MEGANE RS, Model: RENAULT MEGANE RS 2012 X95 / 3.GPages: 239, PDF Size: 9.2 MB
Page 62 of 239
control instruments ............................... (up to the end of the DU)
indicators: instrument panel ............................. (up to the end of the DU)
trip computer and warning system ........(up to the end of the DU)
instrument panel ................................... (up to the end of the DU)
warning lights ........................................ (up to the end of the DU)
instrument panel messages ..................(up to the end of the DU)
1.56
ENG_UD18879_3
Ordinateur de bord (X95 - B95 - D95 - Renault)
ENG_NU_837-6_BDK95_Renault_1
Jaune NoirNoir texte
trip computer and warning system
TRIp cOmpUTER ANd WARNINg sYsTEm (1/10)
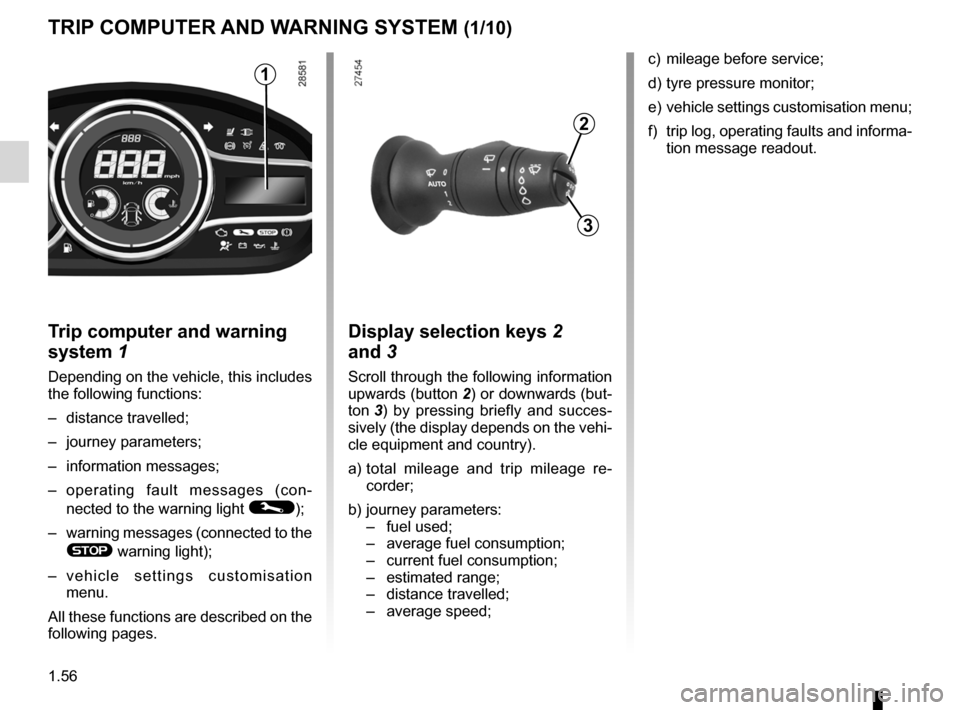
Trip computer and warning
system 1
Depending on the vehicle, this includes
the following functions:
– distance travelled;
– journey parameters;
– information messages;
– operating fault messages (con -
nected to the warning light
©);
– warning messages (connected to the
® warning light);
– v e h i c l e s e t t i n g s c u s t o m i s a t i o n
menu.
All these functions are described on the
following pages.
display selection keys 2
and 3
Scroll through the following information
upwards (button 2) or downwards (but-
ton 3 ) by pressing briefly and succes -
sively (the display depends on the vehi-
cle equipment and country).
a) total mileage and trip mileage re -
corder;
b) journey parameters:
– fuel used;
– average fuel consumption;
– current fuel consumption;
– estimated range;
– distance travelled;
– average speed;
1
2
3
c) mileage before service;
d) tyre pressure monitor;
e) vehicle settings customisation menu;
f) trip log, operating faults and informa-
tion message readout.
Page 69 of 239
JauneNoirNoir texte
1.63
ENG_UD18879_3
Ordinateur de bord (X95 - B95 - D95 - Renault)
ENG_NU_837-6_BDK95_Renault_1
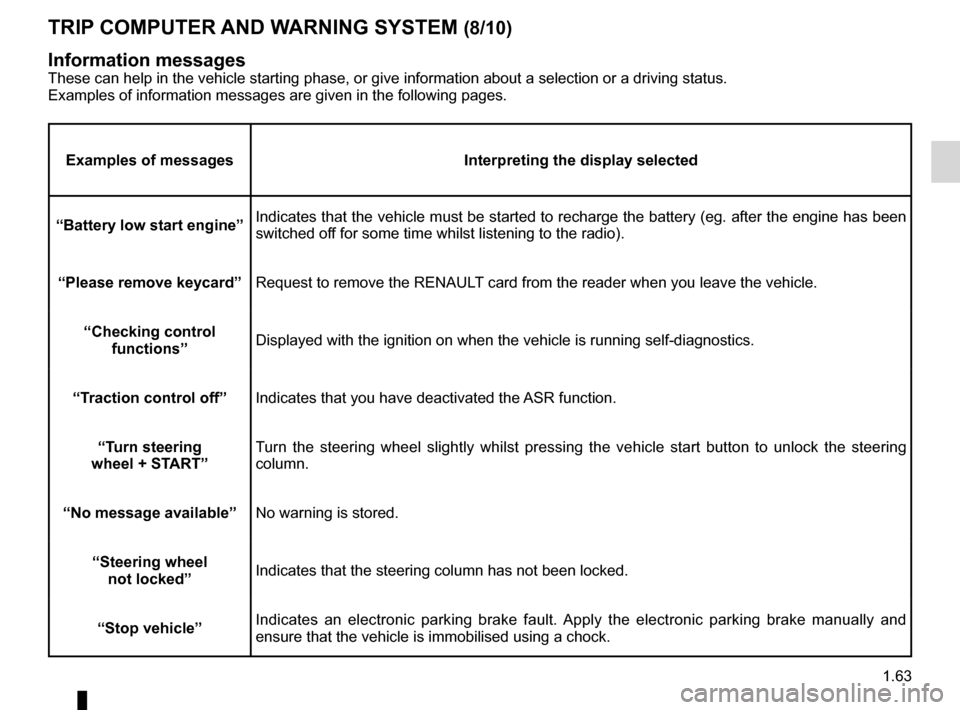
TRIp cOmpUTER ANd WARNINg sYsTEm (8/10)
Examples of messages Interpreting the display selected
“Battery low start engine” Indicates that the vehicle must be started to recharge the battery (eg. after the engine has been
switched off for some time whilst listening to the radio).
“please remove keycard ”Request to remove the RENAULT card from the reader when you leave the vehicle.
“checking control functions ” Displayed with the ignition on when the vehicle is running self-diagnost\
ics.
“Traction control off ”Indicates that you have deactivated the ASR function.
“Turn steering
wheel + sTART” Turn the steering wheel slightly whilst pressing the vehicle start button to unlock the steering
column.
“No message available” No warning is stored.
“steering wheel not locked ”Indicates that the steering column has not been locked.
“stop vehicle” Indicates an electronic parking brake fault. Apply the electronic parking brake manually and
ensure that the vehicle is immobilised using a chock.
Information messagesThese can help in the vehicle starting phase, or give information about \
a selection or a driving status.
Examples of information messages are given in the following pages.
Page 70 of 239
1.64
ENG_UD18879_3
Ordinateur de bord (X95 - B95 - D95 - Renault)
ENG_NU_837-6_BDK95_Renault_1
Jaune NoirNoir texte
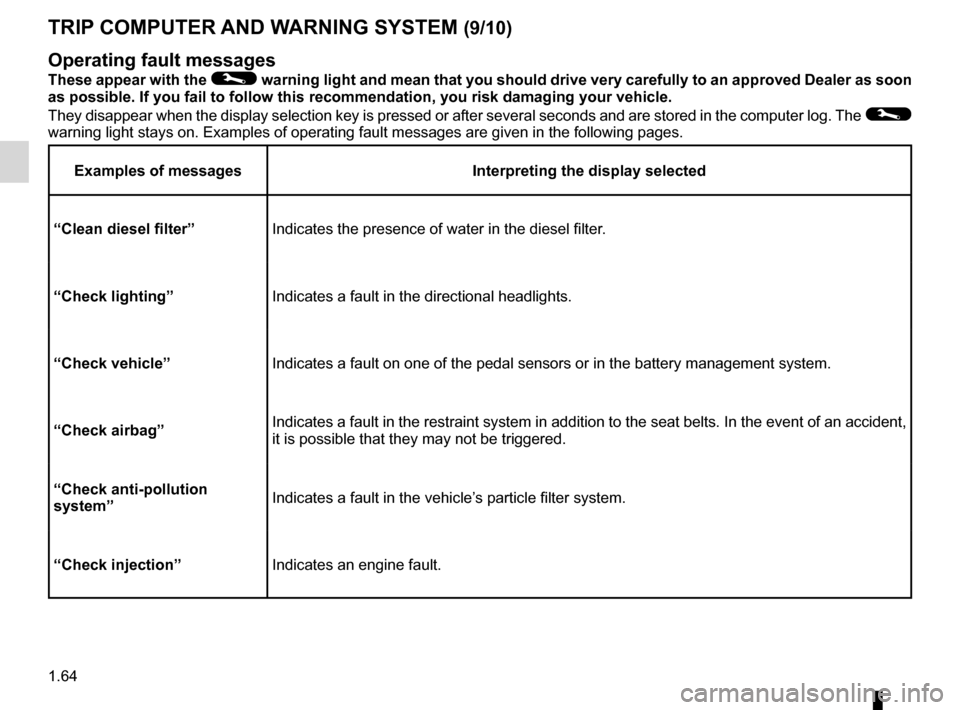
TRIp cOmpUTER ANd WARNINg sYsTEm (9/10)
Operating fault messages
These appear with the © warning light and mean that you should drive very carefully to an approved dealer as soon
as possible. If you fail to follow this recommendation, you risk damagin\
g your vehicle.
They disappear when the display selection key is pressed or after several seconds and are stored in the computer log. The
©
warning light stays on. Examples of operating fault messages are given i\
n the following pages.
Examples of messages Interpreting the display selected
“clean diesel filter” Indicates the presence of water in the diesel filter.
“check lighting ”Indicates a fault in the directional headlights.
“check vehicle” Indicates a fault on one of the pedal sensors or in the battery manageme\
nt system.
“check airbag” Indicates a fault in the restraint system in addition to the seat belts. In the event of an accident,
it is possible that they may not be triggered.
“check anti-pollution
system ” Indicates a fault in the vehicle’s particle filter system.
“check injection” Indicates an engine fault.
Page 71 of 239
JauneNoirNoir texte
1.65
ENG_UD18879_3
Ordinateur de bord (X95 - B95 - D95 - Renault)
ENG_NU_837-6_BDK95_Renault_1
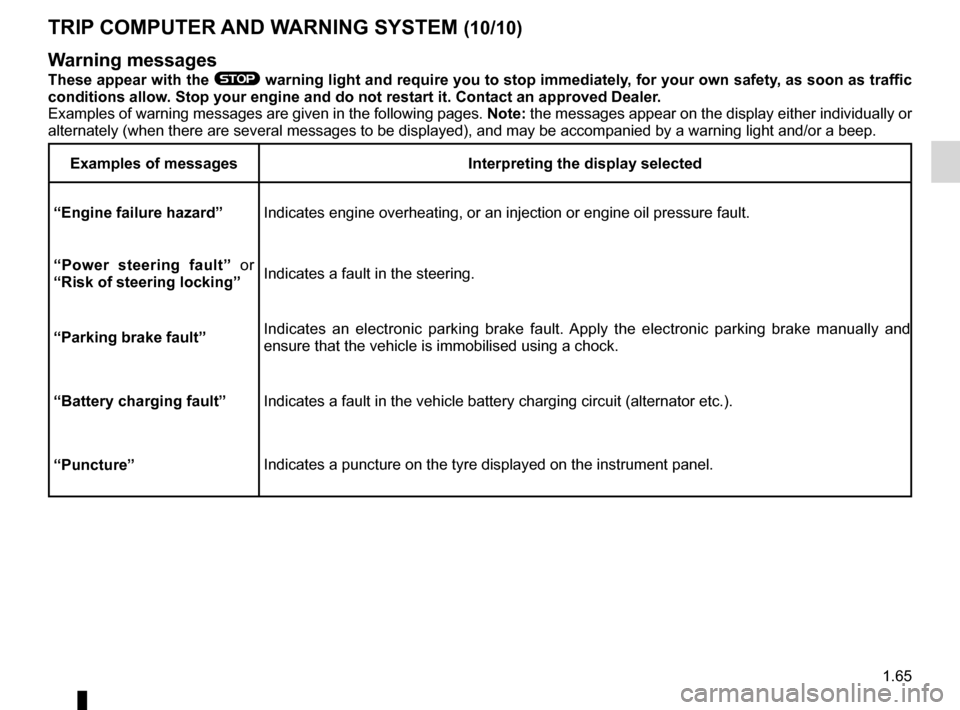
TRIp cOmpUTER ANd WARNINg sYsTEm (10/10)
Warning messages
These appear with the ® warning light and require you to stop immediately, for your own safety, as soon as traffic
conditions allow. stop your engine and do not restart it. contact an approved dealer.
Examples of warning messages are given in the following pages. Note: the messages appear on the display either individually or
alternately (when there are several messages to be displayed), and may\
be accompanied by a warning light and/or a beep.
Examples of messages Interpreting the display selected
“Engine failure hazard ”
Indicates engine overheating, or an injection or engine oil pressure fau\
lt.
“ p ower steering fault ” or
“Risk of steering locking ”Indicates a fault in the steering.
“parking brake fault” Indicates an electronic parking brake fault. Apply the electronic parking brake manually and
ensure that the vehicle is immobilised using a chock.
“Battery charging fault” Indicates a fault in the vehicle battery charging circuit (alternator e\
tc.).
“puncture” Indicates a puncture on the tyre displayed on the instrument panel.
Page 74 of 239
clock ..................................................... (up to the end of the DU)
clock ..................................................... (up to the end of the DU)
external temperature ............................ (up to the end of the DU)
indicators: exterior temperature indicator .......................... (current page)
1.68
ENG_UD6287_1
Heure et température extérieure (X95 - B95 - D95 - Renault)
ENG_NU_837-6_BDK95_Renault_1
Clock and external temperature
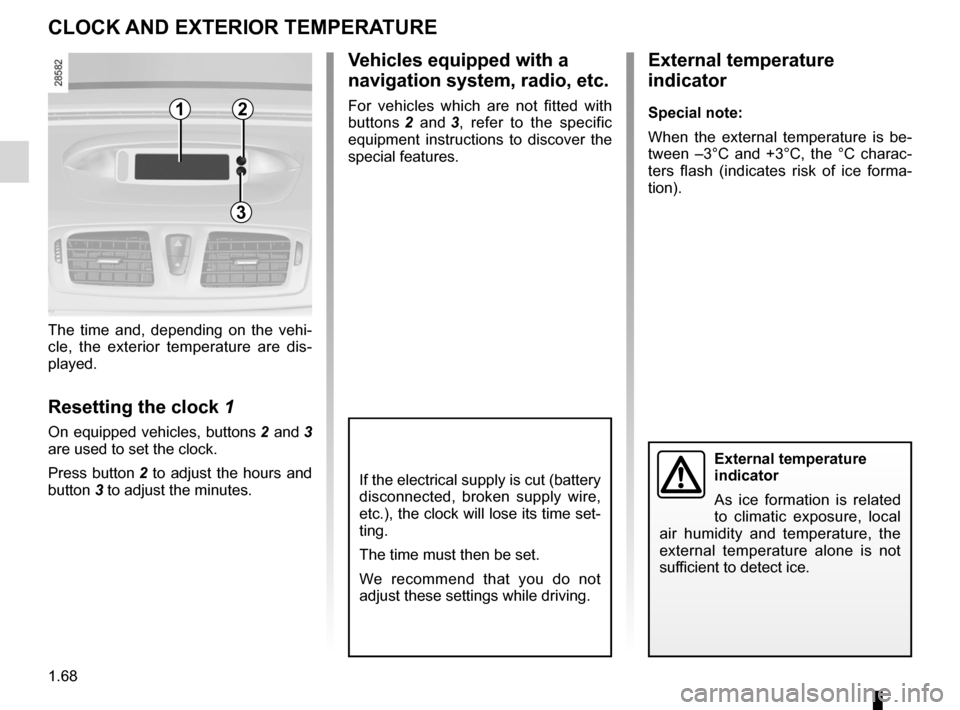
The time and, depending on the vehi -
cle, the exterior temperature are dis -
played.
Resetting the clock 1
On equipped vehicles, buttons 2 and 3
are used to set the clock.
Press button 2 to adjust the hours and
button 3 to adjust the minutes.
External temperature
indicator
As ice formation is related
to climatic exposure, local
air humidity and temperature, the
external temperature alone is not
sufficient to detect ice.
cLOcK ANd EXTERIOR TEmpERATURE
If the electrical supply is cut (battery
disconnected, broken supply wire,
etc.), the clock will lose its time set-
ting.
The time must then be set.
We recommend that you do not
adjust these settings while driving.
External temperature
indicator
special note:
When the external temperature is be -
tween –3°C and +3°C, the °C charac -
ters flash (indicates risk of ice forma -
tion).
v ehicles equipped with a
navigation system, radio, etc.
For vehicles which are not fitted with
buttons 2 and 3 , refer to the specific
equipment instructions to discover the
special features.12
3
Page 76 of 239
warning buzzer ..................................... (up to the end of the DU)
headlight flashers ................................. (up to the end of the DU)
indicators .............................................. (up to the end of the DU)
lights: hazard warning ............................... (up to the end of the DU)
lights: direction indicators .......................... (up to the end of the DU)
indicators: direction indicators .......................... (up to the end of the DU)
hazard warning lights signal ................. (up to the end of the DU)
hazard warning lights signal ................. (up to the end of the DU)
horn ...................................................... (up to the end of the DU)
horn: flash ................................................................. (current page)
horn: sounding the horn ............................................ (current page)
horn ....................................................................... (current page)
audible and visual signals .....................(up to the end of the DU)
1.70
ENG_UD6289_1
Avertisseurs sonore et lumineux (X95 - B95 - D95 - Renault)
ENG_NU_837-6_BDK95_Renault_1
Audible and visual signals
AUdIBLE ANd vIsUAL sIgNALs
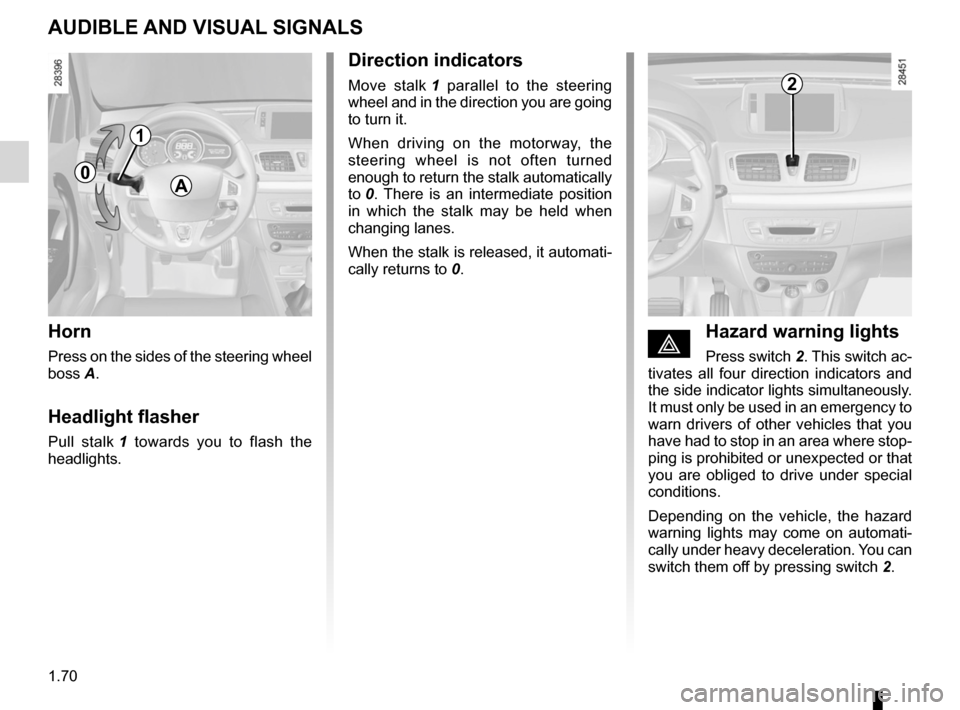
Horn
Press on the sides of the steering wheel
boss A.
Headlight flasher
Pull stalk 1 towards you to flash the
headlights.
éHazard warning lights
Press switch 2. This switch ac-
tivates all four direction indicators and
the side indicator lights simultaneously.
It must only be used in an emergency to
warn drivers of other vehicles that you
have had to stop in an area where stop-
ping is prohibited or unexpected or that
you are obliged to drive under special
conditions.
Depending on the vehicle, the hazard
warning lights may come on automati -
cally under heavy deceleration. You can
switch them off by pressing switch 2.
direction indicators
Move stalk 1 parallel to the steering
wheel and in the direction you are going
to turn it.
When driving on the motorway, the
steering wheel is not often turned
enough to return the stalk automatically
to 0 . There is an intermediate position
in which the stalk may be held when
changing lanes.
When the stalk is released, it automati-
cally returns to 0.
A
2
1
0
Page 77 of 239
lighting:exterior ............................................ (up to the end of the DU)
instrument panel .................................................... (current page)
lights: side lights ......................................................... (current page)
lights: dipped beam headlights ................................... (current page)
hazard warning lights signal .................................. (current page)
signals and lights .................................. (up to the end of the DU)
lighting: instrument panel .............................................. (current page)
daytime running lights ............................................ (current page)
1.71
ENG_UD18905_2
Éclairages et signalisations extérieurs (X95 - B95 - Renault)
ENG_NU_837-6_BDK95_Renault_1
daytime running lights
function
Depending on the vehicle, the daytime
running lights come on automatically
when the engine is started. To activate
or deactivate this function, refer to the
information on the “Vehicle settings
customisation menu” in Section 1.
ámain beam headlightsWith the dipped beam head -
lights lit, pull stalk 1 towards you. This
indicator light on the instrument panel
comes on.
To return to the dipped headlight posi-
tion, pull stalk 1 towards you again.
Exterior lighting and signals
Before driving at night,
check that the electrical
equipment is operating cor-
rectly and adjust the head -
light beams (if your vehicle is not
carrying its normal load). As a gen-
eral precaution, check that the lights
are not obscured (by dirt, mud,
snow or objects being transported).
EXTERIOR LIgHTINg ANd sIgNALs (1/3)
1
31
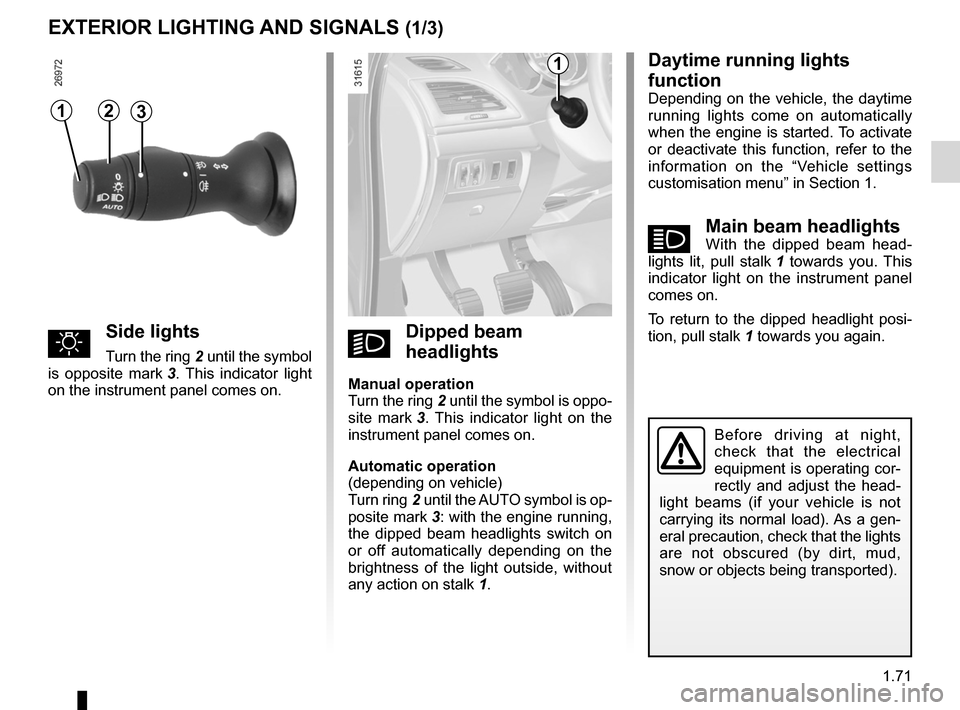
uside lights
Turn the ring 2 until the symbol
is opposite mark 3 . This indicator light
on the instrument panel comes on.kdipped beam
headlights
manual operation
Turn the ring 2 until the symbol is oppo -
site mark 3 . This indicator light on the
instrument panel comes on.
Automatic operation
(depending on vehicle)
Turn ring 2 until the AUTO symbol is op-
posite mark 3: with the engine running,
the dipped beam headlights switch on
or off automatically depending on the
brightness of the light outside, without
any action on stalk 1.
2
Page 78 of 239
lights:main beam headlights ...................................... (current page)
warning buzzer ...................................................... (current page)
see-me-home lighting ............................................ (current page)
lights mobile directional ............................................. (current page)
1.72
ENG_UD18905_2
Éclairages et signalisations extérieurs (X95 - B95 - Renault)
ENG_NU_837-6_BDK95_Renault_1
Jaune NoirNoir texte
EXTERIOR LIgHTINg ANd sIgNALs (2/3)
1
special note:
– If the dipped beam headlights are
manually switched on and if the light
is sufficient, the directional head -
lights will remain fixed;
– If the lights come on automatically
when cornering, the directional
headlights will start working from the
next time the vehicle corners;
– When the dipped beam headlights
are switched on with the engine
running and the vehicle stationary,
the lights move to reinitialise them -
selves. If not, there is a system fault.
switching off the lights
There are two possibilities:
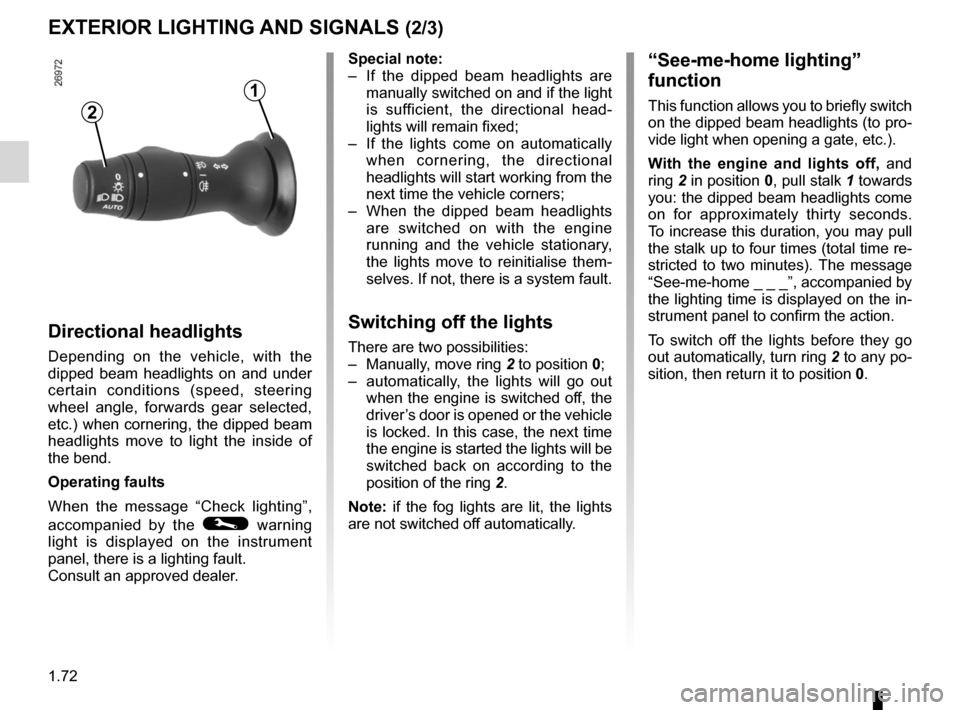
– Manually, move ring 2 to position 0;
– automatically, the lights will go out
when the engine is switched off, the
driver’s door is opened or the vehicle
is locked. In this case, the next time
the engine is started the lights will be
switched back on according to the
position of the ring 2.
Note: if the fog lights are lit, the lights
are not switched off automatically.
“see-me-home lighting”
function
This function allows you to briefly switch
on the dipped beam headlights (to pro-
vide light when opening a gate, etc.).
With the engine and lights off, and
ring 2 in position 0, pull stalk 1 towards
you: the dipped beam headlights come
on for approximately thirty seconds.
To increase this duration, you may pull
the stalk up to four times (total time re-
stricted to two minutes). The message
“See-me-home _ _ _”, accompanied by
the lighting time is displayed on the in-
strument panel to confirm the action.
To switch off the lights before they go
out automatically, turn ring 2 to any po-
sition, then return it to position 0.
directional headlights
Depending on the vehicle, with the
dipped beam headlights on and under
certain conditions (speed, steering
wheel angle, forwards gear selected,
etc.) when cornering, the dipped beam
headlights move to light the inside of
the bend.
Operating faults
When the message “Check lighting”,
accompanied by the
© warning
light is displayed on the instrument
panel, there is a lighting fault.
Consult an approved dealer.
2
Page 79 of 239
lights:fog lights .......................................................... (current page)
JauneNoirNoir texte
1.73
ENG_UD18905_2
Éclairages et signalisations extérieurs (X95 - B95 - Renault)
ENG_NU_837-6_BDK95_Renault_1
EXTERIOR LIgHTINg ANd sIgNALs (3/3)
When driving in fog or snow, or
when transporting objects which are
higher than the roof, the headlights
do not come on automatically.
Switching on the fog lights remains
the responsibility of the driver: the
indicator lights on the instrument
panel inform you whether the fog
lights are lit (indicator light on) or not
(indicator light not on).
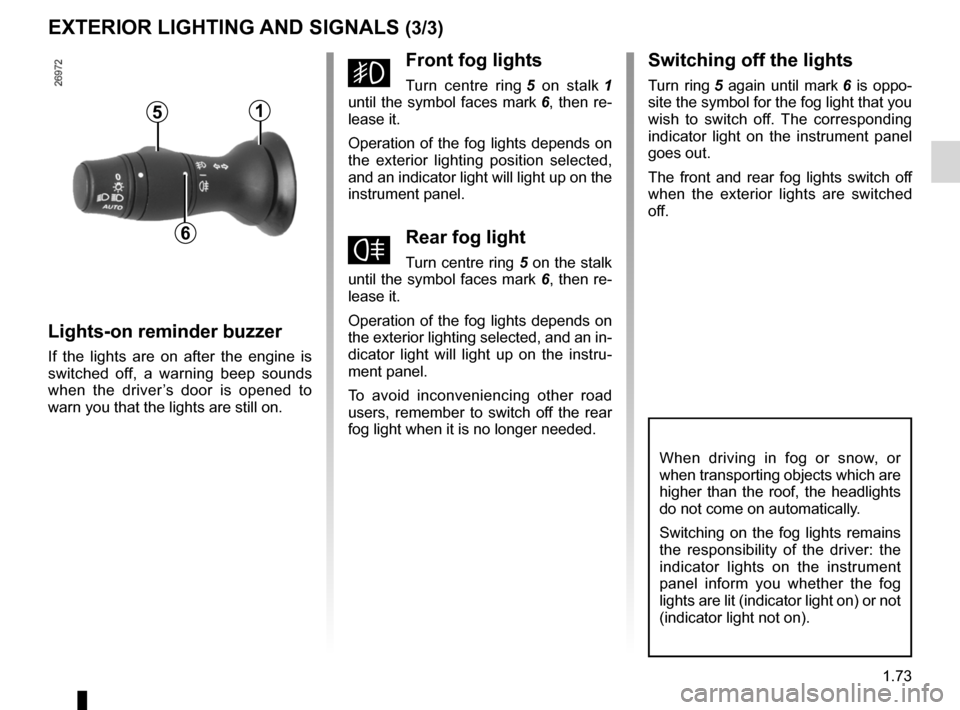
5
6
1
gfront fog lights
Turn centre ring 5 on stalk 1
until the symbol faces mark 6, then re-
lease it.
Operation of the fog lights depends on
the exterior lighting position selected,
and an indicator light will light up on the
instrument panel.
fRear fog light
Turn centre ring 5 on the stalk
until the symbol faces mark 6, then re-
lease it.
Operation of the fog lights depends on
the exterior lighting selected, and an in-
dicator light will light up on the instru -
ment panel.
To avoid inconveniencing other road
users, remember to switch off the rear
fog light when it is no longer needed.
Lights-on reminder buzzer
If the lights are on after the engine is
switched off, a warning beep sounds
when the driver ’s door is opened to
warn you that the lights are still on.
switching off the lights
Turn ring 5 again until mark 6 is oppo -
site the symbol for the fog light that you
wish to switch off. The corresponding
indicator light on the instrument panel
goes out.
The front and rear fog lights switch off
when the exterior lights are switched
off.
Page 82 of 239
headlight washer ................................................... (current page)
1.76
ENG_UD17355_4
Essuie-vitre / lave-vitre avant (X95 - B95 - D95 - Renault)
ENG_NU_837-6_BDK95_Renault_1
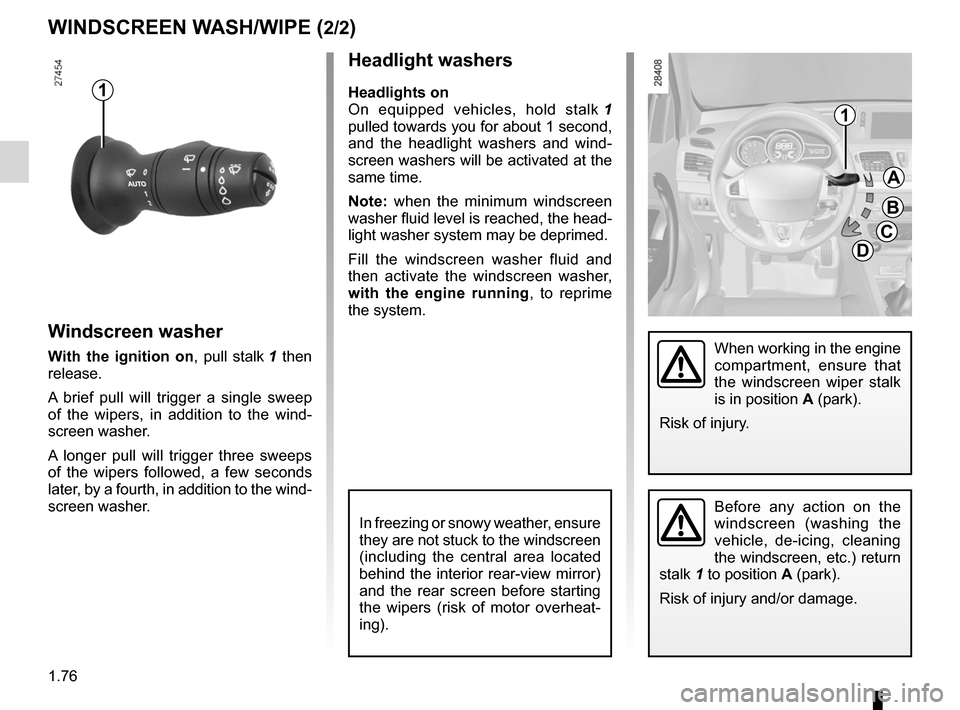
Headlight washers
Headlights on
On equipped vehicles, hold stalk 1
pulled towards you for about 1 second,
and the headlight washers and wind -
screen washers will be activated at the
same time.
Note: when the minimum windscreen
washer fluid level is reached, the head -
light washer system may be deprimed.
Fill the windscreen washer fluid and
then activate the windscreen washer,
with the engine running , to reprime
the system.
Before any action on the
windscreen (washing the
vehicle, de-icing, cleaning
the windscreen, etc.) return
stalk 1 to position A (park).
Risk of injury and/or damage.
Windscreen washer
With the ignition on, pull stalk 1 then
release.
A brief pull will trigger a single sweep
of the wipers, in addition to the wind -
screen washer.
A longer pull will trigger three sweeps
of the wipers followed, a few seconds
later, by a fourth, in addition to the wind -
screen washer.
WINdscREEN WAsH/WIpE (2/2)
1
In freezing or snowy weather, ensure
they are not stuck to the windscreen
(including the central area located
behind the interior rear-view mirror)
and the rear screen before starting
the wipers (risk of motor overheat -
ing).
A
B
c
d
1
When working in the engine
compartment, ensure that
the windscreen wiper stalk
is in position A (park).
Risk of injury.