page 8 RENAULT MEGANE RS 2012 X95 / 3.G User Guide
[x] Cancel search | Manufacturer: RENAULT, Model Year: 2012, Model line: MEGANE RS, Model: RENAULT MEGANE RS 2012 X95 / 3.GPages: 239, PDF Size: 9.2 MB
Page 31 of 239
seat belts .............................................. (up to the end of the DU)
additional methods of restraint ............. (up to the end of the DU)
additional methods of restraint to the rear seat belts .......................(up to the end of the DU)
seat belt pretensioners ......................... (up to the end of the DU)
air bag ................................................... (up to the end of the DU)
air bag ................................................... (up to the end of the DU)
methods of restraint in addition to the front seat belts
(up to the end of the DU)
additional methods of restraint to the front seat belts ......................(up to the end of the DU)
seat belt pretensioners front seat belt .................................. (up to the end of the DU)
methods of restraint in addition to the seat belts
(up to the end of the DU)
pretensioners ......................................................... (current page)
1.25
ENG_UD18889_4
Dispositifs complémentaires aux ceintures avant (X95 - B95 - D95 - R\
enault)
ENG_NU_837-6_BDK95_Renault_1
Additional methods of restraint:
to the front seat belts
mETHOds Of REsTRAINT IN AddITION TO THE fRONT sEAT BELTs (1/4)
Depending on the vehicle, they are
composed of:
– seat belt inertia reel pretension -
ers;
– lap belt pretensioners;
– chest-level load limiters;
– anti-submarining air bags;
– air bags for driver and front pas -
senger.
These systems are designed to act in-
dependently or together when the vehi-
cle is subjected to a frontal impact.
Depending on the severity of the
impact, the system can trigger:
– seat belt locking;
– the seat belt inertia reel pretensioner
(which engages to correct seat belt
slack);
– the low volume front air bag;
– the lap seat belt pretensioners to
hold the occupant in his seat;
– the large volume front air bag.
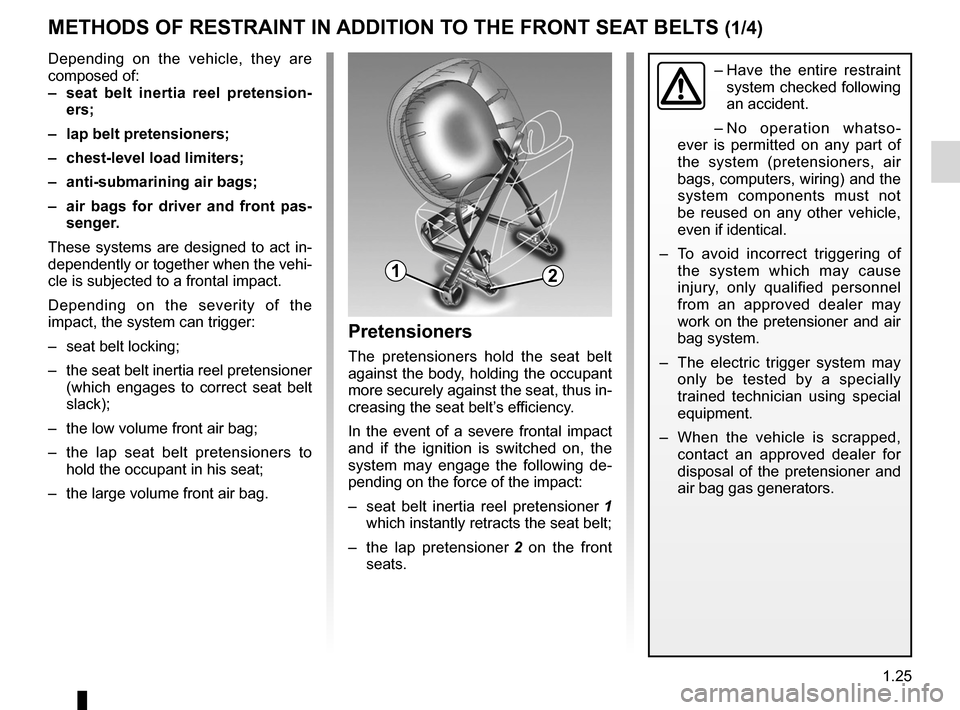
pretensioners
The pretensioners hold the seat belt
against the body, holding the occupant
more securely against the seat, thus in-
creasing the seat belt’s efficiency.
In the event of a severe frontal impact
and if the ignition is switched on, the
system may engage the following de -
pending on the force of the impact:
– seat belt inertia reel pretensioner 1
which instantly retracts the seat belt;
– the lap pretensioner 2 on the front
seats.
– Have the entire restraint
system checked following
an accident.
– No operation whatso -
ever is permitted on any part of
the system (pretensioners, air
bags, computers, wiring) and the
system components must not
be reused on any other vehicle,
even if identical.
– To avoid incorrect triggering of
the system which may cause
injury, only qualified personnel
from an approved dealer may
work on the pretensioner and air
bag system.
– The electric trigger system may
only be tested by a specially
trained technician using special
equipment.
– When the vehicle is scrapped,
contact an approved dealer for
disposal of the pretensioner and
air bag gas generators.
12
Page 43 of 239
child restraint/seat ................................ (up to the end of the DU)
child restraint/seat ................................ (up to the end of the DU)
child restraint/seat ................................ (up to the end of the DU)
child safety ............................................ (up to the end of the DU)
child seats ............................................. (up to the end of the DU)
transporting children ............................. (up to the end of the DU)
1.37
ENG_UD18892_5
Sécurité enfants : installation du siège enfant (X95 - B95 - D\
95 - Renault)
ENG_NU_837-6_BDK95_Renault_1
Some seats are not suitable for fitting
child seats. The diagram on the follow -
ing page shows you how to attach a
child seat.
The types of child seats indicated may
not be available. Before using a differ-
ent child seat, check with the manufac-
turer that it can be fitted.
fitting a child seat
cHILd sAfETY : fitting a child seat (1/6)
In the rear side seat
A carrycot can be installed across the
vehicle and will take up at least two
seats. Position the child with his or her
feet nearest the door.
Move the front seat as far forward as
possible to install a rear-facing child
seat, then move back the seat or seats
in front in accordance with the child
seat instructions.
For the safety of the child in the for -
ward-facing seat, do not move the seat
in front back past the middle of the
runner, do not tilt the seatback too far
(maximum of 25°) and raise the seat as
much as possible.
Check that the forward-facing child seat
is resting against the back of the vehi-
cle seat and that the headrest of the ve-
hicle is not obstructing its use.
In the front seat
The laws concerning children travel
-
ling in the front passenger seat differ in
every country. Consult the legislation in
force and follow the indications on the
diagram on the following page.
Before fitting a child seat in this seat (if
authorised):
– lower the seat belt as far as possible;
– move the seat as far back as possi-
ble;
– gently tilt the seatback away from
vertical (approximately 25°);
– on equipped vehicles, raise the seat
base as far as possible.
Do not change these settings after the
child seat is installed.
R I sK O f dE AT H O R
s ERIOU s INJURY: before
fitting a rear-facing child
seat in this position, check
that the air bag has been deacti -
vated (refer to the information on
“Child safety: deactivating/activat -
ing the front passenger air bag” in
Section 1).
Fit the child seat in a rear
seat wherever possible.
Check that when installing
the child seat in the vehicle
it is not at risk of coming loose from
its base.
If you have to remove the headrest,
check that it is correctly stored so
that it does not come loose under
harsh braking or impact.
Always attach the child seat to the
vehicle even if it is not in use so that
it does not come loose under harsh
braking or impact.
Ensure that the child seat
or the child’s feet do not
prevent the front seat from
locking correctly. Refer to
the information on the “Front seat”
in Section 1.
Page 45 of 239

ENG_NU_837-6_BDK95_Renault_1
cHILd sAfETY : fitting a child seat (3/6)
Type of")
JauneNoirNoir texte
1.39
ENG_UD18892_5
Sécurité enfants : installation du siège enfant (X95 - B95 - D\
95 - Renault)
ENG_NU_837-6_BDK95_Renault_1
cHILd sAfETY : fitting a child seat (3/6)
Type of child seat
(three and five
door versions) Weight of
the child seat size
IsOfIX passenger front
seat (1) (2) Rear side seats Rear centre
seat
carrycot fitted across the
vehicle
Group 0 < 10 kg
F - GXU - IL (3) X
Rear-facing shell seat
Group 0 or 0+ < 13 kg
EUU - IL (4) X
Rear-facing seat
Group 0+ and 1 <
1 3 k g a n d
9 to 18 kg D
UU - IL (4) X
C UU (4) X
forward-facing seat
Group 1 9 to 18 kg
A, B, B1 XU - IUF - IL (5) X
Booster seat
Group 2 and 3 15 to 25 kg and
22 to 36 kg
X
U (5) X
(1) RIsK Of dEATH OR sERIOUs INJURY: before installing a rear-facing child seat on the front passenger seat,
check that the air bag has been deactivated (refer to the information on “Child safety: deactivating/activating the front
passenger air bag” at the end of the section).
The table below summarises the information already shown on the diagram on the previous page, to ensure the regula-
tions in force are respected.
Page 48 of 239

ENG_NU_837-6_BDK95_Renault_1
cHILd sAfETY : fitting a child seat (6/6)
The table below summarises t")
1.42
ENG_UD18892_5
Sécurité enfants : installation du siège enfant (X95 - B95 - D\
95 - Renault)
ENG_NU_837-6_BDK95_Renault_1
cHILd sAfETY : fitting a child seat (6/6)
The table below summarises the information already shown on the diagram on the previous page, to ensure the regula-
tions in force are respected.
Type of child seat
(sport tourer version) Weight of
the child seat size
IsOfIX front passenger
seat (1) (5) Rear side seats Rear centre
seat
carrycot fitted across the vehicle
Group 0 < 10 kg
F - GXU - IL (2) X
shell seat/rear-facing seat
Group 0, or 0+ and 1 <
1 3 k g a n d
9 to 18 kg E, D, C
UU - IL (3) X
forward-facing seat
Group 1 9 to 18 kg
A, B, B1 XU - IUF - IL (4) X
Booster seat
Group 2 and 3 15 to 25 kg and
22 to 36 kg
X
U (4) X
X = Seat not suitable for fitting child seats.
U = Seat allowing a child seat with “Universal” approval to be attache\
d by seat belt; check that it can be fitted correctly.
IUf/IL = On equipped vehicles, seat which allows a child seat with “Universal, semi-universal or vehicle specific” approval to be
fitted using the ISOFIX system. Check that it can be fitted correctly.
(1) Only a rear-facing child seat can be fitted in this seat: position the vehicle seat as far back as possible and gently tilt the seat-
back (approximately 25°).
(2) A carrycot can be fitted across the vehicle and will take up at least two seats. Position the child with his or her feet nearest the
door.
(3) Move the front seat as far forward as possible to fit a rear-facing child seat, then move back the seat(s) in front in accordance
with the child seat instructions.
(4) Forward-facing child seat; position the seatback of the child seat in contact with the seatback of the vehicle seat. Adjust the
headrest, or remove it if necessary. Do not push the front seat more than halfway back on its runners and do not recline the
seatback more than 25°.
(5) RIsK Of dEATH OR sERIOUs INJURY: before installing a rear-facing child seat on the front passenger seat,
check that the air bag has been deactivated (refer to the information on “Child safety: deactivating/activating the front
passenger air bag” at the end of the section).
Page 49 of 239
air bagdeactivating the front passenger air bags ........ (current page)
front passenger air bag deactivation ..................... (current page)
child restraint/seat ................................ (up to the end of the DU)
child safety ............................................ (up to the end of the DU)
child restraint/seat ................................ (up to the end of the DU)
transporting children ............................. (up to the end of the DU)
1.43
ENG_UD18912_4
Sécurité enfants : désactivation/activation airbag passager ava\
nt (X95 - B95 - D95 - Renault)
ENG_NU_837-6_BDK95_Renault_1
deactivating/activating the front passenger air bag
2
deactivating the front
passenger air bags
(on equipped vehicles)
You must deactivate certain devices
in addition to the front passenger seat
belt before fitting a child seat in the front
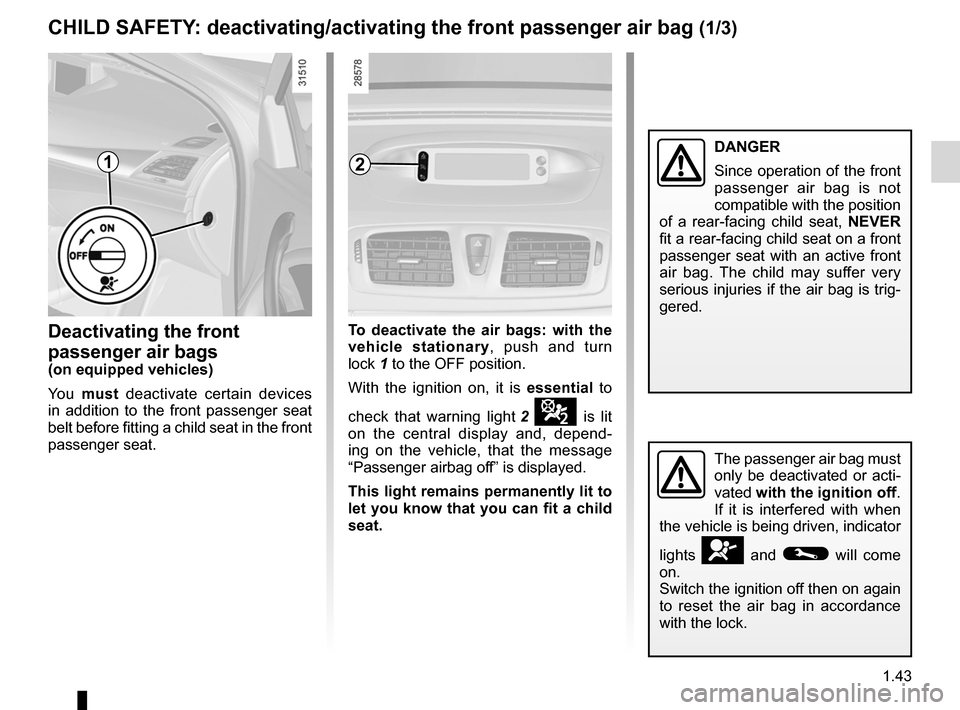
passenger seat. To deactivate the air bags: with the
vehicle stationary
, push and turn
lock 1 to the OFF position.
With the ignition on, it is essential to
check that warning light 2
¹ is lit
on the central display and, depend -
ing on the vehicle, that the message
“Passenger airbag off” is displayed.
This light remains permanently lit to
let you know that you can fit a child
seat.
The passenger air bag must
only be deactivated or acti-
vated with the ignition off.
If it is interfered with when
the vehicle is being driven, indicator
lights
å and © will come
on.
Switch the ignition off then on again
to reset the air bag in accordance
with the lock.
cHILd sAfETY : deactivating/activating the front passenger air bag (1/3)
1dANgER
Since operation of the front
passenger air bag is not
compatible with the position
of a rear-facing child seat, NEvER
fit a rear-facing child seat on a front
passenger seat with an active front
air bag. The child may suffer very
serious injuries if the air bag is trig-
gered.
Page 51 of 239

Jaune NoirNoir texte
1.45
ENG_UD18912_4
Sécurité enfants : désactivation/activation airbag passager ava\
nt (X95 - B95 -")
air bagactivating the front passenger air bags ............ (current page)
Jaune NoirNoir texte
1.45
ENG_UD18912_4
Sécurité enfants : désactivation/activation airbag passager ava\
nt (X95 - B95 - D95 - Renault)
ENG_NU_837-6_BDK95_Renault_1
cHILd sAfETY : deactivating/activating the front passenger air bag (3/3)
4
Operating faults
It is forbidden to fit a rear-facing child
seat to the front passenger seat if the
air bag activation/deactivation system
is faulty.
Allowing any other passenger to sit in
that seat is not recommended.
If warning lights
› and ¹ are
lit at the same time.
Contact your approved dealer as soon
as possible.
Activating the front
passenger air bags
You should reactivate the air bag as
soon as you remove the child seat from
the front passenger seat to ensure the
protection of the front passenger in the
event of an impact.
To reactivate the air bags: when the
vehicle is stationary , push and turn
lock 1 to the ON position.
With the ignition on, it is essential to
check that warning light 4
› is lit
on the central display, and that it goes
out after a few seconds .
1
The passenger air bag must
only be deactivated or acti-
vated with the ignition off.
If it is interfered with when
the vehicle is being driven, indicator
lights
å and © will come
on.
Switch the ignition off then on again
to reset the air bag in accordance
with the lock.
Page 56 of 239
instrument panel ................................... (up to the end of the DU)
warning lights ........................................ (up to the end of the DU)
driver’s position .................................... (up to the end of the DU)
trip computer and warning system ........(up to the end of the DU)
indicators: instrument panel ............................. (up to the end of the DU)
display .................................................. (up to the end of the DU)
operating faults ..................................... (up to the end of the DU)
control instruments ............................... (up to the end of the DU)
indicators ............................................................... (current page)
lights: fog lights .......................................................... (current page)
lights: dipped beam headlights ................................... (current page)
lights: direction indicators ........................................... (current page)
lights: main beam headlights ...................................... (current page)
handbrake .............................................................. (current page)
fuel filling ................................................................. (current page)
1.50
ENG_UD18927_5
Tableau de bord : témoins lumineux (X95 - B95 - D95 - Renault)
ENG_NU_837-6_BDK95_Renault_1
Jaune NoirNoir texte
Control instruments
WARNINg LIgHTs (1/4)
The © warning light means
you should drive very carefully to
an approved Dealer as soon as pos-
sible. If you fail to follow this recom-
mendation, you risk damaging your
vehicle.
A
cLeft-hand direction indicator
tell-tale light
bRight-hand direction indica -
tor tell-tale light
}Handbrake “on” or elec -
tronic parking brake warn -
ing light
Refer to the information on the
“Handbrake” or “Electronic parking
brake” in Section 2.
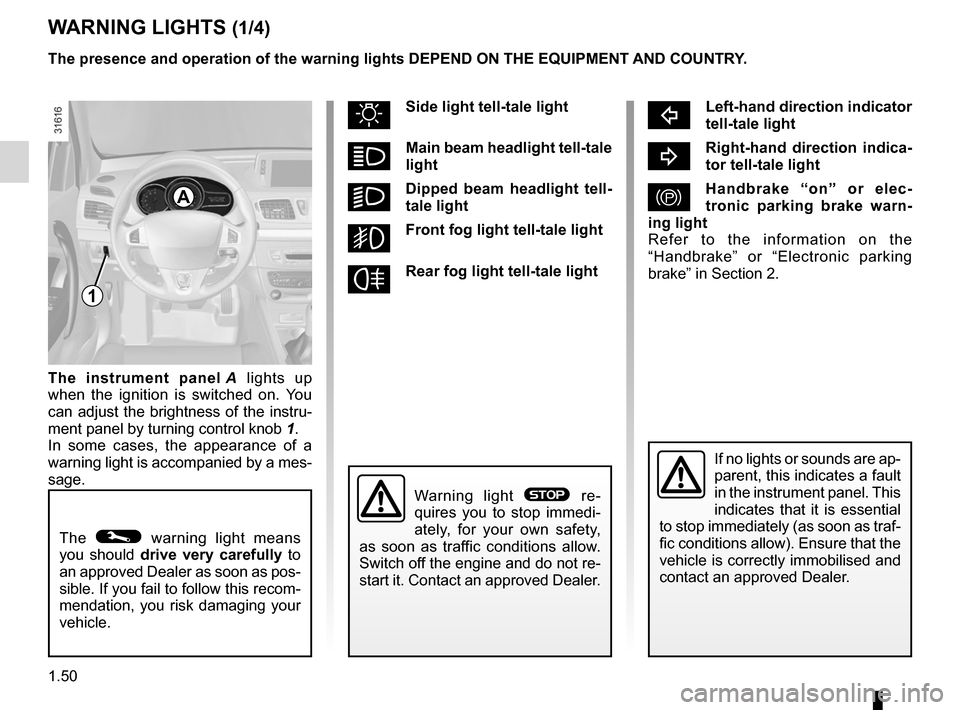
uside light tell-tale light
ámain beam headlight tell-tale
light
kd ipped beam headlight tell -
tale light
gfront fog light tell-tale light
fRear fog light tell-tale light
If no lights or sounds are ap-
parent, this indicates a fault
in the instrument panel. This
indicates that it is essential
to stop immediately (as soon as traf-
fic conditions allow). Ensure that the
vehicle is correctly immobilised and
contact an approved Dealer.
Warning light ® re -
quires you to stop immedi -
ately, for your own safety,
as soon as traffic conditions allow.
Switch off the engine and do not re-
start it. Contact an approved Dealer.
1
The instrument panel A lights up
when the ignition is switched on. You
can adjust the brightness of the instru-
ment panel by turning control knob 1.
In some cases, the appearance of a
warning light is accompanied by a mes-
sage. The presence and operation of the warning lights dEpENd ON THE EQUIpmENT ANd cOUNTRY.
Page 57 of 239
ABS ....................................................................... (current page)
air bag .................................................................... (current page)
variable power-assisted steering ........................... (current page)
filter particle filter ..................................................... (current page)
speed limiter .......................................................... (current page)
cruise control ......................................................... (current page)
JauneNoirNoir texte
1.51
ENG_UD18927_5
Tableau de bord : témoins lumineux (X95 - B95 - D95 - Renault)
ENG_NU_837-6_BDK95_Renault_1
WARNINg LIgHTs (2/4)
A
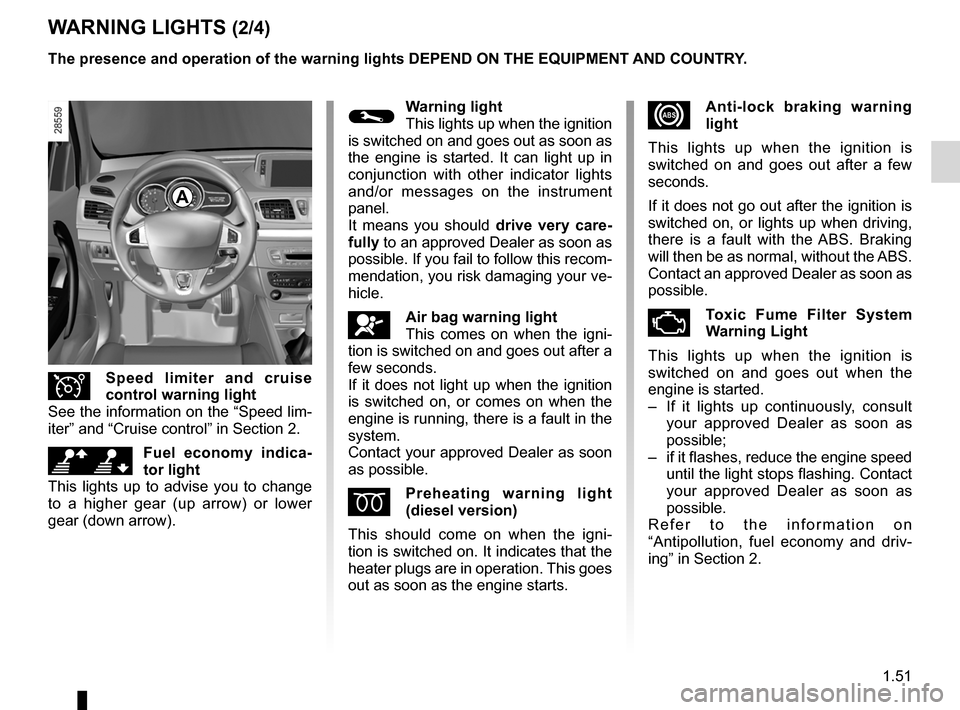
xAnti-lock braking warning
light
This lights up when the ignition is
switched on and goes out after a few
seconds.
If it does not go out after the ignition is
switched on, or lights up when driving,
there is a fault with the ABS. Braking
will then be as normal, without the ABS.
Contact an approved Dealer as soon as
possible.
ÄToxic fume filter system
Warning Light
This lights up when the ignition is
switched on and goes out when the
engine is started.
– If it lights up continuously, consult
your approved Dealer as soon as
possible;
– if it flashes, reduce the engine speed
until the light stops flashing. Contact
your approved Dealer as soon as
possible.
R e f e r t o t h e i n f o r m a t i o n o n
“Antipollution, fuel economy and driv -
ing” in Section 2.
©Warning light
This lights up when the ignition
is switched on and goes out as soon as
the engine is started. It can light up in
conjunction with other indicator lights
and/or messages on the instrument
panel.
It means you should drive very care-
fully to an approved Dealer as soon as
possible. If you fail to follow this recom-
mendation, you risk damaging your ve-
hicle.
åAir bag warning light
This comes on when the igni -
tion is switched on and goes out after a
few seconds.
If it does not light up when the ignition
is switched on, or comes on when the
engine is running, there is a fault in the
system.
Contact your approved Dealer as soon
as possible.
Ép reheating warning light
(diesel version)
This should come on when the igni -
tion is switched on. It indicates that the
heater plugs are in operation. This goes
out as soon as the engine starts.
Îs peed limiter and cruise
control warning light
See the information on the “Speed lim-
iter” and “Cruise control” in Section 2.
\[f uel economy indica -
tor light
This lights up to advise you to change
to a higher gear (up arrow) or lower
gear (down arrow). The presence and operation of the warning lights dEpENd ON THE EQUIpmENT ANd cOUNTRY.
Page 58 of 239
warning buzzer ...................................................... (current page)
battery .................................................................... (current page)
seat belts ............................................................... (current page)
engine oil ............................................................... (current page)
1.52
ENG_UD18927_5
Tableau de bord : témoins lumineux (X95 - B95 - D95 - Renault)
ENG_NU_837-6_BDK95_Renault_1
Jaune NoirNoir texte
WARNINg LIgHTs (3/4)
A
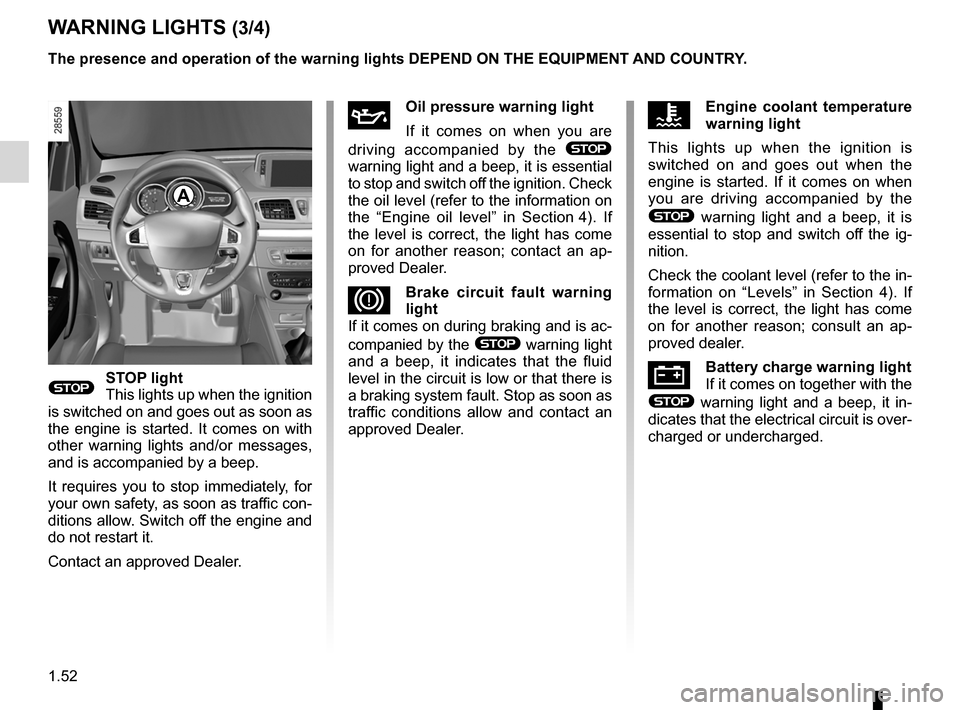
ÀOil pressure warning light
If it comes on when you are
driving accompanied by the
®
warning light and a beep, it is essential
to stop and switch off the ignition. Check
the oil level (refer to the information on
the “Engine oil level” in Section 4). If
the level is correct, the light has come
on for another reason; contact an ap -
proved Dealer.
DBrake circuit fault warning
light
If it comes on during braking and is ac-
companied by the
® warning light
and a beep, it indicates that the fluid
level in the circuit is low or that there is
a braking system fault. Stop as soon as
traffic conditions allow and contact an
approved Dealer.
®sTOp light
This lights up when the ignition
is switched on and goes out as soon as
the engine is started. It comes on with
other warning lights and/or messages,
and is accompanied by a beep.
It requires you to stop immediately, for
your own safety, as soon as traffic con-
ditions allow. Switch off the engine and
do not restart it.
Contact an approved Dealer.
ÔEngine coolant temperature
warning light
This lights up when the ignition is
switched on and goes out when the
engine is started. If it comes on when
you are driving accompanied by the
® warning light and a beep, it is
essential to stop and switch off the ig -
nition.
Check the coolant level (refer to the in-
formation on “Levels” in Section 4). If
the level is correct, the light has come
on for another reason; consult an ap -
proved dealer.
ÚBattery charge warning light
If it comes on together with the
® warning light and a beep, it in-
dicates that the electrical circuit is over-
charged or undercharged.
The presence and operation of the warning lights dEpENd ON THE EQUIpmENT ANd cOUNTRY.
Page 60 of 239
indicators:instrument panel ............................. (up to the end of the DU)
display .................................................. (up to the end of the DU)
instrument panel ................................... (up to the end of the DU)
fuel level ................................................................ (current page)
coolant ................................................................... (current page)
control instruments ............................... (up to the end of the DU)
levels: fuel ................................................................... (current page)
levels: coolant ............................................................. (current page)
1.54
ENG_UD18928_3
Tableau de bord : afficheurs et indicateurs (X95 - B95 - D95 - Renault)
ENG_NU_837-6_BDK95_Renault_1
Jaune NoirNoir texte
dIspLAYs ANd INdIcATORs (1/2)
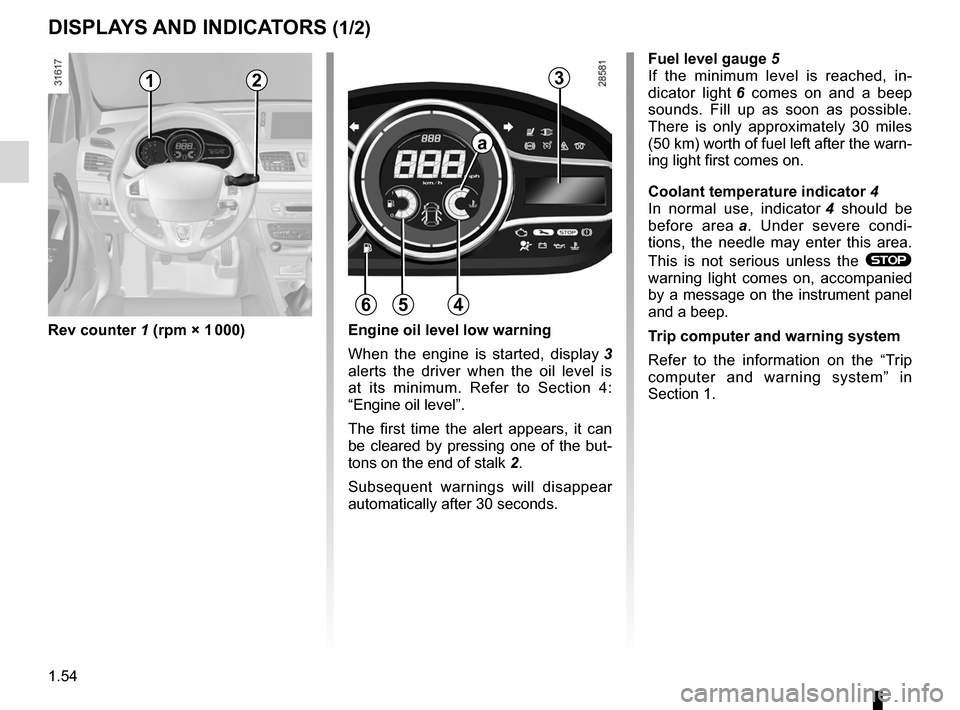
Rev counter 1 (rpm × 1 000) fuel level gauge
5
If the minimum level is reached, in -
dicator light 6 comes on and a beep
sounds. Fill up as soon as possible.
There is only approximately 30 miles
(50 km) worth of fuel left after the warn-
ing light first comes on.
coolant temperature indicator 4
In normal use, indicator 4 should be
before area a . Under severe condi -
tions, the needle may enter this area.
This is not serious unless the
®
warning light comes on, accompanied
by a message on the instrument panel
and a beep.
Trip computer and warning system
Refer to the information on the “Trip
computer and warning system” in
Section 1.
Engine oil level low warning
When the engine is started, display 3
alerts the driver when the oil level is
at its minimum. Refer to Section 4:
“Engine oil level”.
The first time the alert appears, it can
be cleared by pressing one of the but-
tons on the end of stalk 2.
Subsequent warnings will disappear
automatically after 30 seconds.
12
564
a
3