air condition RENAULT SCENIC 2010 J95 / 3.G Petrol Injection S3000 Injection User Guide
[x] Cancel search | Manufacturer: RENAULT, Model Year: 2010, Model line: SCENIC, Model: RENAULT SCENIC 2010 J95 / 3.GPages: 230, PDF Size: 0.92 MB
Page 26 of 230

PETROL INJECTION
Fault finding - Replacement of components
17B
17B-26
PETROL INJECTION
Fault finding - Replacement of components
17B
17B-26V9 MR-372-J84-17B050$188.mif
S3000 Injection
Program No.: AD
Vdiag No.: 4C / 54PETROL INJECTION
Fault finding - Replacement of components
1. COMPUTER REPLACEMENT OR REPROGRAMMING OPERATIONS
The system can be programmed and reprogrammed via the diagnostic socket using the RENAULT CLIP diagnostic
tool (Consult Technical Note 3585A or follow the instructions provided by the diagnostic tool).
Whenever the computer has been programmed, reprogrammed or replaced:
–Switch off the ignition.
–Start and then stop the engine (to initialise the computer) and wait 30 seconds.
–Switch the ignition back on and use the diagnostic tool to carry out the following steps:
– use command VP020 Enter VIN.
– deal with any faults declared by the diagnostic tool. Clear the computer memory.
– program the flywheel sensor target and throttle stops,
– carry out a road test followed by another check with the diagnostic tool. IMPORTANT
–Switch on the diagnostic tool (mains or cigarette lighter supply).
–Connect a battery charger (during the entire computer (re)programming procedure, the engine fan
assemblies are triggered automatically).
–Observe the engine temperature setpoints given on the diagnostic tool before (re)programming.
–Cut off all the electrical consumers (interior lighting, air conditioning, radio, etc.).
Operations to be carried out before the injection computer is reprogrammed:
Before reprogramming the injection computer, move the main Cruise control/Speed limiter switch to the rest
position. The information about the cruise control or the speed limiter displayed on the instrument panel
disappears.
Otherwise, if the main switch remains in the cruise control or speed limiter position during and after reprogramming,
the Cruise control/Speed limiter function will not be operational.
The procedure for resetting the function is as follows:
Vehicle ignition on.
– Position the main switch in rest position (the computer then detects the rest position).
– Position the switch in Cruise control position to activate the Cruise control function.
– Position the switch in Speed limiter position to activate the Speed limiter function.
IMPORTANT
It is not possible to try an injection computer coming from the Parts Department because it will no longer be
possible to use it on another vehicle.
MR-372-J84-17B050$188.mif
Page 28 of 230

PETROL INJECTION
17B
17B - 28
17B
17B - 28V9 MR-372-J84-17B050$235.mif
S3000 Injection
Program No.: AD
Vdiag No.: 4C / 54PETROL INJECTION
Fault finding - Configurations and programming
1. CONFIGURATION
Computer configuration by automatic detection
LC001Vehicle speed connection type
→Multiplex
→Wire
LC003Upstream oxygen sensor
→WITH
→NONE
LC004Downstream oxygen sensor
→WITH
→NONE
LC005Gearbox type
→Automatic gearbox connection
→Sequential gearbox
→Manual gearbox
LC007Cylinder 1 recognition
→WITH
→NONE
LC008Camshaft dephaser
→WITH
→NONE
LC009Air conditioning
→WITH
→NONE
LC010Electronic stability program
→not connected
→connected
LC024OBD warning light management
→WITH
→NONE
LC096Closed brake switch
→YES
→NO
MR-372-J84-17B050$235.mif
Page 29 of 230

PETROL INJECTION
Fault finding - Configurations and programming17B
17B - 29
17B
17B - 29V9 MR-372-J84-17B050$235.mif
S3000 Injection
Program No.: AD
Vdiag No.: 4C / 54
2. PROGRAMMING
Programming the flywheel target
– Decelerate a first time with injection cut-off (i.e. feet off the brake, accelerator pedal and clutch pedals) between
3500 and 3000 rpm, in 3rd gear for a manual gearbox and 2nd for automatic transmission, for at least 5 seconds.
– Decelerate a second time with injection cut-off (i.e. feet off the brake, accelerator pedal and clutch pedals) between
2400 and 2000 rpm for K4 engines and between 1800 and 1400 rpm for R4R engines, in 3rd gear for a manual
gearbox and 2nd for automatic gearbox, for at least 5 seconds.
Check the programming using ET089 Flywheel target programming.
Programming the throttle end stops
When replacing the computer or the motorised throttle valve, with the ignition on, wait 30 seconds so that the
computer may program the MAX and MIN limits, then switch off the ignition and wait 30 seconds for the end of the
Power Latch, so that the computer may store the programmed limits.
Check the programming using ET051 Throttle stop programming.
* This is the moment when, during deceleration with no load, the engine drops to idling speed and recovers torque. LC158Air conditioning heating resistor management
→WITH
→NONE
LC162Controlled coolant thermostat
→WITH
→NONE
LC170Electric coolant pump
→WITH
→NONE
Page 34 of 230
PETROL INJECTION
Fault finding - Interpretation of faults
17B
17B-34
PETROL INJECTION
Fault finding - Interpretation of faults
17B
17B-34V9 MR-372-J84-17B050$329.mif
S3000 Injection
Program No.: AD
Vdiag No.: 4C / 54PETROL INJECTION
Fault finding - Interpretation of faults
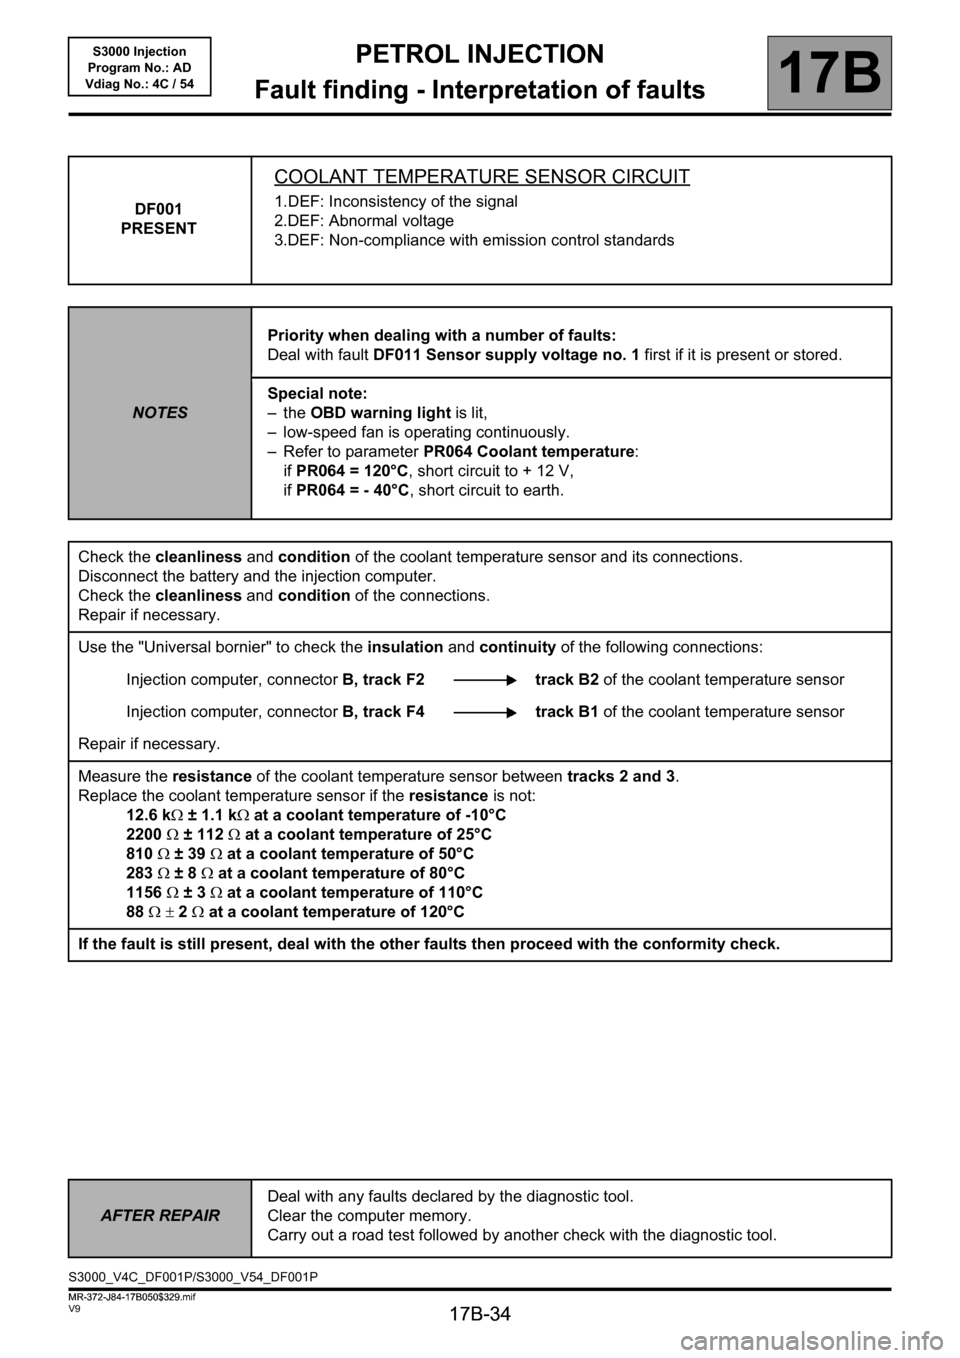
DF001
PRESENT
COOLANT TEMPERATURE SENSOR CIRCUIT
1.DEF: Inconsistency of the signal
2.DEF: Abnormal voltage
3.DEF: Non-compliance with emission control standards
NOTESPriority when dealing with a number of faults:
Deal with fault DF011 Sensor supply voltage no. 1 first if it is present or stored.
Special note:
–the OBD warning light is lit,
– low-speed fan is operating continuously.
– Refer to parameter PR064 Coolant temperature:
if PR064 = 120°C, short circuit to + 12 V,
if PR064 = - 40°C, short circuit to earth.
Check the cleanliness and condition of the coolant temperature sensor and its connections.
Disconnect the battery and the injection computer.
Check the cleanliness and condition of the connections.
Repair if necessary.
Use the "Universal bornier" to check the insulation and continuity of the following connections:
Injection computer, connectorB, track F2 track B2 of the coolant temperature sensor
Injection computer, connectorB, track F4 track B1 of the coolant temperature sensor
Repair if necessary.
Measure the resistance of the coolant temperature sensor between tracks 2 and 3.
Replace the coolant temperature sensor if the resistance is not:
12.6 kΩ ±1.1kΩ at a coolant temperature of -10°C
2200Ω ± 112Ω at a coolant temperature of 25°C
810Ω ±39Ω at a coolant temperature of 50°C
283Ω ±8Ω at a coolant temperature of 80°C
1156Ω ±3Ω at a coolant temperature of 110°C
88Ω ±2Ω at a coolant temperature of 120°C
If the fault is still present, deal with the other faults then proceed with the conformity check.
AFTER REPAIRDeal with any faults declared by the diagnostic tool.
Clear the computer memory.
Carry out a road test followed by another check with the diagnostic tool.
S3000_V4C_DF001P/S3000_V54_DF001P
MR-372-J84-17B050$329.mif
Page 35 of 230
PETROL INJECTION
Fault finding - Interpretation of faults
17B
17B-35
PETROL INJECTION
Fault finding - Interpretation of faults
17B
17B-35V9 MR-372-J84-17B050$329.mif
S3000 Injection
Program No.: AD
Vdiag No.: 4C / 54
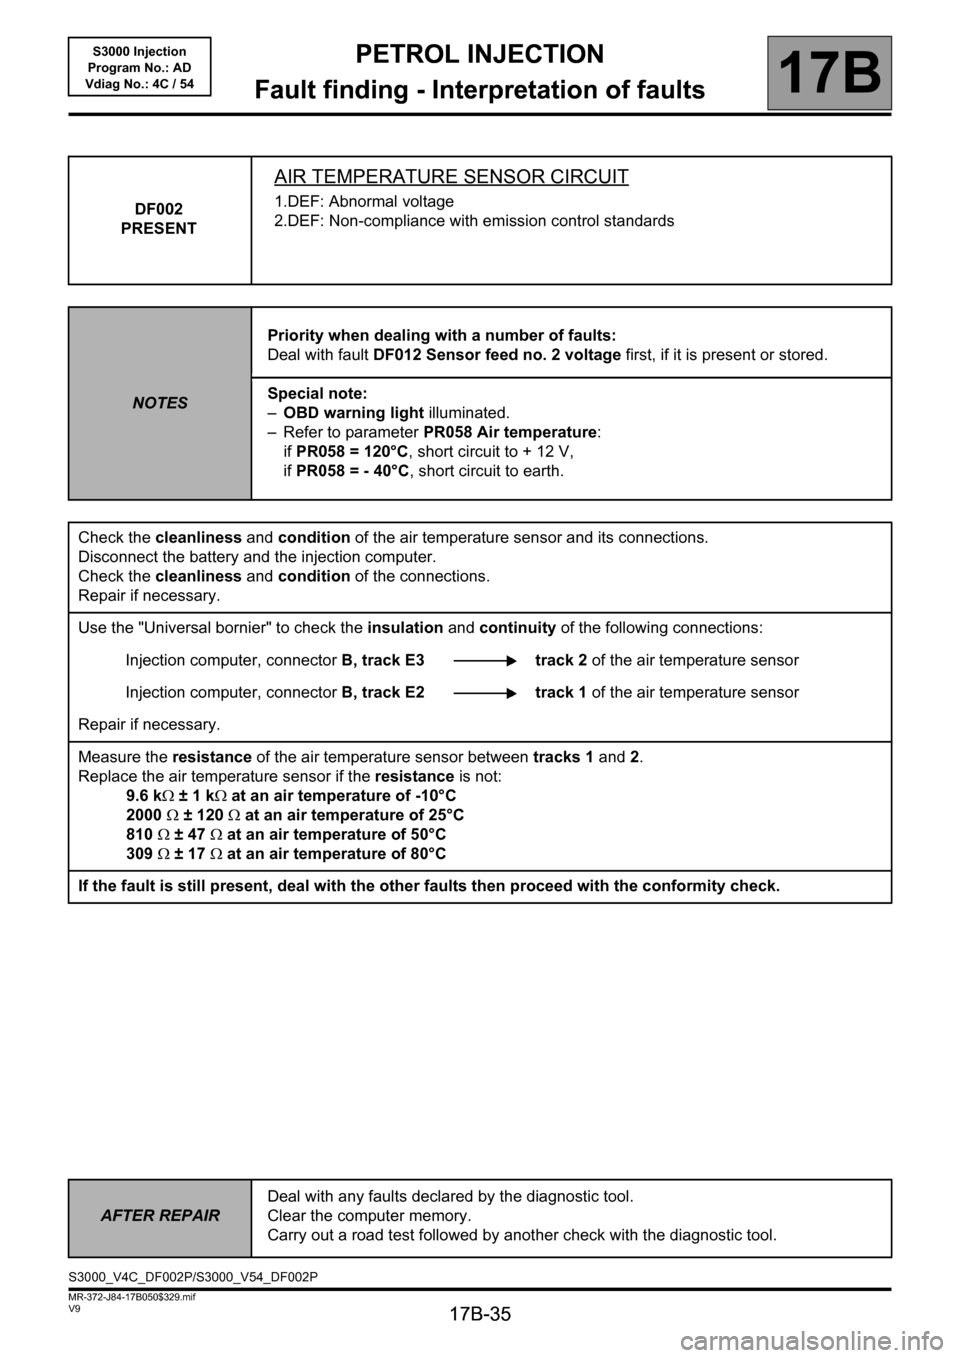
DF002
PRESENT
AIR TEMPERATURE SENSOR CIRCUIT
1.DEF: Abnormal voltage
2.DEF: Non-compliance with emission control standards
NOTESPriority when dealing with a number of faults:
Deal with fault DF012 Sensor feed no. 2 voltage first, if it is present or stored.
Special note:
–OBD warning light illuminated.
– Refer to parameter PR058 Air temperature:
if PR058 = 120°C, short circuit to + 12 V,
if PR058 = - 40°C, short circuit to earth.
Check the cleanliness and condition of the air temperature sensor and its connections.
Disconnect the battery and the injection computer.
Check the cleanliness and condition of the connections.
Repair if necessary.
Use the "Universal bornier" to check the insulation and continuity of the following connections:
Injection computer, connectorB, track E3 track 2 of the air temperature sensor
Injection computer, connectorB, track E2 track 1 of the air temperature sensor
Repair if necessary.
Measure the resistance of the air temperature sensor between tracks 1 and 2.
Replace the air temperature sensor if the resistance is not:
9.6 kΩ ±1kΩ at an air temperature of -10°C
2000Ω ± 120Ω at an air temperature of 25°C
810Ω ±47Ω at an air temperature of 50°C
309Ω ±17Ω at an air temperature of 80°C
If the fault is still present, deal with the other faults then proceed with the conformity check.
AFTER REPAIRDeal with any faults declared by the diagnostic tool.
Clear the computer memory.
Carry out a road test followed by another check with the diagnostic tool.
S3000_V4C_DF002P/S3000_V54_DF002P
Page 36 of 230
PETROL INJECTION
Fault finding - Interpretation of faults
17B
17B-36
PETROL INJECTION
Fault finding - Interpretation of faults
17B
17B-36V9 MR-372-J84-17B050$329.mif
S3000 Injection
Program No.: AD
Vdiag No.: 4C / 54
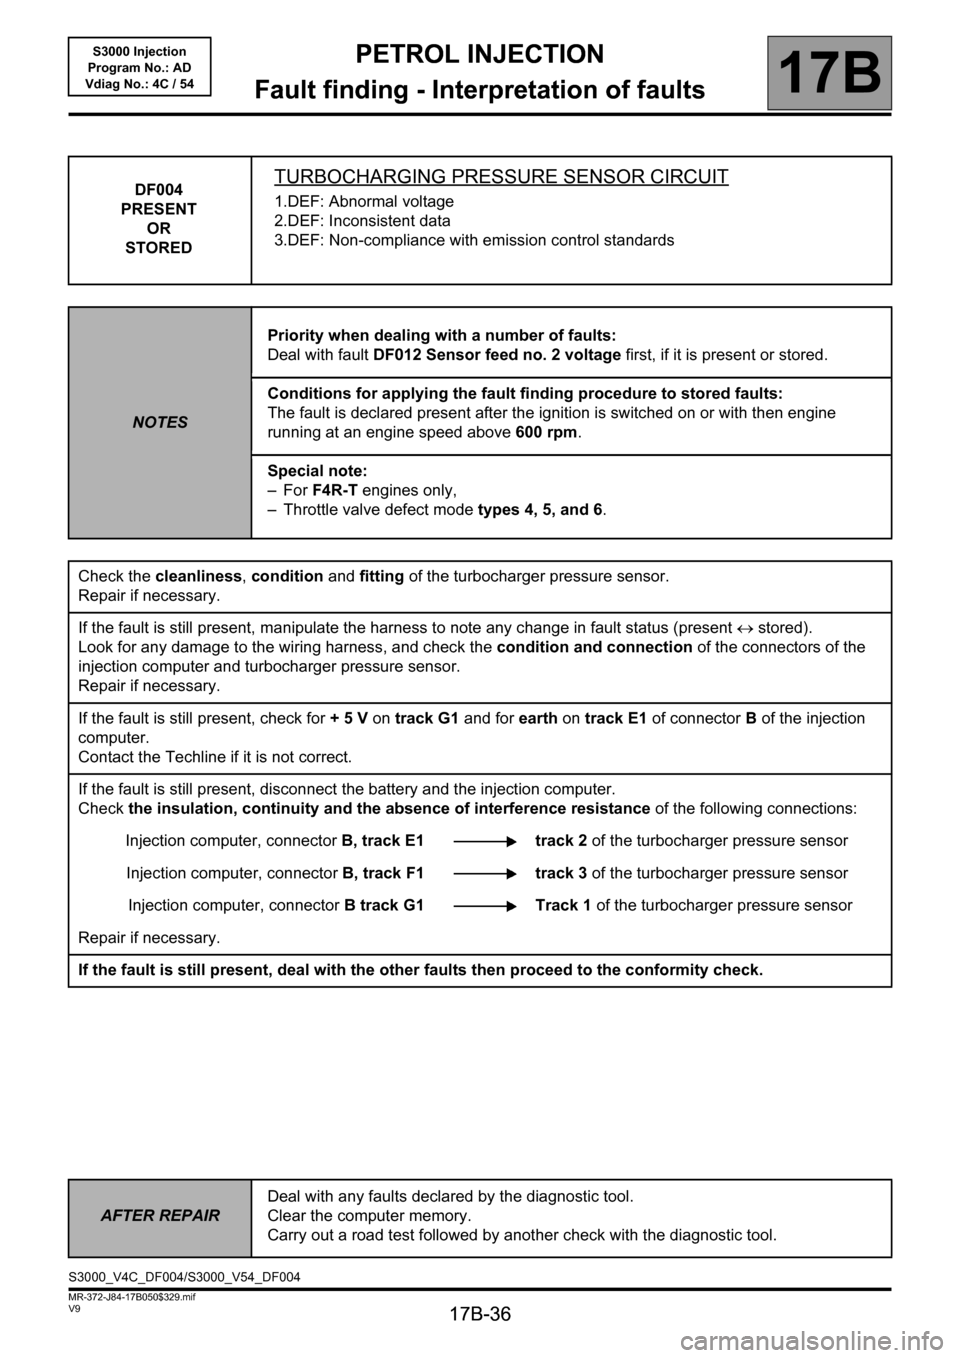
DF004
PRESENT
OR
STOREDTURBOCHARGING PRESSURE SENSOR CIRCUIT
1.DEF: Abnormal voltage
2.DEF: Inconsistent data
3.DEF: Non-compliance with emission control standards
NOTESPriority when dealing with a number of faults:
Deal with fault DF012 Sensor feed no. 2 voltage first, if it is present or stored.
Conditions for applying the fault finding procedure to stored faults:
The fault is declared present after the ignition is switched on or with then engine
running at an engine speed above 600 rpm.
Special note:
–For F4R-T engines only,
– Throttle valve defect mode types 4, 5, and 6.
Check the cleanliness, condition and fitting of the turbocharger pressure sensor.
Repair if necessary.
If the fault is still present, manipulate the harness to note any change in fault status (present↔ stored).
Look for any damage to the wiring harness, and check the condition and connection of the connectors of the
injection computer and turbocharger pressure sensor.
Repair if necessary.
If the fault is still present, check for + 5 V on track G1 and for earth on track E1 of connectorB of the injection
computer.
Contact the Techline if it is not correct.
If the fault is still present, disconnect the battery and the injection computer.
Check the insulation, continuity and the absence of interference resistance of the following connections:
Injection computer, connectorB, track E1 track 2 of the turbocharger pressure sensor
Injection computer, connectorB, track F1 track 3 of the turbocharger pressure sensor
Injection computer, connectorB track G1 Track 1 of the turbocharger pressure sensor
Repair if necessary.
If the fault is still present, deal with the other faults then proceed to the conformity check.
AFTER REPAIRDeal with any faults declared by the diagnostic tool.
Clear the computer memory.
Carry out a road test followed by another check with the diagnostic tool.
S3000_V4C_DF004/S3000_V54_DF004
Page 37 of 230
PETROL INJECTION
Fault finding - Interpretation of faults
17B
17B-37
PETROL INJECTION
Fault finding - Interpretation of faults
17B
17B-37V9 MR-372-J84-17B050$329.mif
S3000 Injection
Program No.: AD
Vdiag No.: 4C / 54
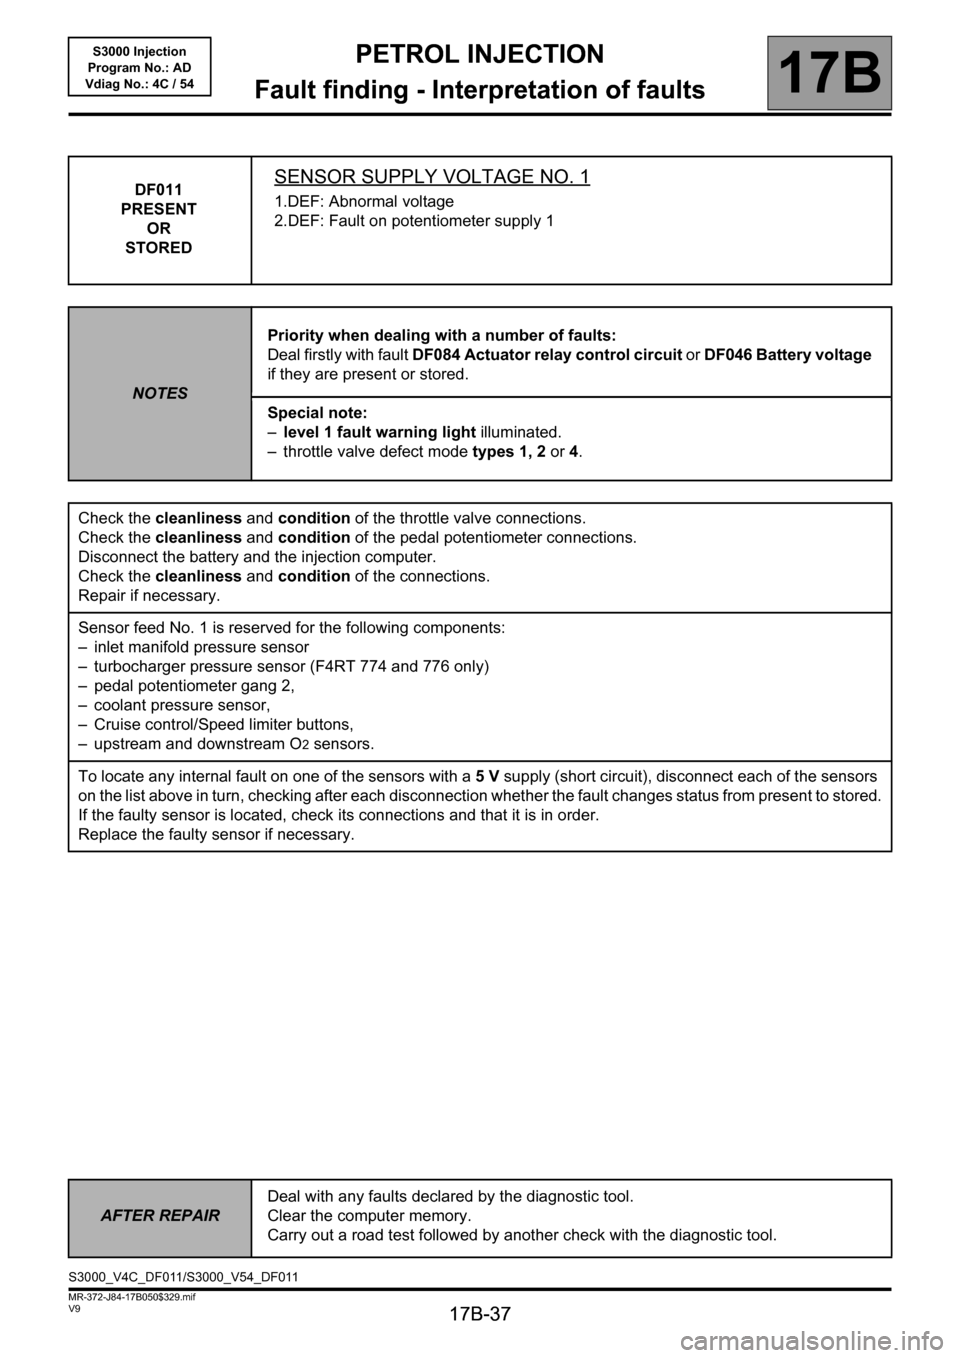
DF011
PRESENT
OR
STOREDSENSOR SUPPLY VOLTAGE NO. 1
1.DEF: Abnormal voltage
2.DEF: Fault on potentiometer supply 1
NOTESPriority when dealing with a number of faults:
Deal firstly with fault DF084 Actuator relay control circuit or DF046 Battery voltage
if they are present or stored.
Special note:
–level 1 fault warning light illuminated.
– throttle valve defect mode types 1, 2 or 4.
Check the cleanliness and condition of the throttle valve connections.
Check the cleanliness and condition of the pedal potentiometer connections.
Disconnect the battery and the injection computer.
Check the cleanliness and condition of the connections.
Repair if necessary.
Sensor feed No. 1 is reserved for the following components:
– inlet manifold pressure sensor
– turbocharger pressure sensor (F4RT 774 and 776 only)
– pedal potentiometer gang 2,
– coolant pressure sensor,
– Cruise control/Speed limiter buttons,
– upstream and downstream O
2 sensors.
To locate any internal fault on one of the sensors with a 5V supply (short circuit), disconnect each of the sensors
on the list above in turn, checking after each disconnection whether the fault changes status from present to stored.
If the faulty sensor is located, check its connections and that it is in order.
Replace the faulty sensor if necessary.
AFTER REPAIRDeal with any faults declared by the diagnostic tool.
Clear the computer memory.
Carry out a road test followed by another check with the diagnostic tool.
S3000_V4C_DF011/S3000_V54_DF011
Page 39 of 230
PETROL INJECTION
Fault finding - Interpretation of faults
17B
17B-39
PETROL INJECTION
Fault finding - Interpretation of faults
17B
17B-39V9 MR-372-J84-17B050$329.mif
S3000 Injection
Program No.: AD
Vdiag No.: 4C / 54
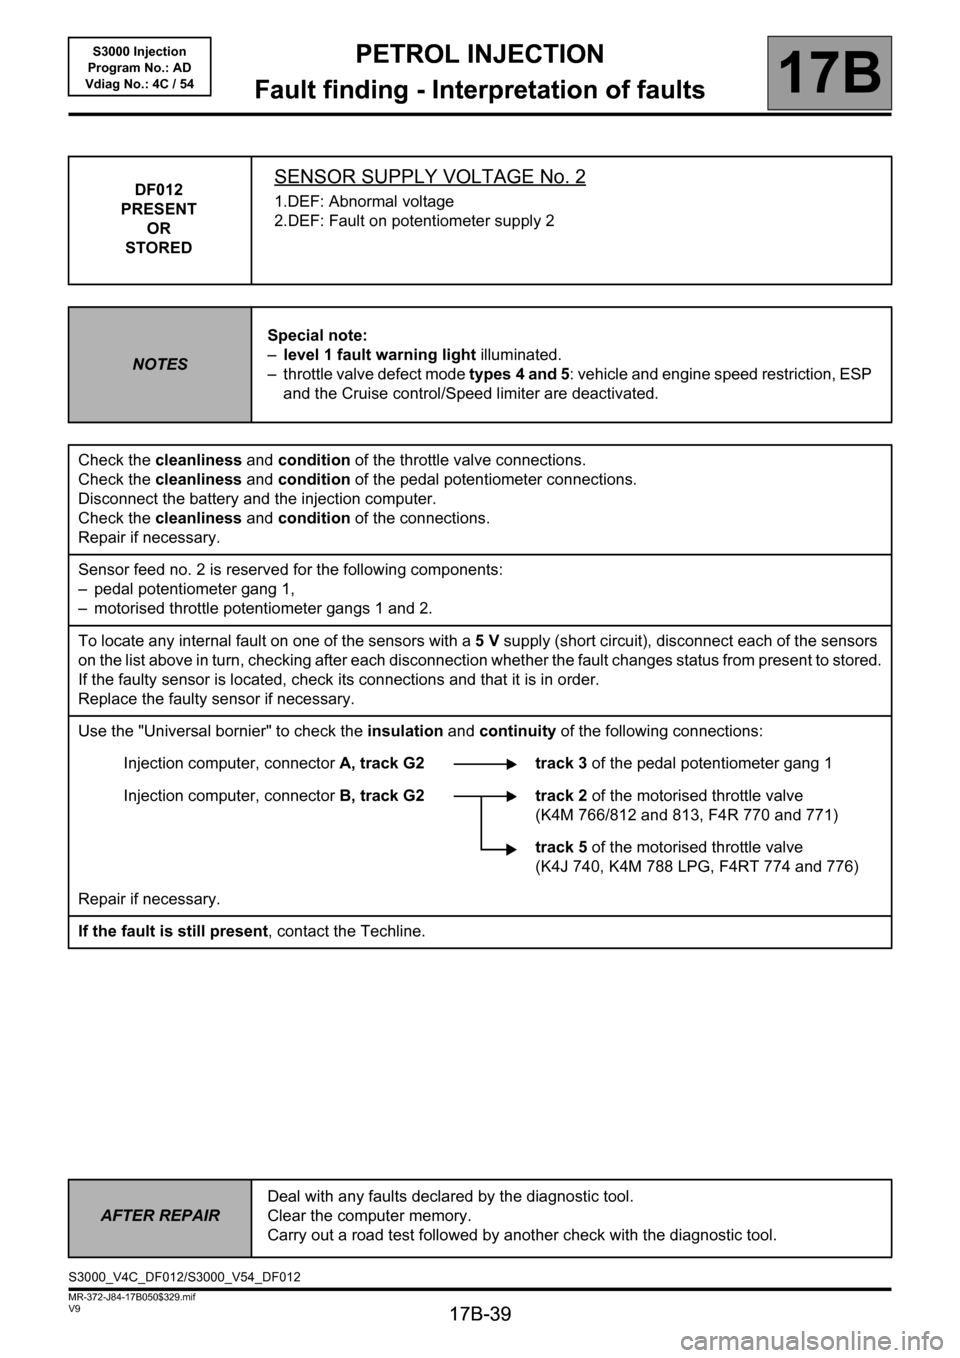
DF012
PRESENT
OR
STOREDSENSOR SUPPLY VOLTAGE No. 2
1.DEF: Abnormal voltage
2.DEF: Fault on potentiometer supply 2
NOTESSpecial note:
–level 1 fault warning light illuminated.
– throttle valve defect mode types 4 and 5: vehicle and engine speed restriction, ESP
and the Cruise control/Speed limiter are deactivated.
Check the cleanliness and condition of the throttle valve connections.
Check the cleanliness and condition of the pedal potentiometer connections.
Disconnect the battery and the injection computer.
Check the cleanliness and condition of the connections.
Repair if necessary.
Sensor feed no. 2 is reserved for the following components:
– pedal potentiometer gang 1,
– motorised throttle potentiometer gangs 1 and 2.
To locate any internal fault on one of the sensors with a 5V supply (short circuit), disconnect each of the sensors
on the list above in turn, checking after each disconnection whether the fault changes status from present to stored.
If the faulty sensor is located, check its connections and that it is in order.
Replace the faulty sensor if necessary.
Use the "Universal bornier" to check the insulation and continuity of the following connections:
Injection computer, connectorA, track G2 track 3 of the pedal potentiometer gang 1
Injection computer, connectorB, track G2 track 2 of the motorised throttle valve
(K4M 766/812 and 813, F4R 770 and 771)
track 5 of the motorised throttle valve
(K4J 740, K4M 788 LPG, F4RT 774 and 776)
Repair if necessary.
If the fault is still present, contact the Techline.
AFTER REPAIRDeal with any faults declared by the diagnostic tool.
Clear the computer memory.
Carry out a road test followed by another check with the diagnostic tool.
S3000_V4C_DF012/S3000_V54_DF012
Page 40 of 230
PETROL INJECTION
Fault finding - Interpretation of faults
17B
17B-40
PETROL INJECTION
Fault finding - Interpretation of faults
17B
17B-40V9 MR-372-J84-17B050$329.mif
S3000 Injection
Program No.: AD
Vdiag No.: 4C / 54
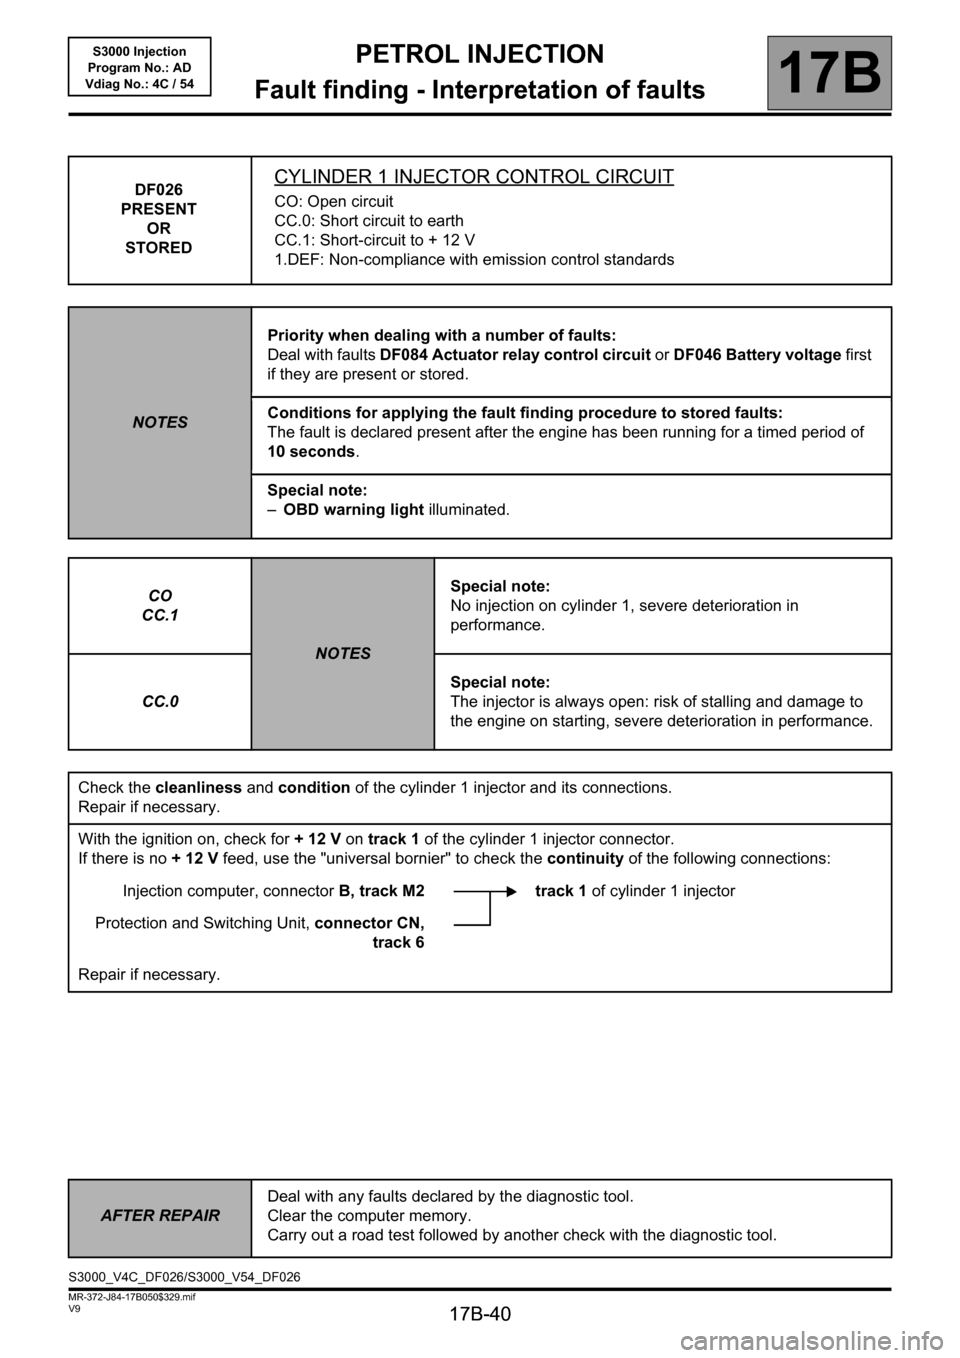
DF026
PRESENT
OR
STOREDCYLINDER 1 INJECTOR CONTROL CIRCUIT
CO: Open circuit
CC.0: Short circuit to earth
CC.1: Short-circuit to + 12 V
1.DEF: Non-compliance with emission control standards
NOTESPriority when dealing with a number of faults:
Deal with faults DF084 Actuator relay control circuit or DF046 Battery voltage first
if they are present or stored.
Conditions for applying the fault finding procedure to stored faults:
The fault is declared present after the engine has been running for a timed period of
10 seconds.
Special note:
–OBD warning light illuminated.
CO
CC.1
NOTESSpecial note:
No injection on cylinder 1, severe deterioration in
performance.
CC.0Special note:
The injector is always open: risk of stalling and damage to
the engine on starting, severe deterioration in performance.
Check the cleanliness and condition of the cylinder 1 injector and its connections.
Repair if necessary.
With the ignition on, check for + 12 V on track 1 of the cylinder 1 injector connector.
If there is no + 12 V feed, use the "universal bornier" to check the continuity of the following connections:
Injection computer, connectorB, track M2 track 1 of cylinder 1 injector
Protection and Switching Unit, connector CN,
track 6
Repair if necessary.
AFTER REPAIRDeal with any faults declared by the diagnostic tool.
Clear the computer memory.
Carry out a road test followed by another check with the diagnostic tool.
S3000_V4C_DF026/S3000_V54_DF026
Page 41 of 230
PETROL INJECTION
Fault finding - Interpretation of faults
17B
17B-41
PETROL INJECTION
Fault finding - Interpretation of faults
17B
17B-41V9 MR-372-J84-17B050$329.mif
S3000 Injection
Program No.: AD
Vdiag No.: 4C / 54
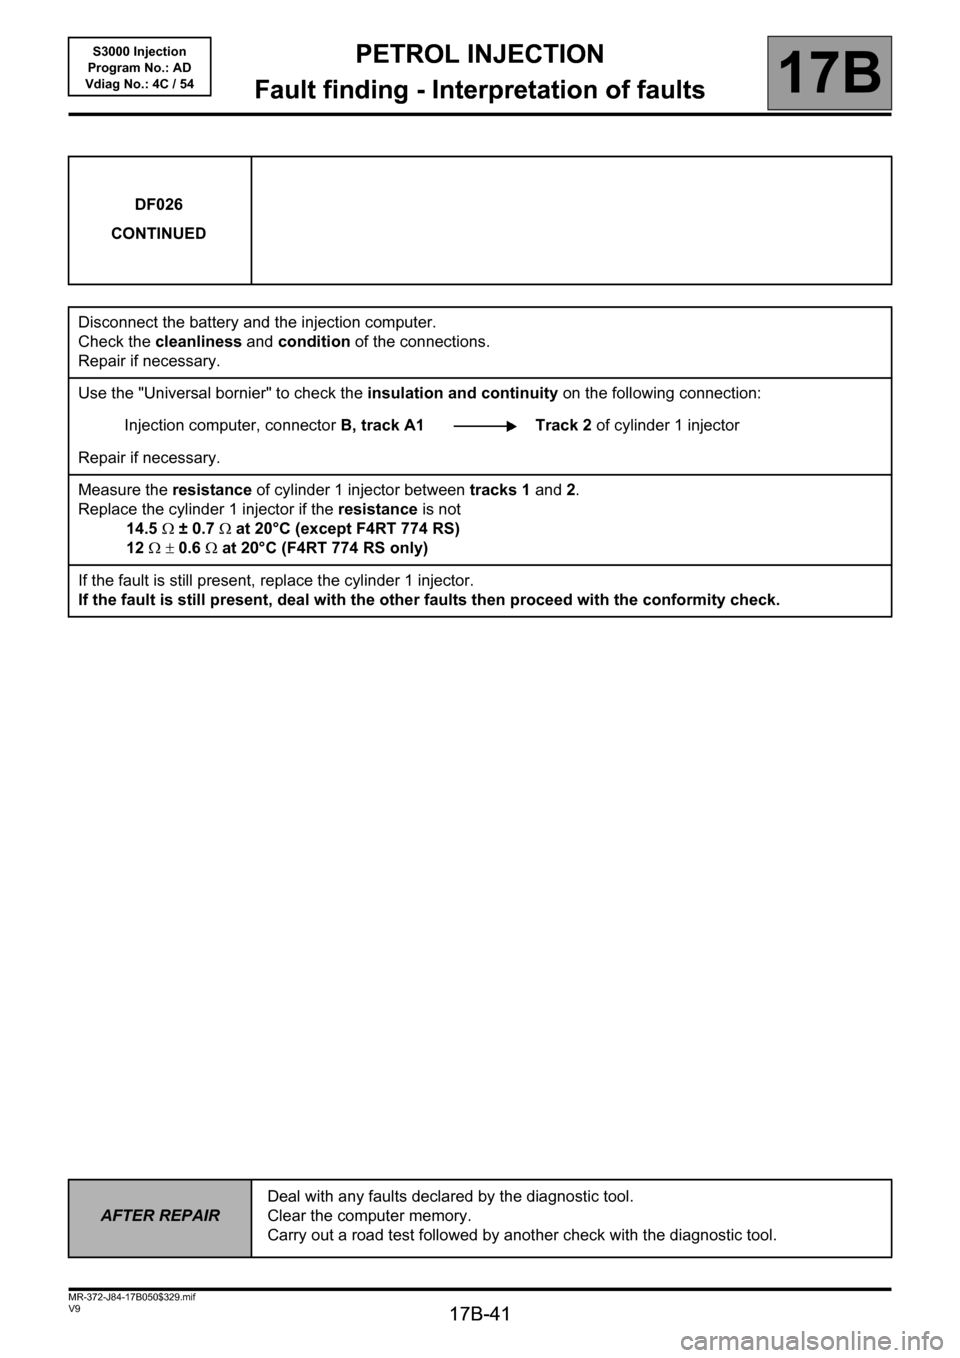
DF026
CONTINUED
Disconnect the battery and the injection computer.
Check the cleanliness and condition of the connections.
Repair if necessary.
Use the "Universal bornier" to check the insulation and continuity on the following connection:
Injection computer, connectorB, track A1 Track 2 of cylinder 1 injector
Repair if necessary.
Measure the resistance of cylinder 1 injector between tracks 1 and 2.
Replace the cylinder 1 injector if the resistance is not
14.5Ω ± 0.7Ω at 20°C (except F4RT 774 RS)
12Ω ±0.6Ω at 20°C (F4RT 774 RS only)
If the fault is still present, replace the cylinder 1 injector.
If the fault is still present, deal with the other faults then proceed with the conformity check.
AFTER REPAIRDeal with any faults declared by the diagnostic tool.
Clear the computer memory.
Carry out a road test followed by another check with the diagnostic tool.