charging RENAULT SCENIC 2011 J95 / 3.G Engine And Peripherals EDC16 Injection Owner's Guide
[x] Cancel search | Manufacturer: RENAULT, Model Year: 2011, Model line: SCENIC, Model: RENAULT SCENIC 2011 J95 / 3.GPages: 236, PDF Size: 1.32 MB
Page 144 of 236
13B - 144
DIESEL INJECTION
Fault finding - Conformity check13B
V10 MR-372-J84-13B150$470.mif
EDC16 INJECTION
Program No.: C1
Vdiag No.: 44, 48 and 4C
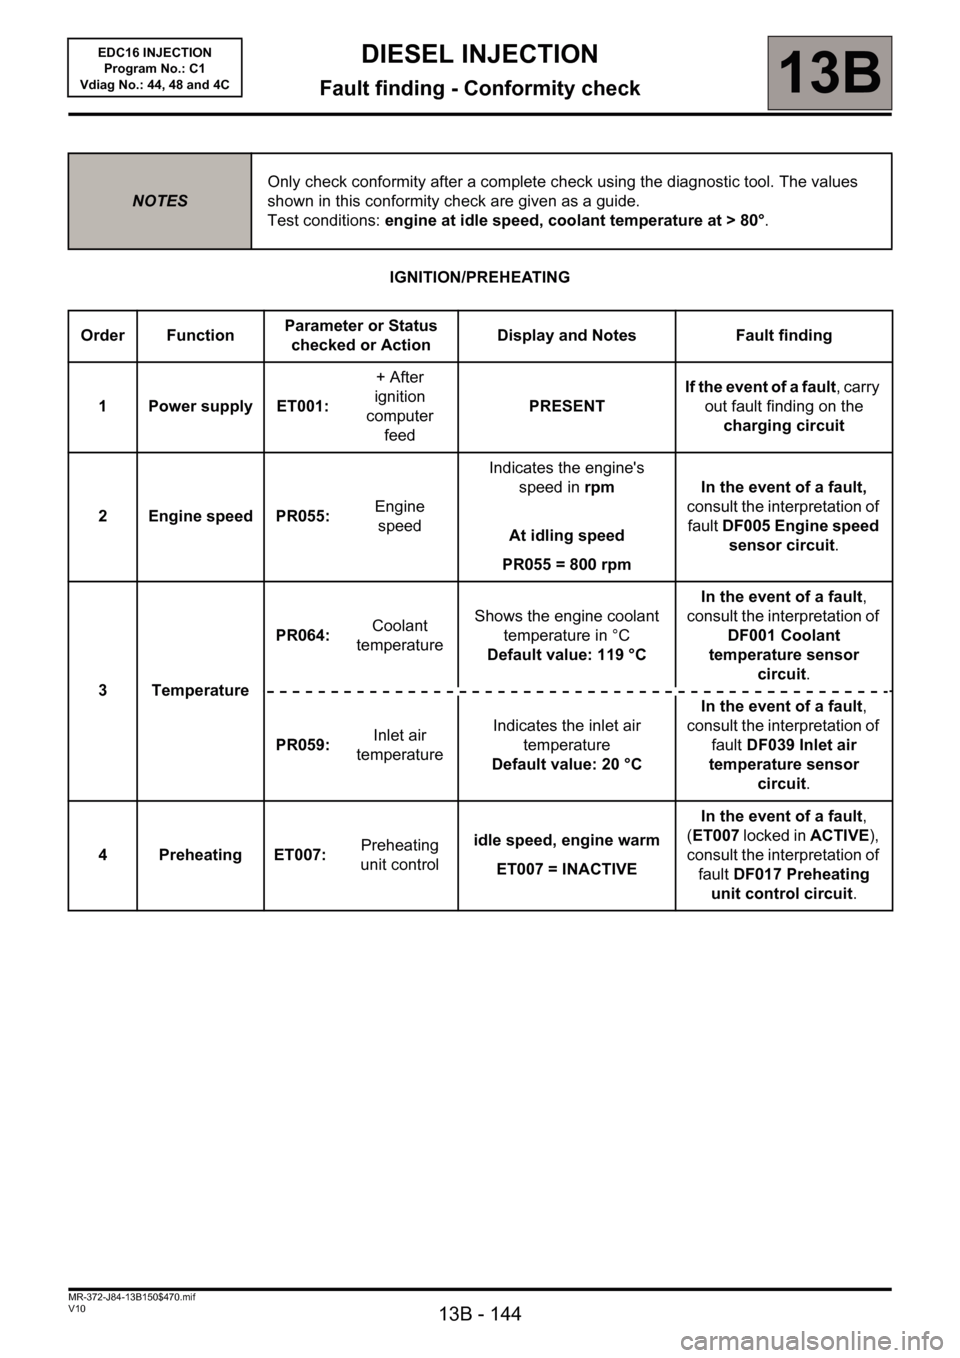
IGNITION/PREHEATING
NOTESOnly check conformity after a complete check using the diagnostic tool. The values
shown in this conformity check are given as a guide.
Test conditions: engine at idle speed, coolant temperature at > 80°.
Order FunctionParameter or Status
checked or ActionDisplay and Notes Fault finding
1 Power supply ET001:+ After
ignition
computer
feedPRESENT If the event of a fault, carry
out fault finding on the
charging circuit
2 Engine speed PR055: Engine
speedIndicates the engine's
speed in rpm
At idling speed
PR055 = 800 rpmIn the event of a fault,
consult the interpretation of
fault DF005 Engine speed
sensor circuit.
3TemperaturePR064: Coolant
temperatureShows the engine coolant
temperature in °C
Default value: 119 °CIn the event of a fault,
consult the interpretation of
DF001 Coolant
temperature sensor
circuit.
PR059:Inlet air
temperatureIndicates the inlet air
temperature
Default value: 20 °CIn the event of a fault,
consult the interpretation of
fault DF039 Inlet air
temperature sensor
circuit.
4 Preheating ET007:Preheating
unit controlidle speed, engine warm
ET007 = INACTIVEIn the event of a fault,
(ET007 locked in ACTIVE),
consult the interpretation of
fault DF017 Preheating
unit control circuit.
Page 145 of 236

13B - 145
DIESEL INJECTION
Fault finding - Conformity check13B
V10 MR-372-J84-13B150$470.mif
EDC16 INJECTION
Program No.: C1
Vdiag No.: 44, 48 and 4C
STARTING
NOTESOnly check conformity after a complete check using the diagnostic tool. The values
shown in this conformity check are given as a guide.
Test conditions: engine at idle speed, coolant temperature at > 80°.
Order FunctionParameter or Status
checked or ActionDisplay and Notes Fault finding
1 Power supplyET001: + After ignition
computer feedPRESENTIf the event of a fault,
carry out fault finding on
the charging circuit
PR071: Computer feed
voltage9 V < X < 16 VIn the event of a fault,
carry out fault finding on
the charging circuit.
PR358: Sensor
reference
voltage3.47 < X < 3.75 V
(Average of the three
sensor feed voltages)In the event of a fault,
consult the interpretation
of faults DF011 Sensor
feed voltage no. 1, DF012
Sensor feed voltage no. 2,
and DF013 Sensor feed
voltage no. 3.
2 Starting ET076:StartingAUTHORISED:
The injection gives
authorisation to start
or
PROHIBITED:
The injection does not
give authorisation to
start.If status ET076 is
PROHIBITED, carry out
fault finding on the entire
multiplex network.
3 Engine operation ET038:EngineAt idling speed
RunningNone
4 Synchronisation ET238: SynchronisationPERFORMEDIn the event of a fault,
consult the interpretation
of status ET238
Page 180 of 236
13B - 180
DIESEL INJECTION
Fault finding - Parameter summary table13B
V10 MR-372-J84-13B150$611.mif
EDC16 INJECTION
Program No.: C1
Vdiag No.: 44, 48 and 4CDIESEL INJECTION
Fault finding - Parameter summary table
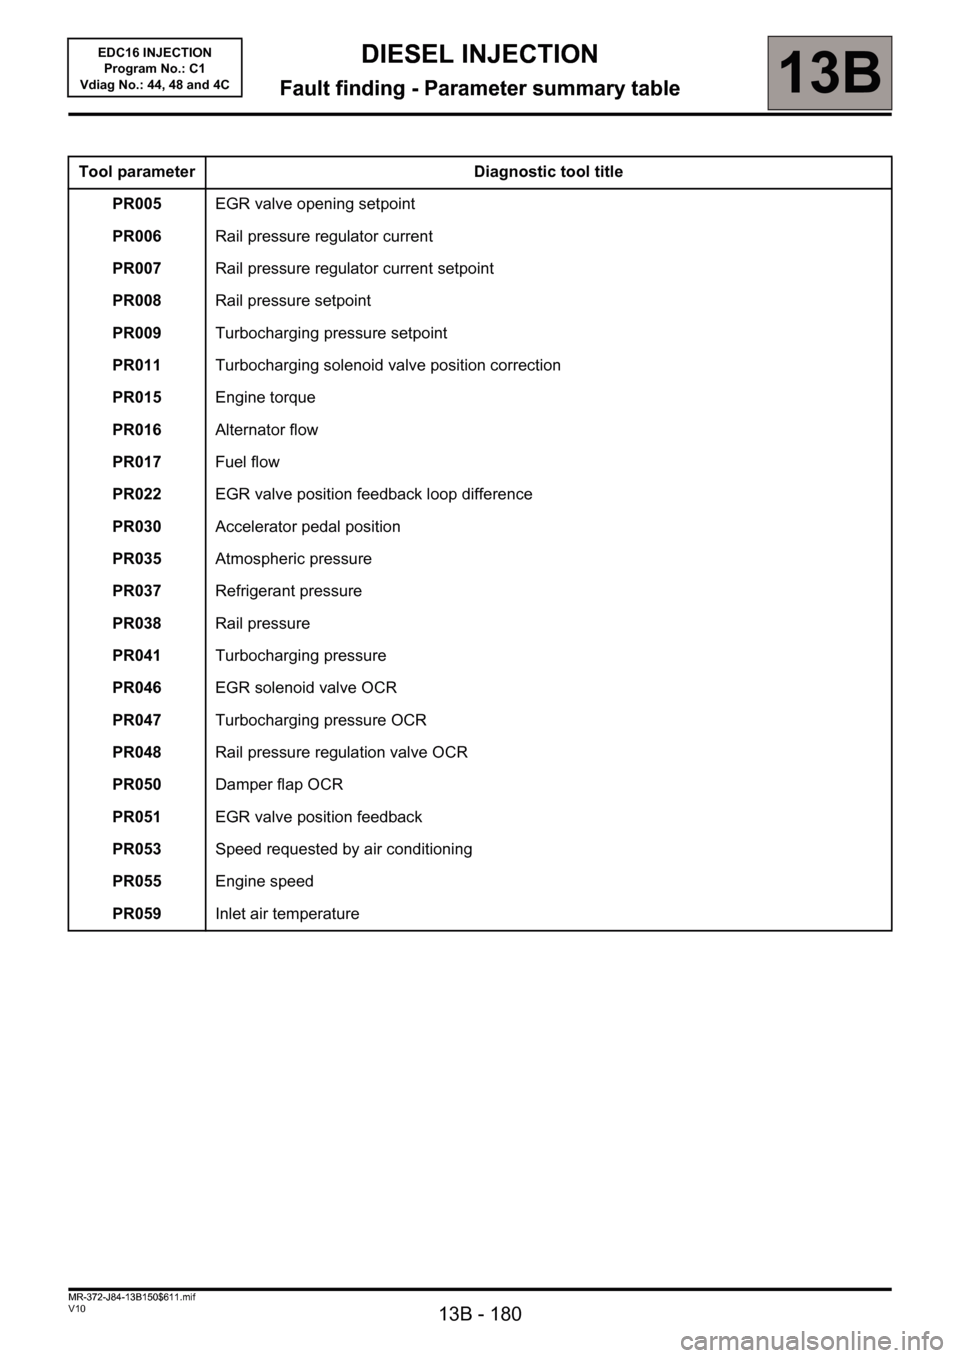
Tool parameter Diagnostic tool title
PR005EGR valve opening setpoint
PR006Rail pressure regulator current
PR007Rail pressure regulator current setpoint
PR008Rail pressure setpoint
PR009Turbocharging pressure setpoint
PR011Turbocharging solenoid valve position correction
PR015Engine torque
PR016Alternator flow
PR017Fuel flow
PR022EGR valve position feedback loop difference
PR030Accelerator pedal position
PR035Atmospheric pressure
PR037Refrigerant pressure
PR038Rail pressure
PR041Turbocharging pressure
PR046EGR solenoid valve OCR
PR047Turbocharging pressure OCR
PR048Rail pressure regulation valve OCR
PR050Damper flap OCR
PR051EGR valve position feedback
PR053Speed requested by air conditioning
PR055Engine speed
PR059Inlet air temperature
MR-372-J84-13B150$611.mif
Page 183 of 236
13B - 183
DIESEL INJECTION
Fault finding - Interpretation of parameters13B
V10 MR-372-J84-13B150$658.mif
EDC16 INJECTION
Program No.: C1
Vdiag No: 44, 48 and 4C
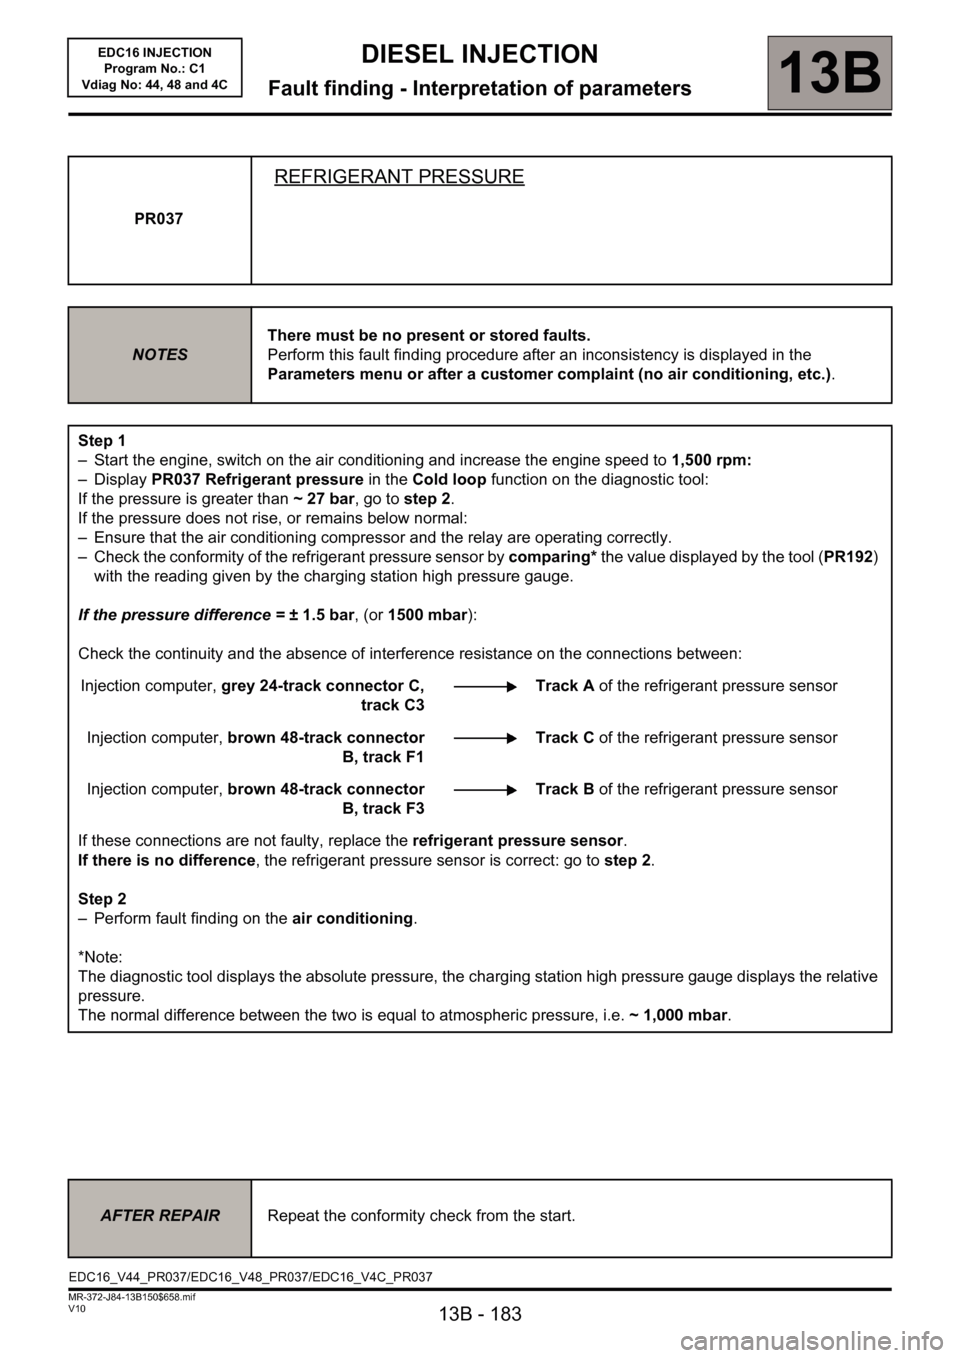
PR037
REFRIGERANT PRESSURE
NOTESThere must be no present or stored faults.
Perform this fault finding procedure after an inconsistency is displayed in the
Parameters menu or after a customer complaint (no air conditioning, etc.).
Step 1
– Start the engine, switch on the air conditioning and increase the engine speed to 1,500 rpm:
– Display PR037 Refrigerant pressure in the Cold loop function on the diagnostic tool:
If the pressure is greater than ~27bar, go to step 2.
If the pressure does not rise, or remains below normal:
– Ensure that the air conditioning compressor and the relay are operating correctly.
– Check the conformity of the refrigerant pressure sensor by comparing* the value displayed by the tool (PR192)
with the reading given by the charging station high pressure gauge.
If the pressure difference = ±1.5bar, (or 1500 mbar):
Check the continuity and the absence of interference resistance on the connections between:
Injection computer, grey 24-track connector C,
track C3Track A of the refrigerant pressure sensor
Injection computer, brown 48-track connector
B, track F1Track C of the refrigerant pressure sensor
Injection computer, brown 48-track connector
B, track F3Track B of the refrigerant pressure sensor
If these connections are not faulty, replace the refrigerant pressure sensor.
If there is no difference, the refrigerant pressure sensor is correct: go to step 2.
Step 2
– Perform fault finding on the air conditioning.
*Note:
The diagnostic tool displays the absolute pressure, the charging station high pressure gauge displays the relative
pressure.
The normal difference between the two is equal to atmospheric pressure, i.e. ~1,000mbar.
AFTER REPAIRRepeat the conformity check from the start.
EDC16_V44_PR037/EDC16_V48_PR037/EDC16_V4C_PR037
Page 188 of 236
13B - 188
DIESEL INJECTION
Fault finding - Command summary table13B
V10 MR-372-J84-13B150$705.mif
EDC16 INJECTION
Program No.: C1
Vdiag No.: 44, 48 and 4CDIESEL INJECTION
Fault finding - Command summary table
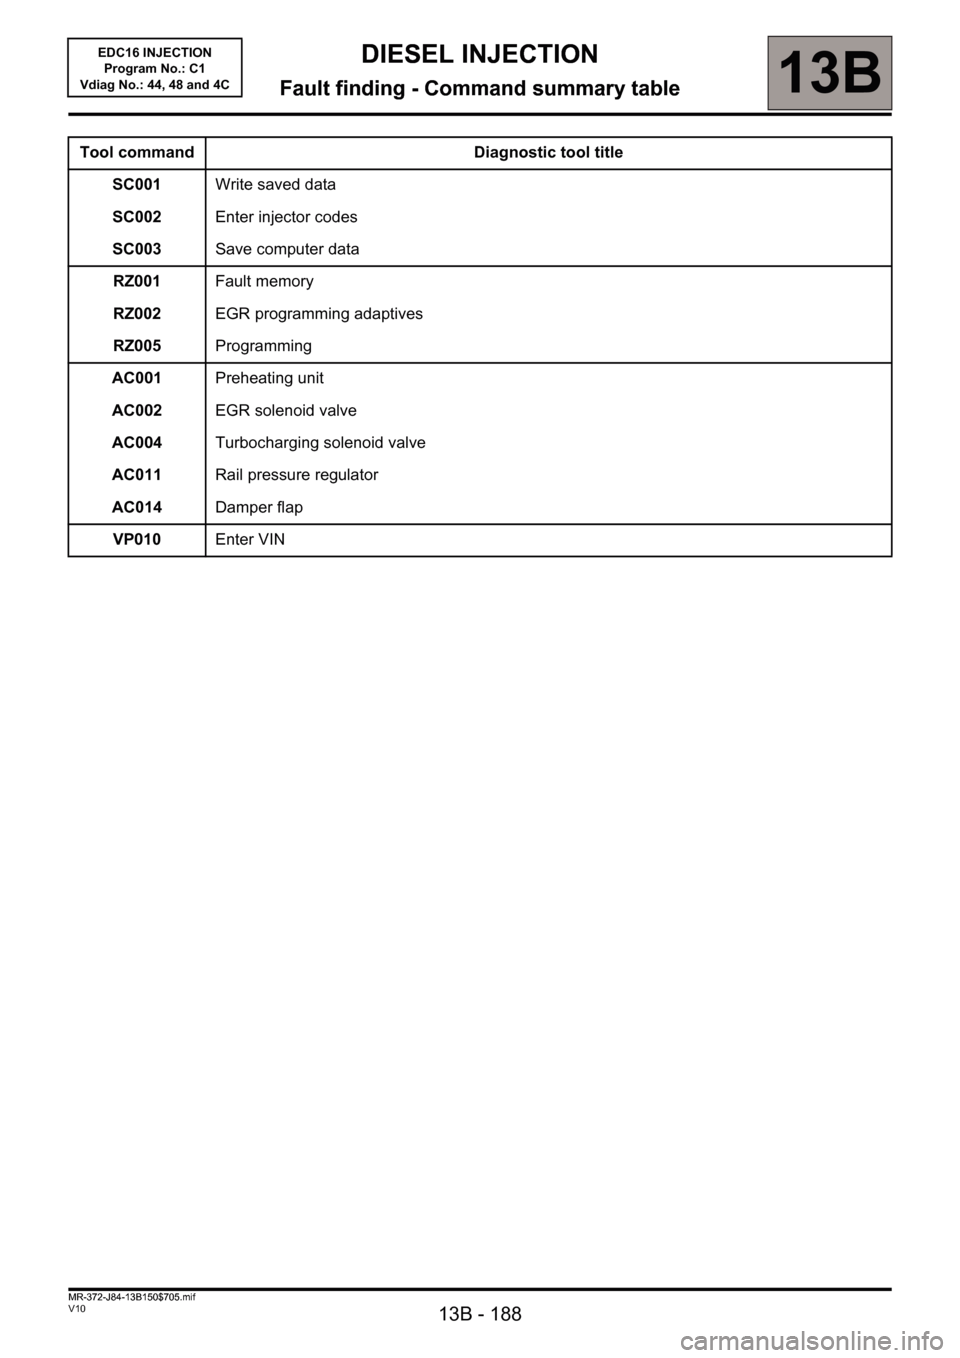
Tool command Diagnostic tool title
SC001Write saved data
SC002Enter injector codes
SC003Save computer data
RZ001Fault memory
RZ002EGR programming adaptives
RZ005Programming
AC001Preheating unit
AC002EGR solenoid valve
AC004Turbocharging solenoid valve
AC011Rail pressure regulator
AC014Damper flap
VP010Enter VIN
MR-372-J84-13B150$705.mif
Page 197 of 236
13B - 197
DIESEL INJECTION
Fault finding - Interpretation of commands13B
V10 MR-372-J84-13B150$752.mif
EDC16 INJECTION
Program No.: C1
Vdiag No: 44, 48 and 4C
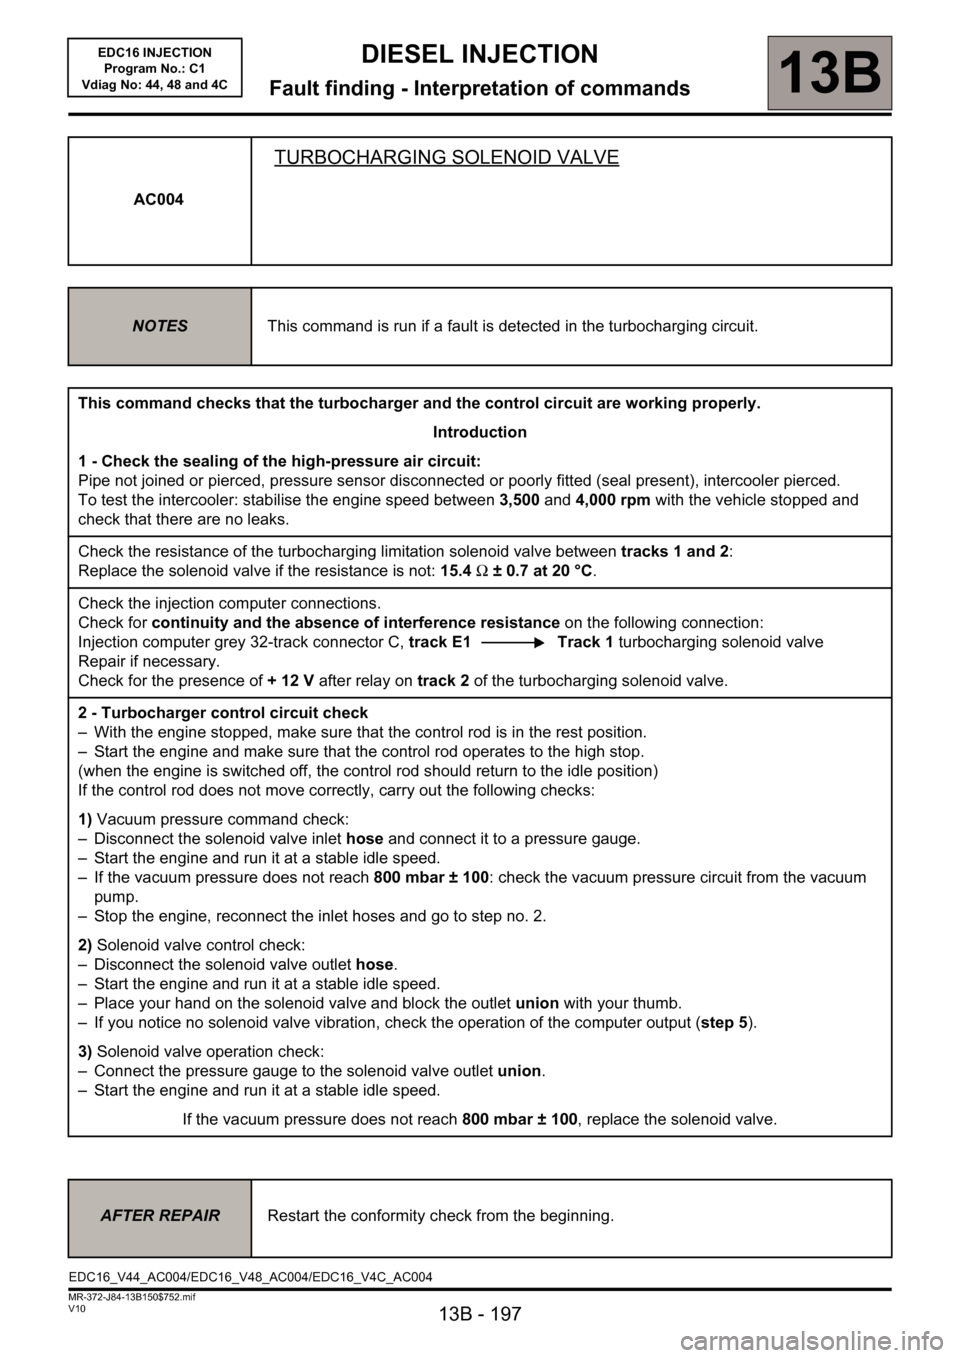
AC004
TURBOCHARGING SOLENOID VALVE
NOTESThis command is run if a fault is detected in the turbocharging circuit.
This command checks that the turbocharger and the control circuit are working properly.
Introduction
1 - Check the sealing of the high-pressure air circuit:
Pipe not joined or pierced, pressure sensor disconnected or poorly fitted (seal present), intercooler pierced.
To test the intercooler: stabilise the engine speed between 3,500 and 4,000 rpm with the vehicle stopped and
check that there are no leaks.
Check the resistance of the turbocharging limitation solenoid valve between tracks 1 and 2:
Replace the solenoid valve if the resistance is not: 15.4 Ω ± 0.7 at 20 °C.
Check the injection computer connections.
Check for continuity and the absence of interference resistance on the following connection:
Injection computer grey 32-track connector C, track E1 Track 1 turbocharging solenoid valve
Repair if necessary.
Check for the presence of +12V after relay on track 2 of the turbocharging solenoid valve.
2 - Turbocharger control circuit check
– With the engine stopped, make sure that the control rod is in the rest position.
– Start the engine and make sure that the control rod operates to the high stop.
(when the engine is switched off, the control rod should return to the idle position)
If the control rod does not move correctly, carry out the following checks:
1) Vacuum pressure command check:
– Disconnect the solenoid valve inlet hose and connect it to a pressure gauge.
– Start the engine and run it at a stable idle speed.
– If the vacuum pressure does not reach 800 mbar ± 100: check the vacuum pressure circuit from the vacuum
pump.
– Stop the engine, reconnect the inlet hoses and go to step no. 2.
2) Solenoid valve control check:
– Disconnect the solenoid valve outlet hose.
– Start the engine and run it at a stable idle speed.
– Place your hand on the solenoid valve and block the outlet union with your thumb.
– If you notice no solenoid valve vibration, check the operation of the computer output (step 5).
3) Solenoid valve operation check:
– Connect the pressure gauge to the solenoid valve outlet union.
– Start the engine and run it at a stable idle speed.
If the vacuum pressure does not reach 800 mbar ± 100, replace the solenoid valve.
AFTER REPAIRRestart the conformity check from the beginning.
EDC16_V44_AC004/EDC16_V48_AC004/EDC16_V4C_AC004
Page 198 of 236
13B - 198
DIESEL INJECTION
Fault finding - Interpretation of commands13B
V10 MR-372-J84-13B150$752.mif
EDC16 INJECTION
Program No.: C1
Vdiag No: 44, 48 and 4C
* Opening Cyclic Ratio. AC004
CONTINUED
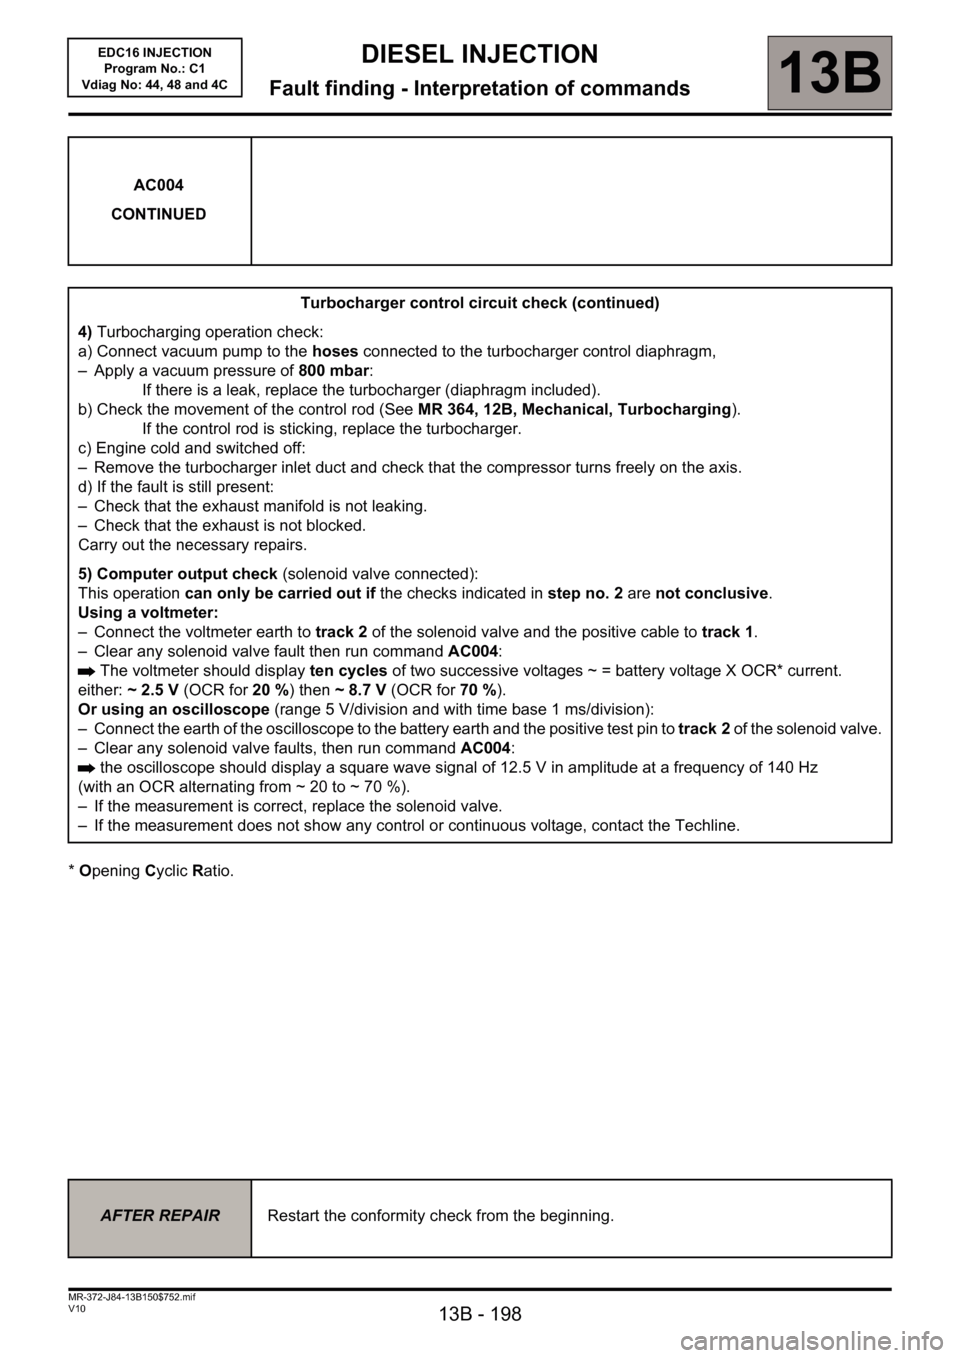
Turbocharger control circuit check (continued)
4) Turbocharging operation check:
a) Connect vacuum pump to the hoses connected to the turbocharger control diaphragm,
– Apply a vacuum pressure of 800 mbar:
If there is a leak, replace the turbocharger (diaphragm included).
b) Check the movement of the control rod (See MR 364, 12B, Mechanical, Turbocharging).
If the control rod is sticking, replace the turbocharger.
c) Engine cold and switched off:
– Remove the turbocharger inlet duct and check that the compressor turns freely on the axis.
d) If the fault is still present:
– Check that the exhaust manifold is not leaking.
– Check that the exhaust is not blocked.
Carry out the necessary repairs.
5) Computer output check (solenoid valve connected):
This operation can only be carried out if the checks indicated in step no. 2 are not conclusive.
Using a voltmeter:
– Connect the voltmeter earth to track 2 of the solenoid valve and the positive cable to track 1.
– Clear any solenoid valve fault then run command AC004:
The voltmeter should display ten cycles of two successive voltages ~ =battery voltage X OCR* current.
either: ~2.5V (OCR for 20 %) then ~8.7V (OCR for 70 %).
Or using an oscilloscope (range 5 V/division and with time base 1 ms/division):
– Connect the earth of the oscilloscope to the battery earth and the positive test pin to track 2 of the solenoid valve.
– Clear any solenoid valve faults, then run command AC004:
the oscilloscope should display a square wave signal of 12.5 V in amplitude at a frequency of 140 Hz
(with an OCR alternating from ~ 20 to ~ 70 %).
– If the measurement is correct, replace the solenoid valve.
– If the measurement does not show any control or continuous voltage, contact the Techline.
AFTER REPAIRRestart the conformity check from the beginning.
Page 208 of 236
13B-208
MR-372-J84-13B150$846.mif
V10
DIESEL INJECTION
Fault finding - Fault finding chart13B
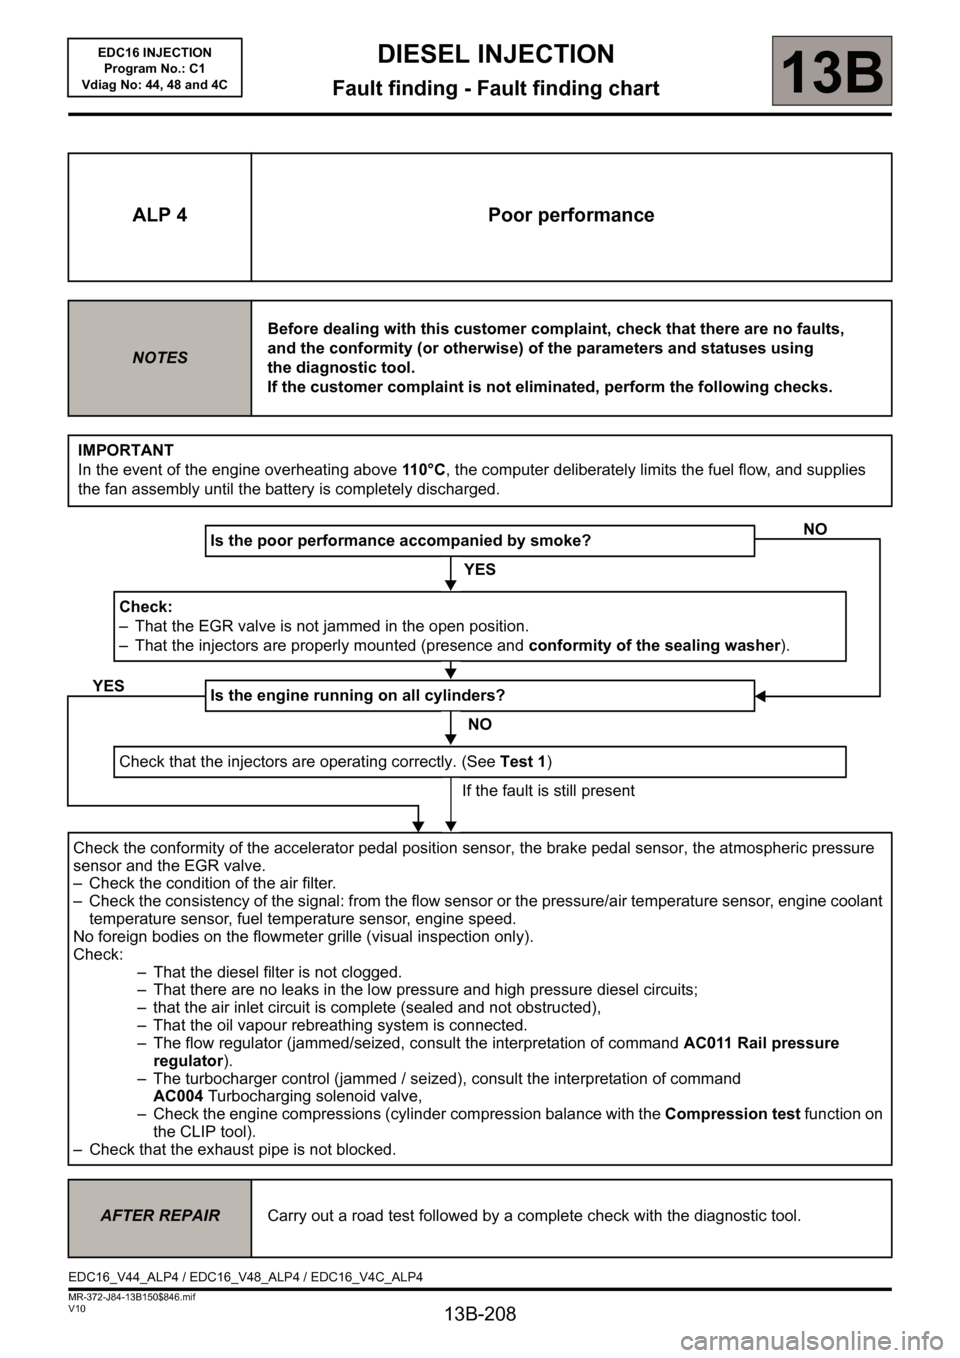
ALP 4 Poor performance
NOTESBefore dealing with this customer complaint, check that there are no faults,
and the conformity (or otherwise) of the parameters and statuses using
the diagnostic tool.
If the customer complaint is not eliminated, perform the following checks.
IMPORTANT
In the event of the engine overheating above 11 0 ° C, the computer deliberately limits the fuel flow, and supplies
the fan assembly until the battery is completely discharged.
Is the poor performance accompanied by smoke?
YES
Check:
– That the EGR valve is not jammed in the open position.
– That the injectors are properly mounted (presence and conformity of the sealing washer).
Is the engine running on all cylinders?
NO
Check that the injectors are operating correctly. (See Test 1)
If the fault is still present
Check the conformity of the accelerator pedal position sensor, the brake pedal sensor, the atmospheric pressure
sensor and the EGR valve.
– Check the condition of the air filter.
– Check the consistency of the signal: from the flow sensor or the pressure/air temperature sensor, engine coolant
temperature sensor, fuel temperature sensor, engine speed.
No foreign bodies on the flowmeter grille (visual inspection only).
Check:
– That the diesel filter is not clogged.
– That there are no leaks in the low pressure and high pressure diesel circuits;
– that the air inlet circuit is complete (sealed and not obstructed),
– That the oil vapour rebreathing system is connected.
– The flow regulator (jammed/seized, consult the interpretation of command AC011 Rail pressure
regulator).
– The turbocharger control (jammed / seized), consult the interpretation of command
AC004Turbocharging solenoid valve,
– Check the engine compressions (cylinder compression balance with the Compression test function on
the CLIP tool).
– Check that the exhaust pipe is not blocked.
NO
YES
AFTER REPAIRCarry out a road test followed by a complete check with the diagnostic tool.
EDC16_V44_ALP4 / EDC16_V48_ALP4 / EDC16_V4C_ALP4
EDC16 INJECTION
Program No.: C1
Vdiag No: 44, 48 and 4C
Page 210 of 236
13B-210
MR-372-J84-13B150$846.mif
V10
DIESEL INJECTION
Fault finding - Fault finding chart13B
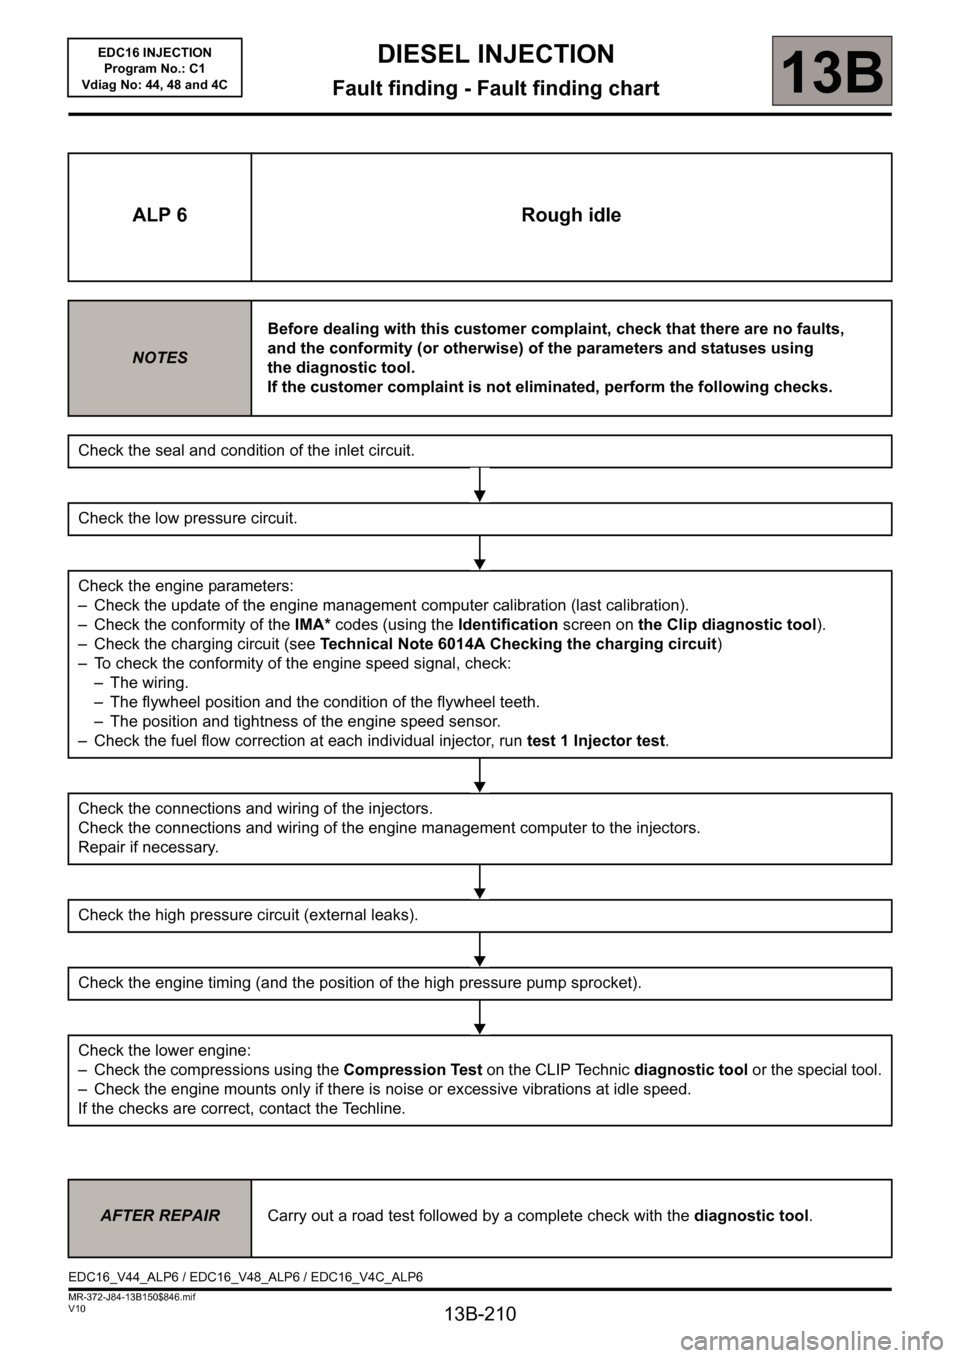
ALP 6 Rough idle
NOTESBefore dealing with this customer complaint, check that there are no faults,
and the conformity (or otherwise) of the parameters and statuses using
the diagnostic tool.
If the customer complaint is not eliminated, perform the following checks.
Check the seal and condition of the inlet circuit.
Check the low pressure circuit.
Check the engine parameters:
– Check the update of the engine management computer calibration (last calibration).
– Check the conformity of the IMA* codes (using the Identification screen on the Clip diagnostic tool).
– Check the charging circuit (see Technical Note 6014A Checking the charging circuit)
– To check the conformity of the engine speed signal, check:
– The wiring.
– The flywheel position and the condition of the flywheel teeth.
– The position and tightness of the engine speed sensor.
– Check the fuel flow correction at each individual injector, run test 1 Injector test.
Check the connections and wiring of the injectors.
Check the connections and wiring of the engine management computer to the injectors.
Repair if necessary.
Check the high pressure circuit (external leaks).
Check the engine timing (and the position of the high pressure pump sprocket).
Check the lower engine:
– Check the compressions using the Compression Test on the CLIP Technic diagnostic tool or the special tool.
– Check the engine mounts only if there is noise or excessive vibrations at idle speed.
If the checks are correct, contact the Techline.
AFTER REPAIRCarry out a road test followed by a complete check with the diagnostic tool.
EDC16_V44_ALP6 / EDC16_V48_ALP6 / EDC16_V4C_ALP6EDC16 INJECTION
Program No.: C1
Vdiag No: 44, 48 and 4C
Page 212 of 236
13B-212
MR-372-J84-13B150$846.mif
V10
DIESEL INJECTION
Fault finding - Fault finding chart13B
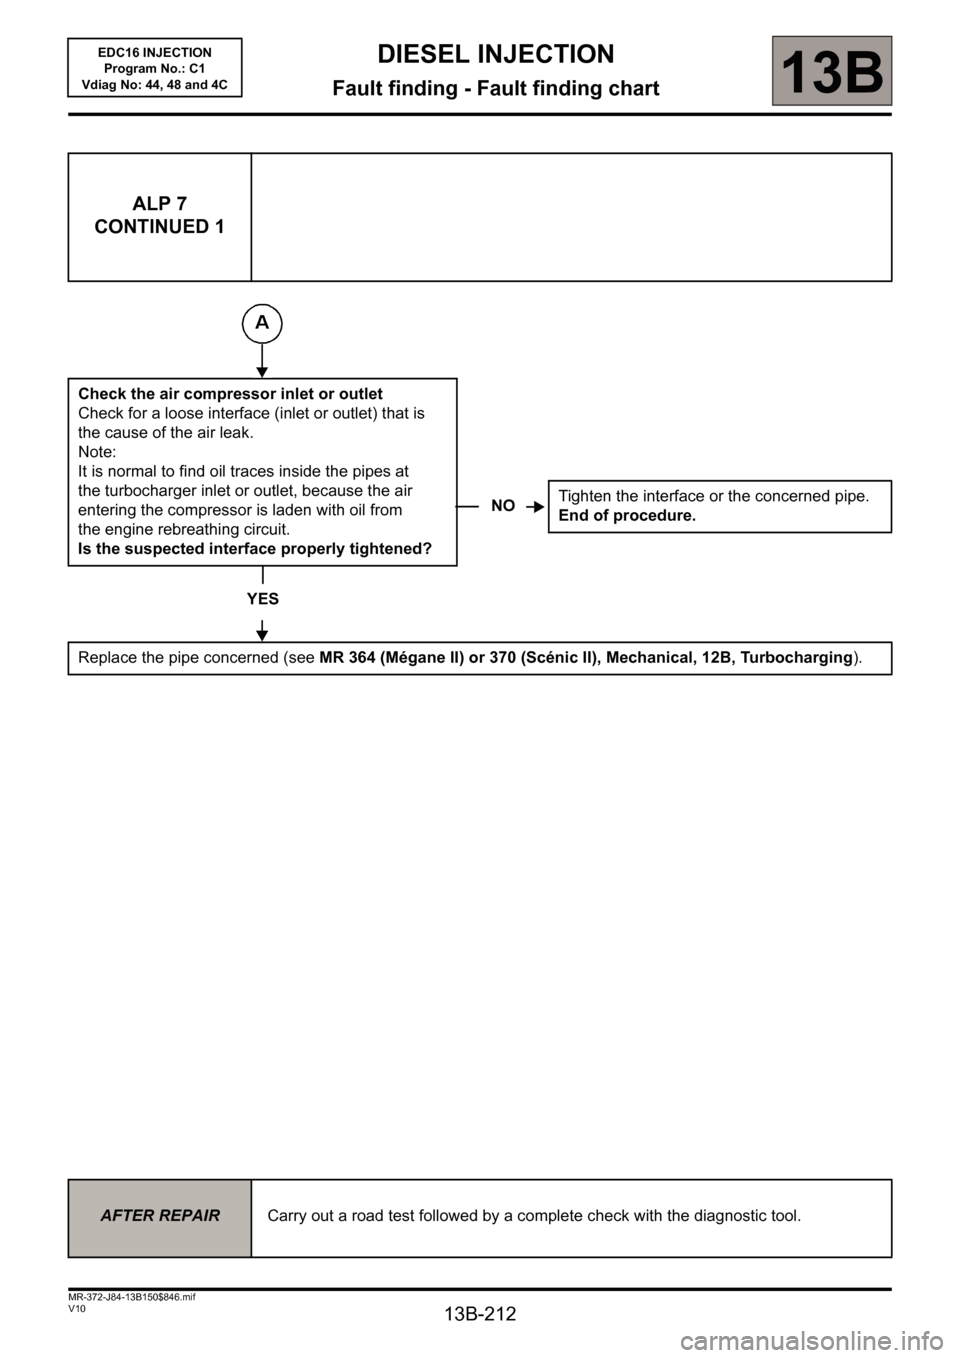
ALP 7
CONTINUED 1
Check the air compressor inlet or outlet
Check for a loose interface (inlet or outlet) that is
the cause of the air leak.
Note:
It is normal to find oil traces inside the pipes at
the turbocharger inlet or outlet, because the air
entering the compressor is laden with oil from
the engine rebreathing circuit.
Is the suspected interface properly tightened?
YES
Replace the pipe concerned (see MR 364 (Mégane II) or 370 (Scénic II), Mechanical, 12B, Turbocharging).
NOTighten the interface or the concerned pipe.
End of procedure.
AFTER REPAIRCarry out a road test followed by a complete check with the diagnostic tool.
EDC16 INJECTION
Program No.: C1
Vdiag No: 44, 48 and 4C