clutch RENAULT SCENIC 2011 J95 / 3.G Engine And Peripherals Siemens Injection User Guide
[x] Cancel search | Manufacturer: RENAULT, Model Year: 2011, Model line: SCENIC, Model: RENAULT SCENIC 2011 J95 / 3.GPages: 329, PDF Size: 1.71 MB
Page 164 of 329
13B-164
MR-372-J84-13B050$624.mif
V17
Siemens Injection
SID301 and 304
Vdiag No.: 44-45-48-49-4D-4C
Program No.: B1 and B2DIESEL INJECTION
Fault finding – Interpretation of statuses13B
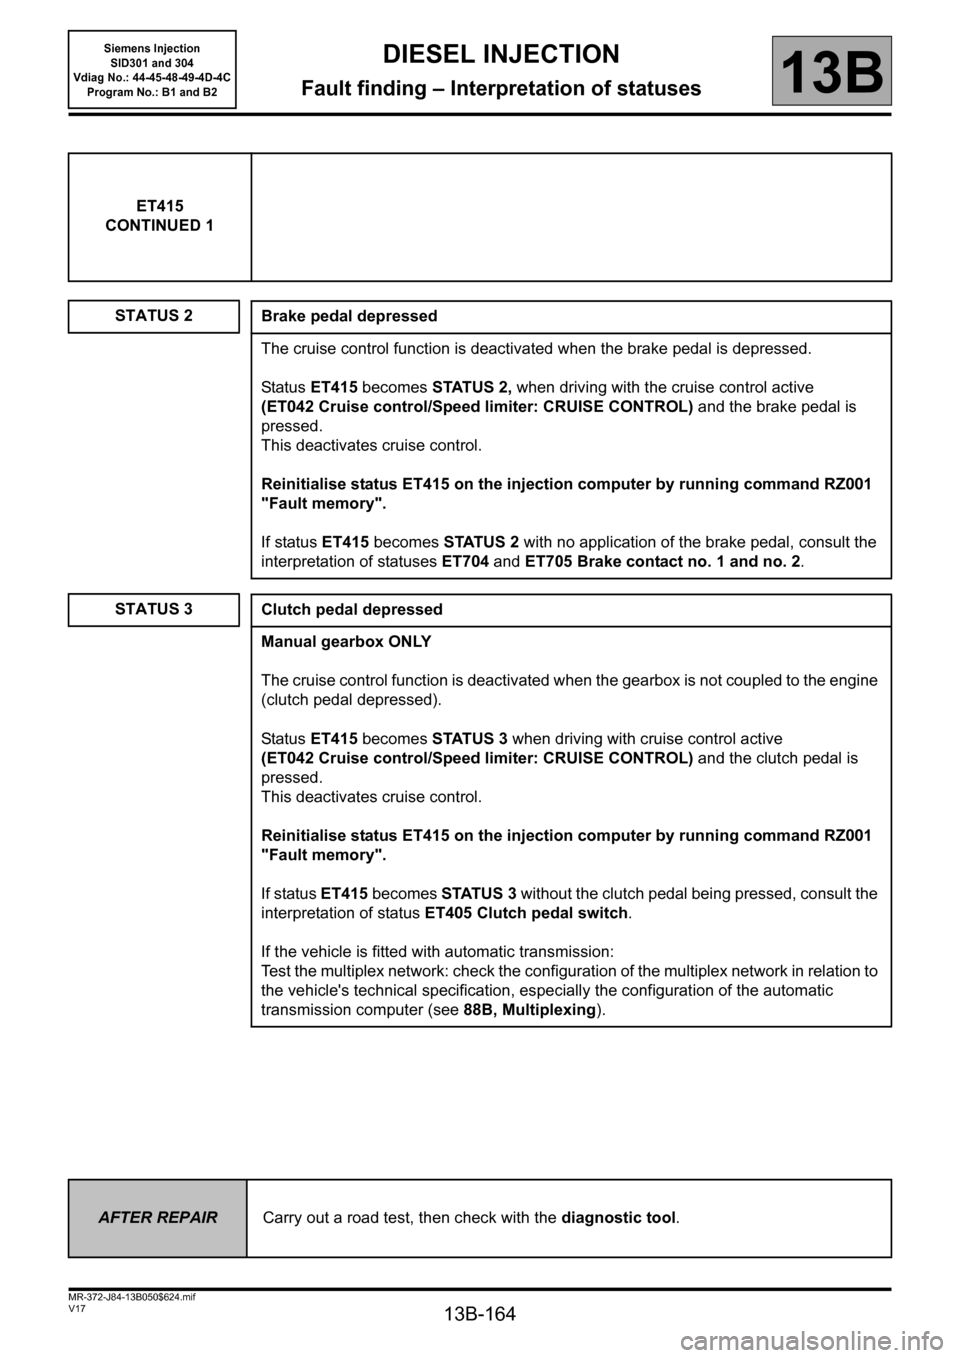
ET415
CONTINUED 1
STATUS 2
Brake pedal depressed
The cruise control function is deactivated when the brake pedal is depressed.
Status ET415 becomes STATUS 2, when driving with the cruise control active
(ET042 Cruise control/Speed limiter: CRUISE CONTROL) and the brake pedal is
pressed.
This deactivates cruise control.
Reinitialise status ET415 on the injection computer by running command RZ001
"Fault memory".
If status ET415 becomes STATUS 2 with no application of the brake pedal, consult the
interpretation of statuses ET704 and ET705 Brake contact no. 1 and no. 2.
STATUS 3Clutch pedal depressed
Manual gearbox ONLY
The cruise control function is deactivated when the gearbox is not coupled to the engine
(clutch pedal depressed).
Status ET415 becomes STATUS 3 when driving with cruise control active
(ET042 Cruise control/Speed limiter: CRUISE CONTROL) and the clutch pedal is
pressed.
This deactivates cruise control.
Reinitialise status ET415 on the injection computer by running command RZ001
"Fault memory".
If status ET415 becomes STATUS 3 without the clutch pedal being pressed, consult the
interpretation of status ET405 Clutch pedal switch.
If the vehicle is fitted with automatic transmission:
Test the multiplex network: check the configuration of the multiplex network in relation to
the vehicle's technical specification, especially the configuration of the automatic
transmission computer (see 88B, Multiplexing).
AFTER REPAIRCarry out a road test, then check with the diagnostic tool.
Page 166 of 329
13B-166
MR-372-J84-13B050$624.mif
V17
Siemens Injection
SID301 and 304
Vdiag No.: 44-45-48-49-4D-4C
Program No.: B1 and B2DIESEL INJECTION
Fault finding – Interpretation of statuses13B
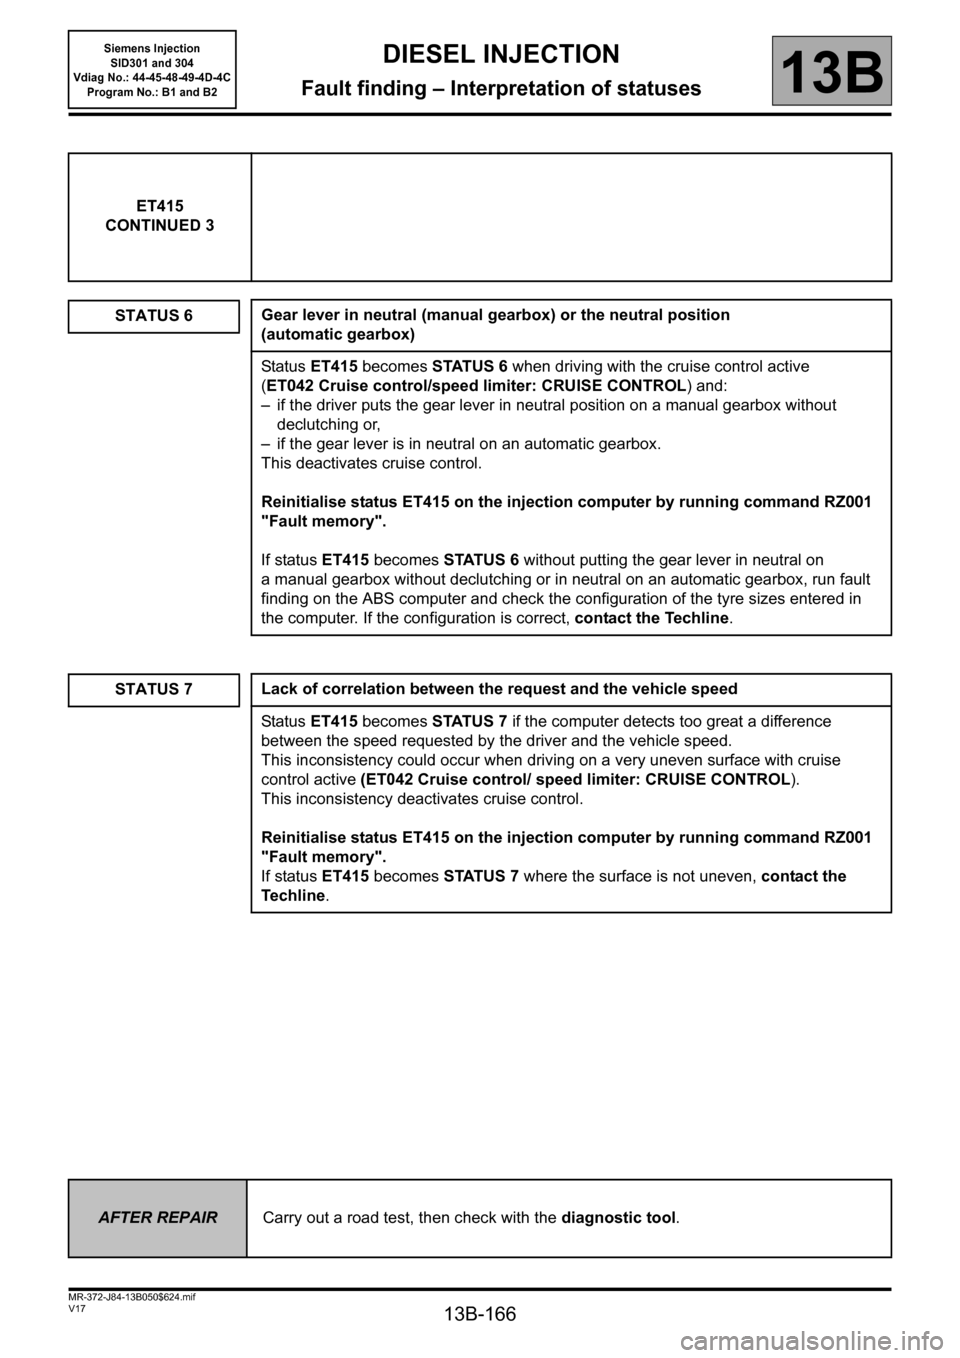
ET415
CONTINUED 3
STATUS 6
Gear lever in neutral (manual gearbox) or the neutral position
(automatic gearbox)
Status ET415 becomes STATUS 6 when driving with the cruise control active
(ET042 Cruise control/speed limiter: CRUISE CONTROL) and:
– if the driver puts the gear lever in neutral position on a manual gearbox without
declutching or,
– if the gear lever is in neutral on an automatic gearbox.
This deactivates cruise control.
Reinitialise status ET415 on the injection computer by running command RZ001
"Fault memory".
If status ET415 becomes STATUS 6 without putting the gear lever in neutral on
a manual gearbox without declutching or in neutral on an automatic gearbox, run fault
finding on the ABS computer and check the configuration of the tyre sizes entered in
the computer. If the configuration is correct, contact the Techline.
STATUS 7Lack of correlation between the request and the vehicle speed
Status ET415 becomes STATUS 7 if the computer detects too great a difference
between the speed requested by the driver and the vehicle speed.
This inconsistency could occur when driving on a very uneven surface with cruise
control active (ET042 Cruise control/ speed limiter: CRUISE CONTROL).
This inconsistency deactivates cruise control.
Reinitialise status ET415 on the injection computer by running command RZ001
"Fault memory".
If status ET415 becomes STATUS 7 where the surface is not uneven, contact the
Techline.
AFTER REPAIRCarry out a road test, then check with the diagnostic tool.
Page 262 of 329
13B-262
MR-372-J84-13B050$819.mif
V17
DIESEL INJECTION
Fault finding – Interpretation of commands
Siemens Injection
SID301 and 304
Vdiag No.: 44-45-48-49-4D-4C
Program No.: B1 and B2
13B
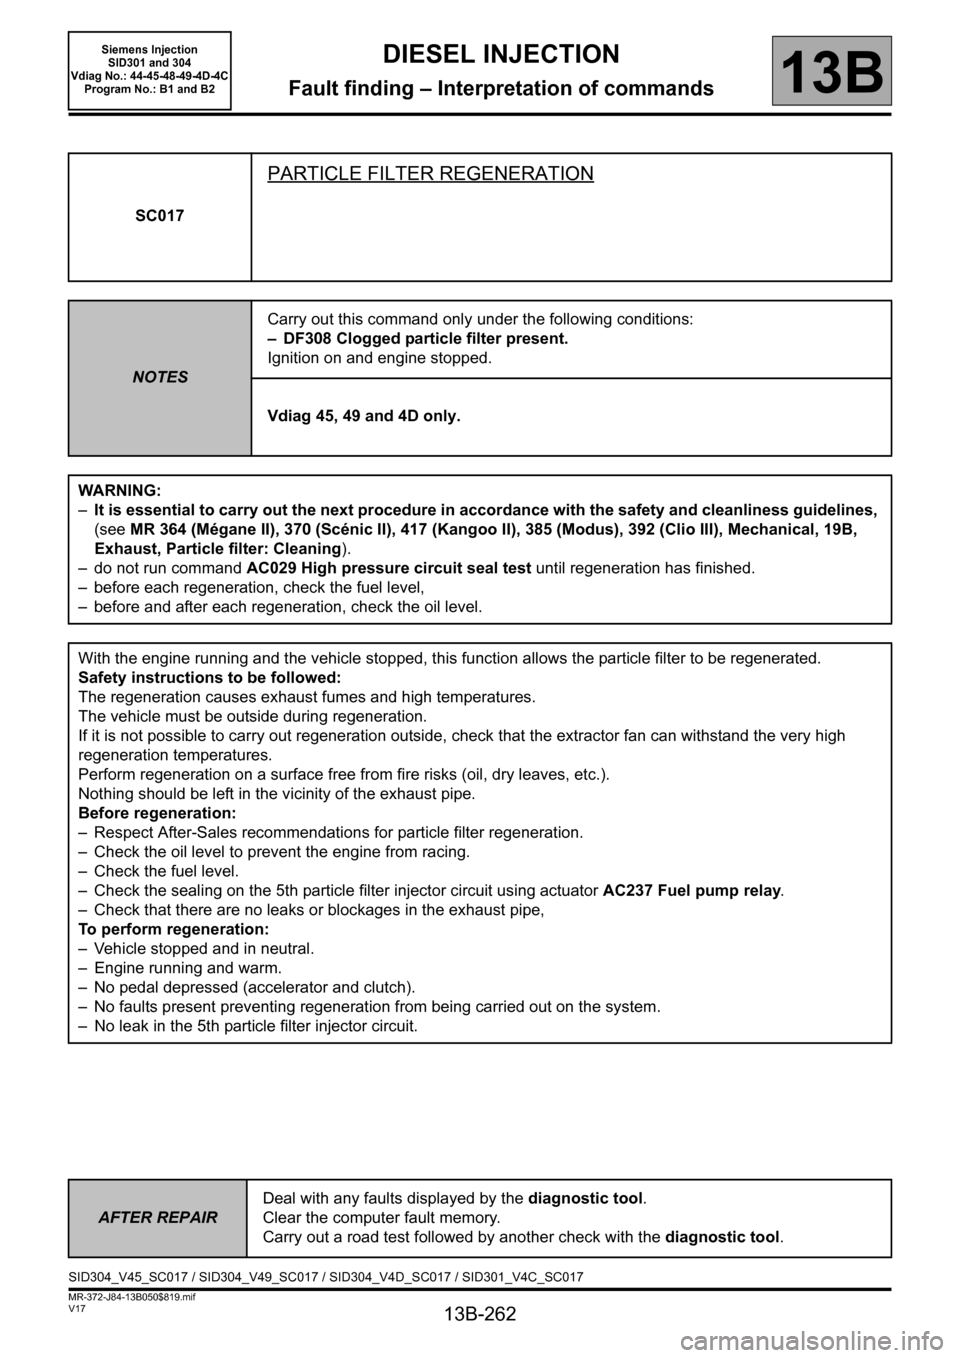
SC017
PARTICLE FILTER REGENERATION
NOTESCarry out this command only under the following conditions:
– DF308 Clogged particle filter present.
Ignition on and engine stopped.
Vdiag 45, 49 and 4D only.
WARNING:
–It is essential to carry out the next procedure in accordance with the safety and cleanliness guidelines,
(see MR 364 (Mégane II), 370 (Scénic II), 417 (Kangoo II), 385 (Modus), 392 (Clio III), Mechanical, 19B,
Exhaust, Particle filter: Cleaning).
– do not run command AC029 High pressure circuit seal test until regeneration has finished.
– before each regeneration, check the fuel level,
– before and after each regeneration, check the oil level.
With the engine running and the vehicle stopped, this function allows the particle filter to be regenerated.
Safety instructions to be followed:
The regeneration causes exhaust fumes and high temperatures.
The vehicle must be outside during regeneration.
If it is not possible to carry out regeneration outside, check that the extractor fan can withstand the very high
regeneration temperatures.
Perform regeneration on a surface free from fire risks (oil, dry leaves, etc.).
Nothing should be left in the vicinity of the exhaust pipe.
Before regeneration:
– Respect After-Sales recommendations for particle filter regeneration.
– Check the oil level to prevent the engine from racing.
– Check the fuel level.
– Check the sealing on the 5th particle filter injector circuit using actuator AC237 Fuel pump relay.
– Check that there are no leaks or blockages in the exhaust pipe,
To perform regeneration:
– Vehicle stopped and in neutral.
– Engine running and warm.
– No pedal depressed (accelerator and clutch).
– No faults present preventing regeneration from being carried out on the system.
– No leak in the 5th particle filter injector circuit.
AFTER REPAIRDeal with any faults displayed by the diagnostic tool.
Clear the computer fault memory.
Carry out a road test followed by another check with the diagnostic tool.
SID304_V45_SC017 / SID304_V49_SC017 / SID304_V4D_SC017 / SID301_V4C_SC017
Page 263 of 329
13B-263
MR-372-J84-13B050$819.mif
V17
DIESEL INJECTION
Fault finding – Interpretation of commands
Siemens Injection
SID301 and 304
Vdiag No.: 44-45-48-49-4D-4C
Program No.: B1 and B2
13B
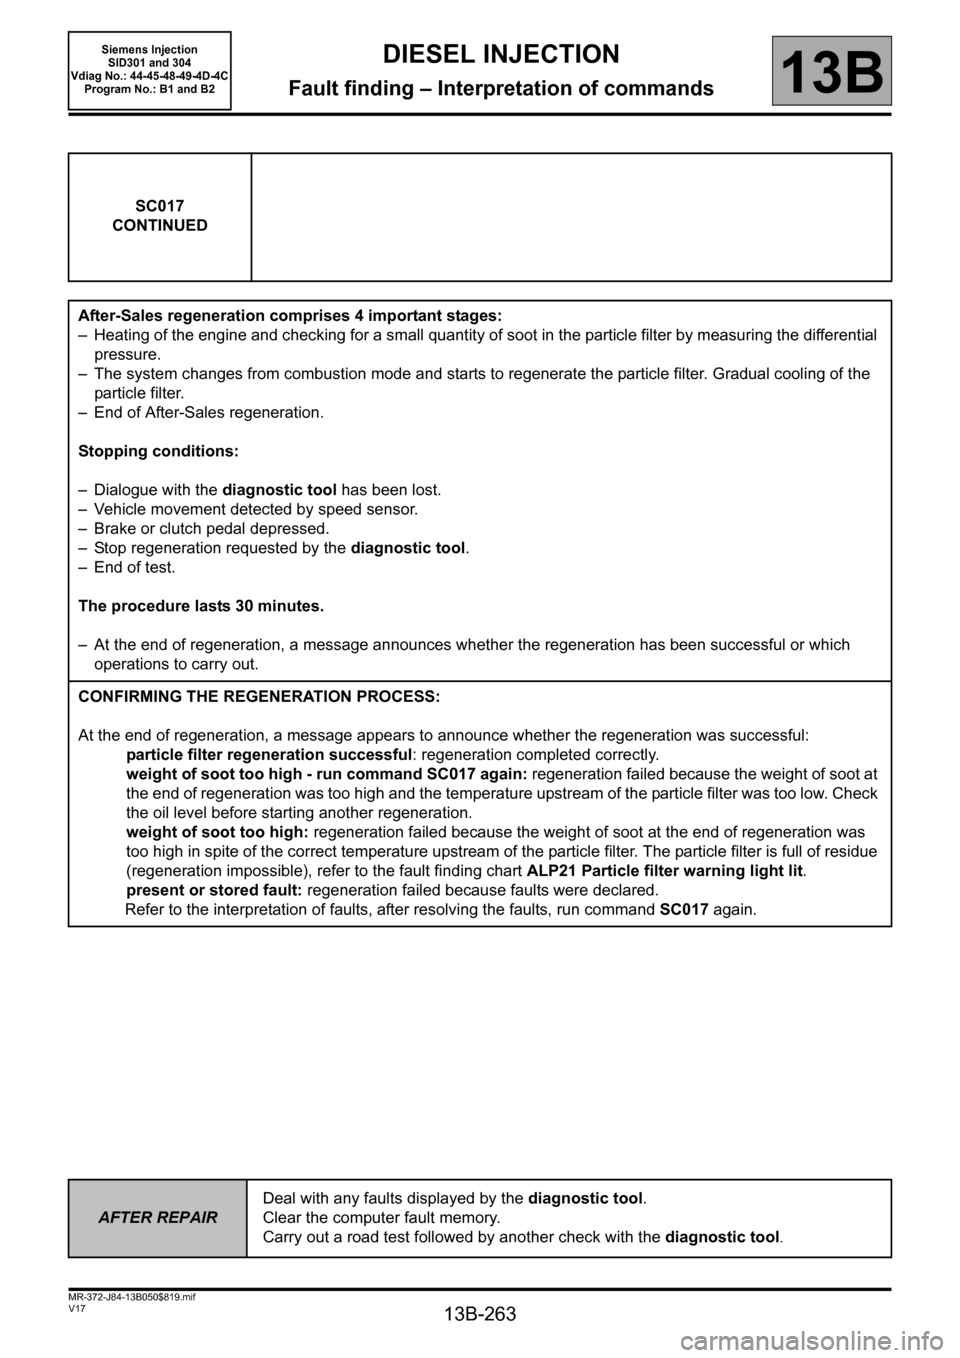
SC017
CONTINUED
After-Sales regeneration comprises 4 important stages:
– Heating of the engine and checking for a small quantity of soot in the particle filter by measuring the differential
pressure.
– The system changes from combustion mode and starts to regenerate the particle filter. Gradual cooling of the
particle filter.
– End of After-Sales regeneration.
Stopping conditions:
– Dialogue with the diagnostic tool has been lost.
– Vehicle movement detected by speed sensor.
– Brake or clutch pedal depressed.
– Stop regeneration requested by the diagnostic tool.
– End of test.
The procedure lasts 30 minutes.
– At the end of regeneration, a message announces whether the regeneration has been successful or which
operations to carry out.
CONFIRMING THE REGENERATION PROCESS:
At the end of regeneration, a message appears to announce whether the regeneration was successful:
particle filter regeneration successful: regeneration completed correctly.
weight of soot too high - run command SC017 again: regeneration failed because the weight of soot at
the end of regeneration was too high and the temperature upstream of the particle filter was too low. Check
the oil level before starting another regeneration.
weight of soot too high: regeneration failed because the weight of soot at the end of regeneration was
too high in spite of the correct temperature upstream of the particle filter. The particle filter is full of residue
(regeneration impossible), refer to the fault finding chart ALP21 Particle filter warning light lit.
present or stored fault: regeneration failed because faults were declared.
Refer to the interpretation of faults, after resolving the faults, run command SC017 again.
AFTER REPAIRDeal with any faults displayed by the diagnostic tool.
Clear the computer fault memory.
Carry out a road test followed by another check with the diagnostic tool
.
Page 281 of 329
13B-281
MR-372-J84-13B050$897.mif
V17
DIESEL INJECTION
Fault finding – Fault Finding Chart
Siemens Injection
SID301 and 304
Vdiag No.: 44-45-48-49-4D-4C
Program No.: B1 and B2
13B
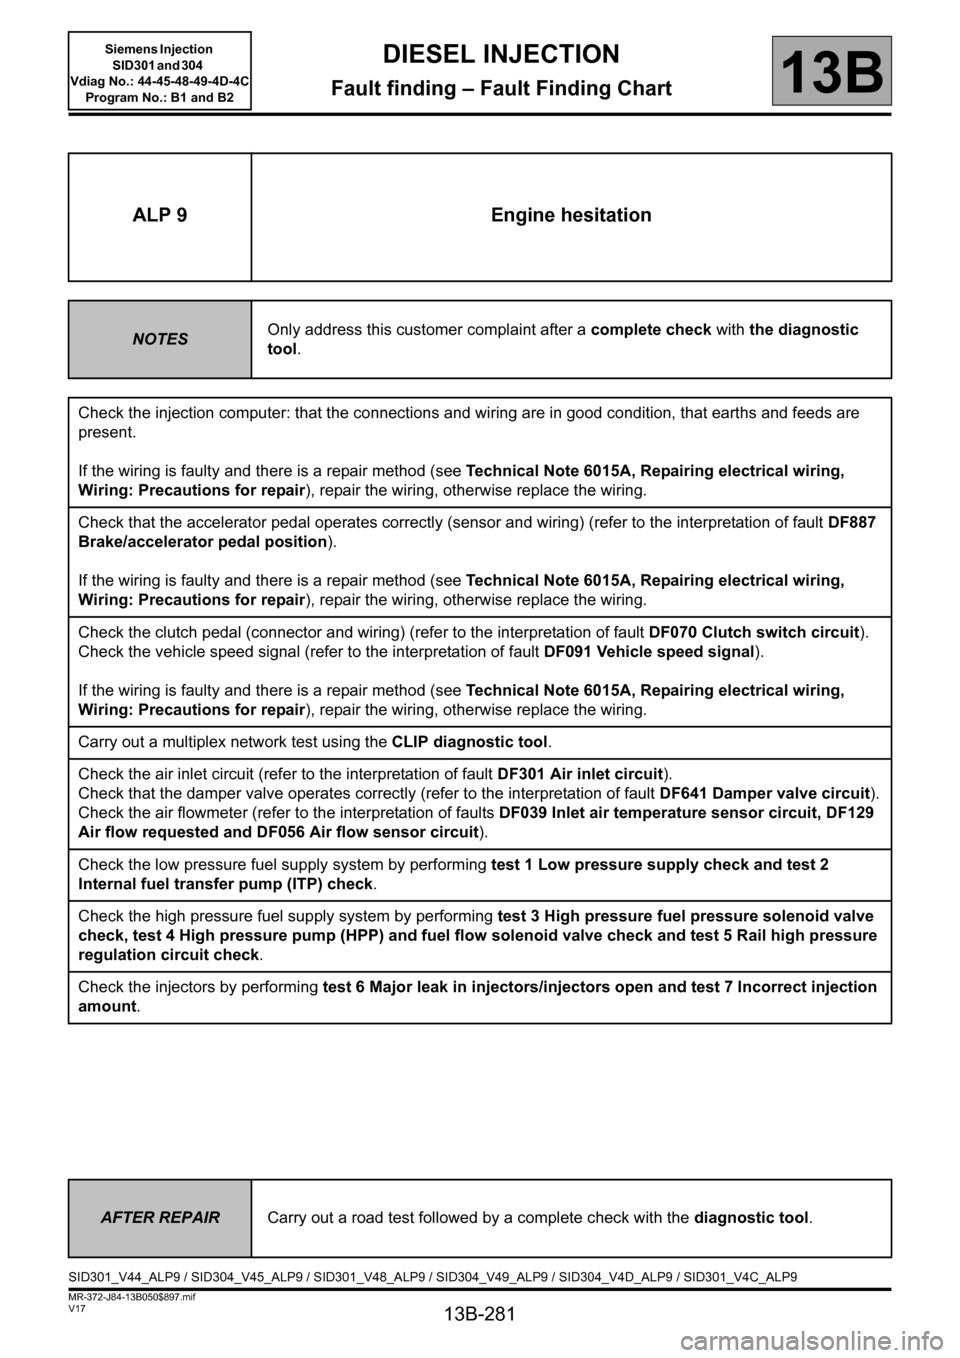
ALP 9 Engine hesitation
NOTESOnly address this customer complaint after a complete check with the diagnostic
tool.
Check the injection computer: that the connections and wiring are in good condition, that earths and feeds are
present.
If the wiring is faulty and there is a repair method (see Technical Note 6015A, Repairing electrical wiring,
Wiring: Precautions for repair), repair the wiring, otherwise replace the wiring.
Check that the accelerator pedal operates correctly (sensor and wiring) (refer to the interpretation of fault DF887
Brake/accelerator pedal position).
If the wiring is faulty and there is a repair method (see Technical Note 6015A, Repairing electrical wiring,
Wiring: Precautions for repair), repair the wiring, otherwise replace the wiring.
Check the clutch pedal (connector and wiring) (refer to the interpretation of fault DF070 Clutch switch circuit).
Check the vehicle speed signal (refer to the interpretation of fault DF091 Vehicle speed signal).
If the wiring is faulty and there is a repair method (see Technical Note 6015A, Repairing electrical wiring,
Wiring: Precautions for repair), repair the wiring, otherwise replace the wiring.
Carry out a multiplex network test using the CLIP diagnostic tool.
Check the air inlet circuit (refer to the interpretation of fault DF301 Air inlet circuit).
Check that the damper valve operates correctly (refer to the interpretation of fault DF641 Damper valve circuit).
Check the air flowmeter (refer to the interpretation of faults DF039 Inlet air temperature sensor circuit, DF129
Air flow requested and DF056 Air flow sensor circuit).
Check the low pressure fuel supply system by performing test 1 Low pressure supply check and test 2
Internal fuel transfer pump (ITP) check.
Check the high pressure fuel supply system by performing test 3 High pressure fuel pressure solenoid valve
check, test 4 High pressure pump (HPP) and fuel flow solenoid valve check and test 5 Rail high pressure
regulation circuit check.
Check the injectors by performing test 6 Major leak in injectors/injectors open and test 7 Incorrect injection
amount.
AFTER REPAIRCarry out a road test followed by a complete check with the diagnostic tool.
SID301_V44_ALP9 / SID304_V45_ALP9 / SID301_V48_ALP9 / SID304_V49_ALP9 / SID304_V4D_ALP9 / SID301_V4C_ALP9
Page 282 of 329
13B-282
MR-372-J84-13B050$897.mif
V17
DIESEL INJECTION
Fault finding – Fault Finding Chart
Siemens Injection
SID301 and 304
Vdiag No.: 44-45-48-49-4D-4C
Program No.: B1 and B2
13B
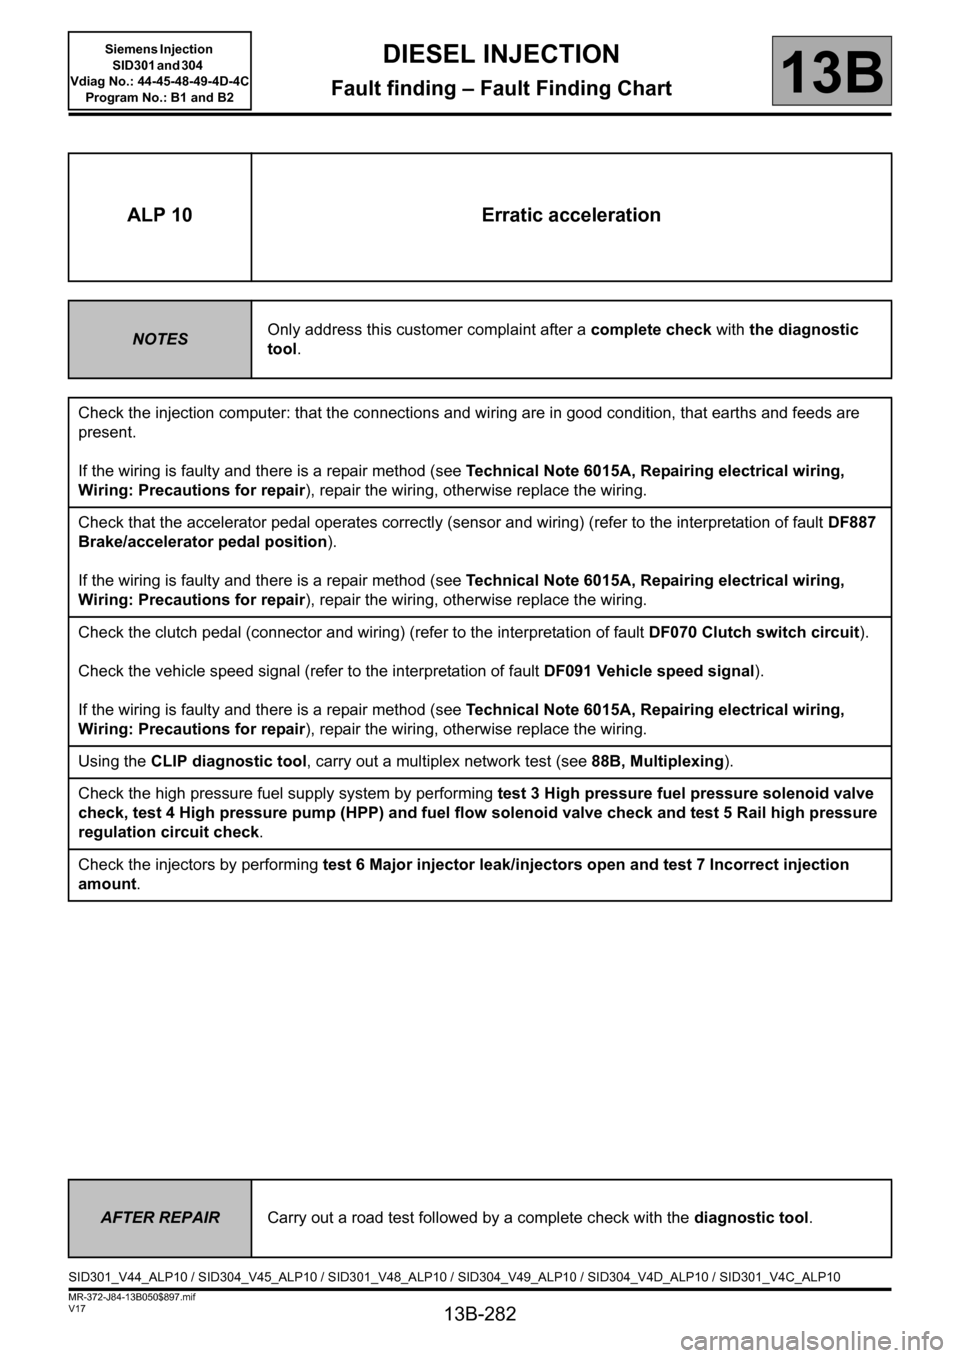
ALP 10 Erratic acceleration
NOTESOnly address this customer complaint after a complete check with the diagnostic
tool.
Check the injection computer: that the connections and wiring are in good condition, that earths and feeds are
present.
If the wiring is faulty and there is a repair method (see Technical Note 6015A, Repairing electrical wiring,
Wiring: Precautions for repair), repair the wiring, otherwise replace the wiring.
Check that the accelerator pedal operates correctly (sensor and wiring) (refer to the interpretation of fault DF887
Brake/accelerator pedal position).
If the wiring is faulty and there is a repair method (see Technical Note 6015A, Repairing electrical wiring,
Wiring: Precautions for repair), repair the wiring, otherwise replace the wiring.
Check the clutch pedal (connector and wiring) (refer to the interpretation of fault DF070 Clutch switch circuit).
Check the vehicle speed signal (refer to the interpretation of fault DF091 Vehicle speed signal).
If the wiring is faulty and there is a repair method (see Technical Note 6015A, Repairing electrical wiring,
Wiring: Precautions for repair), repair the wiring, otherwise replace the wiring.
Using the CLIP diagnostic tool, carry out a multiplex network test (see 88B, Multiplexing).
Check the high pressure fuel supply system by performing test 3 High pressure fuel pressure solenoid valve
check, test 4 High pressure pump (HPP) and fuel flow solenoid valve check and test 5 Rail high pressure
regulation circuit check.
Check the injectors by performing test 6 Major injector leak/injectors open and test 7 Incorrect injection
amount.
AFTER REPAIRCarry out a road test followed by a complete check with the diagnostic tool.
SID301_V44_ALP10 / SID304_V45_ALP10 / SID301_V48_ALP10 / SID304_V49_ALP10 / SID304_V4D_ALP10 / SID301_V4C_ALP10
Page 284 of 329
13B-284
MR-372-J84-13B050$897.mif
V17
DIESEL INJECTION
Fault finding – Fault Finding Chart
Siemens Injection
SID301 and 304
Vdiag No.: 44-45-48-49-4D-4C
Program No.: B1 and B2
13B
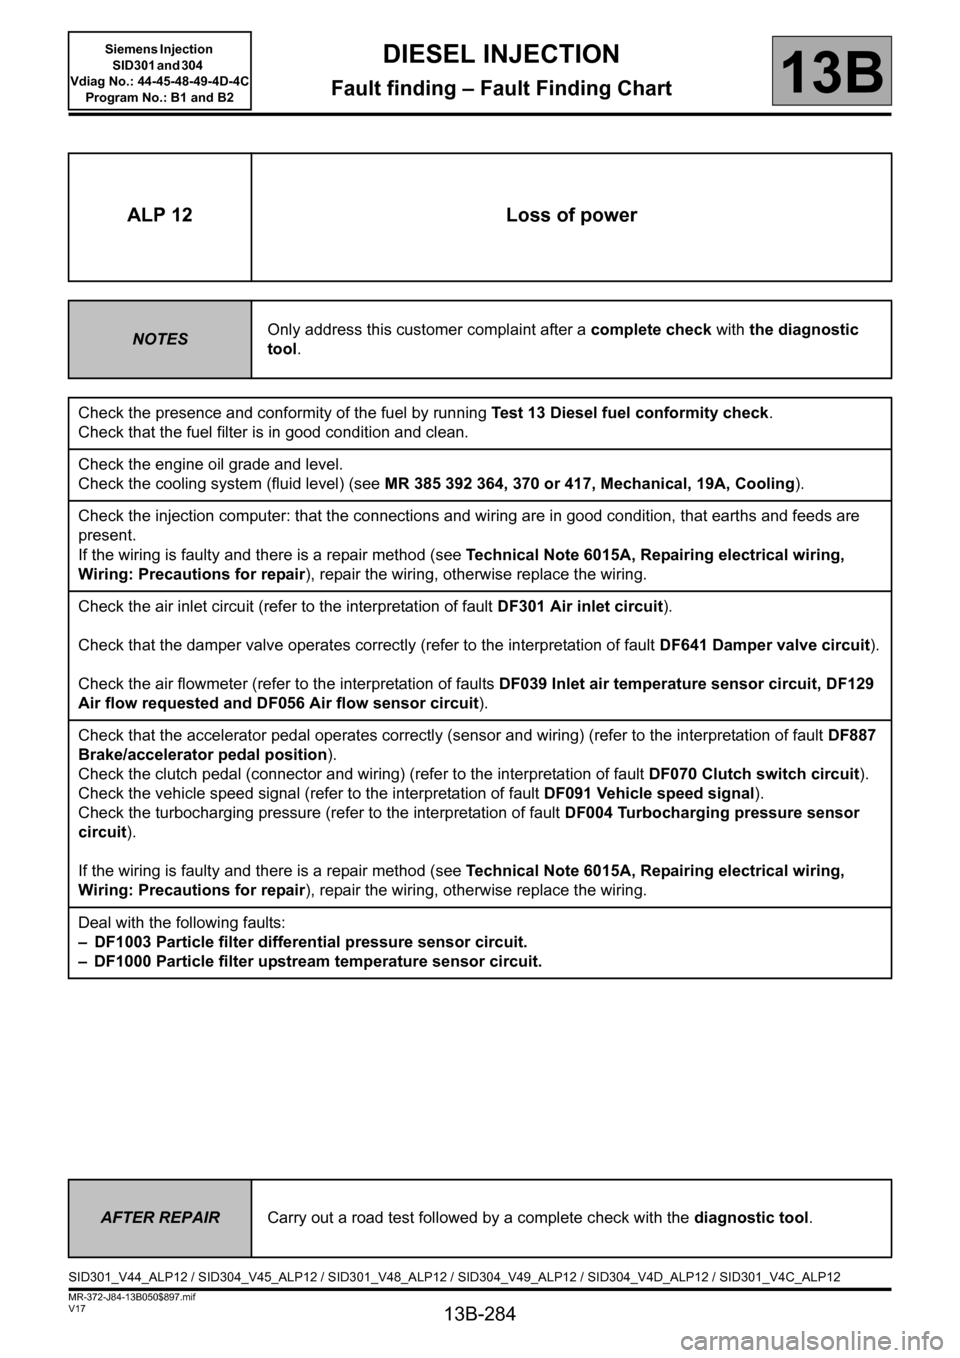
ALP 12 Loss of power
NOTESOnly address this customer complaint after a complete check with the diagnostic
tool.
Check the presence and conformity of the fuel by running Test 13 Diesel fuel conformity check.
Check that the fuel filter is in good condition and clean.
Check the engine oil grade and level.
Check the cooling system (fluid level) (see MR 385 392 364, 370 or 417, Mechanical, 19A, Cooling).
Check the injection computer: that the connections and wiring are in good condition, that earths and feeds are
present.
If the wiring is faulty and there is a repair method (see Technical Note 6015A, Repairing electrical wiring,
Wiring: Precautions for repair), repair the wiring, otherwise replace the wiring.
Check the air inlet circuit (refer to the interpretation of fault DF301 Air inlet circuit).
Check that the damper valve operates correctly (refer to the interpretation of fault DF641 Damper valve circuit).
Check the air flowmeter (refer to the interpretation of faults DF039 Inlet air temperature sensor circuit, DF129
Air flow requested and DF056 Air flow sensor circuit).
Check that the accelerator pedal operates correctly (sensor and wiring) (refer to the interpretation of fault DF887
Brake/accelerator pedal position).
Check the clutch pedal (connector and wiring) (refer to the interpretation of fault DF070 Clutch switch circuit).
Check the vehicle speed signal (refer to the interpretation of fault DF091 Vehicle speed signal).
Check the turbocharging pressure (refer to the interpretation of fault DF004 Turbocharging pressure sensor
circuit).
If the wiring is faulty and there is a repair method (see Technical Note 6015A, Repairing electrical wiring,
Wiring: Precautions for repair), repair the wiring, otherwise replace the wiring.
Deal with the following faults:
– DF1003 Particle filter differential pressure sensor circuit.
– DF1000 Particle filter upstream temperature sensor circuit.
AFTER REPAIRCarry out a road test followed by a complete check with the diagnostic tool.
SID301_V44_ALP12 / SID304_V45_ALP12 / SID301_V48_ALP12 / SID304_V49_ALP12 / SID304_V4D_ALP12 / SID301_V4C_ALP12
Page 286 of 329
13B-286
MR-372-J84-13B050$897.mif
V17
DIESEL INJECTION
Fault finding – Fault Finding Chart
Siemens Injection
SID301 and 304
Vdiag No.: 44-45-48-49-4D-4C
Program No.: B1 and B2
13B
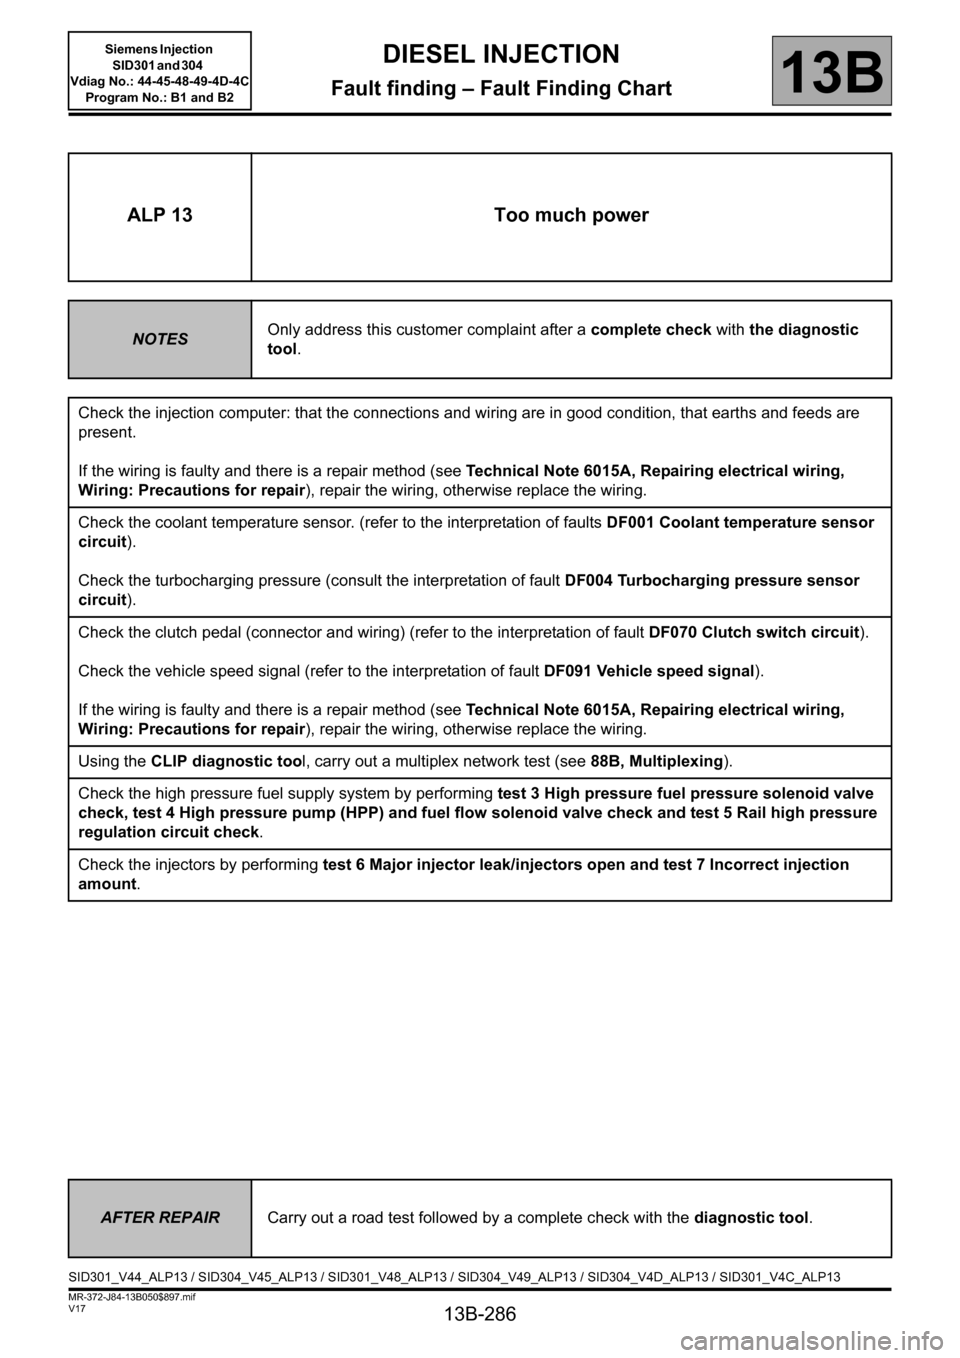
ALP 13 Too much power
NOTESOnly address this customer complaint after a complete check with the diagnostic
tool.
Check the injection computer: that the connections and wiring are in good condition, that earths and feeds are
present.
If the wiring is faulty and there is a repair method (see Technical Note 6015A, Repairing electrical wiring,
Wiring: Precautions for repair), repair the wiring, otherwise replace the wiring.
Check the coolant temperature sensor. (refer to the interpretation of faults DF001 Coolant temperature sensor
circuit).
Check the turbocharging pressure (consult the interpretation of fault DF004 Turbocharging pressure sensor
circuit).
Check the clutch pedal (connector and wiring) (refer to the interpretation of fault DF070 Clutch switch circuit).
Check the vehicle speed signal (refer to the interpretation of fault DF091 Vehicle speed signal).
If the wiring is faulty and there is a repair method (see Technical Note 6015A, Repairing electrical wiring,
Wiring: Precautions for repair), repair the wiring, otherwise replace the wiring.
Using the CLIP diagnostic tool, carry out a multiplex network test (see 88B, Multiplexing).
Check the high pressure fuel supply system by performing test 3 High pressure fuel pressure solenoid valve
check, test 4 High pressure pump (HPP) and fuel flow solenoid valve check and test 5 Rail high pressure
regulation circuit check.
Check the injectors by performing test 6 Major injector leak/injectors open and test 7 Incorrect injection
amount.
AFTER REPAIRCarry out a road test followed by a complete check with the diagnostic tool.
SID301_V44_ALP13 / SID304_V45_ALP13 / SID301_V48_ALP13 / SID304_V49_ALP13 / SID304_V4D_ALP13 / SID301_V4C_ALP13