check oil RENAULT SCENIC 2012 J95 / 3.G Engine And Peripherals EDC16CP33 Owner's Manual
[x] Cancel search | Manufacturer: RENAULT, Model Year: 2012, Model line: SCENIC, Model: RENAULT SCENIC 2012 J95 / 3.GPages: 510, PDF Size: 2.98 MB
Page 442 of 510
13B-442V12 MR-372-J84-13B300$150.mif
DIESEL INJECTION
Fault finding – Interpretation of commands13B
AC031THERMOPLUNGER No. 3 RELAY
NOTESCheck that the computer is correctly configured using command LC056
Thermoplungers
There must be no present or stored faults:
Perform this fault finding procedure if there is a fault with the passenger compartment
heating - demisting.
Use the Wiring Diagram Technical Note, Laguna II ph2, Vel Satis ph2, Espace IV
ph2, Mégane II ph2, Scénic II ph2.
If the Thermoplunger no. 3 relay or the additional heater interface unit does not function when command
AC031 is run.
Check the condition of the thermoplunger 3 relay mounting on the engine fuse box or the additional heater
interface unit (see Wiring Diagram Technical Note, Vehicle, component code 1069 or 1550).
Check the condition of the engine management computer connector (see Wiring Diagram Technical Note,
Vehicle, component code 120).
If the connector or connectors are faulty and if there is a repair procedure (see Technical Note 6015A, Electrical
wiring repair, Wiring: Precautions for repair), repair the connector, otherwise replace the wiring.
if the fault is still present, check as follows that this relay is controlled by the engine management computer:
Disconnect the thermoplunger no. 3 relay and fit a 50 Ω to 100Ω resistor on its mounting instead of the coil and
connect a voltmeter as follows:
– positive terminal to + 12 V battery,
– negative terminal to connection 3JAB of component 1069 or 1550.
Run command AC031.
If the voltmeter indicates the battery voltage (4 ON-OFF cycles of 10 seconds), replace the thermoplunger no. 3
relay.
If the voltmeter does not show the battery voltage (4 ON-OFF cycles of 10 seconds), contact the Techline.
EDC16CP33_V18_AC031 / EDC16CP33_V1C_AC031 / EDC16CP33_V54_AC031 / EDC16CP33_V20_AC031 / EDC16CP33_V58_AC031 /
EDC16CP33_V5C_AC031 / EDC16CP33_V24_AC031 / EDC16CP33_V04_AC031 / EDC16CP33_V08_AC031 / EDC16CP33_V44_AC031 /
EDC16CP33_V4C_AC031 / EDC16CP33_V34_AC031 / EDC16CP33_V38_AC031 / EDC16CP33_V74_AC031 / EDC16CP33_V28_AC031 /
EDC16CP33_V62_AC031 / EDC16CP33_V26_AC031 / EDC16CP33_V60_AC031
EDC16CP33
Program No.: C4
Vdiag No.: 04, 08, 18, 1C,
20, 24, 26, 28, 34, 38, 44,
4C, 54, 58, 5C, 60, 62, 74
AFTER REPAIRCarry out a road test, then check with the diagnostic tool.
Page 446 of 510
13B-446V12 MR-372-J84-13B300$150.mif
DIESEL INJECTION
Fault finding – Interpretation of commands13B
AC063THERMOPLUNGER No. 1 RELAY
NOTESThere must be no present or stored faults:
Perform this fault finding procedure if there is a fault with the passenger compartment
heating - demisting.
Use the Wiring Diagram Technical Note, Laguna II ph2, Vel Satis ph2, Espace IV
ph2, Mégane II ph2, Scénic II ph2.
If the Thermoplunger no. 1 relay or the additional heater interface unit does not function when command
AC063 is run.
Check the condition of the thermoplunger no. 1 relay mounting connector on the engine fuse box (see Wiring
Diagram Technical Note, Vehicle, component code 1067 or 1550).
Check the condition of the engine management computer connector (see Wiring Diagram Technical Note,
Vehicle, component code 120).
If the connector or connectors are faulty and if there is a repair procedure (see Technical Note 6015A, Repairing
electrical wiring, Wiring: Precautions for repair), repair the connector, otherwise replace the wiring.
if the fault is still present, check as follows that this relay is controlled by the engine management computer:
Disconnect thermoplunger no. 1 relay, and fit a 50 Ω to 100 Ω resistor on the mounting instead of the coil and
connect a voltmeter as follows:
– positive terminal to + 12 V battery,
– negative terminal to connection 3JA of component 1067 or 1550.
Run command AC063.
If the voltmeter shows the battery voltage (4 ON-OFF cycles of 10 seconds), replace the thermoplunger no. 1
relay.
If the voltmeter does not show the battery voltage (4 ON-OFF cycles of 10 seconds), contact the Techline.
EDC16CP33_V18_AC063 / EDC16CP33_V1C_AC063 / EDC16CP33_V54_AC063 / EDC16CP33_V20_AC063 / EDC16CP33_V58_AC063 /
EDC16CP33_V5C_AC063 / EDC16CP33_V24_AC063 / EDC16CP33_V04_AC063 / EDC16CP33_V08_AC063 / EDC16CP33_V44_AC063 /
EDC16CP33_V4C_AC063 / EDC16CP33_V34_AC063 / EDC16CP33_V38_AC063 / EDC16CP33_V74_AC063 / EDC16CP33_V28_AC063 /
EDC16CP33_V62_AC063 / EDC16CP33_V26_AC063 / EDC16CP33_V60_AC063
EDC16CP33
Program No.: C4
Vdiag No.: 04, 08, 18, 1C,
20, 24, 26, 28, 34, 38, 44,
4C, 54, 58, 5C, 60, 62, 74
AFTER REPAIRCarry out a road test, then check with the diagnostic tool.
Page 448 of 510
13B-448V12 MR-372-J84-13B300$150.mif
DIESEL INJECTION
Fault finding – Interpretation of commands13B
AC064THERMOPLUNGER No. 2 RELAY
NOTESThere must be no present or stored faults.
Perform this fault finding procedure if there is a fault with the passenger compartment
heating - demisting.
Consult the "Wiring diagrams" Technical Note to locate the relevant fuses and relays.
Special notes:
The thermoplunger no. 2 relay or the additional heater interface unit supplies
thermoplungers 2 and 3 in parallel.
Use the Wiring Diagram Technical Note, Laguna II ph2, Vel Satis ph2, Espace IV
ph2, Mégane II ph2, Scénic II ph2.
If the thermoplunger no. 2 relay does not operate during command AC064.
Check the condition of the thermoplunger 2 relay mounting on the engine fuse box or the additional heater
interface unit (see Wiring Diagram Technical Note, Vehicle, component code 1068 or 1550).
Check the condition of the engine management computer connector (see Wiring Diagram Technical Note,
Vehicle, component code 120).
If the connector or connectors are faulty and if there is a repair procedure (see Technical Note 6015A, Repairing
electrical wiring, Wiring: Precautions for repair), repair the connector, otherwise replace the wiring.
if the fault is still present, check as follows that this relay is controlled by the engine management computer:
Disconnect the thermoplunger no. 2 relay, fit a 50 Ω to 100 Ω resistor on its mounting instead of the coil, and
connect a voltmeter as follows:
– positive terminal to + 12 V battery,
– negative terminal on connection 3JAA of component 1068 or 1550.
Run command AC064.
If the voltmeter shows the battery voltage (4 ON-OFF cycles of 10 seconds), replace the thermoplunger no. 2
relay.
If the voltmeter does not show the battery voltage (4 ON-OFF cycles of 10 seconds), contact the Techline.
EDC16CP33_V18_AC064 / EDC16CP33_V1C_AC064 / EDC16CP33_V54_AC064 / EDC16CP33_V20_AC064 / EDC16CP33_V58_AC064 /
EDC16CP33_V5C_AC064 / EDC16CP33_V24_AC064 / EDC16CP33_V04_AC064 / EDC16CP33_V08_AC064 / EDC16CP33_V44_AC064 /
EDC16CP33_V4C_AC064 / EDC16CP33_V34_AC064 / EDC16CP33_V38_AC064 / EDC16CP33_V74_AC064 / EDC16CP33_V28_AC064 /
EDC16CP33_V62_AC064 / EDC16CP33_V26_AC064 / EDC16CP33_V60_AC064
EDC16CP33
Program No.: C4
Vdiag No.: 04, 08, 18, 1C,
20, 24, 26, 28, 34, 38, 44,
4C, 54, 58, 5C, 60, 62, 74
AFTER REPAIRCarry out a road test, then check with the diagnostic tool.
Page 452 of 510
13B-452V12 MR-372-J84-13B300$150.mif
DIESEL INJECTION
Fault finding – Interpretation of commands13B
Laguna II ph2, Vel Satis ph2, Espace IV ph2 only.
AC153HIGH SPEED FAN ASSEMBLY
NOTESThere must be no present or stored faults:
Perform this fault finding after an engine cooling fault.
Engine stopped.
Use the Wiring Diagram Technical Note for Laguna II ph2, Vel Satis ph2, Espace
IV ph2.
If command AC153 does not actuate the high speed fan assembly relay.
Check the condition of the high speed fan assembly relay mounting connectors (see Wiring Diagram
Technical Note, Vehicle, component code 597).
If the connector or connectors are faulty and there is a repair procedure (see Technical Note 6015A, Electrical
wiring repair, Wiring: Precautions for repair), repair the connector, otherwise replace the wiring.
If the fault is still present, check that the relay is actuated by the engine management computer as follows:
Disconnect the high speed fan assembly relay, fit a 50 Ω to 100 Ω resistor on its mounting in place of the coil, and
connect a voltmeter as follows:
– positive terminal to + 12 V battery,
– negative terminal to connection 3JP of component 234.
Run command AC153.
If the voltmeter shows the battery voltage (4 ON-OFF cycles of 10 seconds), replace the relay.
If the voltmeter does not show the battery voltage (4 ON-OFF cycles of 10 seconds), contact the Techline.
If the high speed fan assembly relay is supplied using command AC153, but there is still a fan assembly
actuation fault, use the wiring diagram to check:
The conformity of the fan assembly maxi-fuse.
– Check the + 12 V battery supply to connection BP71 of component 234.
– Check the conformity of the high speed fan assembly relay.
– Check the continuity of connection 49B between components 234 and 362.
– Check the conformity of the fan assembly.
– Check for complete earthing on connection MAS of component 162.
If the connection or connections are faulty and there is a repair procedure (see Technical Note 6015A, Electrical
wiring repair, Wiring: Precautions for repair), repair the wiring, otherwise replace it.
EDC16CP33_V18_AC153 / EDC16CP33_V1C_AC153 / EDC16CP33_V54_AC153 / EDC16CP33_V20_AC153 / EDC16CP33_V58_AC153 /
EDC16CP33_V5C_AC153 / EDC16CP33_V24_AC153 / EDC16CP33_V04_AC153 / EDC16CP33_V08_AC153 / EDC16CP33_V44_AC153 /
EDC16CP33_V4C_AC153 / EDC16CP33_V34_AC153 / EDC16CP33_V38_AC153 / EDC16CP33_V74_AC153 / EDC16CP33_V28_AC153 /
EDC16CP33_V26_AC153
EDC16CP33
Program No.: C4
Vdiag No.: 04, 08, 18, 1C,
20, 24, 26, 28, 34, 38, 44,
4C, 54, 58, 5C, 74
AFTER REPAIRCarry out a road test, then check with the diagnostic tool.
Page 453 of 510
13B-453V12 MR-372-J84-13B300$150.mif
DIESEL INJECTION
Fault finding – Interpretation of commands13B
Laguna II ph2, Vel Satis ph2, Espace IV ph2 only.
AC154LOW-SPEED FAN ASSEMBLY
NOTESThere must be no present or stored faults.
Perform this fault finding after an engine cooling fault or air conditioning fault.
Engine stopped.
Use the Wiring Diagram Technical Note for Laguna II ph2, Vel Satis ph2, Espace
IV ph2.
If, when running command AC154, the low speed fan assembly relay does not operate:
Check the condition of the low speed fan assembly relay mounting connectors (see Wiring Diagram Technical
Note, Vehicle, component code 597).
If the connector or connectors are faulty and if there is a repair procedure (see Technical Note 6015A, Repairing
electrical wiring, Wiring: Precautions for repair), repair the connector, otherwise replace the wiring.
If the fault is still present, check that the relay is actuated by the engine management computer as follows:
Disconnect the low speed fan assembly relay, fit a 50 Ω to 100 Ω resistor on the relay mounting in place of the
coil, and connect a voltmeter as follows:
– positive terminal to + 12 V battery,
– negative terminal to connection 3JN of component 700.
Run command AC154.
If the voltmeter shows the battery voltage (4 ON-OFF cycles of 10 seconds), replace the relay.
If the voltmeter does not show the battery voltage (4 ON-OFF cycles of 10 seconds), contact the Techline.
If the low speed fan assembly relay is supplied using command AC154, but there is still a fan assembly actuation
fault, use the wiring diagram to check:
The conformity of the fan assembly maxi-fuse.
– Check the continuity of connection 49L between components 700 and 321.
– Check the low speed resistor (resistance and connections).
– Check the continuity of connection 49B between components 262 and 321.
– Check for complete earthing on connection MAS of component 162.
If the connection or connections are faulty and there is a repair procedure (see Technical Note 6015A, Electrical
wiring repair, Wiring: Precautions for repair), repair the wiring, otherwise replace it.
EDC16CP33_V18_AC154 / EDC16CP33_V1C_AC154 / EDC16CP33_V54_AC154 / EDC16CP33_V20_AC154 / EDC16CP33_V58_AC154 /
EDC16CP33_V5C_AC154 / EDC16CP33_V24_AC154 / EDC16CP33_V04_AC154 / EDC16CP33_V08_AC154 / EDC16CP33_V44_AC154 /
EDC16CP33_V4C_AC154 / EDC16CP33_V34_AC154 / EDC16CP33_V38_AC154 / EDC16CP33_V74_AC154 / EDC16CP33_V28_AC154 /
EDC16CP33_V26_AC154
EDC16CP33
Program No.: C4
Vdiag No.: 04, 08, 18, 1C,
20, 24, 26, 28, 34, 38, 44,
4C, 54, 58, 5C, 74
AFTER REPAIRCarry out a road test, then check with the diagnostic tool.
Page 479 of 510
13B-479
AFTER REPAIRCarry out a road test, then check with the diagnostic tool.
V12 MR-372-J84-13B300$170.mif
DIESEL INJECTION
Fault finding – Fault Finding Chart13B
ALP4
CONTINUED 3
Check:
– That the diesel filter is not clogged.
– That there are no leaks on the high and low pressure diesel circuits: run Test 3 Low pressure circuit check.
–Test the high pressure fuel circuit:
Run scenario SC035 High pressure fuel circuit fault finding (see Interpretation of commands).
Continue by checking the following:
– The connection of the oil vapour rebreathing circuit.
– The pump pressure regulator (MPROP), (jamming - sticking); apply the interpretation of command AC226 Pump
pressure regulator.
– The rail pressure regulator (DRV), (jamming - sticking); apply the interpretation of command AC225 Rail
pressure regulator.
– Check the engine timing (and the position of the high pressure pump sprocket).
– Check the engine compressions: use a compression gauge, M9R hose end piece, part no. Mot. 1772 and apply
command VP036 Fuel supply inhibition (see Interpretation of commands).
If the fault is still present, contact the techline.
EDC16CP33
Program No.: C4
Vdiag No.: 04, 08, 18, 1C,
20, 24, 26, 28, 34, 38, 44,
4C, 54, 58, 5C, 60, 62, 74
Page 504 of 510
13B-504V12 MR-372-J84-13B300$180.mif
DIESEL INJECTION
Fault finding – Test13B
TEST10
CONTINUED 1
2. If at least one of these values is X < - 5 mg/stroke
– Check the valve clearance.
– Check the level and condition of the engine oil.
– Remove the injector with the largest adjustment.
– If there is contamination via the diesel, check the condition of the cylinder concerned (cylinder, piston, valves).
– Replace the injector* concerned.
– See paragraph Part C, for confirmation of the fault finding.
3. If at least one of these values does not stabilise (20 seconds after starting):
– Check the low pressure circuit using Test 3 Low pressure circuit test.
– Check the fuel is correct by carrying out Test 12 Diesel fuel conformity check.
See paragraph Part C of Test 10, for confirmation of the fault finding.
After replacing an injector, follow the injector code programming procedure (see Replacement of components),
run SC036 Reinitialise programming and select the number of the injector replaced.
IMPORTANT:
When removing / refitting injectors, follow the cleanliness and safety instructions (see MR 395 (Laguna II ph2),
402 (Vel Satis), 405 (Espace IV Ph2), 364 (Megane II ph2), 370 (Scenic II ph2) Mechanical, 13B, Diesel
injection, Diesel injectors: Removal - Refitting).
EDC16CP33
Program No.: C4
Vdiag No.: 04, 08, 18, 1C,
20, 24, 26, 28, 34, 38, 44,
4C, 54, 58, 5C, 60, 62, 74
Page 506 of 510
13B-506V12 MR-372-J84-13B300$180.mif
DIESEL INJECTION
Fault finding – Test13B
TEST10
CONTINUED 3
Part C:
Confirmation of flow correction fault finding for each injector (individual correction):
Clear the faults and run a test with the engine at idle speed and the fuel temperature > 50°C, check that no faults
appear on the diagnostic tool and that the correction values do not reach X = ± 5 mg/stroke to confirm the repair.
– If one or more cylinders have flow correction values for an injector which exceed X = ± 5 mg/stroke, follow the
fault finding procedure described in Part A: Fuel regulation balance check for each injector (individual) of
Test 10.
– Otherwise, follow the fault finding procedure described in Part D of Test 10.
Part D:
Injector nozzle sealing check:
Check the level and condition of the engine oil:
– If there is contamination from the diesel fuel, the leaking injector nozzle will be "greasy".
– Disconnect the preheating relay.
– Ensure that this is not caused by rising engine oil by checking the engine compression values.
– Check the condition of the heater plug: this must not be wet. If it is, change the defective injector.
– If the engine compression values are correct: locate the faulty injector by looking at the condition of the cylinders
and the pistons through the heater plug wells (greasy cylinder, overheating, signs of damage, etc.).
– If the cylinder - piston examination is not conclusive, remove the injectors and change the one with the greasy
nozzle.
– If the fault finding checks do not enable the engine to be repaired, contact the Techline.
After replacing the injector, follow the injector code programming procedure (see Replacement of components),
run SC036 Reinitialise programming, and select the number of the injector replaced.
Note:
Before replacing an injector, check for the sealing washer and its conformity (see Fault finding chart ALP4 Poor
performance).
IMPORTANT:
When removing / refitting injectors, follow the cleanliness and safety instructions (see MR 395 (Laguna II ph2),
402 (Vel Satis), 405 (Espace IV Ph2), 364 (Megane II ph2), 370 (Scenic II ph2) Mechanical, 13B, Diesel
injection, Diesel injectors: Removal - Refitting).
EDC16CP33
Program No.: C4
Vdiag No.: 04, 08, 18, 1C,
20, 24, 26, 28, 34, 38, 44,
4C, 54, 58, 5C, 60, 62, 74
Page 507 of 510
13B-507V12 MR-372-J84-13B300$180.mif
DIESEL INJECTION
Fault finding – Test13B
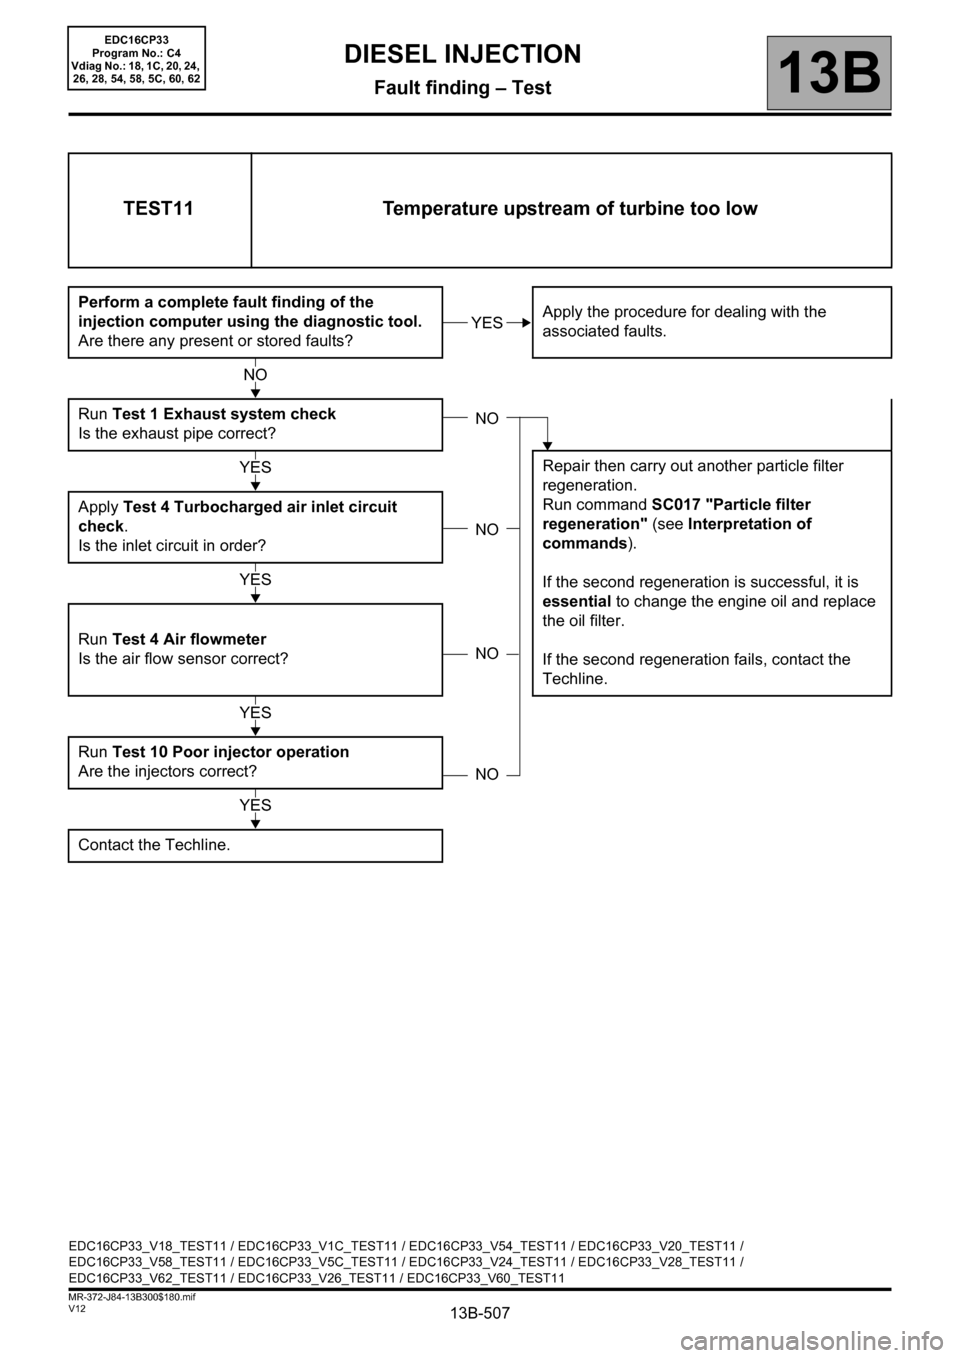
TEST11 Temperature upstream of turbine too low
Perform a complete fault finding of the
injection computer using the diagnostic tool.
Are there any present or stored faults?Apply the procedure for dealing with the
associated faults.
Run Test 1 Exhaust system check
Is the exhaust pipe correct?
Repair then carry out another particle filter
regeneration.
Run command SC017 "Particle filter
regeneration" (see Interpretation of
commands).
If the second regeneration is successful, it is
essential to change the engine oil and replace
the oil filter.
If the second regeneration fails, contact the
Techline. Apply Test 4 Turbocharged air inlet circuit
check.
Is the inlet circuit in order?
Run Test 4 Air flowmeter
Is the air flow sensor correct?
Run Test 10 Poor injector operation
Are the injectors correct?
Contact the Techline.
YES
NO
NO
NONO
NO
NO
YES
YES
YES
YES
EDC16CP33_V18_TEST11 / EDC16CP33_V1C_TEST11 / EDC16CP33_V54_TEST11 / EDC16CP33_V20_TEST11 /
EDC16CP33_V58_TEST11 / EDC16CP33_V5C_TEST11 / EDC16CP33_V24_TEST11 / EDC16CP33_V28_TEST11 /
EDC16CP33_V62_TEST11 / EDC16CP33_V26_TEST11 / EDC16CP33_V60_TEST11
EDC16CP33
Program No.: C4
Vdiag No.: 18, 1C, 20, 24,
26, 28, 54, 58, 5C, 60, 62
Page 509 of 510
13B-509V12 MR-372-J84-13B300$180.mif
DIESEL INJECTION
Fault finding – Test13B
TEST12
CONTINUED 1
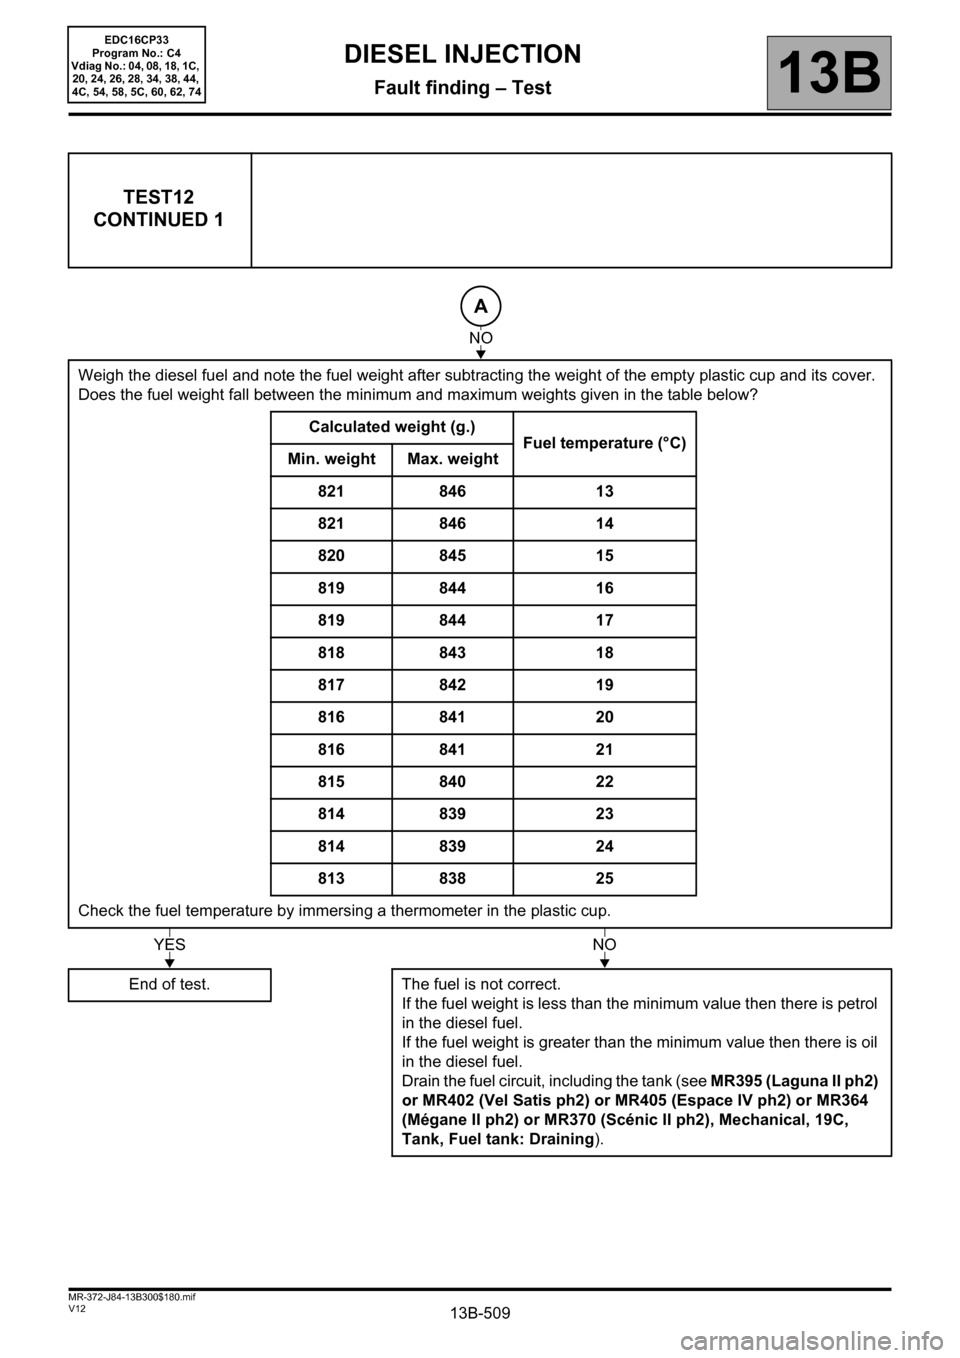
Weigh the diesel fuel and note the fuel weight after subtracting the weight of the empty plastic cup and its cover.
Does the fuel weight fall between the minimum and maximum weights given in the table below?
Calculated weight (g.)
Fuel temperature (°C)
Min. weight Max. weight
821 846 13
821 846 14
820 845 15
819 844 16
819 844 17
818 843 18
817 842 19
816 841 20
816 841 21
815 840 22
814 839 23
814 839 24
813 838 25
Check the fuel temperature by immersing a thermometer in the plastic cup.
End of test. The fuel is not correct.
If the fuel weight is less than the minimum value then there is petrol
in the diesel fuel.
If the fuel weight is greater than the minimum value then there is oil
in the diesel fuel.
Drain the fuel circuit, including the tank (see MR395 (Laguna II ph2)
or MR402 (Vel Satis ph2) or MR405 (Espace IV ph2) or MR364
(Mégane II ph2) or MR370 (Scénic II ph2), Mechanical, 19C,
Tank, Fuel tank: Draining).
A
NO
YESNO
EDC16CP33
Program No.: C4
Vdiag No.: 04, 08, 18, 1C,
20, 24, 26, 28, 34, 38, 44,
4C, 54, 58, 5C, 60, 62, 74