heater RENAULT SCENIC 2012 J95 / 3.G Engine And Peripherals EDC16CP33 Workshop Manual
[x] Cancel search | Manufacturer: RENAULT, Model Year: 2012, Model line: SCENIC, Model: RENAULT SCENIC 2012 J95 / 3.GPages: 510, PDF Size: 2.98 MB
Page 18 of 510
13B-18V12 MR-372-J84-13B300$030.mif
DIESEL INJECTION
Fault finding – System operation13B
EDC16CP33
Program No.: C4
Vdiag No.: 04, 08, 18, 1C,
20, 24, 26, 28, 34, 38, 44,
4C, 54, 58, 5C, 60, 62, 74
VI - Pre-postheating actuation
Pre/postheating control involves actuating the heater plugs and the preheating indicator light on the instrument
panel (multiplex signal).
The heater plugs are actuated by a static relay.
After the ignition is switched on, a preheating delay is activated. The length of time that the warning light is lit
depends on the coolant temperature, air temperature, atmospheric pressure and battery voltage. When the coolant
temperature is below a certain threshold, a postheating function can be used to improve the combustion stability,
and consequently engine operation (reducing unburnt particles and pollutant emissions). Postheating can last up
to5 minutes.
IMPORTANT:
There are two types of heater plug: SLOW and FAST:
SLOW plugs are identified by a black ring.
FAST plugs are identified by a white ring.
The heater plugs fitted on the vehicle must be replaced with plugs of the same type; otherwise there is
a risk of the heater plugs deteriorating which could lead to engine destruction.
Only Vdiag 20, 24, 38 and 74:
when replacing heater plugs with plugs which differ from those currently fitted on the vehicle (replacement of
SLOW plugs with FAST plugs), the computer must be configured (see Replacement of components, Replacing
heater plugs) by running command SC036 Reinitialise programming and selecting Heater plugs if this choice
is available, then following the procedure.
Page 22 of 510
13B-22V12 MR-372-J84-13B300$050.mif
13B
EDC16CP33
Program No.: C4
Vdiag No.: 04, 08, 18, 1C,
20, 24, 26, 28, 34, 38, 44,
4C, 54, 58, 5C, 60, 62, 74
COMPUTER REPLACEMENT OR REPROGRAMMING
Two operations must be performed when replacing or reprogramming the computer:
SC003 Save computer data and SC001 Enter saved data.
–Run SC003 before replacing or reprogramming the computer. This enables certain data to be saved in the
diagnostic tool so that the new computer* can be reconfigured like the old one. The saved data includes: injector
codes, EGR programming, specific data for particle filter operation and vehicle options.
–Run SC001 after replacing or reprogramming the computer. It enables you to rewrite the data (saved by
command SC003) to the new computer*.
Only Vdiag 20, 24, 38 and 74:
–Run SC036 Reinitialise programming and select Heater plugs (see Interpretation of commands); this will allow
you to configure the correct type of heater plugs fitted on the vehicle, if necessary.
If you cannot establish dialogue with the computer being replaced: you will not be able to save anything. After
replacing the computer:
– Write the IMA codes for each injector manually by reading the code on each injector; run command SC002 Enter
injector codes.
– Check the exhaust pipe for leaks or blockage. Repair if necessary.
– Perform an After-Sales regeneration, follow the procedure for command SC017 Particle filter regeneration (see
Interpretation of commands).
– It is essential to change the engine oil and oil filter.
– Enter the data specific to particle filter operation by running SC036 Reinitialise programming and selecting after
replacing injection computer with no save option.
– Enter the VIN into the computer, use command VP010 Enter VIN.
–Only for Vdiag 20, 24, 38 and 74: Configure the type of heater plugs fitted on the vehicle by running SC036
Reinitialise programming and selecting Heater plugs (see Interpretation of commands).
Exhaust gas recirculation valve data is programmed automatically the 1st time the new computer is turned on*.
* New computer or reprogrammed computer.
IMA*: Individual injector correctionOperations to be carried out before the injection computer is reprogrammed:
Before reprogramming the injection computer, move the main cruise control/speed limiter switch to the rest
position. The information about the cruise control or the speed limiter displayed on the instrument panel
disappears.
Otherwise, if the main switch remains in the cruise control or speed limiter position during and after reprogramming,
the cruise control/speed limiter function will not be operational.
The procedure for resetting the function is as follows:
Vehicle ignition on.
• Position the cruise control/speed limiter switch in the rest position (the computer detects the rest position at that
moment).
• Position the cruise control/speed limiter switch in the Cruise control position to activate the cruise control
function.
• Position the cruise control/speed limiter switch in the Speed limiter position to activate the speed limiter function.
DIESEL INJECTION
Fault finding – Replacement of components
Page 23 of 510
13B-23V12 MR-372-J84-13B300$050.mif
DIESEL INJECTION
Fault finding – Replacement of components13B
EDC16CP33
Program No.: C4
Vdiag No.: 04, 08, 18, 1C,
20, 24, 26, 28, 34, 38, 44,
4C, 54, 58, 5C, 60, 62, 74
PROCEDURE
• Before replacing or reprogramming the computer:
–Select SC003 Save computer data,
– if the following message appears: there is a saved file; do you want to overwrite this data?: (this file
corresponds to the last save carried out on the tool)
–Select YES,
When the save has been performed, replace the computer or carry out the programming then proceed to the next
step.
• After replacing or reprogramming the computer:
Select SC001 Write saved data.
Follow the instructions,
– When the command is finished, switch off the ignition, wait for the message to appear on the diagnostic tool
(maximum time 8 minutes): Loss of dialogue with the computer: EDC16 CP33, check the connection of the
tool and the computer supply.
– Switch on the ignition again and use command VP010 Enter VIN if the VIN has been cleared.
–Only Vdiag 20, 24, 38 and 74: Establish communication and run SC036 Reinitialise programming and select
Heater plugs (see Interpretation of commands), this will allow you to configure the correct type of heater plugs
fitted on the vehicle, if necessary.
– For all Vdiags, clear the fault memory.
– End of procedure.
Page 27 of 510
13B-27V12 MR-372-J84-13B300$050.mif
DIESEL INJECTION
Fault finding – Replacement of components13B
EDC16CP33
Program No.: C4
Vdiag No.: 04, 08, 18, 1C,
20, 24, 26, 28, 34, 38, 44,
4C, 54, 58, 5C, 60, 62, 74
REPLACING THE DAMPER VALVE
After replacing the damper valve, run command SC036 Reinitialise programming and select damper valve.
When the command is complete, switch off the ignition and exit fault finding mode.
Wait for the diagnostic tool message (maximum wait 8 minutes): Loss of dialogue with the computer: EDC16
CP33, check the tool connection and the computer supply before switching the ignition back on.
REPLACING THE PARTICLE FILTER (Vdiag: 18, 1C, 54, 20, 58, 5C, 24, 26, 28, 60 and 62 only)
After replacing the particle filter, reconfigure the computer.
The system must be configured via the diagnostic socket using the RENAULT CLIP tool.
Carry out the following steps:
– switch on the ignition,
– run command SC036,
–select After particle filter replacement as the operation type and follow the instructions,
–switch off the ignition and wait for the diagnostic tool message (maximum wait 8 minutes): Loss of dialogue
with the computer: EDC16 CP33, check the tool connection and the computer supply voltage,
– then switch on the ignition again,
–clear the faults from the computer memory (this operation must be carried out within 3 minutes of the ignition
being switched on)
Carry out a road test followed by a complete check with the diagnostic tool.
REPLACING THE HEATER PLUGS (Vdiag 20, 24, 38 and 74 only)
SLOW plugs are identified by a black ring.
FAST plugs are identified by a white ring.
After replacing the heater plugs with plugs of a different type, reconfigure the type of plugs fitted on the vehicle.
Carry out the following steps:
– switch on the ignition,
– run command SC036 Reinitialise programming,
–select Heater plugs as the operation type and follow the instructions,
–switch off the ignition and wait for the diagnostic tool message (maximum wait 8 minutes): Loss of dialogue
with the computer: EDC16 CP33, check the tool connection and the computer supply voltage,
– then switch on the ignition again,
– clear the faults from the computer memory.
Carry out a road test followed by a complete check with the diagnostic tool. Note:
When reinitialisation is complete, the Emission control / EOBD (European On Board Diagnostic) sub-function
displays:
PR858
≠ 0%, PR859 ≠ 0%, PR860 ≠ 0% and PR861 ≠ 0%.
Page 30 of 510
13B-30V12 MR-372-J84-13B300$060.mif
DIESEL INJECTION
Fault finding – Fault summary table13B
EDC16CP33
Program No.: C4
Vdiag No.: 04, 08, 18, 1C,
20, 24, 26, 28, 34, 38, 44,
4C, 54, 58, 5C, 60, 62, 74
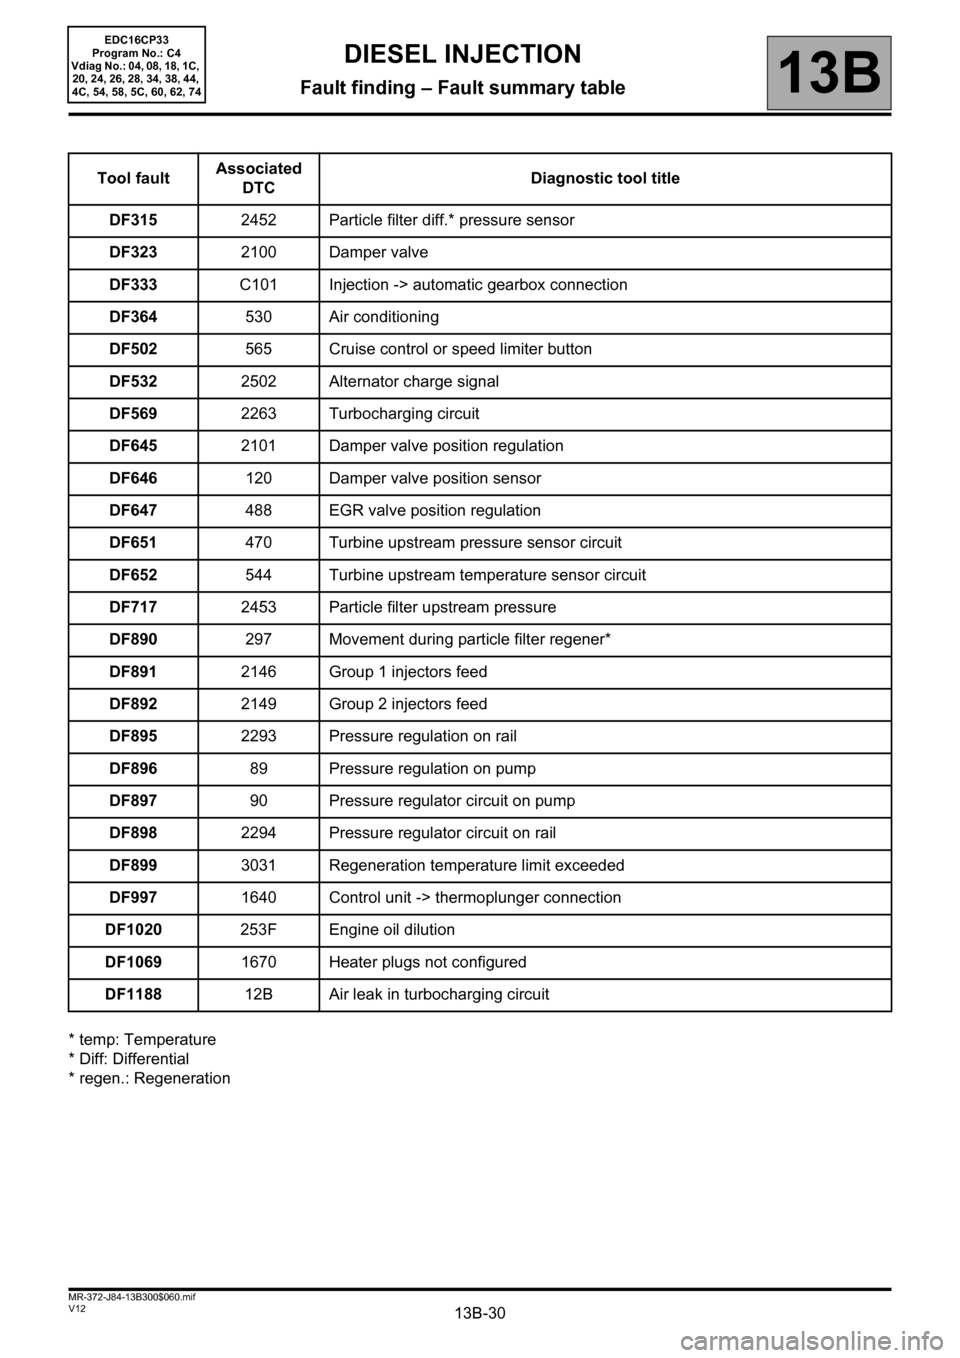
* temp: Temperature
* Diff: Differential
* regen.: RegenerationTool faultAssociated
DTCDiagnostic tool title
DF3152452 Particle filter diff.* pressure sensor
DF3232100 Damper valve
DF333C101 Injection -> automatic gearbox connection
DF364530 Air conditioning
DF502565 Cruise control or speed limiter button
DF5322502 Alternator charge signal
DF5692263 Turbocharging circuit
DF6452101 Damper valve position regulation
DF646120 Damper valve position sensor
DF647488 EGR valve position regulation
DF651470 Turbine upstream pressure sensor circuit
DF652544 Turbine upstream temperature sensor circuit
DF7172453 Particle filter upstream pressure
DF890297 Movement during particle filter regener*
DF8912146 Group 1 injectors feed
DF8922149 Group 2 injectors feed
DF8952293 Pressure regulation on rail
DF89689 Pressure regulation on pump
DF89790 Pressure regulator circuit on pump
DF8982294 Pressure regulator circuit on rail
DF8993031 Regeneration temperature limit exceeded
DF9971640 Control unit -> thermoplunger connection
DF1020253F Engine oil dilution
DF10691670 Heater plugs not configured
DF118812B Air leak in turbocharging circuit
Page 67 of 510
13B-67
AFTER REPAIRDeal with any other faults. Clear the fault memory.
Switch off the ignition until the end of the power-latch phase, and carry out a road test
followed by a check with the diagnostic tool.
V12 MR-372-J84-13B300$071.mif
DIESEL INJECTION
Fault finding – Interpretation of faults13B
EDC16CP33
Program No.: C4
Vdiag No.: 04, 08, 18, 1C,
20, 24, 26, 28, 34, 38, 44,
4C, 54, 58, 5C, 60, 62, 74
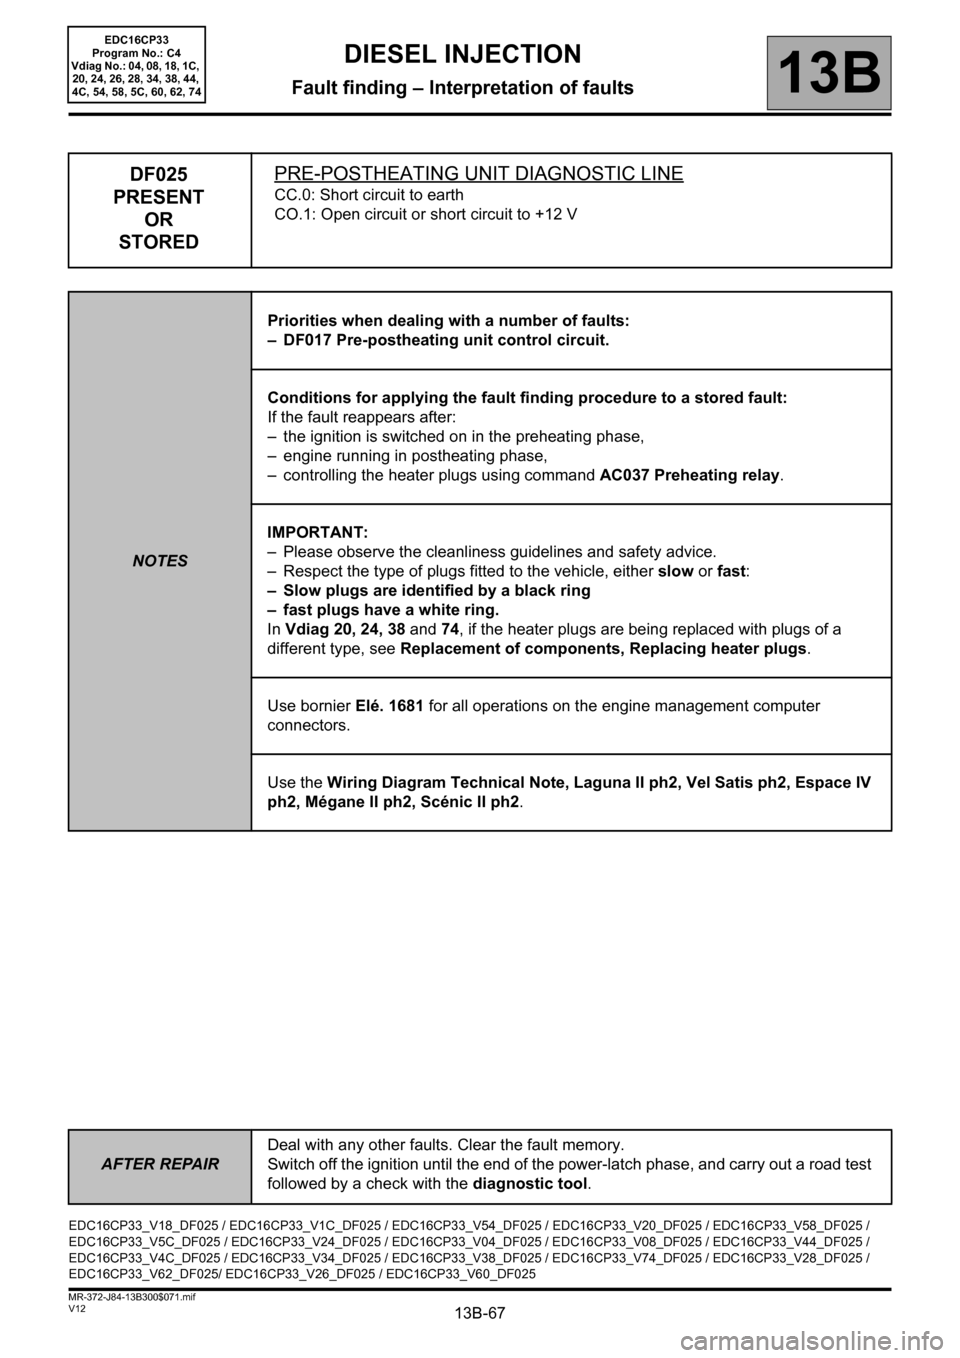
DF025
PRESENT
OR
STOREDPRE-POSTHEATING UNIT DIAGNOSTIC LINE
CC.0: Short circuit to earth
CO.1: Open circuit or short circuit to +12 V
NOTESPriorities when dealing with a number of faults:
– DF017 Pre-postheating unit control circuit.
Conditions for applying the fault finding procedure to a stored fault:
If the fault reappears after:
– the ignition is switched on in the preheating phase,
– engine running in postheating phase,
– controlling the heater plugs using command AC037 Preheating relay.
IMPORTANT:
– Please observe the cleanliness guidelines and safety advice.
– Respect the type of plugs fitted to the vehicle, either slow or fast:
– Slow plugs are identified by a black ring
– fast plugs have a white ring.
In Vdiag 20, 24, 38 and 74, if the heater plugs are being replaced with plugs of a
different type, see Replacement of components, Replacing heater plugs.
Use bornier Elé. 1681 for all operations on the engine management computer
connectors.
Use the Wiring Diagram Technical Note, Laguna II ph2, Vel Satis ph2, Espace IV
ph2, Mégane II ph2, Scénic II ph2.
EDC16CP33_V18_DF025 / EDC16CP33_V1C_DF025 / EDC16CP33_V54_DF025 / EDC16CP33_V20_DF025 / EDC16CP33_V58_DF025 /
EDC16CP33_V5C_DF025 / EDC16CP33_V24_DF025 / EDC16CP33_V04_DF025 / EDC16CP33_V08_DF025 / EDC16CP33_V44_DF025 /
EDC16CP33_V4C_DF025 / EDC16CP33_V34_DF025 / EDC16CP33_V38_DF025 / EDC16CP33_V74_DF025 / EDC16CP33_V28_DF025 /
EDC16CP33_V62_DF025/ EDC16CP33_V26_DF025 / EDC16CP33_V60_DF025
Page 68 of 510
13B-68
AFTER REPAIRDeal with any other faults. Clear the fault memory.
Switch off the ignition until the end of the power-latch phase, and carry out a road test
followed by a check with the diagnostic tool.
V12 MR-372-J84-13B300$071.mif
DIESEL INJECTION
Fault finding – Interpretation of faults13B
EDC16CP33
Program No.: C4
Vdiag No.: 04, 08, 18, 1C,
20, 24, 26, 28, 34, 38, 44,
4C, 54, 58, 5C, 60, 62, 74
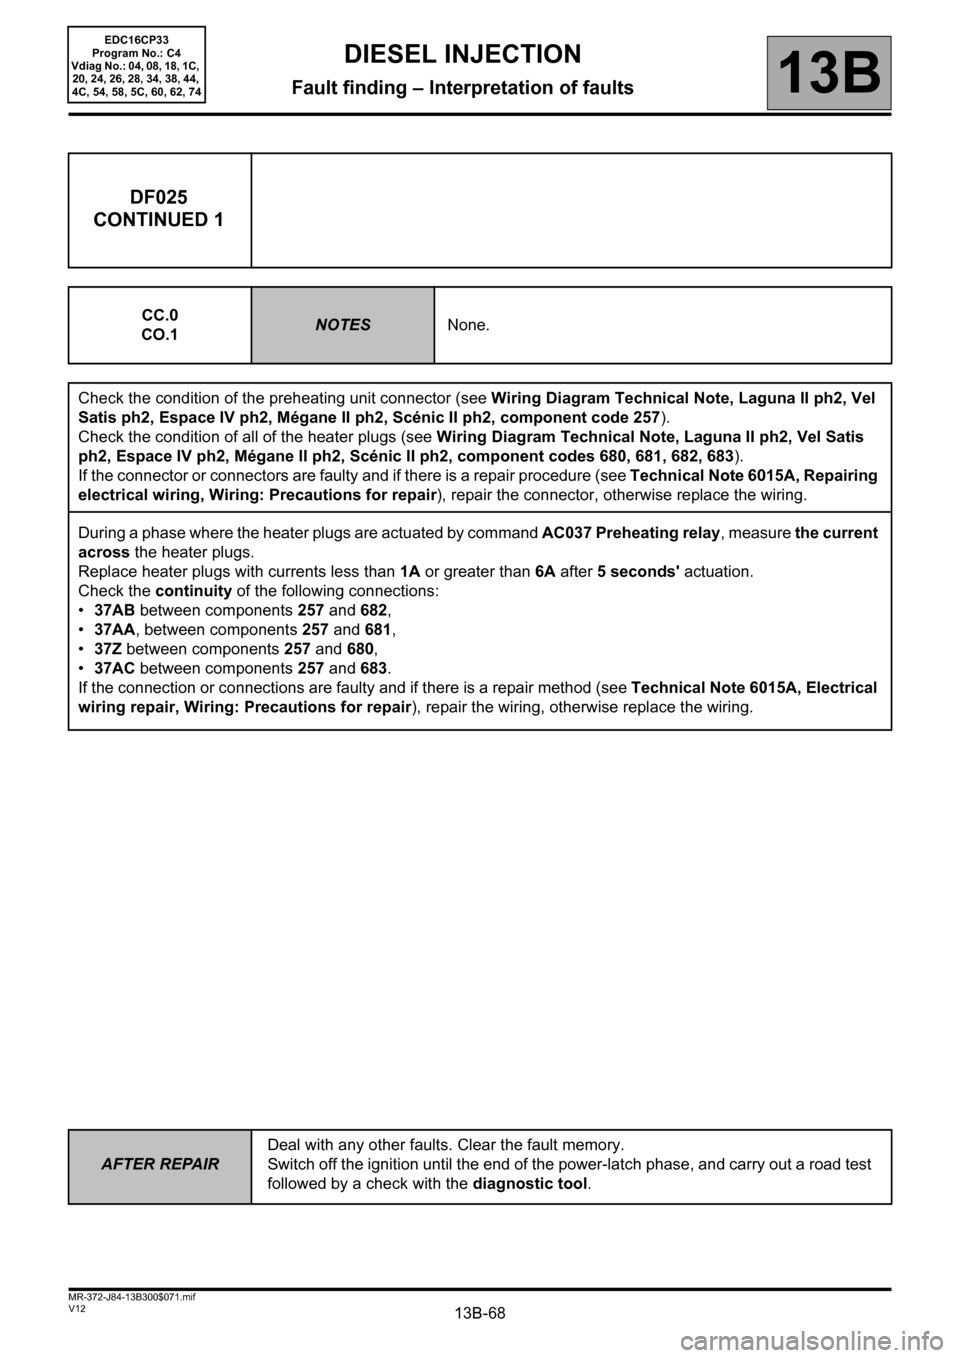
DF025
CONTINUED 1
CC.0
CO.1NOTESNone.
Check the condition of the preheating unit connector (see Wiring Diagram Technical Note, Laguna II ph2, Vel
Satis ph2, Espace IV ph2, Mégane II ph2, Scénic II ph2, component code 257).
Check the condition of all of the heater plugs (see Wiring Diagram Technical Note, Laguna II ph2, Vel Satis
ph2, Espace IV ph2, Mégane II ph2, Scénic II ph2, component codes 680, 681, 682, 683).
If the connector or connectors are faulty and if there is a repair procedure (see Technical Note 6015A, Repairing
electrical wiring, Wiring: Precautions for repair), repair the connector, otherwise replace the wiring.
During a phase where the heater plugs are actuated by command AC037 Preheating relay, measure the current
across the heater plugs.
Replace heater plugs with currents less than 1A or greater than 6A after 5 seconds' actuation.
Check the continuity of the following connections:
•37AB between components 257 and 682,
•37AA, between components 257 and 681,
•37Z between components 257 and 680,
•37AC between components 257 and 683.
If the connection or connections are faulty and if there is a repair method (see Technical Note 6015A, Electrical
wiring repair, Wiring: Precautions for repair), repair the wiring, otherwise replace the wiring.
Page 90 of 510
13B-90
AFTER REPAIRDeal with any other faults. Clear the fault memory.
Switch off the ignition until the end of the power-latch phase, and carry out a road test
followed by a check with the diagnostic tool.
V12 MR-372-J84-13B300$071.mif
DIESEL INJECTION
Fault finding – Interpretation of faults13B
EDC16CP33
Program No.: C4
Vdiag No.: 04, 08, 18, 1C,
20, 24, 26, 28, 34, 38, 44,
4C, 54, 58, 5C, 60, 62, 74
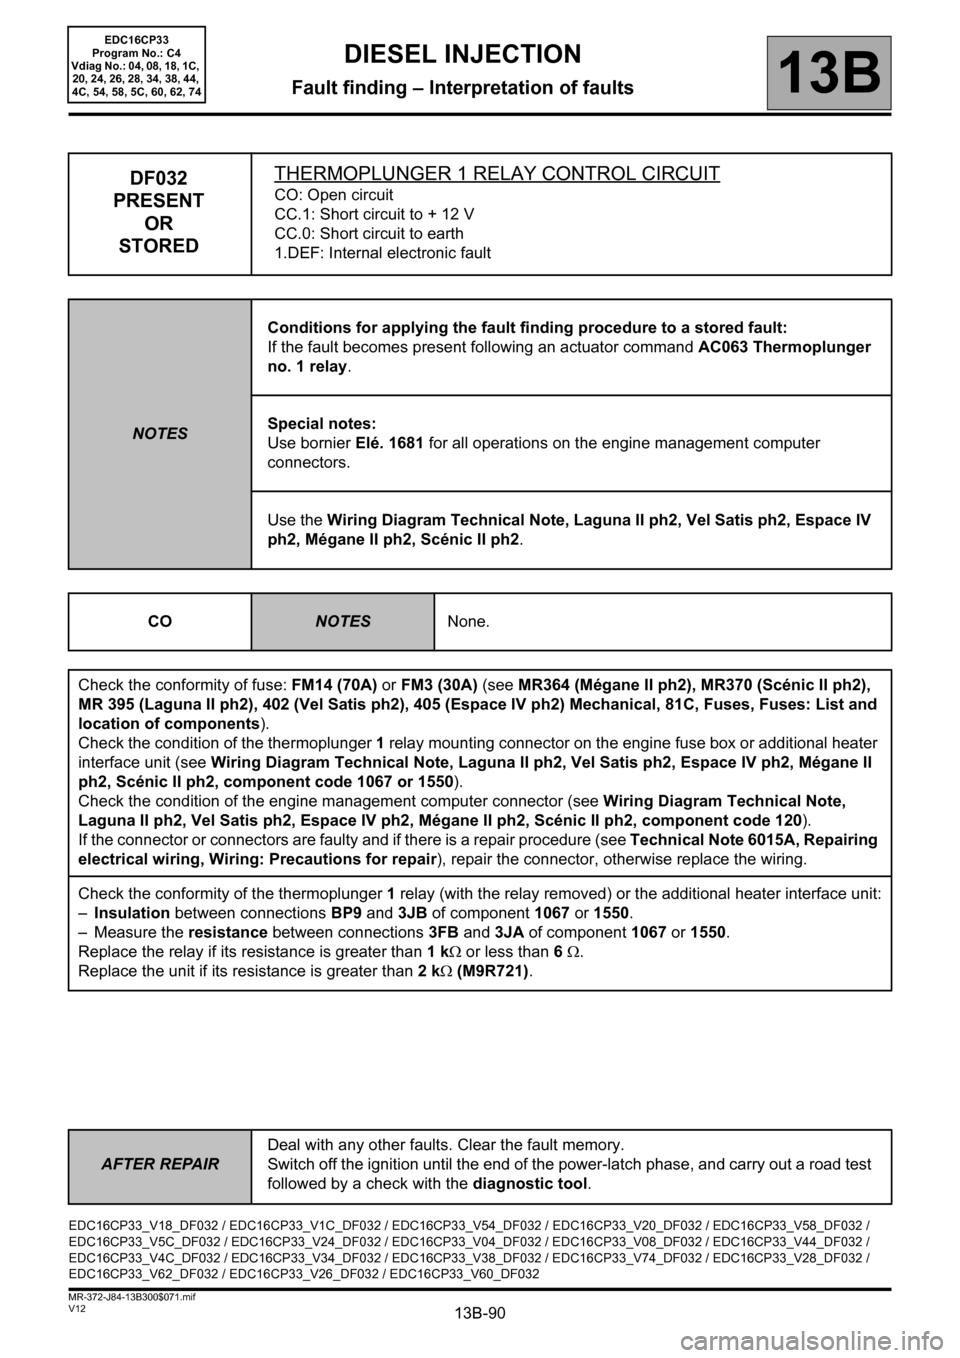
DF032
PRESENT
OR
STOREDTHERMOPLUNGER 1 RELAY CONTROL CIRCUITCO: Open circuit
CC.1: Short circuit to + 12 V
CC.0: Short circuit to earth
1.DEF: Internal electronic fault
NOTESConditions for applying the fault finding procedure to a stored fault:
If the fault becomes present following an actuator command AC063 Thermoplunger
no. 1 relay.
Special notes:
Use bornier Elé. 1681 for all operations on the engine management computer
connectors.
Use the Wiring Diagram Technical Note, Laguna II ph2, Vel Satis ph2, Espace IV
ph2, Mégane II ph2, Scénic II ph2.
CO
NOTESNone.
Check the conformity of fuse: FM14 (70A) or FM3 (30A) (see MR364 (Mégane II ph2), MR370 (Scénic II ph2),
MR 395 (Laguna II ph2), 402 (Vel Satis ph2), 405 (Espace IV ph2) Mechanical, 81C, Fuses, Fuses: List and
location of components).
Check the condition of the thermoplunger 1 relay mounting connector on the engine fuse box or additional heater
interface unit (see Wiring Diagram Technical Note, Laguna II ph2, Vel Satis ph2, Espace IV ph2, Mégane II
ph2, Scénic II ph2, component code 1067 or 1550).
Check the condition of the engine management computer connector (see Wiring Diagram Technical Note,
Laguna II ph2, Vel Satis ph2, Espace IV ph2, Mégane II ph2, Scénic II ph2, component code 120).
If the connector or connectors are faulty and if there is a repair procedure (see Technical Note 6015A, Repairing
electrical wiring, Wiring: Precautions for repair), repair the connector, otherwise replace the wiring.
Check the conformity of the thermoplunger 1 relay (with the relay removed) or the additional heater interface unit:
–Insulation between connections BP9 and 3JB of component 1067 or 1550.
– Measure the resistance between connections3FB and 3JA of component1067 or 1550.
Replace the relay if its resistance is greater than 1 kΩ or less than 6 Ω.
Replace the unit if its resistance is greater than 2 kΩ (M9R721).
EDC16CP33_V18_DF032 / EDC16CP33_V1C_DF032 / EDC16CP33_V54_DF032 / EDC16CP33_V20_DF032 / EDC16CP33_V58_DF032 /
EDC16CP33_V5C_DF032 / EDC16CP33_V24_DF032 / EDC16CP33_V04_DF032 / EDC16CP33_V08_DF032 / EDC16CP33_V44_DF032 /
EDC16CP33_V4C_DF032 / EDC16CP33_V34_DF032 / EDC16CP33_V38_DF032 / EDC16CP33_V74_DF032 / EDC16CP33_V28_DF032 /
EDC16CP33_V62_DF032 / EDC16CP33_V26_DF032 / EDC16CP33_V60_DF032
Page 91 of 510
13B-91
AFTER REPAIRDeal with any other faults. Clear the fault memory.
Switch off the ignition until the end of the power-latch phase, and carry out a road test
followed by a check with the diagnostic tool.
V12 MR-372-J84-13B300$071.mif
DIESEL INJECTION
Fault finding – Interpretation of faults13B
EDC16CP33
Program No.: C4
Vdiag No.: 04, 08, 18, 1C,
20, 24, 26, 28, 34, 38, 44,
4C, 54, 58, 5C, 60, 62, 74
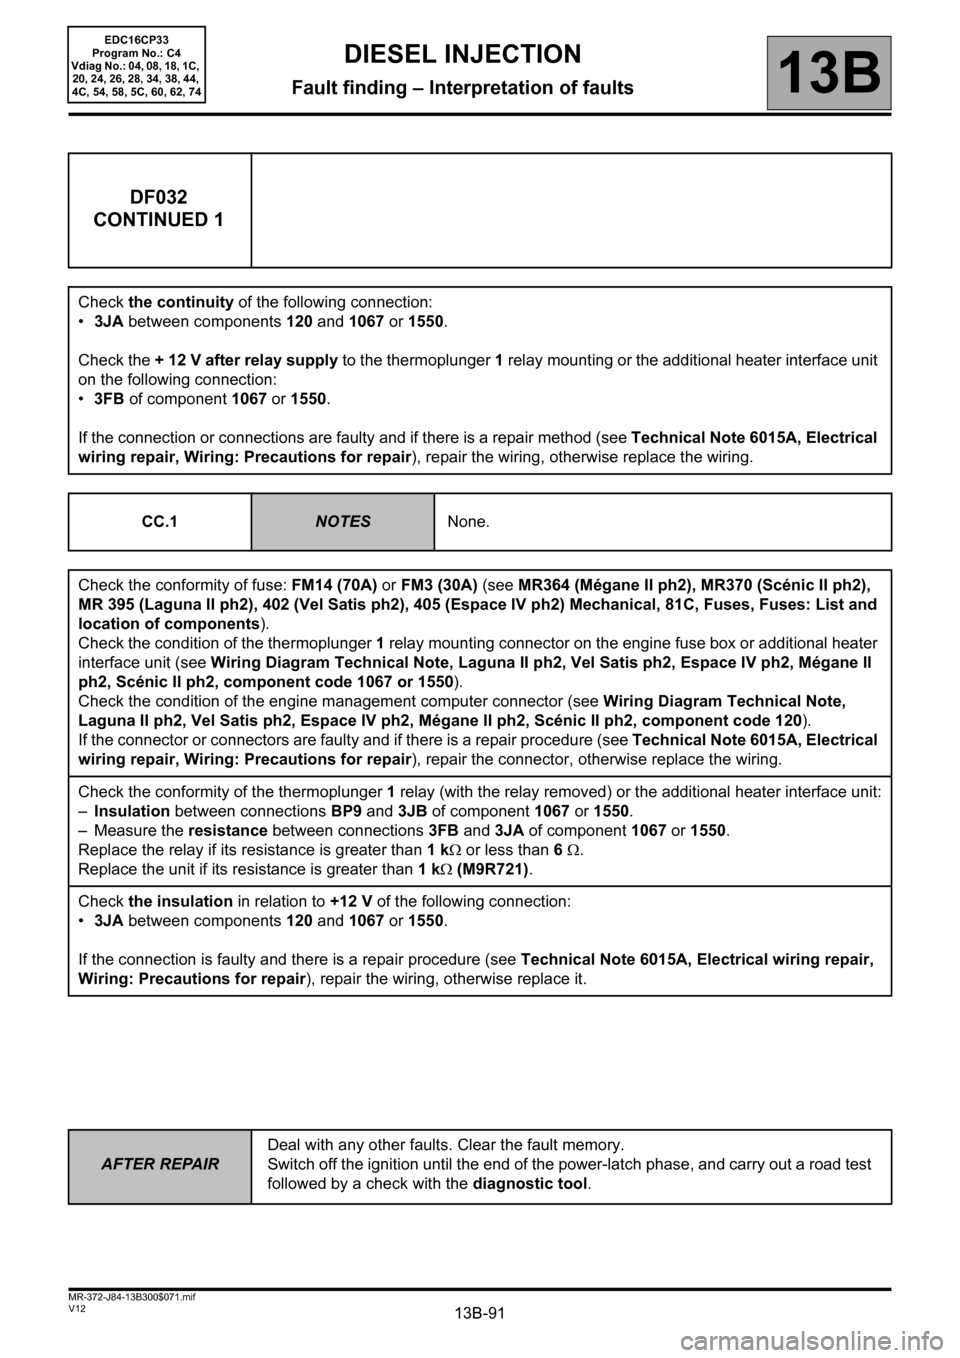
DF032
CONTINUED 1
Check the continuity of the following connection:
•3JA between components 120 and 1067 or 1550.
Check the + 12 V after relay supply to the thermoplunger 1 relay mounting or the additional heater interface unit
on the following connection:
•3FB of component 1067 or 1550.
If the connection or connections are faulty and if there is a repair method (see Technical Note 6015A, Electrical
wiring repair, Wiring: Precautions for repair), repair the wiring, otherwise replace the wiring.
CC.1
NOTESNone.
Check the conformity of fuse: FM14 (70A) or FM3 (30A) (see MR364 (Mégane II ph2), MR370 (Scénic II ph2),
MR 395 (Laguna II ph2), 402 (Vel Satis ph2), 405 (Espace IV ph2) Mechanical, 81C, Fuses, Fuses: List and
location of components).
Check the condition of the thermoplunger 1 relay mounting connector on the engine fuse box or additional heater
interface unit (see Wiring Diagram Technical Note, Laguna II ph2, Vel Satis ph2, Espace IV ph2, Mégane II
ph2, Scénic II ph2, component code 1067 or 1550).
Check the condition of the engine management computer connector (see Wiring Diagram Technical Note,
Laguna II ph2, Vel Satis ph2, Espace IV ph2, Mégane II ph2, Scénic II ph2, component code 120).
If the connector or connectors are faulty and if there is a repair procedure (see Technical Note 6015A, Electrical
wiring repair, Wiring: Precautions for repair), repair the connector, otherwise replace the wiring.
Check the conformity of the thermoplunger 1 relay (with the relay removed) or the additional heater interface unit:
–Insulation between connections BP9 and 3JB of component 1067 or 1550.
– Measure the resistance between connections3FB and 3JA of component1067 or 1550.
Replace the relay if its resistance is greater than 1 kΩ or less than 6 Ω.
Replace the unit if its resistance is greater than 1 kΩ (M9R721).
Check the insulation in relation to +12 V of the following connection:
•3JA between components 120 and 1067 or 1550.
If the connection is faulty and there is a repair procedure (see Technical Note 6015A, Electrical wiring repair,
Wiring: Precautions for repair), repair the wiring, otherwise replace it.
Page 92 of 510
13B-92
AFTER REPAIRDeal with any other faults. Clear the fault memory.
Switch off the ignition until the end of the power-latch phase, and carry out a road test
followed by a check with the diagnostic tool.
V12 MR-372-J84-13B300$071.mif
DIESEL INJECTION
Fault finding – Interpretation of faults13B
EDC16CP33
Program No.: C4
Vdiag No.: 04, 08, 18, 1C,
20, 24, 26, 28, 34, 38, 44,
4C, 54, 58, 5C, 60, 62, 74
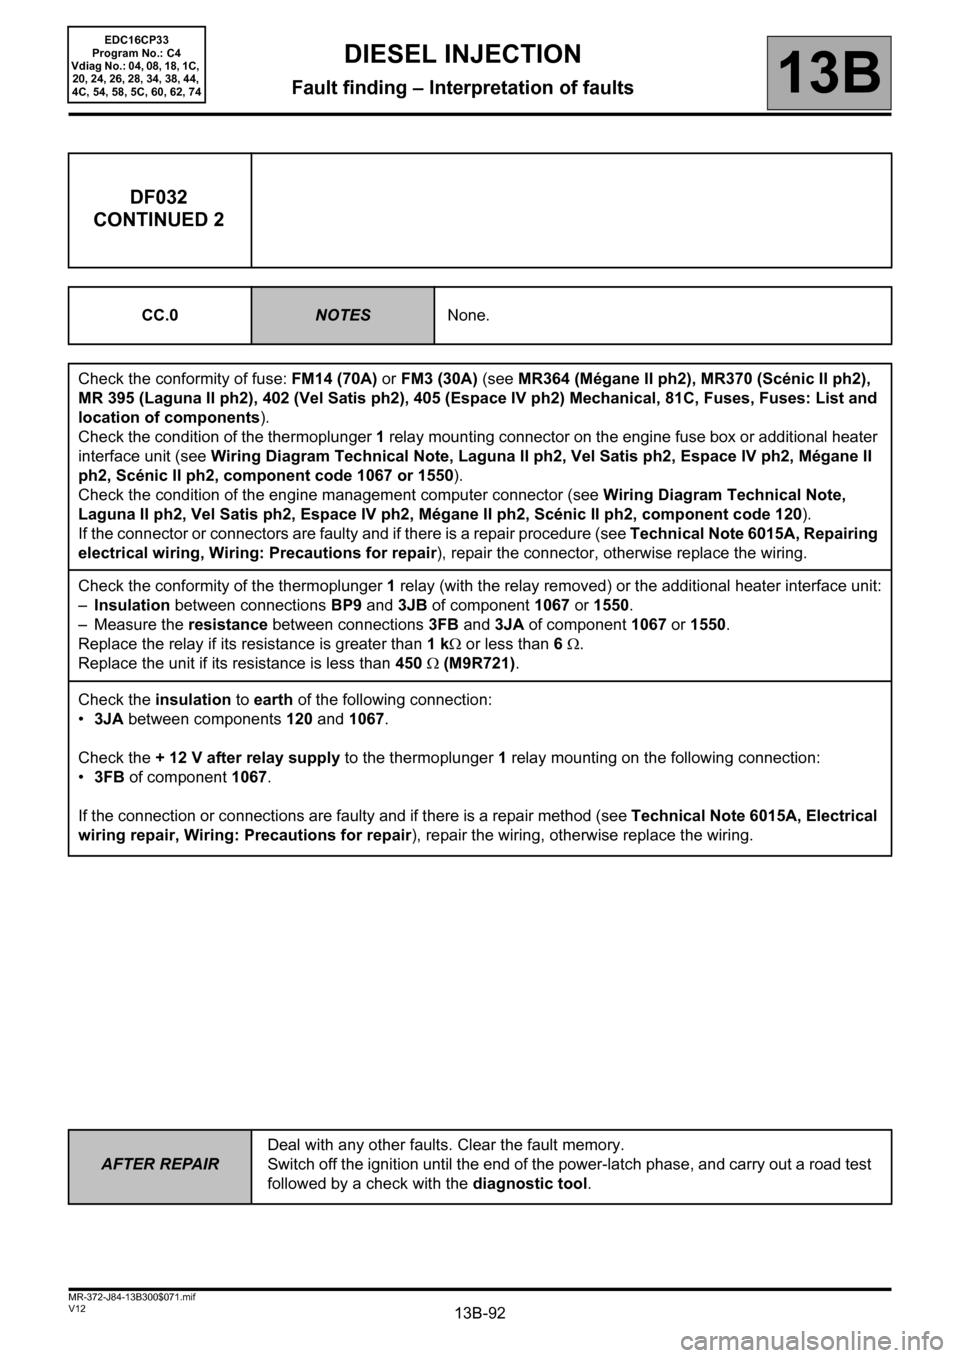
DF032
CONTINUED 2
CC.0NOTESNone.
Check the conformity of fuse: FM14 (70A) or FM3 (30A) (see MR364 (Mégane II ph2), MR370 (Scénic II ph2),
MR 395 (Laguna II ph2), 402 (Vel Satis ph2), 405 (Espace IV ph2) Mechanical, 81C, Fuses, Fuses: List and
location of components).
Check the condition of the thermoplunger 1 relay mounting connector on the engine fuse box or additional heater
interface unit (see Wiring Diagram Technical Note, Laguna II ph2, Vel Satis ph2, Espace IV ph2, Mégane II
ph2, Scénic II ph2, component code 1067 or 1550).
Check the condition of the engine management computer connector (see Wiring Diagram Technical Note,
Laguna II ph2, Vel Satis ph2, Espace IV ph2, Mégane II ph2, Scénic II ph2, component code 120).
If the connector or connectors are faulty and if there is a repair procedure (see Technical Note 6015A, Repairing
electrical wiring, Wiring: Precautions for repair), repair the connector, otherwise replace the wiring.
Check the conformity of the thermoplunger 1 relay (with the relay removed) or the additional heater interface unit:
–Insulation between connections BP9 and 3JB of component 1067 or 1550.
– Measure the resistance between connections3FB and 3JA of component1067 or 1550.
Replace the relay if its resistance is greater than 1 kΩ or less than 6 Ω.
Replace the unit if its resistance is less than 450 Ω (M9R721).
Check the insulation to earth of the following connection:
•3JA between components 120 and 1067.
Check the + 12 V after relay supply to the thermoplunger 1 relay mounting on the following connection:
•3FB of component 1067.
If the connection or connections are faulty and if there is a repair method (see Technical Note 6015A, Electrical
wiring repair, Wiring: Precautions for repair), repair the wiring, otherwise replace the wiring.