replace battery RENAULT SCENIC 2012 J95 / 3.G Engine And Peripherals EDC16CP33 Workshop Manual
[x] Cancel search | Manufacturer: RENAULT, Model Year: 2012, Model line: SCENIC, Model: RENAULT SCENIC 2012 J95 / 3.GPages: 510, PDF Size: 2.98 MB
Page 13 of 510
13B-13V12 MR-372-J84-13B300$030.mif
DIESEL INJECTION
Fault finding – System operation13B
EDC16CP33
Program No.: C4
Vdiag No.: 04, 08, 18, 1C,
20, 24, 26, 28, 34, 38, 44,
4C, 54, 58, 5C, 60, 62, 74
Fuel surplus from the pump, injector return rail or rail is collected in a low pressure "octopus manifold" and is then
sent to the fuel filter, providing that the fuel is cold (recirculation), and then to the tank.
The system can inject diesel fuel into the engine at a pressure of up to 1600 bar. Before each operation, check that
the injector rail is depressurised and that the fuel temperature is not too high.
You must respect the cleanliness guidelines and safety advice specified in this document for any work on the high
pressure injection system.
Removal of the internal parts of the pump and injectors is prohibited. Only the fuel pressure regulator (or actuator)
on the high pressure pump (MPROP), the fuel pressure regulator (or actuator) on the injector rail (DRV) or the diesel
temperature sensor can be replaced.
For safety reasons, it is strictly prohibited to undo a high pressure pipe union when the engine is running.
It is not possible to remove the pressure sensor from the fuel rail because this may cause circuit contamination
faults. If the pressure sensor fails, replace the pressure sensor, the rail and the high pressure pipes.
Some vehicles have a presence sensor mounted in the filter for detecting water in the diesel. If there is water in
the diesel fuel, the orange "Injection and pre-post heating" warning light will come on.
Supplying + 12 V directly to any component in the system is prohibited.
Ultrasonic decoking and cleaning are prohibited.
Never start the engine unless the battery is connected correctly.
Disconnect the injection computer when carrying out any welding work on the vehicle.
b. The connections between the vehicle's various computers are multiplexed.
The electronic system fitted in this vehicle is multiplexed.
This enables dialogue between the various vehicle computers. As a result:
– the fault warning lights on the instrument panel are lit by the multiplex network,
– vehicle faults are displayed by the multiplex network,
– the vehicle speed sensor on the gearbox is not needed.
The vehicle speed signal on the instrument panel is sent by the ABS computer via the multiplex network. The vehicle
speed signal is mainly used by the injection computer, the airbag computer and the automatic transmission
computer (if the vehicle is fitted with this).WARNING:
The engine must not operate with:
– Diesel fuel containing more than 10% diester,
– petrol, even in tiny quantities.
Note:
For the M9R 724 (Vdiag 5C and 58):
The engine is limited to 3000 rpm if the vehicle is stationary or if the vehicle speed is less than 4 mph (7 km/h)
and if the engine is warm.
Page 18 of 510
13B-18V12 MR-372-J84-13B300$030.mif
DIESEL INJECTION
Fault finding – System operation13B
EDC16CP33
Program No.: C4
Vdiag No.: 04, 08, 18, 1C,
20, 24, 26, 28, 34, 38, 44,
4C, 54, 58, 5C, 60, 62, 74
VI - Pre-postheating actuation
Pre/postheating control involves actuating the heater plugs and the preheating indicator light on the instrument
panel (multiplex signal).
The heater plugs are actuated by a static relay.
After the ignition is switched on, a preheating delay is activated. The length of time that the warning light is lit
depends on the coolant temperature, air temperature, atmospheric pressure and battery voltage. When the coolant
temperature is below a certain threshold, a postheating function can be used to improve the combustion stability,
and consequently engine operation (reducing unburnt particles and pollutant emissions). Postheating can last up
to5 minutes.
IMPORTANT:
There are two types of heater plug: SLOW and FAST:
SLOW plugs are identified by a black ring.
FAST plugs are identified by a white ring.
The heater plugs fitted on the vehicle must be replaced with plugs of the same type; otherwise there is
a risk of the heater plugs deteriorating which could lead to engine destruction.
Only Vdiag 20, 24, 38 and 74:
when replacing heater plugs with plugs which differ from those currently fitted on the vehicle (replacement of
SLOW plugs with FAST plugs), the computer must be configured (see Replacement of components, Replacing
heater plugs) by running command SC036 Reinitialise programming and selecting Heater plugs if this choice
is available, then following the procedure.
Page 56 of 510
13B-56
AFTER REPAIRDeal with any other faults. Clear the fault memory.
Switch off the ignition until the end of the power-latch phase, and carry out a road test
followed by a check with the diagnostic tool.
V12 MR-372-J84-13B300$071.mif
DIESEL INJECTION
Fault finding – Interpretation of faults13B
EDC16CP33
Program No.: C4
Vdiag No.: 04, 08, 18, 1C,
20, 24, 26, 28, 34, 38, 44,
4C, 54, 58, 5C, 60, 62, 74
DF017
CONTINUED 1
Check the continuity of the following connection:
•3FF between components 120 and 257.
Check the + 12 V battery supply to the preheating unit on the following connection:
•BP35 of component 257.
If the connection or connections are faulty and if there is a repair method (see Technical Note 6015A, Electrical
wiring repair, Wiring: Precautions for repair), repair the wiring, otherwise replace the wiring.
If the fault is still present, replace the pre-postheating unit.
CC.1
NOTESNone.
Check the condition of the preheating unit connector (see Wiring Diagram Technical Note, Laguna II ph2, Vel
Satis ph2, Espace IV ph2, Mégane II ph2, Scénic II ph2, component code 257).
Check the condition of the engine management computer connector (see Wiring Diagram Technical Note,
Laguna II ph2, Vel Satis ph2, Espace IV ph2, Mégane II ph2, Scénic II ph2, component code 120).
If the connector or connectors are faulty and if there is a repair procedure (see Technical Note 6015A, Repairing
electrical wiring, Wiring: Precautions for repair), repair the connector, otherwise replace the wiring.
Measure the resistance between connections 3FF and BP35 of component 257.
If the resistance is less than 1 kΩ, replace the preheating unit.
Check the insulation in relation to +12 V of the following connection:
•3FF between components 120 and 257.
If the connection is faulty and there is a repair procedure (see Technical Note 6015A, Electrical wiring repair,
Wiring: Precautions for repair), repair the wiring, otherwise replace it.
If the fault is still present, replace the pre-postheating unit.
Page 57 of 510
13B-57
AFTER REPAIRDeal with any other faults. Clear the fault memory.
Switch off the ignition until the end of the power-latch phase, and carry out a road test
followed by a check with the diagnostic tool.
V12 MR-372-J84-13B300$071.mif
DIESEL INJECTION
Fault finding – Interpretation of faults13B
EDC16CP33
Program No.: C4
Vdiag No.: 04, 08, 18, 1C,
20, 24, 26, 28, 34, 38, 44,
4C, 54, 58, 5C, 60, 62, 74
DF017
CONTINUED 2
CC.0NOTESNone.
Check the condition of the preheating unit connector (see Wiring Diagram Technical Note, Laguna II ph2, Vel
Satis ph2, Espace IV ph2, Mégane II ph2, Scénic II ph2, component code 257).
Check the condition of the engine management computer connector (see Wiring Diagram Technical Note,
Laguna II ph2, Vel Satis ph2, Espace IV ph2, Mégane II ph2, Scénic II ph2, component code 120).
If the connector or connectors are faulty and if there is a repair procedure (see Technical Note 6015A, Repairing
electrical wiring, Wiring: Precautions for repair), repair the connector, otherwise replace the wiring.
Measure the resistance between connections 3FF and BP35 of component 257.
If the resistance is less than 450Ω, replace the preheating unit.
Check the insulation to earth of the following connection:
•3FF between components 120 and 257.
Check the + 12 V battery supply to the preheating unit:
•BP35 of component 257,
If the connection or connections are faulty and if there is a repair method (see Technical Note 6015A, Electrical
wiring repair, Wiring: Precautions for repair), repair the wiring, otherwise replace the wiring.
If the fault is still present, replace the pre-postheating unit.
Page 58 of 510
13B-58
AFTER REPAIRDeal with any other faults. Clear the fault memory.
Switch off the ignition until the end of the power-latch phase, and carry out a road test
followed by a check with the diagnostic tool.
V12 MR-372-J84-13B300$071.mif
DIESEL INJECTION
Fault finding – Interpretation of faults13B
EDC16CP33
Program No.: C4
Vdiag No.: 04, 08, 18, 1C,
20, 24, 26, 28, 34, 38, 44,
4C, 54, 58, 5C, 60, 62, 74
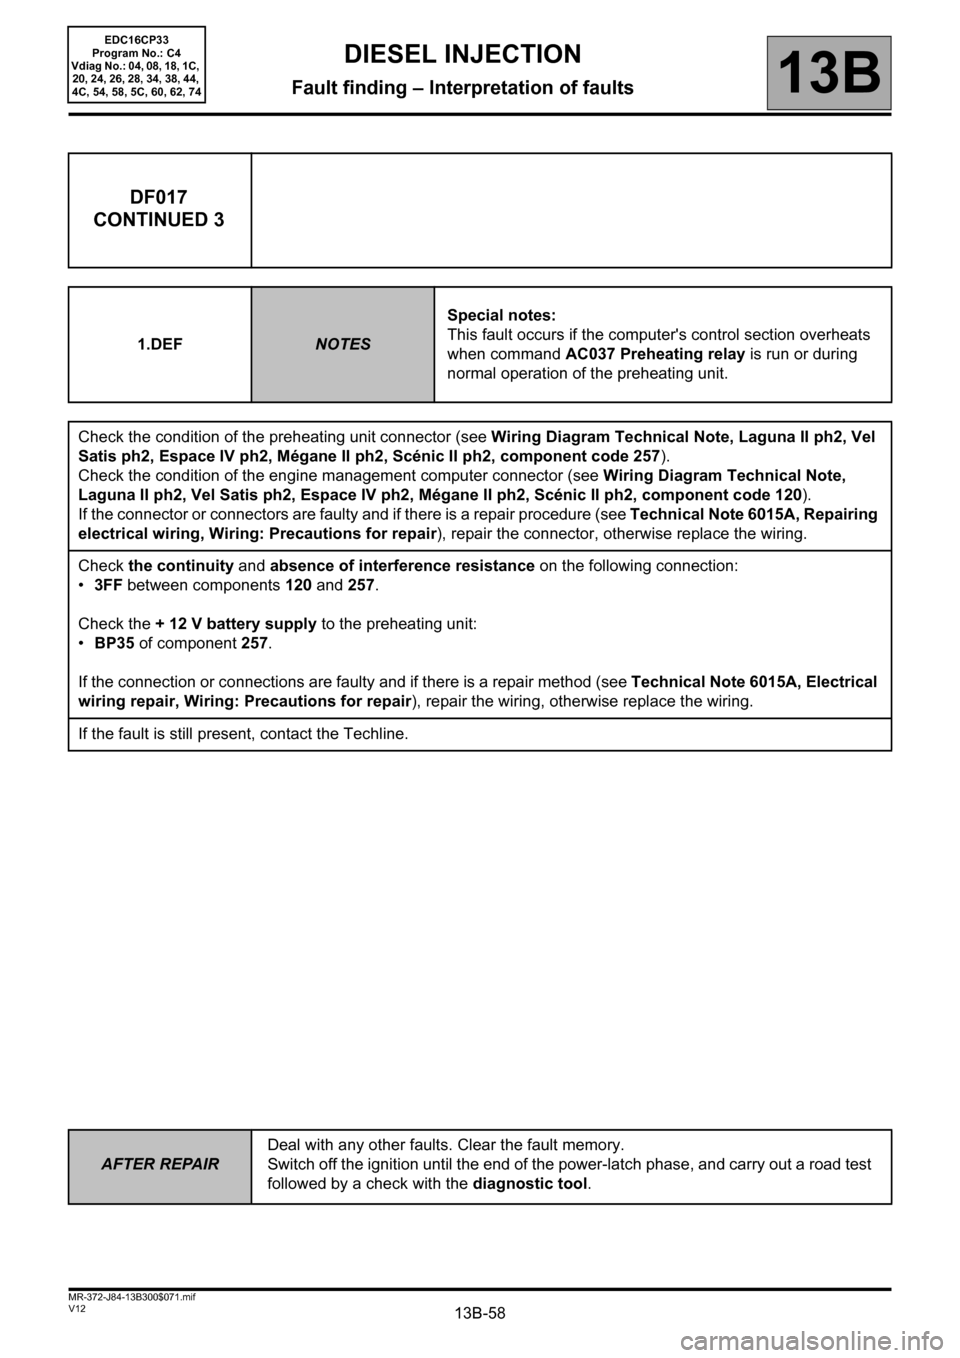
DF017
CONTINUED 3
1.DEFNOTESSpecial notes:
This fault occurs if the computer's control section overheats
when command AC037 Preheating relay is run or during
normal operation of the preheating unit.
Check the condition of the preheating unit connector (see Wiring Diagram Technical Note, Laguna II ph2, Vel
Satis ph2, Espace IV ph2, Mégane II ph2, Scénic II ph2, component code 257).
Check the condition of the engine management computer connector (see Wiring Diagram Technical Note,
Laguna II ph2, Vel Satis ph2, Espace IV ph2, Mégane II ph2, Scénic II ph2, component code 120).
If the connector or connectors are faulty and if there is a repair procedure (see Technical Note 6015A, Repairing
electrical wiring, Wiring: Precautions for repair), repair the connector, otherwise replace the wiring.
Check the continuity and absence of interference resistance on the following connection:
•3FF between components120 and 257.
Check the + 12 V battery supply to the preheating unit:
•BP35 of component 257.
If the connection or connections are faulty and if there is a repair method (see Technical Note 6015A, Electrical
wiring repair, Wiring: Precautions for repair), repair the wiring, otherwise replace the wiring.
If the fault is still present, contact the Techline.
Page 69 of 510
13B-69
AFTER REPAIRDeal with any other faults. Clear the fault memory.
Switch off the ignition until the end of the power-latch phase, and carry out a road test
followed by a check with the diagnostic tool.
V12 MR-372-J84-13B300$071.mif
DIESEL INJECTION
Fault finding – Interpretation of faults13B
EDC16CP33
Program No.: C4
Vdiag No.: 04, 08, 18, 1C,
20, 24, 26, 28, 34, 38, 44,
4C, 54, 58, 5C, 60, 62, 74
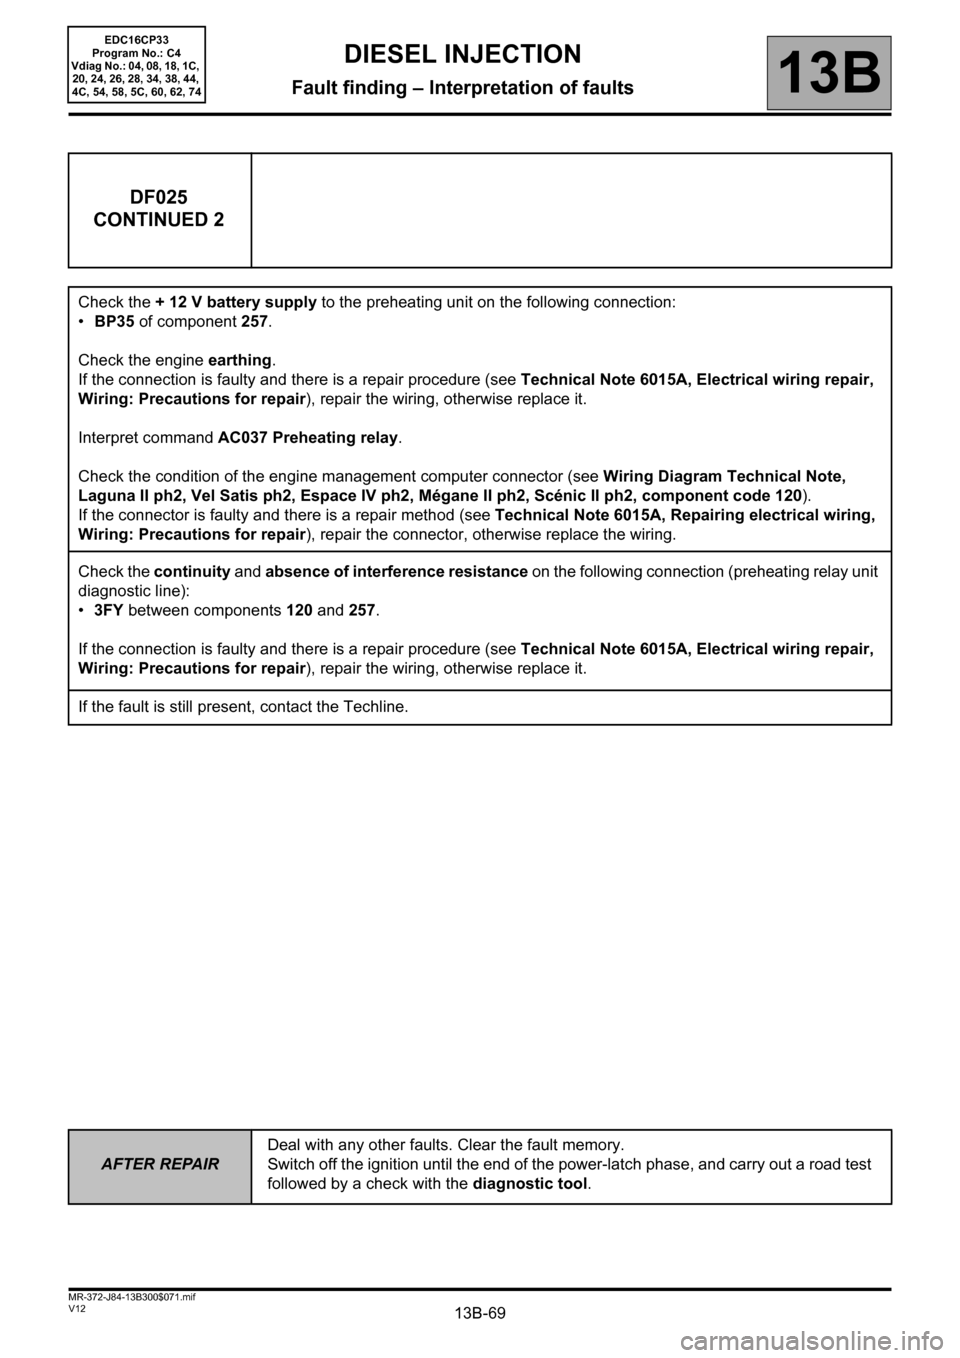
DF025
CONTINUED 2
Check the + 12 V battery supply to the preheating unit on the following connection:
•BP35 of component 257.
Check the engine earthing.
If the connection is faulty and there is a repair procedure (see Technical Note 6015A, Electrical wiring repair,
Wiring: Precautions for repair), repair the wiring, otherwise replace it.
Interpret command AC037 Preheating relay.
Check the condition of the engine management computer connector (see Wiring Diagram Technical Note,
Laguna II ph2, Vel Satis ph2, Espace IV ph2, Mégane II ph2, Scénic II ph2, component code 120).
If the connector is faulty and there is a repair method (see Technical Note 6015A, Repairing electrical wiring,
Wiring: Precautions for repair), repair the connector, otherwise replace the wiring.
Check the continuity and absence of interference resistance on the following connection (preheating relay unit
diagnostic line):
•3FY between components 120 and 257.
If the connection is faulty and there is a repair procedure (see Technical Note 6015A, Electrical wiring repair,
Wiring: Precautions for repair), repair the wiring, otherwise replace it.
If the fault is still present, contact the Techline.
Page 93 of 510
13B-93
AFTER REPAIRDeal with any other faults. Clear the fault memory.
Switch off the ignition until the end of the power-latch phase, and carry out a road test
followed by a check with the diagnostic tool.
V12 MR-372-J84-13B300$071.mif
DIESEL INJECTION
Fault finding – Interpretation of faults13B
EDC16CP33
Program No.: C4
Vdiag No.: 04, 08, 18, 1C,
20, 24, 26, 28, 34, 38, 44,
4C, 54, 58, 5C, 60, 62, 74
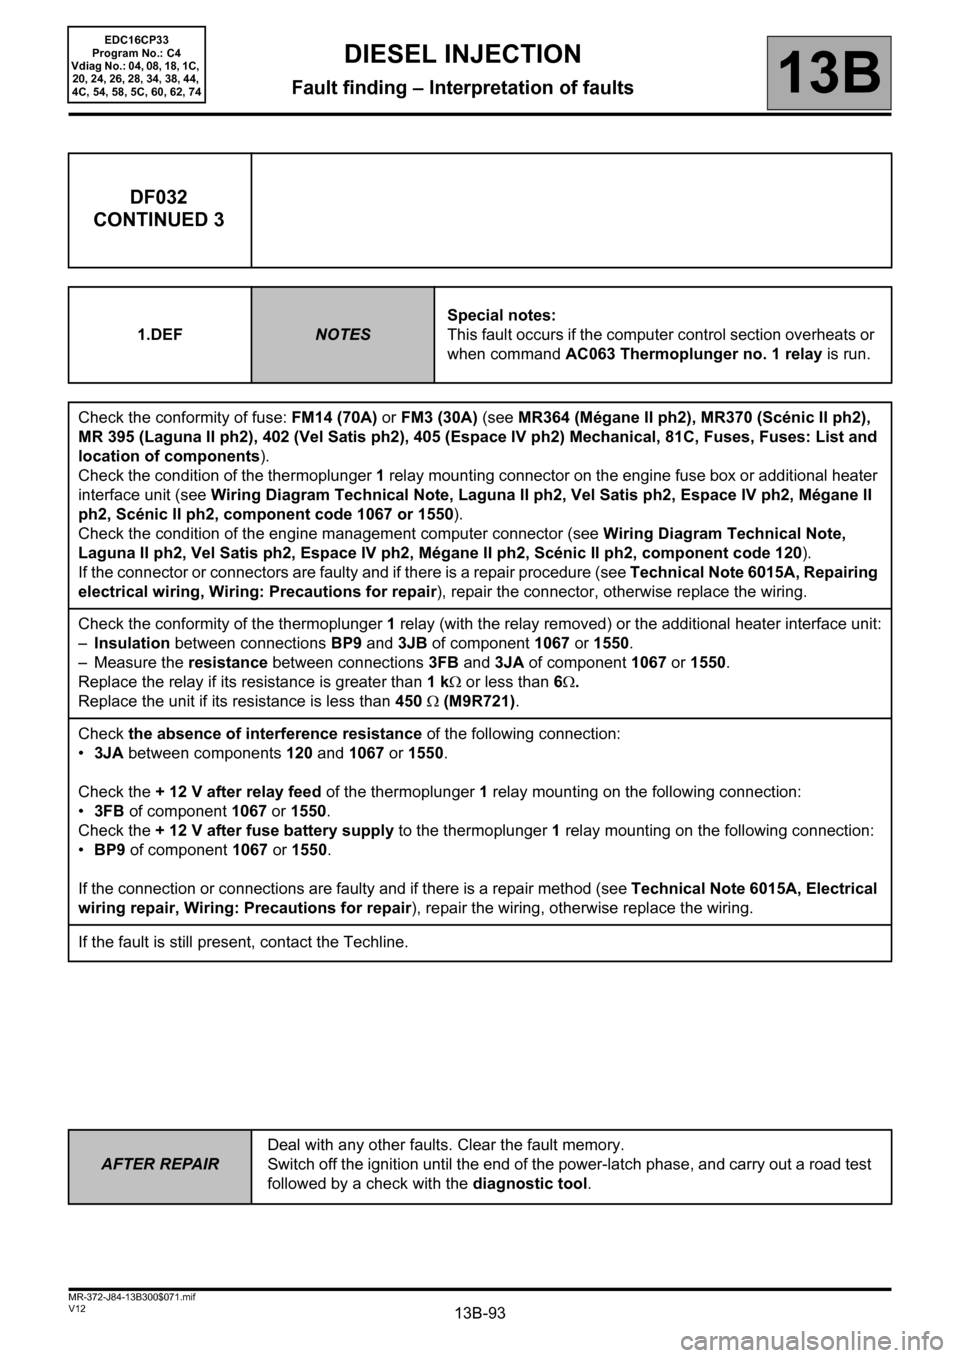
DF032
CONTINUED 3
1.DEFNOTESSpecial notes:
This fault occurs if the computer control section overheats or
when command AC063 Thermoplunger no. 1 relay is run.
Check the conformity of fuse: FM14 (70A) or FM3 (30A) (see MR364 (Mégane II ph2), MR370 (Scénic II ph2),
MR 395 (Laguna II ph2), 402 (Vel Satis ph2), 405 (Espace IV ph2) Mechanical, 81C, Fuses, Fuses: List and
location of components).
Check the condition of the thermoplunger 1 relay mounting connector on the engine fuse box or additional heater
interface unit (see Wiring Diagram Technical Note, Laguna II ph2, Vel Satis ph2, Espace IV ph2, Mégane II
ph2, Scénic II ph2, component code 1067 or 1550).
Check the condition of the engine management computer connector (see Wiring Diagram Technical Note,
Laguna II ph2, Vel Satis ph2, Espace IV ph2, Mégane II ph2, Scénic II ph2, component code 120).
If the connector or connectors are faulty and if there is a repair procedure (see Technical Note 6015A, Repairing
electrical wiring, Wiring: Precautions for repair), repair the connector, otherwise replace the wiring.
Check the conformity of the thermoplunger 1 relay (with the relay removed) or the additional heater interface unit:
–Insulation between connections BP9 and 3JB of component 1067 or 1550.
– Measure the resistance between connections3FB and 3JA of component1067 or 1550.
Replace the relay if its resistance is greater than 1 kΩ or less than 6Ω.
Replace the unit if its resistance is less than 450 Ω (M9R721).
Check the absence of interference resistance of the following connection:
•3JA between components 120 and 1067 or 1550.
Check the + 12 V after relay feed of the thermoplunger 1 relay mounting on the following connection:
•3FB of component 1067 or
1550.
Check the + 12 V after fuse battery supply to the thermoplunger 1 relay mounting on the following connection:
•BP9 of component 1067 or 1550.
If the connection or connections are faulty and if there is a repair method (see Technical Note 6015A, Electrical
wiring repair, Wiring: Precautions for repair), repair the wiring, otherwise replace the wiring.
If the fault is still present, contact the Techline.
Page 97 of 510
13B-97
AFTER REPAIRDeal with any other faults. Clear the fault memory.
Switch off the ignition until the end of the power-latch phase, and carry out a road test
followed by a check with the diagnostic tool.
V12 MR-372-J84-13B300$072.mif
DIESEL INJECTION
Fault finding – Interpretation of faults13B
EDC16CP33
Program No.: C4
Vdiag No.: 04, 08, 18, 1C,
20, 24, 26, 28, 34, 38, 44,
4C, 54, 58, 5C, 60, 62, 74
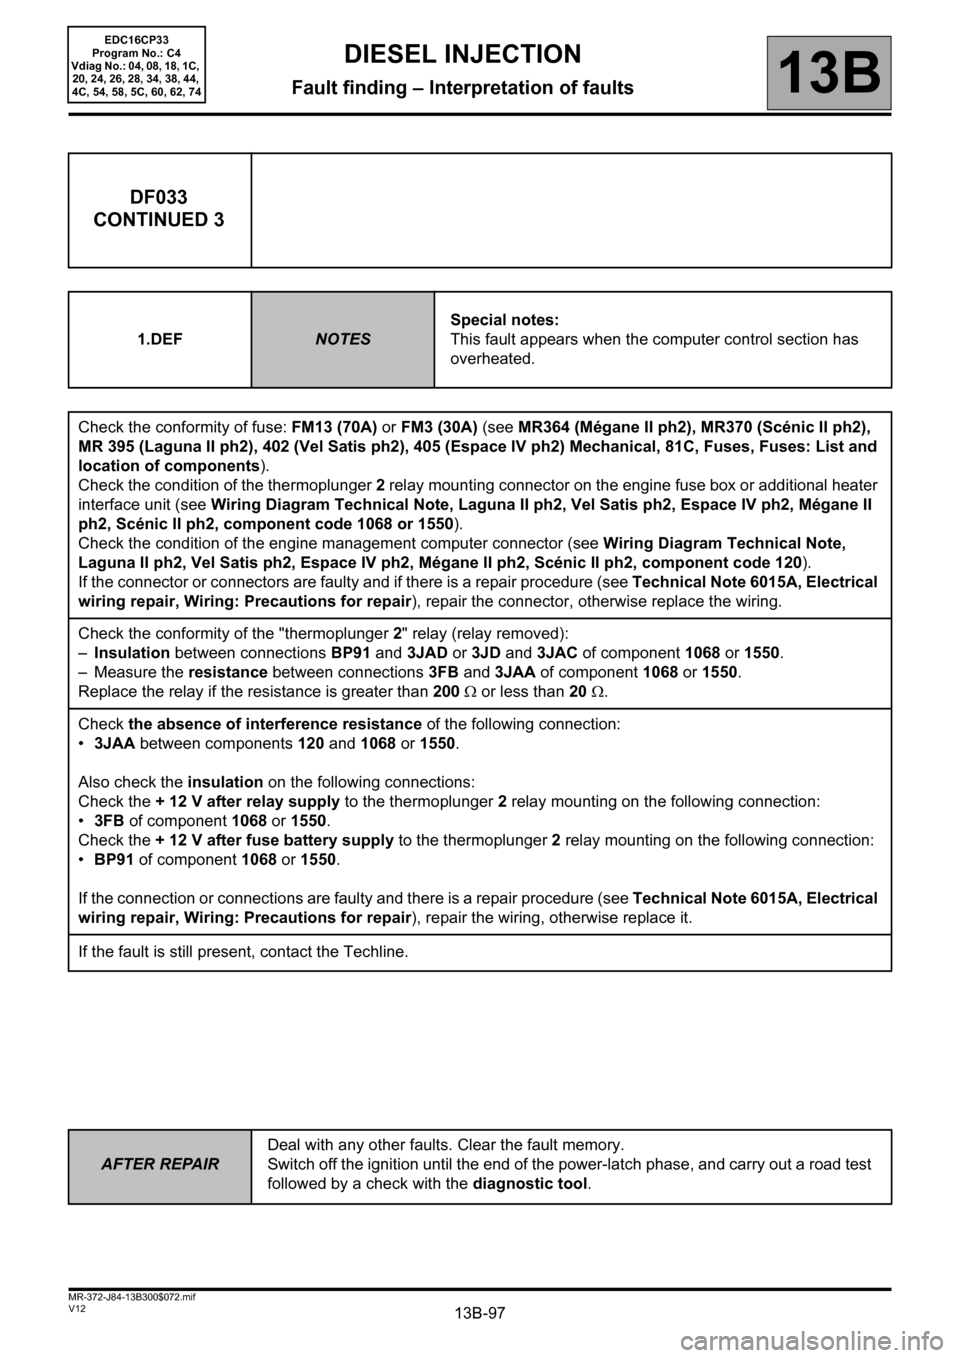
DF033
CONTINUED 3
1.DEFNOTESSpecial notes:
This fault appears when the computer control section has
overheated.
Check the conformity of fuse: FM13 (70A) or FM3 (30A) (see MR364 (Mégane II ph2), MR370 (Scénic II ph2),
MR 395 (Laguna II ph2), 402 (Vel Satis ph2), 405 (Espace IV ph2) Mechanical, 81C, Fuses, Fuses: List and
location of components).
Check the condition of the thermoplunger 2 relay mounting connector on the engine fuse box or additional heater
interface unit (see Wiring Diagram Technical Note, Laguna II ph2, Vel Satis ph2, Espace IV ph2, Mégane II
ph2, Scénic II ph2, component code 1068 or 1550).
Check the condition of the engine management computer connector (see Wiring Diagram Technical Note,
Laguna II ph2, Vel Satis ph2, Espace IV ph2, Mégane II ph2, Scénic II ph2, component code 120).
If the connector or connectors are faulty and if there is a repair procedure (see Technical Note 6015A, Electrical
wiring repair, Wiring: Precautions for repair), repair the connector, otherwise replace the wiring.
Check the conformity of the "thermoplunger 2" relay (relay removed):
–Insulation between connections BP91 and 3JAD or 3JD and 3JAC of component 1068 or 1550.
– Measure the resistance between connections 3FB and 3JAA of component 1068 or 1550.
Replace the relay if the resistance is greater than 200 Ω or less than 20 Ω.
Check the absence of interference resistance of the following connection:
•3JAA between components 120 and 1068 or 1550.
Also check the insulation on the following connections:
Check the + 12 V after relay supply to the thermoplunger 2 relay mounting on the following connection:
•3FB of component 1068
or 1550.
Check the + 12 V after fuse battery supply to the thermoplunger 2 relay mounting on the following connection:
•BP91 of component 1068 or 1550.
If the connection or connections are faulty and there is a repair procedure (see Technical Note 6015A, Electrical
wiring repair, Wiring: Precautions for repair), repair the wiring, otherwise replace it.
If the fault is still present, contact the Techline.
Page 101 of 510
13B-101
AFTER REPAIRDeal with any other faults. Clear the fault memory.
Switch off the ignition until the end of the power-latch phase, and carry out a road test
followed by a check with the diagnostic tool.
V12 MR-372-J84-13B300$072.mif
DIESEL INJECTION
Fault finding – Interpretation of faults13B
EDC16CP33
Program No.: C4
Vdiag No.: 04, 08, 18, 1C,
20, 24, 26, 28, 34, 38, 44,
4C, 54, 58, 5C, 60, 62, 74
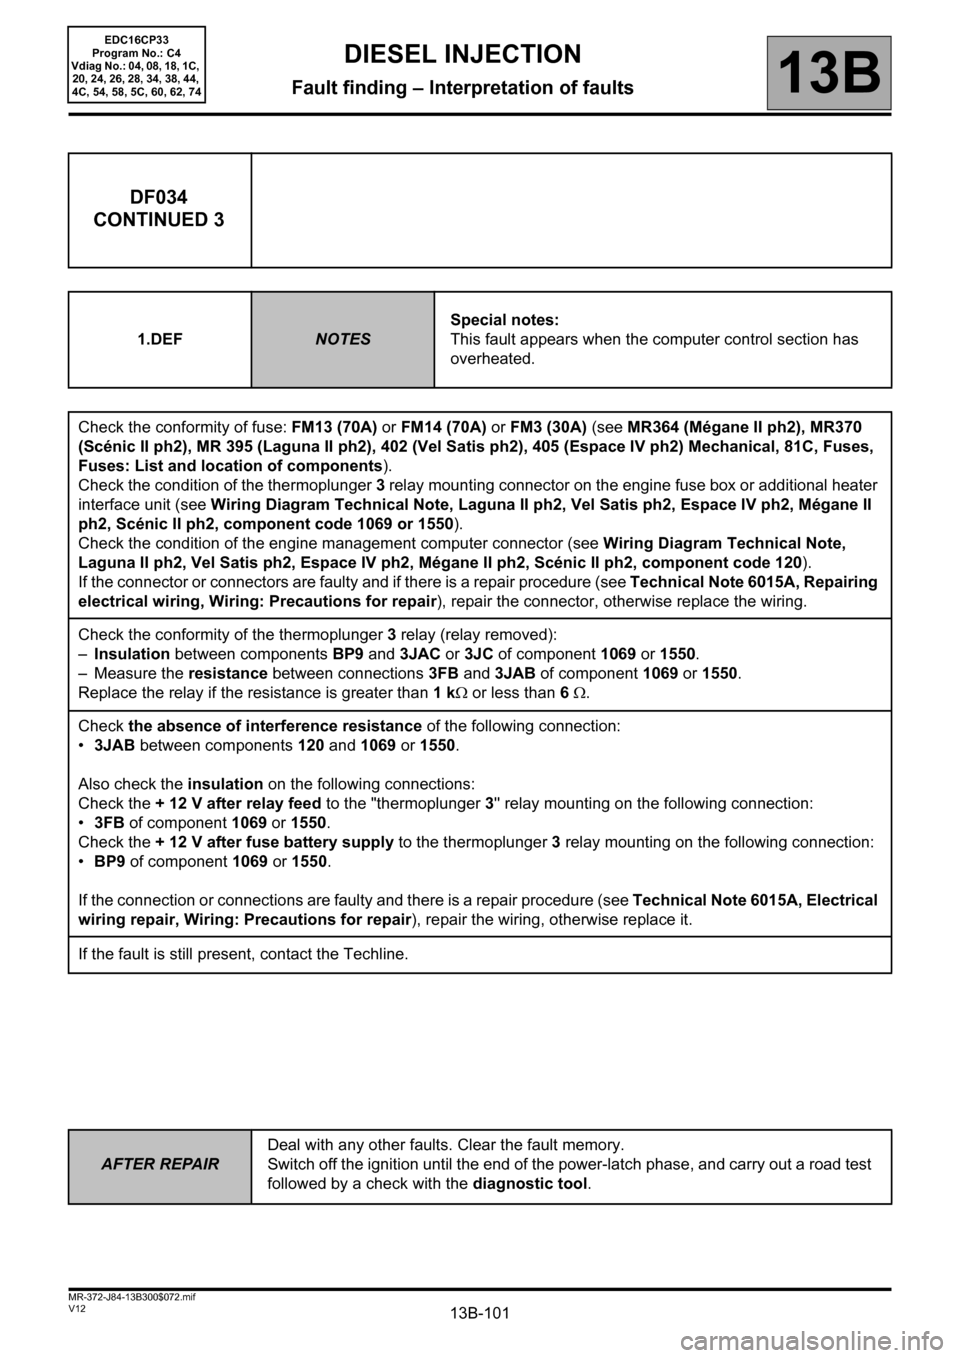
DF034
CONTINUED 3
1.DEFNOTESSpecial notes:
This fault appears when the computer control section has
overheated.
Check the conformity of fuse: FM13 (70A) or FM14 (70A) or FM3 (30A) (see MR364 (Mégane II ph2), MR370
(Scénic II ph2), MR 395 (Laguna II ph2), 402 (Vel Satis ph2), 405 (Espace IV ph2) Mechanical, 81C, Fuses,
Fuses: List and location of components).
Check the condition of the thermoplunger 3 relay mounting connector on the engine fuse box or additional heater
interface unit (see Wiring Diagram Technical Note, Laguna II ph2, Vel Satis ph2, Espace IV ph2, Mégane II
ph2, Scénic II ph2, component code 1069 or 1550).
Check the condition of the engine management computer connector (see Wiring Diagram Technical Note,
Laguna II ph2, Vel Satis ph2, Espace IV ph2, Mégane II ph2, Scénic II ph2, component code 120).
If the connector or connectors are faulty and if there is a repair procedure (see Technical Note 6015A, Repairing
electrical wiring, Wiring: Precautions for repair), repair the connector, otherwise replace the wiring.
Check the conformity of the thermoplunger 3 relay (relay removed):
–Insulation between components BP9 and 3JAC or 3JC of component 1069 or 1550.
– Measure the resistance between connections 3FB and 3JAB of component 1069 or 1550.
Replace the relay if the resistance is greater than 1 kΩ or less than 6 Ω.
Check the absence of interference resistance of the following connection:
•3JAB between components 120 and 1069 or 1550.
Also check the insulation on the following connections:
Check the + 12 V after relay feed to the "thermoplunger 3'' relay mounting on the following connection:
•3FB of component 1069 or
1550.
Check the + 12 V after fuse battery supply to the thermoplunger 3 relay mounting on the following connection:
•BP9 of component 1069 or 1550.
If the connection or connections are faulty and there is a repair procedure (see Technical Note 6015A, Electrical
wiring repair, Wiring: Precautions for repair), repair the wiring, otherwise replace it.
If the fault is still present, contact the Techline.
Page 105 of 510
13B-105
AFTER REPAIRDeal with any other faults. Clear the fault memory.
Switch off the ignition until the end of the power-latch phase, and carry out a road test
followed by a check with the diagnostic tool.
V12 MR-372-J84-13B300$072.mif
DIESEL INJECTION
Fault finding – Interpretation of faults13B
EDC16CP33
Program No.: C4
Vdiag No.: 04, 08, 18, 1C,
20, 24, 26, 28, 34, 38, 44,
4C, 54, 58, 5C, 60, 62, 74
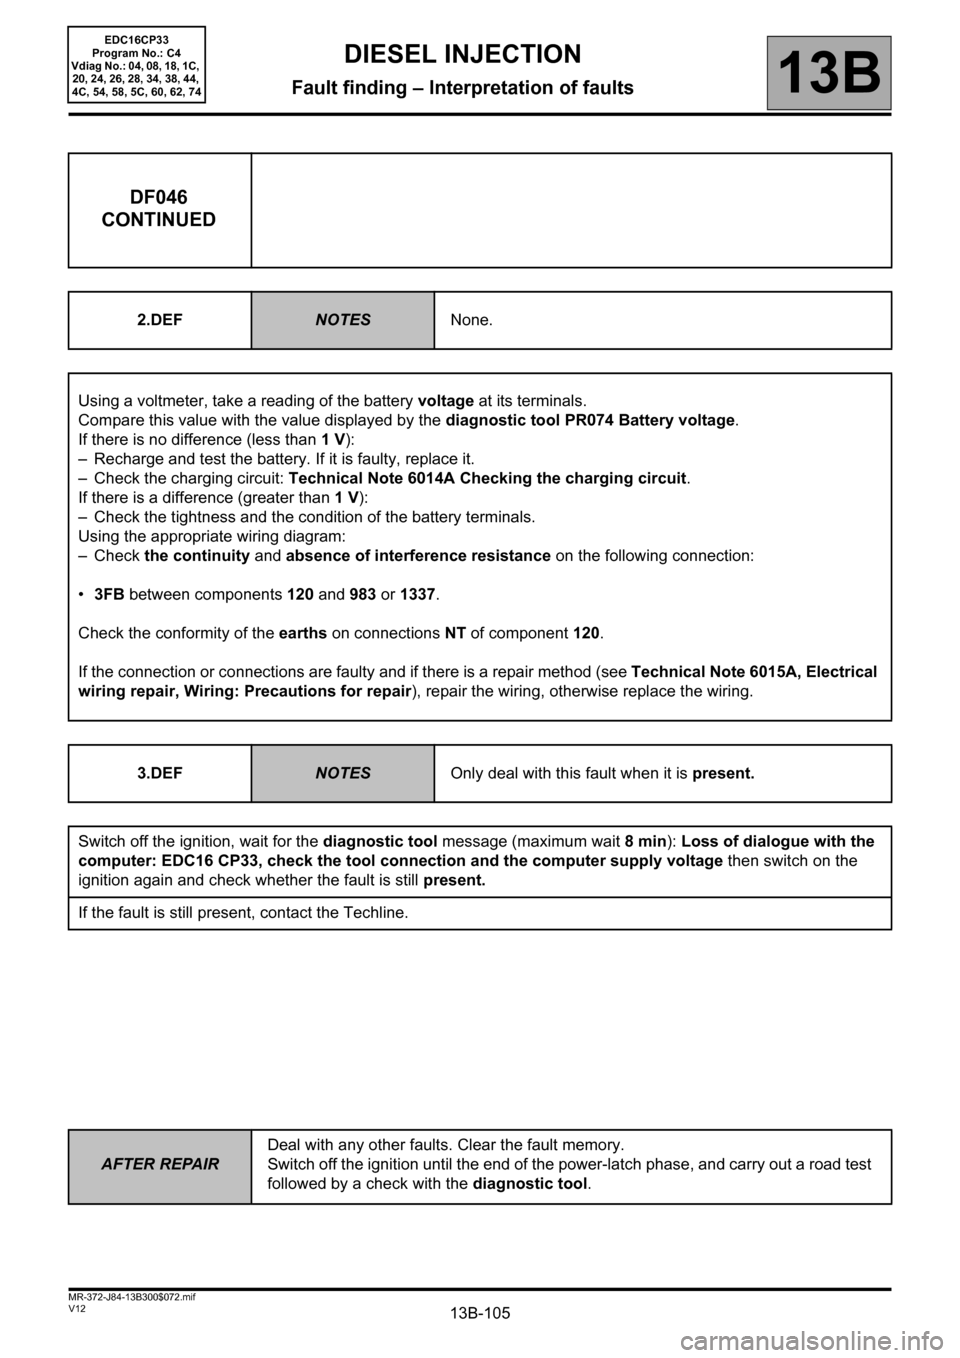
DF046
CONTINUED
2.DEFNOTESNone.
Using a voltmeter, take a reading of the battery voltage at its terminals.
Compare this value with the value displayed by the diagnostic tool PR074 Battery voltage.
If there is no difference (less than 1 V):
– Recharge and test the battery. If it is faulty, replace it.
– Check the charging circuit: Technical Note 6014A Checking the charging circuit.
If there is a difference (greater than 1 V):
– Check the tightness and the condition of the battery terminals.
Using the appropriate wiring diagram:
–Check the continuity and absence of interference resistance on the following connection:
•3FB between components 120 and 983 or 1337.
Check the conformity of the earths on connections NT of component 120.
If the connection or connections are faulty and if there is a repair method (see Technical Note 6015A, Electrical
wiring repair, Wiring: Precautions for repair), repair the wiring, otherwise replace the wiring.
3.DEF
NOTESOnly deal with this fault when it is present.
Switch off the ignition, wait for the diagnostic tool message (maximum wait 8 min): Loss of dialogue with the
computer: EDC16 CP33, check the tool connection and the computer supply voltage then switch on the
ignition again and check whether the fault is still present.
If the fault is still present, contact the Techline.