warning RENAULT SCENIC 2014 J95 / 3.G Petrol Injection - Sagem3000 Owner's Guide
[x] Cancel search | Manufacturer: RENAULT, Model Year: 2014, Model line: SCENIC, Model: RENAULT SCENIC 2014 J95 / 3.GPages: 181
Page 54 of 181
PETROL INJECTION
Fault finding – Interpretation of faults17B
17B-54V12 MR-372-J84-17B000$360.mif
SAGEM 3000
Program No.: A7
Vdiag No.: 44, 48
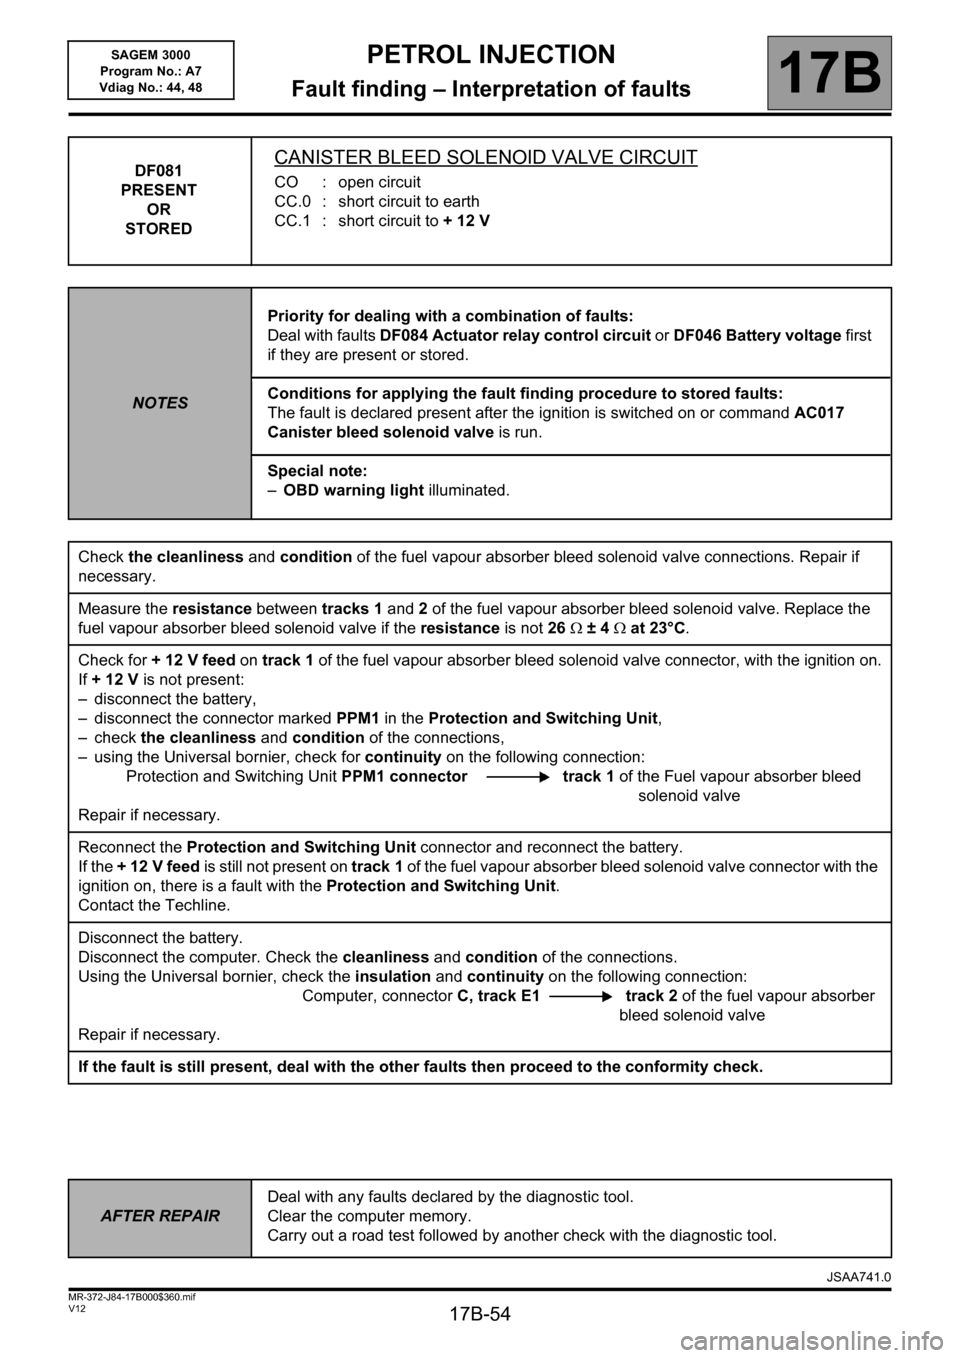
DF081
PRESENT
OR
STOREDCANISTER BLEED SOLENOID VALVE CIRCUIT
CO : open circuit
CC.0 : short circuit to earth
CC.1 : short circuit to + 12 V
NOTESPriority for dealing with a combination of faults:
Deal with faults DF084 Actuator relay control circuit or DF046 Battery voltage first
if they are present or stored.
Conditions for applying the fault finding procedure to stored faults:
The fault is declared present after the ignition is switched on or command AC017
Canister bleed solenoid valve is run.
Special note:
–OBD warning light illuminated.
Check the cleanliness and condition of the fuel vapour absorber bleed solenoid valve connections. Repair if
necessary.
Measure the resistance between tracks 1 and 2 of the fuel vapour absorber bleed solenoid valve. Replace the
fuel vapour absorber bleed solenoid valve if the resistance is not 26 ±4 at 23°C.
Check for + 12 V feed on track 1 of the fuel vapour absorber bleed solenoid valve connector, with the ignition on.
If +12V is not present:
– disconnect the battery,
– disconnect the connector marked PPM1 in the Protection and Switching Unit,
–check the cleanliness and condition of the connections,
– using the Universal bornier, check for continuity on the following connection:
Protection and Switching Unit PPM1 connector track 1 of the Fuel vapour absorber bleed
solenoid valve
Repair if necessary.
Reconnect the Protection and Switching Unit connector and reconnect the battery.
If the + 12 V feed is still not present on track 1 of the fuel vapour absorber bleed solenoid valve connector with the
ignition on, there is a fault with the Protection and Switching Unit.
Contact the Techline.
Disconnect the battery.
Disconnect the computer. Check the cleanliness and condition of the connections.
Using the Universal bornier, check the insulation and continuity on the following connection:
Computer, connector C, track E1 track 2 of the fuel vapour absorber
bleed solenoid valve
Repair if necessary.
If the fault is still present, deal with the other faults then proceed to the conformity check.
AFTER REPAIRDeal with any faults declared by the diagnostic tool.
Clear the computer memory.
Carry out a road test followed by another check with the diagnostic tool.
JSAA741.0
Page 55 of 181
PETROL INJECTION
Fault finding – Interpretation of faults17B
17B-55V12 MR-372-J84-17B000$360.mif
SAGEM 3000
Program No.: A7
Vdiag No.: 44, 48
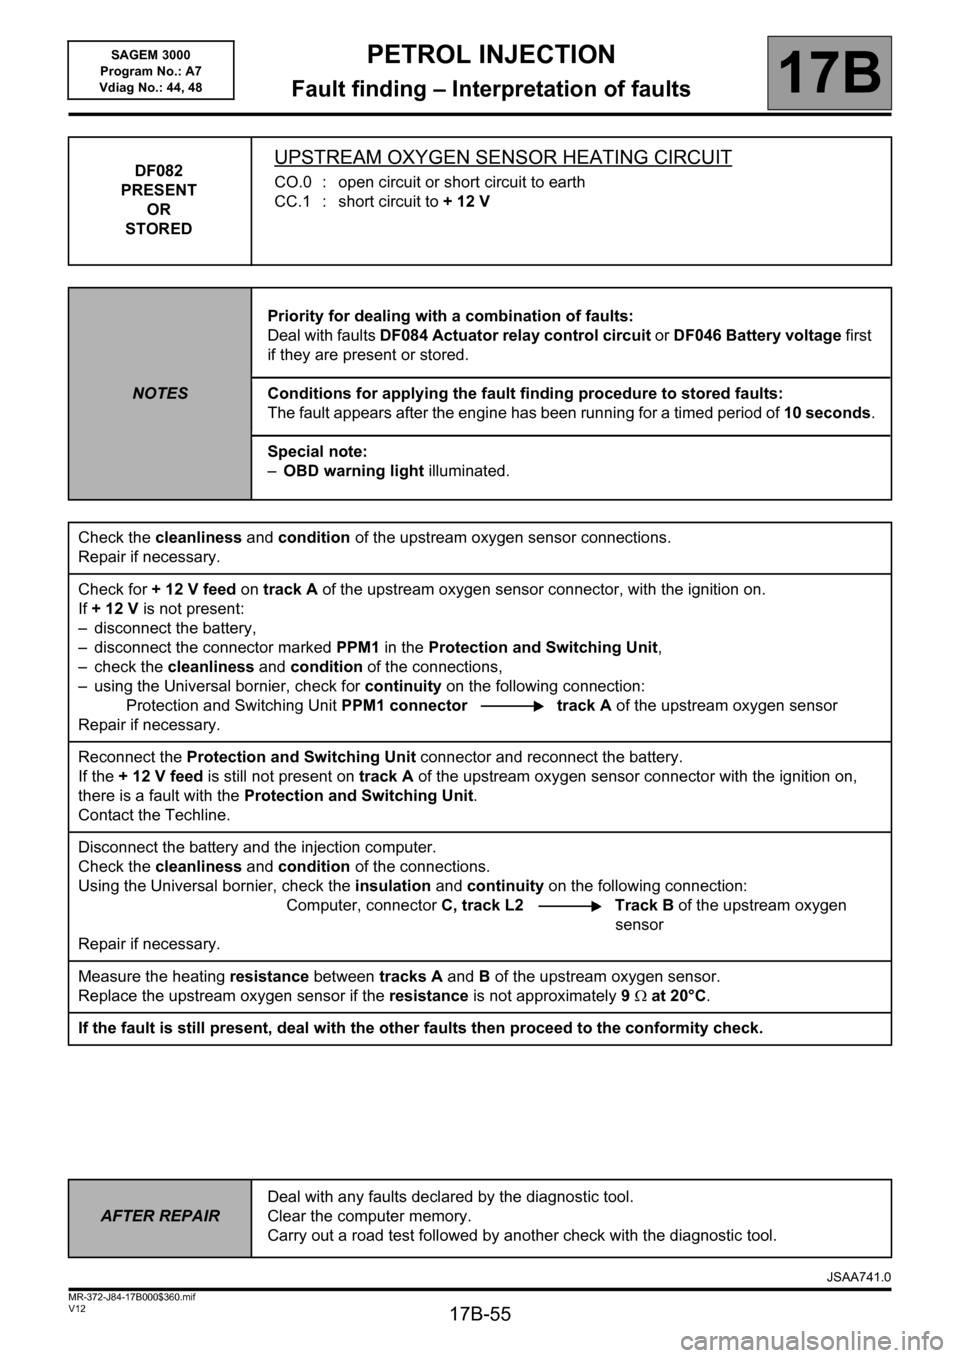
DF082
PRESENT
OR
STOREDUPSTREAM OXYGEN SENSOR HEATING CIRCUIT
CO.0 : open circuit or short circuit to earth
CC.1 : short circuit to + 12 V
NOTESPriority for dealing with a combination of faults:
Deal with faults DF084 Actuator relay control circuit or DF046 Battery voltage first
if they are present or stored.
Conditions for applying the fault finding procedure to stored faults:
The fault appears after the engine has been running for a timed period of 10 seconds.
Special note:
–OBD warning light illuminated.
Check the cleanliness and condition of the upstream oxygen sensor connections.
Repair if necessary.
Check for + 12 V feed on track A of the upstream oxygen sensor connector, with the ignition on.
If +12V is not present:
– disconnect the battery,
– disconnect the connector marked PPM1 in the Protection and Switching Unit,
– check the cleanliness and condition of the connections,
– using the Universal bornier, check for continuity on the following connection:
Protection and Switching Unit PPM1 connector track A of the upstream oxygen sensor
Repair if necessary.
Reconnect the Protection and Switching Unit connector and reconnect the battery.
If the + 12 V feed is still not present on track A of the upstream oxygen sensor connector with the ignition on,
there is a fault with the Protection and Switching Unit.
Contact the Techline.
Disconnect the battery and the injection computer.
Check the cleanliness and condition of the connections.
Using the Universal bornier, check the insulation and continuity on the following connection:
Computer, connector C, track L2 Track B of the upstream oxygen
sensor
Repair if necessary.
Measure the heating resistance between tracks A and B of the upstream oxygen sensor.
Replace the upstream oxygen sensor if the resistance is not approximately 9 at 20°C.
If the fault is still present, deal with the other faults then proceed to the conformity check.
AFTER REPAIRDeal with any faults declared by the diagnostic tool.
Clear the computer memory.
Carry out a road test followed by another check with the diagnostic tool.
JSAA741.0
Page 56 of 181
PETROL INJECTION
Fault finding – Interpretation of faults17B
17B-56V12 MR-372-J84-17B000$360.mif
SAGEM 3000
Program No.: A7
Vdiag No.: 44, 48
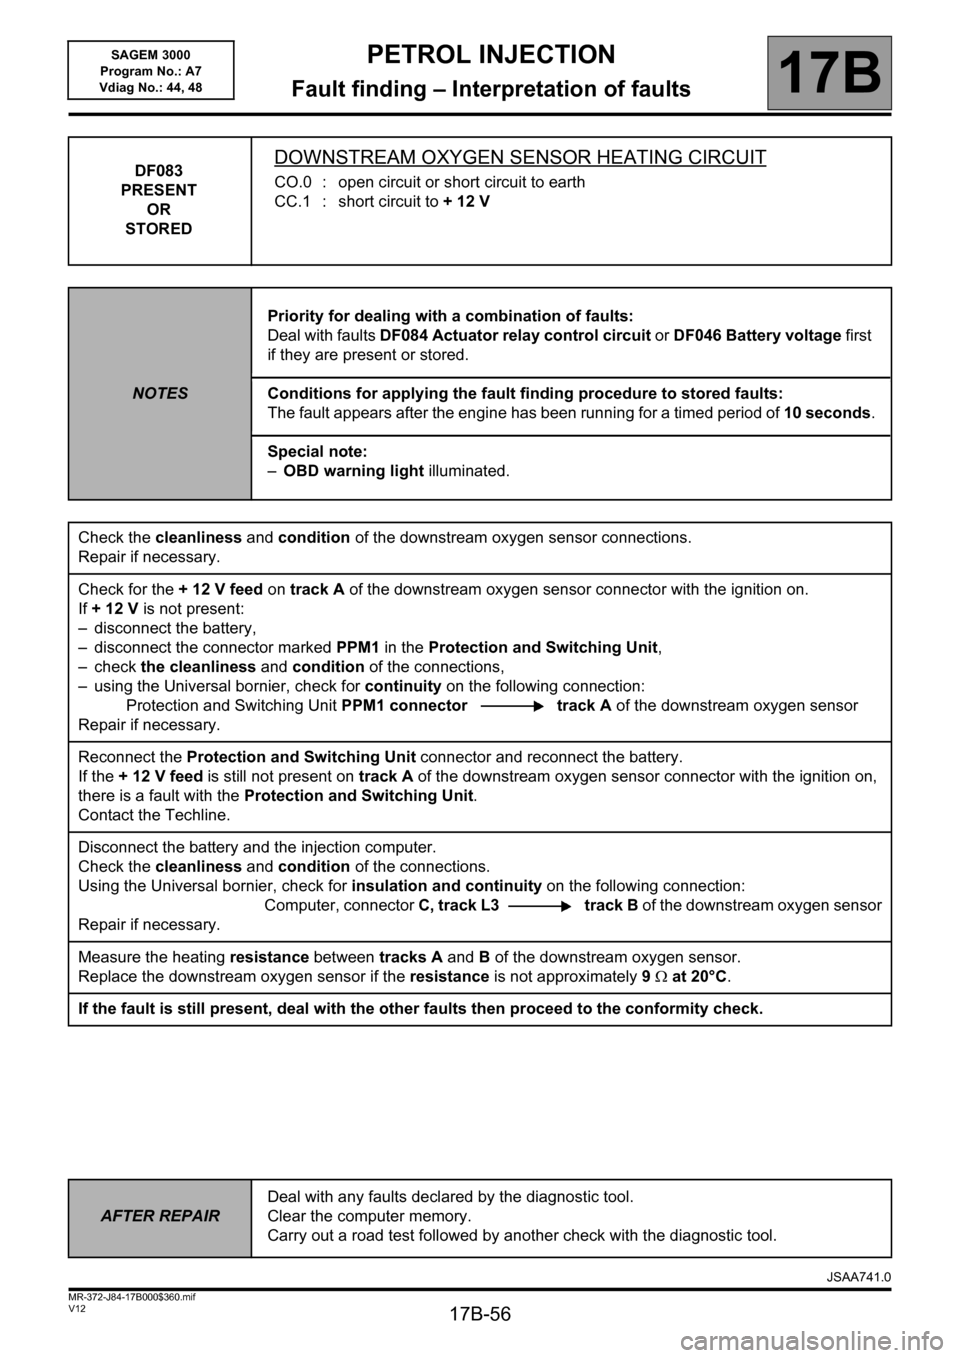
DF083
PRESENT
OR
STOREDDOWNSTREAM OXYGEN SENSOR HEATING CIRCUIT
CO.0 : open circuit or short circuit to earth
CC.1 : short circuit to + 12 V
NOTESPriority for dealing with a combination of faults:
Deal with faults DF084 Actuator relay control circuit or DF046 Battery voltage first
if they are present or stored.
Conditions for applying the fault finding procedure to stored faults:
The fault appears after the engine has been running for a timed period of 10 seconds.
Special note:
–OBD warning light illuminated.
Check the cleanliness and condition of the downstream oxygen sensor connections.
Repair if necessary.
Check for the + 12 V feed on track A of the downstream oxygen sensor connector with the ignition on.
If +12V is not present:
– disconnect the battery,
– disconnect the connector marked PPM1 in the Protection and Switching Unit,
–check the cleanliness and condition of the connections,
– using the Universal bornier, check for continuity on the following connection:
Protection and Switching Unit PPM1 connector track A of the downstream oxygen sensor
Repair if necessary.
Reconnect the Protection and Switching Unit connector and reconnect the battery.
If the + 12 V feed is still not present on track A of the downstream oxygen sensor connector with the ignition on,
there is a fault with the Protection and Switching Unit.
Contact the Techline.
Disconnect the battery and the injection computer.
Check the cleanliness and condition of the connections.
Using the Universal bornier, check for insulation and continuity on the following connection:
Computer, connector C, track L3 track B of the downstream oxygen sensor
Repair if necessary.
Measure the heating resistance between tracks A and B of the downstream oxygen sensor.
Replace the downstream oxygen sensor if the resistance is not approximately 9 at 20°C.
If the fault is still present, deal with the other faults then proceed to the conformity check.
AFTER REPAIRDeal with any faults declared by the diagnostic tool.
Clear the computer memory.
Carry out a road test followed by another check with the diagnostic tool.
JSAA741.0
Page 58 of 181
PETROL INJECTION
Fault finding – Interpretation of faults17B
17B-58V12 MR-372-J84-17B000$360.mif
SAGEM 3000
Program No.: A7
Vdiag No.: 44, 48
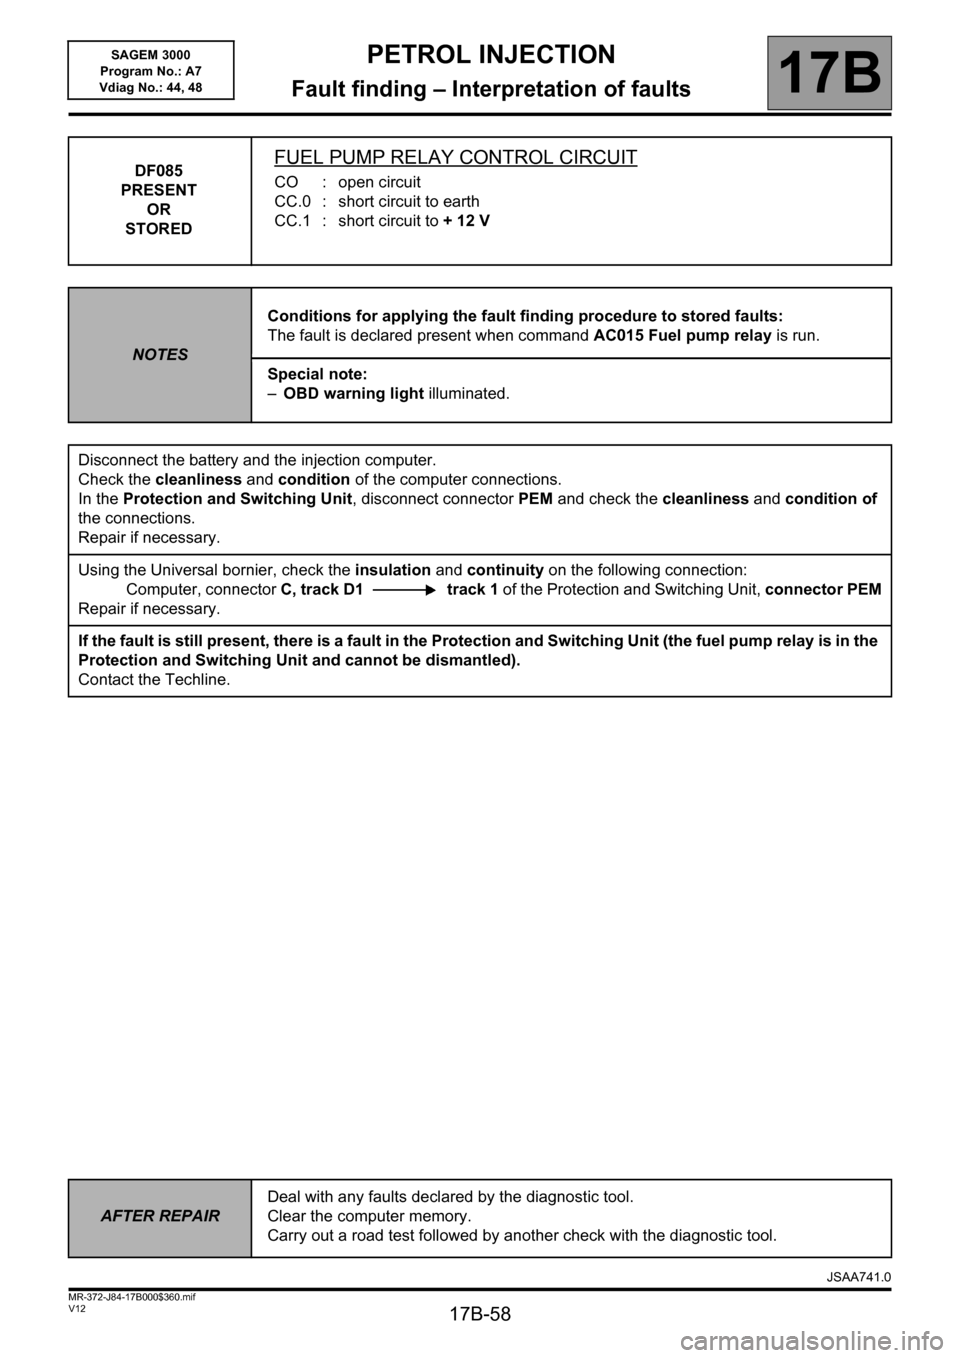
DF085
PRESENT
OR
STOREDFUEL PUMP RELAY CONTROL CIRCUIT
CO : open circuit
CC.0 : short circuit to earth
CC.1 : short circuit to + 12 V
NOTESConditions for applying the fault finding procedure to stored faults:
The fault is declared present when command AC015 Fuel pump relay is run.
Special note:
–OBD warning light illuminated.
Disconnect the battery and the injection computer.
Check the cleanliness and condition of the computer connections.
In the Protection and Switching Unit, disconnect connector PEM and check the cleanliness and condition of
the connections.
Repair if necessary.
Using the Universal bornier, check the insulation and continuity on the following connection:
Computer, connector C, track D1 track 1 of the Protection and Switching Unit, connector PEM
Repair if necessary.
If the fault is still present, there is a fault in the Protection and Switching Unit (the fuel pump relay is in the
Protection and Switching Unit and cannot be dismantled).
Contact the Techline.
AFTER REPAIRDeal with any faults declared by the diagnostic tool.
Clear the computer memory.
Carry out a road test followed by another check with the diagnostic tool.
JSAA741.0
Page 60 of 181
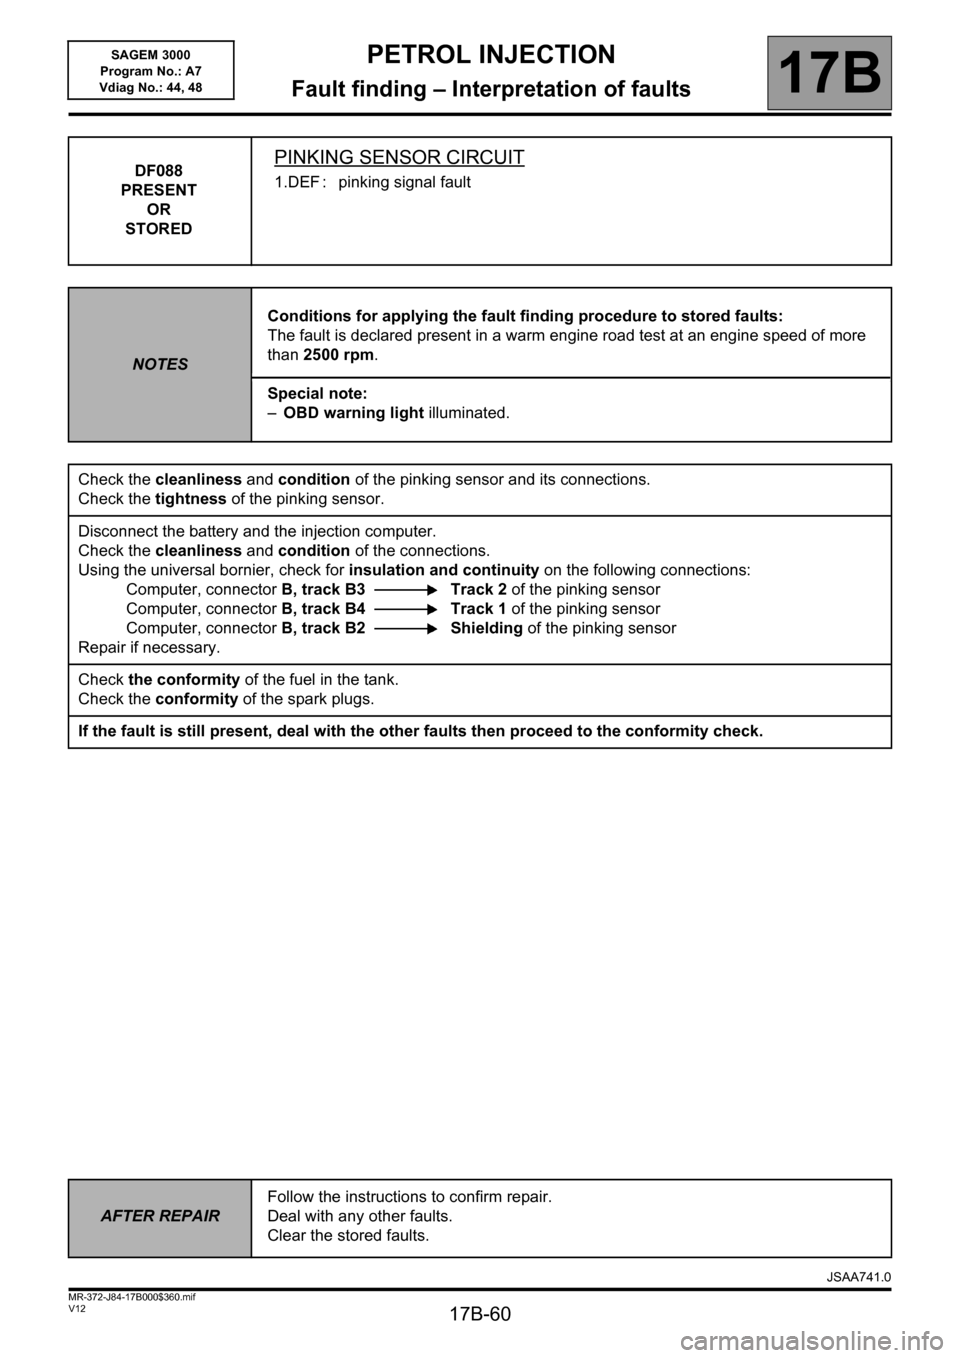
PETROL INJECTION
Fault finding – Interpretation of faults17B
17B-60V12 MR-372-J84-17B000$360.mif
SAGEM 3000
Program No.: A7
Vdiag No.: 44, 48
DF088
PRESENT
OR
STOREDPINKING SENSOR CIRCUIT
1.DEF : pinking signal fault
NOTESConditions for applying the fault finding procedure to stored faults:
The fault is declared present in a warm engine road test at an engine speed of more
than 2500 rpm.
Special note:
–OBD warning light illuminated.
Check the cleanliness and condition of the pinking sensor and its connections.
Check the tightness of the pinking sensor.
Disconnect the battery and the injection computer.
Check the cleanliness and condition of the connections.
Using the universal bornier, check for insulation and continuity on the following connections:
Computer, connector B, track B3 Track 2 of the pinking sensor
Computer, connector B, track B4 Track 1 of the pinking sensor
Computer, connectorB, track B2 Shielding of the pinking sensor
Repair if necessary.
Check the conformity of the fuel in the tank.
Check the conformity of the spark plugs.
If the fault is still present, deal with the other faults then proceed to the conformity check.
AFTER REPAIRFollow the instructions to confirm repair.
Deal with any other faults.
Clear the stored faults.
JSAA741.0
Page 61 of 181
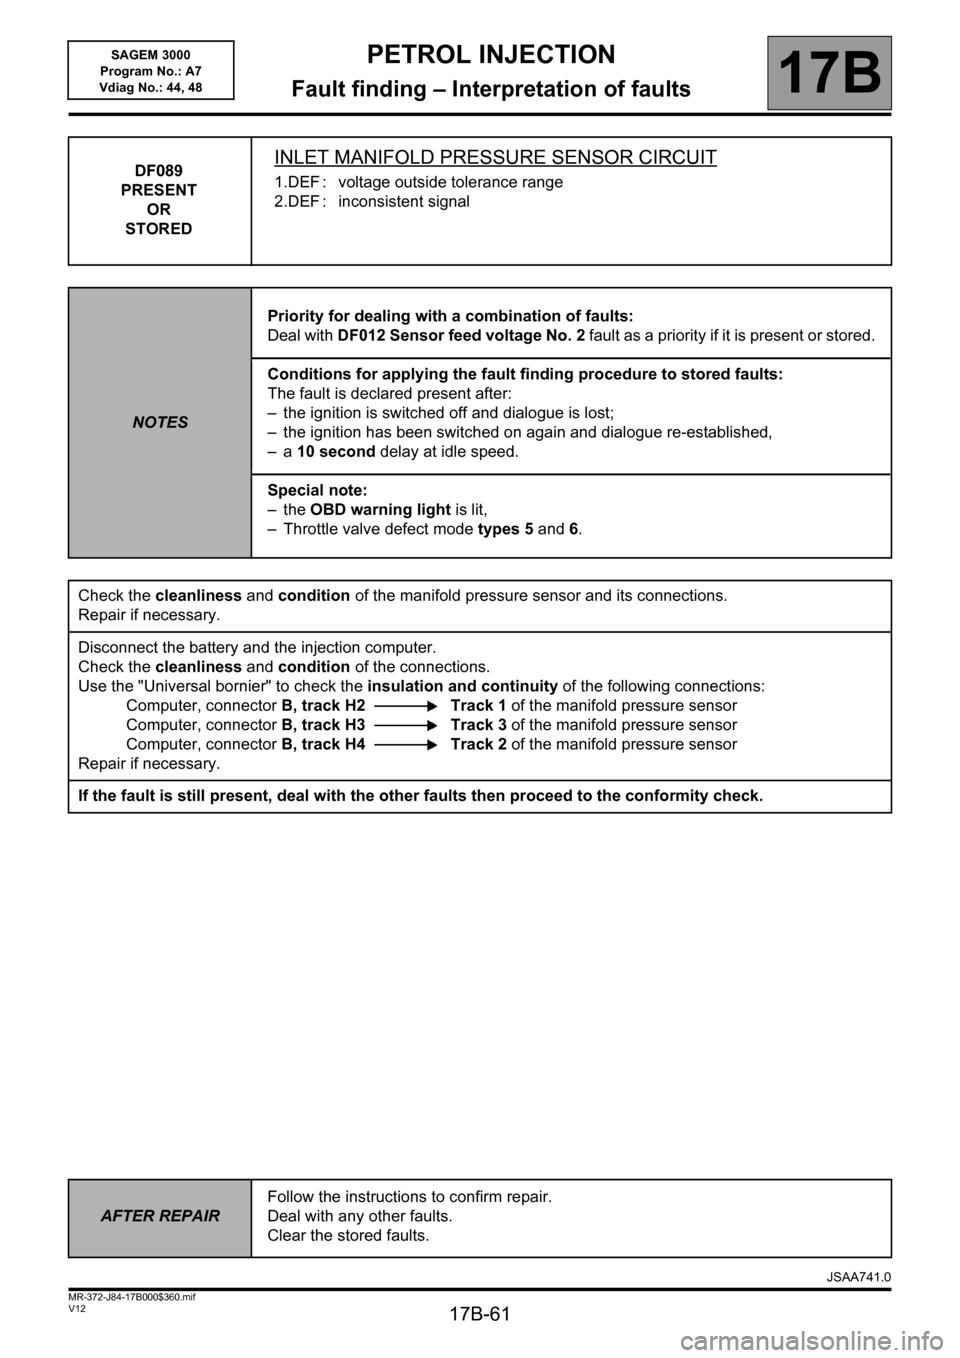
PETROL INJECTION
Fault finding – Interpretation of faults17B
17B-61V12 MR-372-J84-17B000$360.mif
SAGEM 3000
Program No.: A7
Vdiag No.: 44, 48
DF089
PRESENT
OR
STOREDINLET MANIFOLD PRESSURE SENSOR CIRCUIT
1.DEF : voltage outside tolerance range
2.DEF : inconsistent signal
NOTESPriority for dealing with a combination of faults:
Deal with DF012 Sensor feed voltage No. 2 fault as a priority if it is present or stored.
Conditions for applying the fault finding procedure to stored faults:
The fault is declared present after:
– the ignition is switched off and dialogue is lost;
– the ignition has been switched on again and dialogue re-established,
–a 10 second delay at idle speed.
Special note:
– the OBD warning light is lit,
– Throttle valve defect mode types 5 and 6.
Check the cleanliness and condition of the manifold pressure sensor and its connections.
Repair if necessary.
Disconnect the battery and the injection computer.
Check the cleanliness and condition of the connections.
Use the "Universal bornier" to check the insulation and continuity of the following connections:
Computer, connector B, track H2 Track 1 of the manifold pressure sensor
Computer, connector B, track H3 Track 3 of the manifold pressure sensor
Computer, connector B, track H4 Track 2 of the manifold pressure sensor
Repair if necessary.
If the fault is still present, deal with the other faults then proceed to the conformity check.
AFTER REPAIRFollow the instructions to confirm repair.
Deal with any other faults.
Clear the stored faults.
JSAA741.0
Page 62 of 181
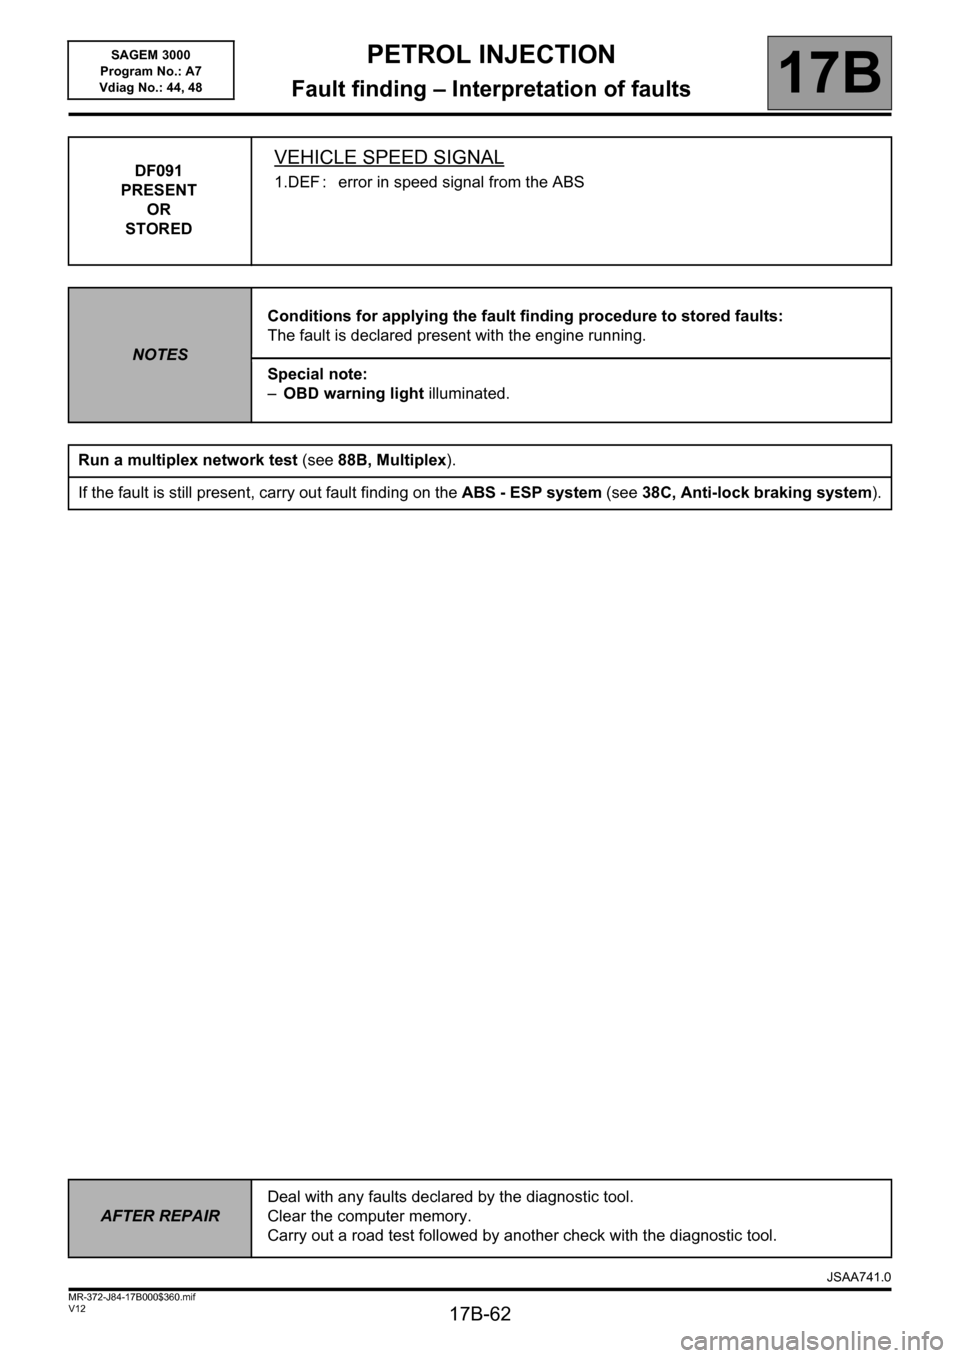
PETROL INJECTION
Fault finding – Interpretation of faults17B
17B-62V12 MR-372-J84-17B000$360.mif
SAGEM 3000
Program No.: A7
Vdiag No.: 44, 48
DF091
PRESENT
OR
STOREDVEHICLE SPEED SIGNAL
1.DEF : error in speed signal from the ABS
NOTESConditions for applying the fault finding procedure to stored faults:
The fault is declared present with the engine running.
Special note:
–OBD warning light illuminated.
Run a multiplex network test (see88B, Multiplex).
If the fault is still present, carry out fault finding on the ABS - ESP system (see38C, Anti-lock braking system).
AFTER REPAIRDeal with any faults declared by the diagnostic tool.
Clear the computer memory.
Carry out a road test followed by another check with the diagnostic tool.
JSAA741.0
Page 63 of 181
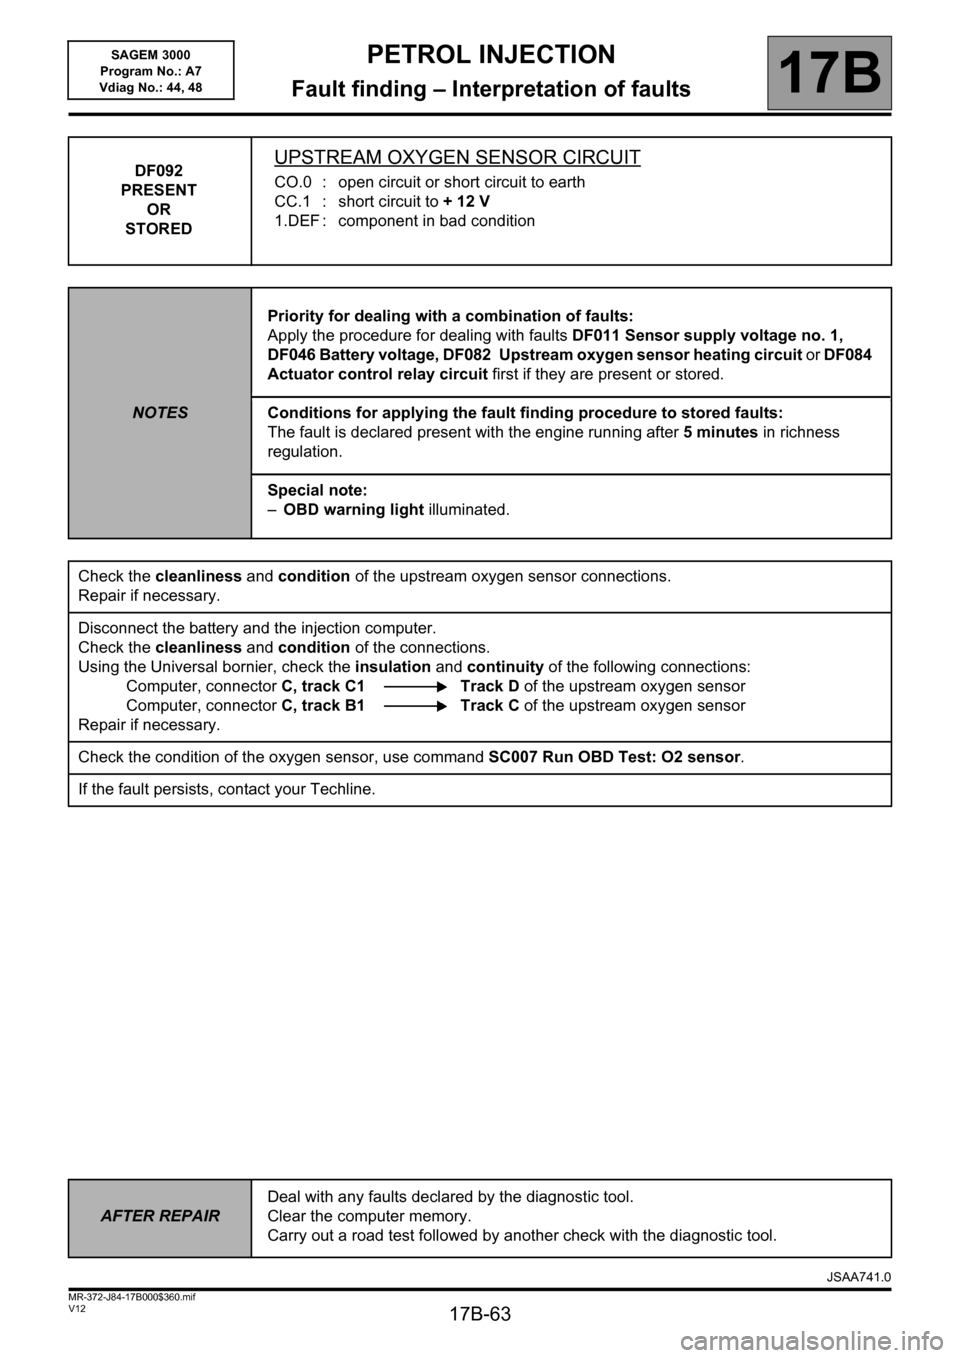
PETROL INJECTION
Fault finding – Interpretation of faults17B
17B-63V12 MR-372-J84-17B000$360.mif
SAGEM 3000
Program No.: A7
Vdiag No.: 44, 48
DF092
PRESENT
OR
STOREDUPSTREAM OXYGEN SENSOR CIRCUIT
CO.0 : open circuit or short circuit to earth
CC.1 : short circuit to + 12 V
1.DEF : component in bad condition
NOTESPriority for dealing with a combination of faults:
Apply the procedure for dealing with faults DF011 Sensor supply voltage no. 1,
DF046 Battery voltage, DF082 Upstream oxygen sensor heating circuit or DF084
Actuator control relay circuit first if they are present or stored.
Conditions for applying the fault finding procedure to stored faults:
The fault is declared present with the engine running after 5 minutes in richness
regulation.
Special note:
–OBD warning light illuminated.
Check the cleanliness and condition of the upstream oxygen sensor connections.
Repair if necessary.
Disconnect the battery and the injection computer.
Check the cleanliness and condition of the connections.
Using the Universal bornier, check the insulation and continuity of the following connections:
Computer, connectorC, track C1 Track D of the upstream oxygen sensor
Computer, connectorC, track B1 Track C of the upstream oxygen sensor
Repair if necessary.
Check the condition of the oxygen sensor, use command SC007 Run OBD Test: O2 sensor.
If the fault persists, contact your Techline.
AFTER REPAIRDeal with any faults declared by the diagnostic tool.
Clear the computer memory.
Carry out a road test followed by another check with the diagnostic tool.
JSAA741.0
Page 64 of 181
PETROL INJECTION
Fault finding – Interpretation of faults17B
17B-64V12 MR-372-J84-17B000$360.mif
SAGEM 3000
Program No.: A7
Vdiag No.: 44, 48
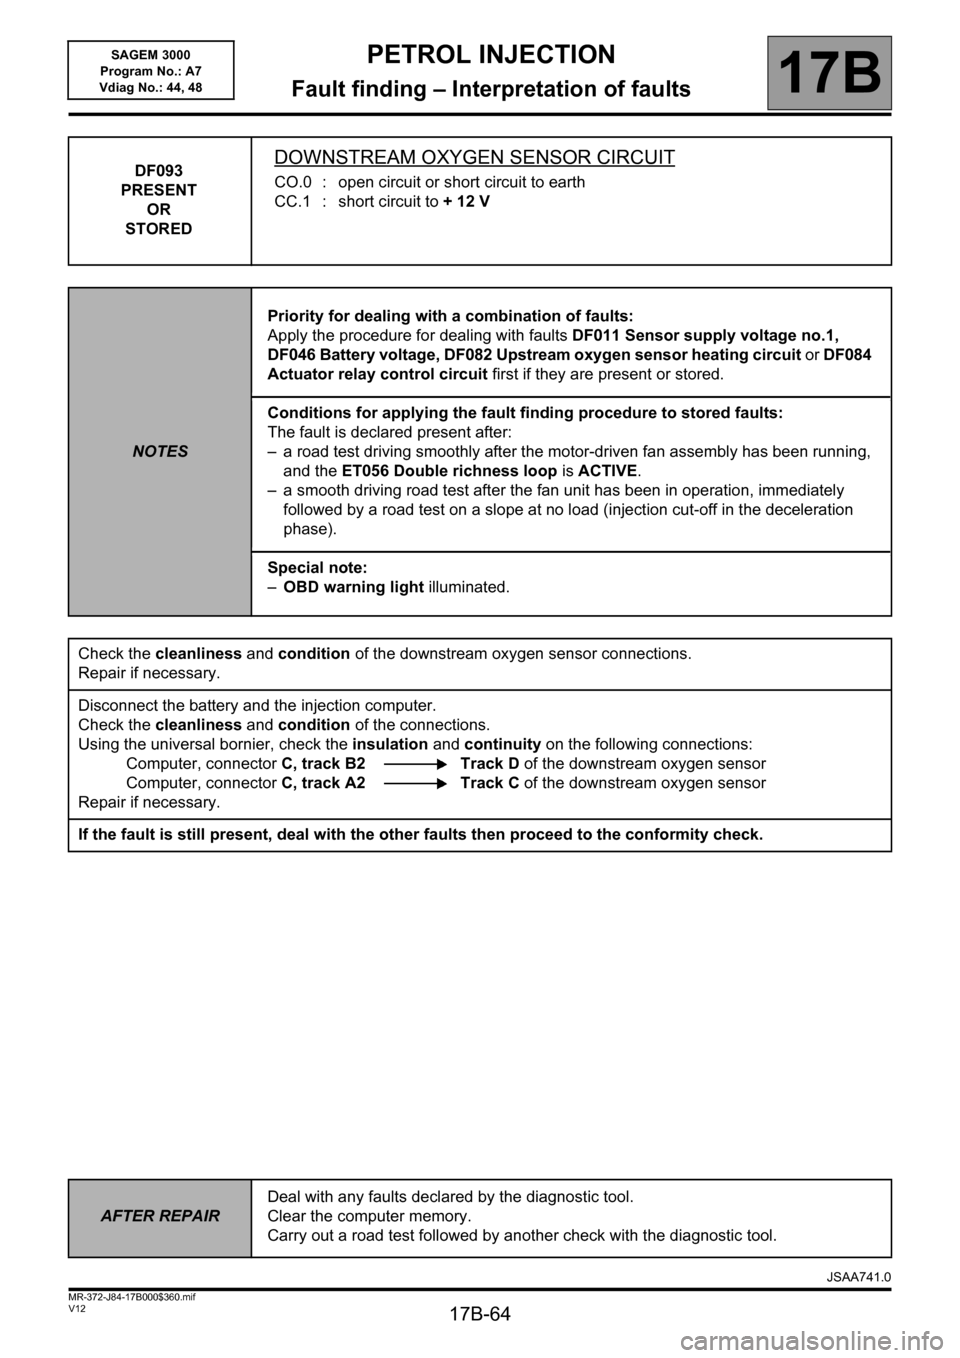
DF093
PRESENT
OR
STOREDDOWNSTREAM OXYGEN SENSOR CIRCUIT
CO.0 : open circuit or short circuit to earth
CC.1 : short circuit to + 12 V
NOTESPriority for dealing with a combination of faults:
Apply the procedure for dealing with faults DF011 Sensor supply voltage no.1,
DF046 Battery voltage, DF082 Upstream oxygen sensor heating circuit or DF084
Actuator relay control circuit first if they are present or stored.
Conditions for applying the fault finding procedure to stored faults:
The fault is declared present after:
– a road test driving smoothly after the motor-driven fan assembly has been running,
and the ET056 Double richness loop is ACTIVE.
– a smooth driving road test after the fan unit has been in operation, immediately
followed by a road test on a slope at no load (injection cut-off in the deceleration
phase).
Special note:
–OBD warning light illuminated.
Check the cleanliness and condition of the downstream oxygen sensor connections.
Repair if necessary.
Disconnect the battery and the injection computer.
Check the cleanliness and condition of the connections.
Using the universal bornier, check the insulation and continuity on the following connections:
Computer, connectorC, track B2 Track D of the downstream oxygen sensor
Computer, connectorC, track A2 Track C of the downstream oxygen sensor
Repair if necessary.
If the fault is still present, deal with the other faults then proceed to the conformity check.
AFTER REPAIRDeal with any faults declared by the diagnostic tool.
Clear the computer memory.
Carry out a road test followed by another check with the diagnostic tool.
JSAA741.0
Page 65 of 181
PETROL INJECTION
Fault finding – Interpretation of faults17B
17B-65V12 MR-372-J84-17B000$360.mif
SAGEM 3000
Program No.: A7
Vdiag No.: 44, 48
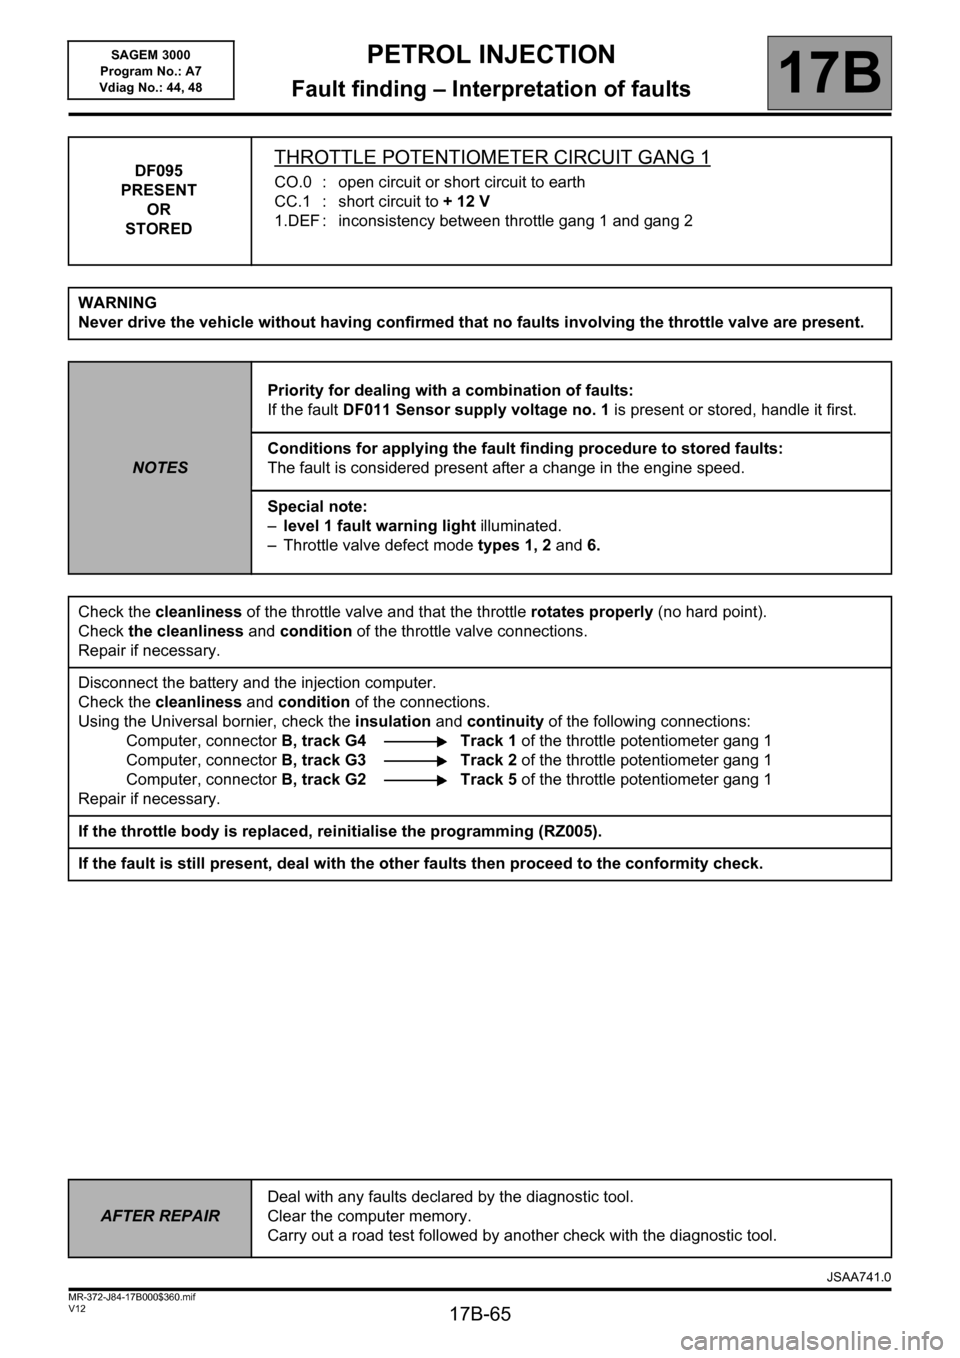
DF095
PRESENT
OR
STOREDTHROTTLE POTENTIOMETER CIRCUIT GANG 1
CO.0 : open circuit or short circuit to earth
CC.1 : short circuit to + 12 V
1.DEF : inconsistency between throttle gang 1 and gang 2
WARNING
Never drive the vehicle without having confirmed that no faults involving the throttle valve are present.
NOTESPriority for dealing with a combination of faults:
If the fault DF011 Sensor supply voltage no. 1 is present or stored, handle it first.
Conditions for applying the fault finding procedure to stored faults:
The fault is considered present after a change in the engine speed.
Special note:
–level 1 fault warning light illuminated.
– Throttle valve defect mode types 1, 2 and 6.
Check the cleanliness of the throttle valve and that the throttle rotates properly (no hard point).
Check the cleanliness and condition of the throttle valve connections.
Repair if necessary.
Disconnect the battery and the injection computer.
Check the cleanliness and condition of the connections.
Using the Universal bornier, check the insulation and continuity of the following connections:
Computer, connectorB, track G4 Track 1 of the throttle potentiometer gang 1
Computer, connectorB, track G3 Track 2 of the throttle potentiometer gang 1
Computer, connectorB, track G2 Track 5 of the throttle potentiometer gang 1
Repair if necessary.
If the throttle body is replaced, reinitialise the programming (RZ005).
If the fault is still present, deal with the other faults then proceed to the conformity check.
AFTER REPAIRDeal with any faults declared by the diagnostic tool.
Clear the computer memory.
Carry out a road test followed by another check with the diagnostic tool.
JSAA741.0