Screen RENAULT SCENIC 2017 J95 / 3.G R Link Owner's Manual
[x] Cancel search | Manufacturer: RENAULT, Model Year: 2017, Model line: SCENIC, Model: RENAULT SCENIC 2017 J95 / 3.GPages: 96, PDF Size: 4.02 MB
Page 50 of 96
GB.48
RANGE
The range distance is only available for
electric vehicles.
Attainability of the
destination
The classic map display indicates
whether the battery level of your elec-
tric vehicle is sufficient to reach your
destination:
– chequered flag: the vehicle can reach your destination at the current
battery level;
– chequered flag with lightning symbol on red background: look for a re-
charging station to avoid running out
of power.
Low battery warning
When the charge level reaches the
minimum alert level on the instrument
panel, the system automatically pro-
poses a list of recharging stations near
your current location.
Deactivating the low battery
warning
This option enables you to deactivate
the automatic proposal of recharging
stations when the battery level is low:
– from the “Navigation” menu, select “Settings” then “EV settings”.
– select the “Disable low battery warn- ing” option.
Select this option again to reactivate
the low battery alert.
Note: if the ongoing guidance is indi-
cating an attainable charging point, the
low battery alert will not be triggered.
Range view
– In guidance mode, from the route summary screen: you can see the
route portions (zones) that are at-
tainable (in green) and non-attaina-
ble (in red);
– when not in guidance mode, from the “attainable zone” main menu: your
range distance is shown as a radi-
ous around your vehicle’s current
position.
Page 51 of 96
GB.49
ADDING, MANAGING SAVED ADDRESSES
Save an address from a
recent destination
– In the “Drive to...” menu, select “Recent destinations”;
– select the recent destination you wish to save;
– on the screen/map, press “ +” then
“Add to saved locations”;
– give a name to an address, then press “Next”;
– If the “Home” address is not regis- tered, the system asks if the saved
address is your home, select “Yes”
or “No”. A message confirms that the
address has been saved.
– If the “Home” address is registered, the system offers to select this ad-
dress.
Renaming a saved address
– From the main menu, press “Navigation” then “Settings” then
“Manage saved locations”;
– select an address saved in the memory that you wish to remember;
– on the screen/map, press “Rename”;
– enter the new name for the saved address, then press “Next” to con-
firm.
Deleting a saved address
– From the “Manage saved locations” menu, select the saved address you
wish to delete;
– on the screen/map, press “Delete”;
– a message asks you to confirm the deletion - press “Yes” to confirm or
“No” to cancel.
Accessing saved
addresses
To access saved addresses, from the
main menu press “Navigation”, then
“Drive to...”, then “Saved locations”.
Page 54 of 96
GB.52
LISTENING TO THE RADIO (1/5)
Selecting a wavelength
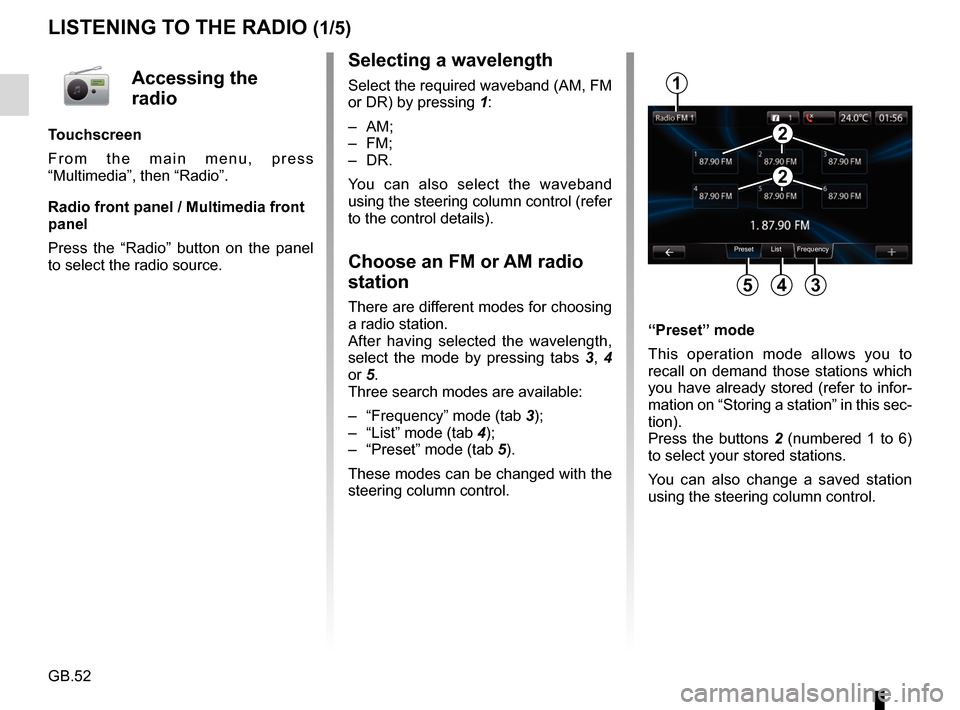
Select the required waveband (AM, FM
or DR) by pressing 1:
– AM;
– FM;
– DR.
You can also select the waveband
using the steering column control (refer
to the control details).
Choose an FM or AM radio
station
There are different modes for choosing
a radio station.
After having selected the wavelength,
select the mode by pressing tabs 3, 4
or 5.
Three search modes are available:
– “Frequency” mode (tab 3);
– “List” mode (tab 4);
– “Preset” mode (tab 5).
These modes can be changed with the
steering column control. “Preset” mode
This operation mode allows you to
recall on demand those stations which
you have already stored (refer to infor-
mation on “Storing a station” in this sec-
tion).
Press the buttons 2 (numbered 1 to 6)
to select your stored stations.
You can also change a saved station
using the steering column control.
Preset List Frequency
1
345
2
2
Accessing the
radio
Touchscreen
From the main menu, press
“Multimedia”, then “Radio”.
Radio front panel / Multimedia front
panel
Press the “Radio” button on the panel
to select the radio source.
Page 55 of 96
GB.53
LISTENING TO THE RADIO (2/5)To select a radio station DR
(terrestrial digital radio)
There are different modes for choosing
a radio station.
After selecting the waveband, select
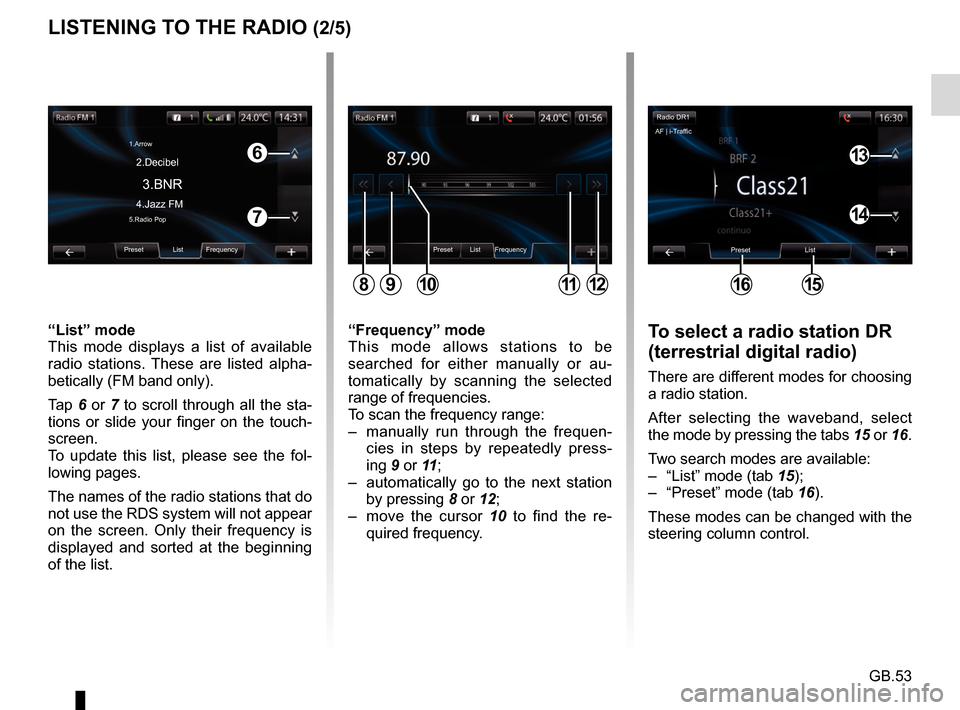
the mode by pressing the tabs 15 or 16.
Two search modes are available:
– “List” mode (tab 15);
– “Preset” mode (tab 16).
These modes can be changed with the
steering column control.
“Frequency” mode
This mode allows stations to be
searched for either manually or au-
tomatically by scanning the selected
range of frequencies.
To scan the frequency range:
– manually run through the frequen-
cies in steps by repeatedly press-
ing 9 or 11 ;
– automatically go to the next station by pressing 8 or 12;
– move the cursor 10 to find the re- quired frequency.
“List” mode
This mode displays a list of available
radio stations. These are listed alpha-
betically (FM band only).
Tap 6 or 7 to scroll through all the sta-
tions or slide your finger on the touch-
screen.
To update this list, please see the fol-
lowing pages.
The names of the radio stations that do
not use the RDS system will not appear
on the screen. Only their frequency is
displayed and sorted at the beginning
of the list.
Preset List Frequency
811912
6
7
Preset List Frequency
3.BNR
1.Arrow
4.Jazz FM 2.Decibel5.Radio Pop
10
Radio DR1
Preset List
1615
13
14
AF | i-Traffic
Page 56 of 96
GB.54
LISTENING TO THE RADIO (3/5)
Pop-up menu “+”.
FM or AM
From one of the three modes, press “+”
to:
– change the source (Radio, USB, SD, etc.);
– add a station to your favourites;
– save a station;
– get text information;
– access the radio settings.
Storing a station
From “Frequency” mode or “List” mode,
press “+” then “Save as preset”.
You can also press one of the preset
buttons until you hear a beep.
You can store up to 6 stations per band.
“List” mode
This mode displays a list of available
radio stations.
Tap
13 or 14 to scroll through all the sta-
tions or slide your finger on the touch-
screen.
To update this list, please see the fol-
lowing pages.
“Preset” mode
This operation mode allows you to
recall on demand those stations which
you have already stored (refer to infor-
mation on “Storing a station” in this sec-
tion).
Press the buttons (numbered 1 to 6) to
select your stored stations.
You can also change a saved station
using the steering column control. Text information (Radio text)
Some FM radio stations broadcast
text information relating to their pro-
grammes (e.g. song titles).
Note: this information is only available
for certain radio stations.
DR (terrestrial digital radio)
From one of the two modes, press “+”
to:
– change the source (Radio, USB, SD,
etc.);
– Save as preset;
– display radio text;
– digital radio services;
– settings.
Storing a station
From “List” mode, press “+”, then “Save
as preset”.
You can also press one of the preset
buttons until you hear a beep.
You can store up to six radio stations.
Page 60 of 96
GB.58
Accessing photos
From the “Multimedia” menu, press
“Pictures” then select the connected
source (Card SD, USB, etc.) to access
the photos. The system offers you two
options:
– “read all photos”;
– “Read a photo”.
Note: Some formats may not be rea-
dable by the system.
Options from folders
From the list of folders/photos, press
“+” to:
– change the source;
– display full screen;
– display the slideshow;
– access zoom in;
– access photo settings.
Note: For more information on compa-
tible photo formats, please consult an
Authorised Dealer.
PHOTO READER
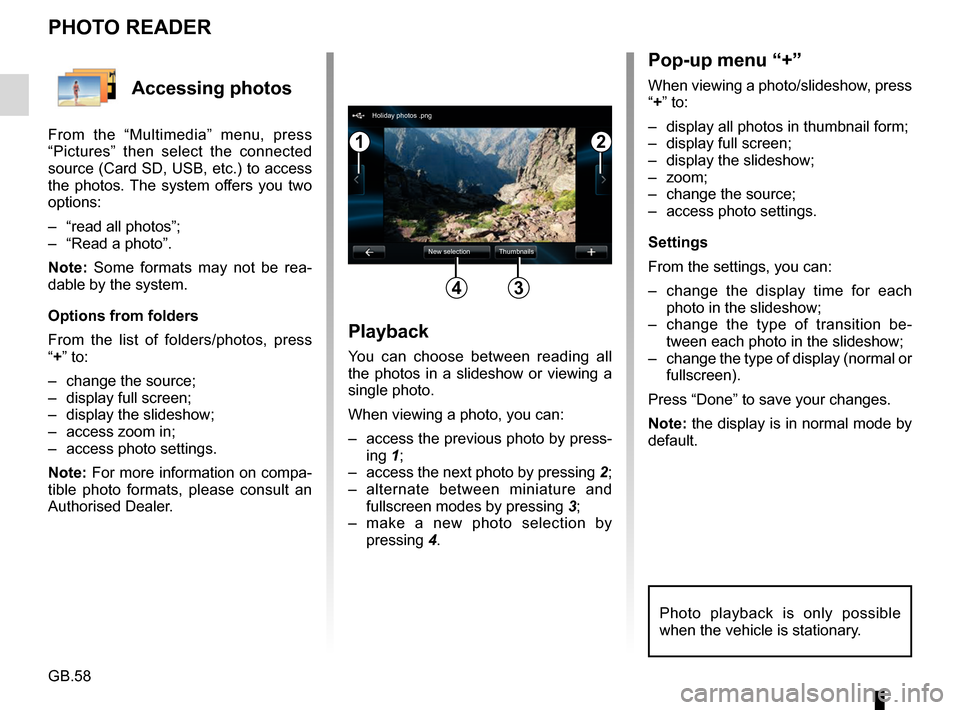
Playback
You can choose between reading all
the photos in a slideshow or viewing a
single photo.
When viewing a photo, you can:
– access the previous photo by press-ing 1;
– access the next photo by pressing 2;
– alternate between miniature and fullscreen modes by pressing 3;
– make a new photo selection by pressing 4.
Pop-up menu “+”
When viewing a photo/slideshow, press
“+” to:
– display all photos in thumbnail form;
– display full screen;
– display the slideshow;
– zoom;
– change the source;
– access photo settings.
Settings
From the settings, you can:
– change the display time for each
photo in the slideshow;
– change the type of transition be- tween each photo in the slideshow;
– change the type of display (normal or fullscreen).
Press “Done” to save your changes.
Note: the display is in normal mode by
default.
12
34
Holiday photos .png
New selection Thumbnails
Photo playback is only possible
when the vehicle is stationary.
Page 61 of 96
GB.59
Accessing videos
From the “Multimedia” menu, press
“Video” then select the source con-
nected (SD card, USB, etc.) to access
videos. The system offers you two op-
tions:
– “play all videos”;
– “play a video”.
Note: Some formats may not be read-
able by the system.
Options from folders
From the list of folders/videos, press “+”
to:
– change the source;
– access the settings.
Note: For more information on compat-
ible video formats, please consult an
Authorised Dealer.
VIDEO PLAYBACK
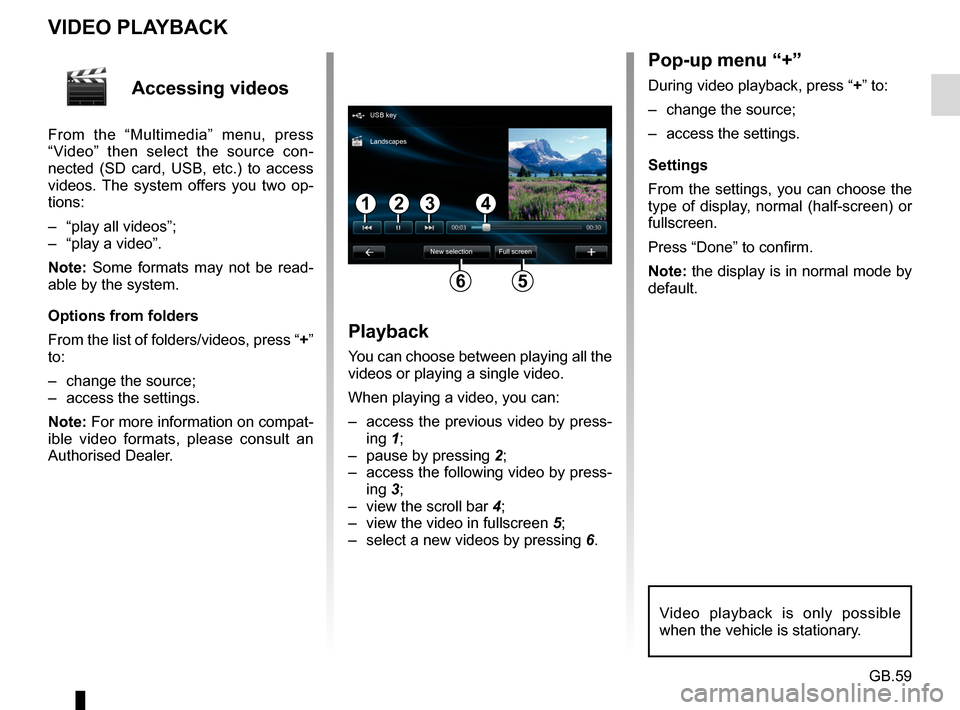
Playback
You can choose between playing all the
videos or playing a single video.
When playing a video, you can:
– access the previous video by press-ing 1;
– pause by pressing 2;
– access the following video by press- ing 3;
– view the scroll bar 4;
– view the video in fullscreen 5;
– select a new videos by pressing 6.
Pop-up menu “+”
During video playback, press “+” to:
– change the source;
– access the settings.
Settings
From the settings, you can choose the
type of display, normal (half-screen) or
fullscreen.
Press “Done” to confirm.
Note: the display is in normal mode by
default.
Video playback is only possible
when the vehicle is stationary.
1324
56
USB key
New selection Full screen
Landscapes
Page 63 of 96
GB.61
MULTIMEDIA SETTINGS (2/2)
Pictures
This menu allows you to adjust the mul-
timedia settings:
– set the timing of each picture in the slideshow;
– configure the default view for pic- tures.Video
This menu enables you to set the
type of video display:
– “Normal view”;
– “Full screen”.
Page 64 of 96
GB.62
PAIRING AND UNPAIRING A TELEPHONE (1/2)
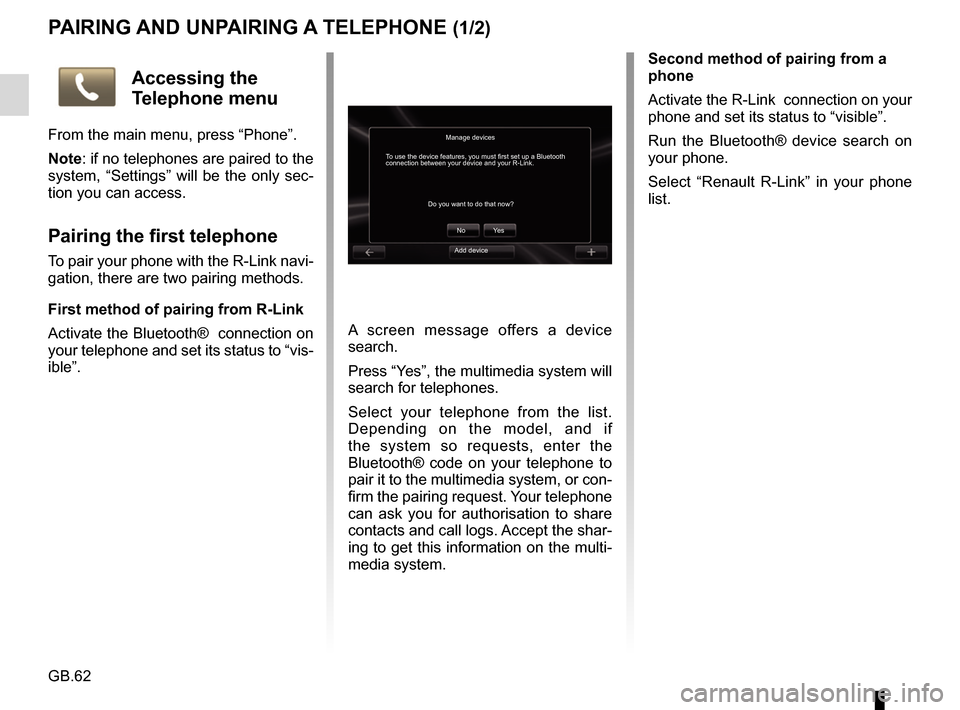
A screen message offers a device
search.
Press “Yes”, the multimedia system will
search for telephones.
Select your telephone from the list.
Depending on the model, and if
the system so requests, enter the
Bluetooth® code on your telephone to
pair it to the multimedia system, or con-
firm the pairing request. Your telephone
can ask you for authorisation to share
contacts and call logs. Accept the shar-
ing to get this information on the multi-
media system.Second method of pairing from a
phone
Activate the R-Link connection on your
phone and set its status to “visible”.
Run the Bluetooth® device search on
your phone.
Select “Renault R-Link” in your phone
list.
Manage devices
No
Do you want to do that now?
To use the device features, you must first set up a Bluetooth
connection between your device and your R-Link.
Ye s
Accessing the
Telephone menu
From the main menu, press “Phone”.
Note: if no telephones are paired to the
system, “Settings” will be the only sec-
tion you can access.
Pairing the first telephone
To pair your phone with the R-Link navi-
gation, there are two pairing methods.
First method of pairing from R-Link
Activate the Bluetooth® connection on
your telephone and set its status to “vis-
ible”.Add device
Page 65 of 96
GB.63
PAIRING, UNPAIRING A TELEPHONE (2/2)
Pairing another telephone
From your telephone, activate the
Bluetooth® connection.
From the “Telephone” menu, press
“Settings”, then “Manage devices”.
From the list of paired phones in the
“Manage devices” menu, press the
“Add device” button to add a phone to
the list.
For safety reasons, carry
out these operations when
the vehicle is stationary.
Unpairing a phone
From the main menu, select
“Telephone”, “Settings”, then “Manage
devices”.
From the list of paired telephones in
the “Manage devices” menu, press
the button on the pop-up menu, then
“Delete device(s)”. Select the device
you want to unpair on the multimedia
system screen, then press “Delete”.