LED RENAULT SCENIC 2018 Owner's Guide
[x] Cancel search | Manufacturer: RENAULT, Model Year: 2018, Model line: SCENIC, Model: RENAULT SCENIC 2018Pages: 364, PDF Size: 10.43 MB
Page 189 of 364
2.69
SPEED LIMITER (3/3)
Recalling the limit speed
If a speed has been saved, it can be re-
called by pressing switch 3 (R).
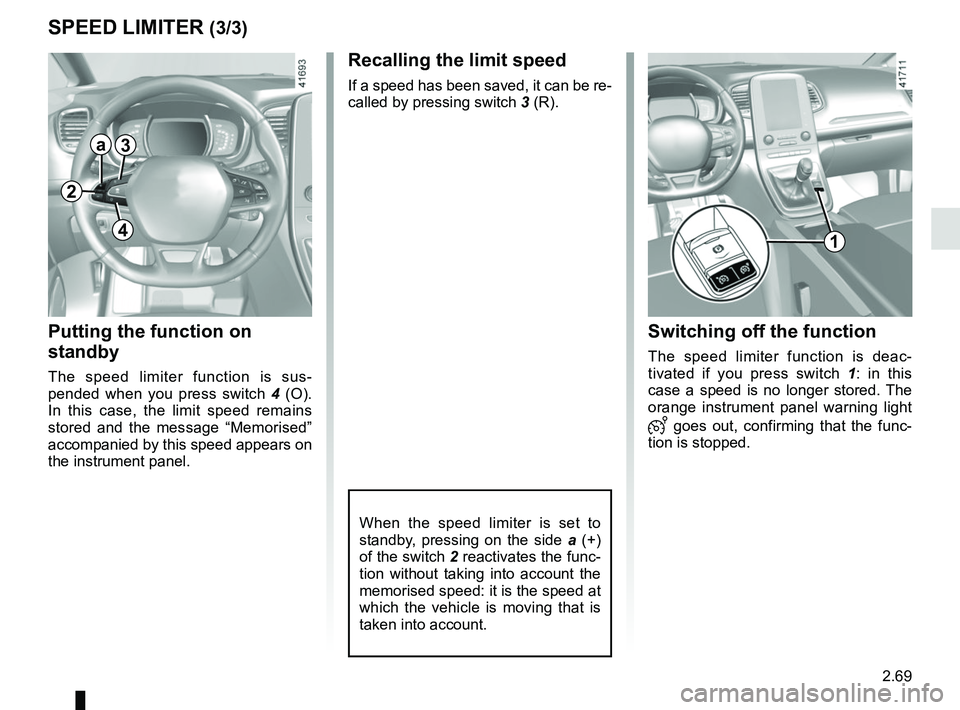
Putting the function on
standby
The speed limiter function is sus-
pended when you press switch 4 (O).
In this case, the limit speed remains
stored and the message “Memorised”
accompanied by this speed appears on
the instrument panel.
Switching off the function
The speed limiter function is deac-
tivated if you press switch 1 : in this
case a speed is no longer stored. The
orange instrument panel warning light
goes out, confirming that the func-
tion is stopped.
When the speed limiter is set to
standby, pressing on the side a (+)
of the switch 2 reactivates the func-
tion without taking into account the
memorised speed: it is the speed at
which the vehicle is moving that is
taken into account.
2
a3
41
Page 190 of 364
2.70
CRUISE CONTROL (1/4)
The cruise control function helps you to
maintain your driving speed at a speed
that you choose, called the cruising
speed.
This cruising speed may be set at any
speed above 20 mph (30 km/h).
The cruise control function
is in no way linked to the
braking system.
This function is an addi-
tional driving aid. The func-
tion does not take the place
of the driver. Therefore, it
can under no circumstances replace
the driver’s responsibility to respect
speed limits and to be vigilant (the
driver must always be ready to
brake). Cruise control must not be
used in heavy traffic, on winding or
slippery roads (black ice, aquaplan-
ing, gravel) and during bad weather
(fog, rain, side winds etc.).
There is a risk of accidents.
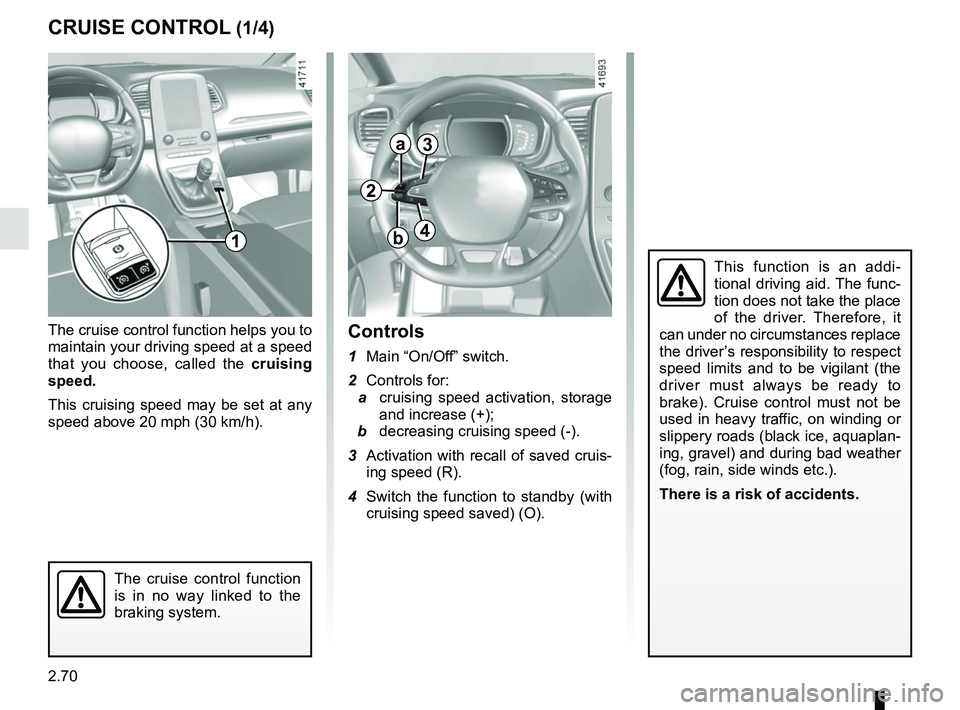
Controls
1 Main “On/Off” switch.
2 Controls for:
a cruising speed activation, storage
and increase (+);
b decreasing cruising speed (-).
3 Activation with recall of saved cruis- ing speed (R).
4 Switch the function to standby (with cruising speed saved) (O).
2
a
b
3
41
Page 193 of 364
2.73
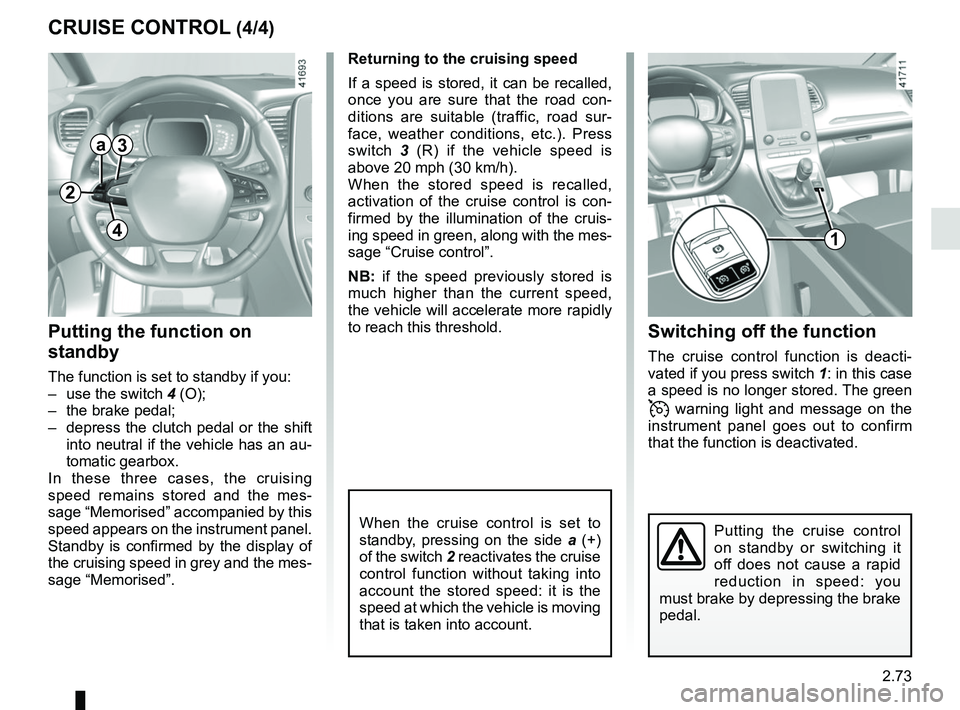
CRUISE CONTROL (4/4)Switching off the function
The cruise control function is deacti-
vated if you press switch 1: in this case
a speed is no longer stored. The green
warning light and message on the
instrument panel goes out to confirm
that the function is deactivated.
Returning to the cruising speed
If a speed is stored, it can be recalled,
once you are sure that the road con-
ditions are suitable (traffic, road sur-
face, weather conditions, etc.). Press
switch
3 (R) if the vehicle speed is
above 20 mph (30 km/h).
When the stored speed is recalled,
activation of the cruise control is con-
firmed by the illumination of the cruis-
ing speed in green, along with the mes-
sage “Cruise control”.
NB: if the speed previously stored is
much higher than the current speed,
the vehicle will accelerate more rapidly
to reach this threshold.
When the cruise control is set to
standby, pressing on the side a (+)
of the switch 2 reactivates the cruise
control function without taking into
account the stored speed: it is the
speed at which the vehicle is moving
that is taken into account.
Putting the function on
standby
The function is set to standby if you:
– use the switch 4 (O);
– the brake pedal;
– depress the clutch pedal or the shift into neutral if the vehicle has an au-
tomatic gearbox.
In these three cases, the cruising
speed remains stored and the mes-
sage “Memorised” accompanied by this
speed appears on the instrument panel.
Standby is confirmed by the display of
the cruising speed in grey and the mes-
sage “Memorised”.
Putting the cruise control
on standby or switching it
off does not cause a rapid
reduction in speed: you
must brake by depressing the brake
pedal.
2
a3
41
Page 197 of 364
2.77
ADAPTIVE CRUISE CONTROL (4/8)
Exceeding the cruising speed
The cruising speed may be exceeded
at any time by depressing the accelera-
tor pedal.
When exceeding this speed, the cruis-
ing speed and the following bars show
red and the cruising speed flashes on
the instrument panel: the distance con-
trol function is no longer activated.
Then, release the accelerator: cruise
and distance control will automatically
reactivate unless the function has been
set to standby.
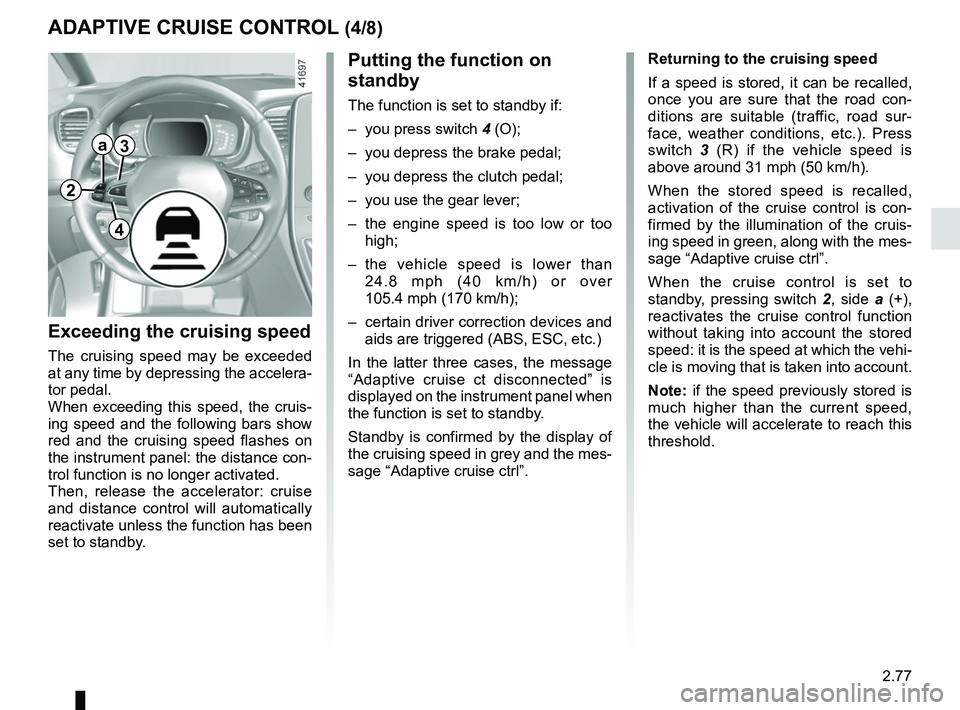
Putting the function on
standby
The function is set to standby if:
– you press switch 4 (O);
– you depress the brake pedal;
– you depress the clutch pedal;
– you use the gear lever;
– the engine speed is too low or too high;
– the vehicle speed is lower than 24.8 mph (40 km/h) or over
105.4 mph (170 km/h);
– certain driver correction devices and aids are triggered (ABS, ESC, etc.)
In the latter three cases, the message
“Adaptive cruise ct disconnected” is
displayed on the instrument panel when
the function is set to standby.
Standby is confirmed by the display of
the cruising speed in grey and the mes-
sage “Adaptive cruise ctrl”. Returning to the cruising speed
If a speed is stored, it can be recalled,
once you are sure that the road con-
ditions are suitable (traffic, road sur-
face, weather conditions, etc.). Press
switch
3 (R) if the vehicle speed is
above around 31 mph (50 km/h).
When the stored speed is recalled,
activation of the cruise control is con-
firmed by the illumination of the cruis-
ing speed in green, along with the mes-
sage “Adaptive cruise ctrl”.
When the cruise control is set to
standby, pressing switch 2, side a (+),
reactivates the cruise control function
without taking into account the stored
speed: it is the speed at which the vehi-
cle is moving that is taken into account.
Note: if the speed previously stored is
much higher than the current speed,
the vehicle will accelerate to reach this
threshold.
2
a3
4
Page 201 of 364

Limitation of the system operation
– A vehicle travelling in the opposite direction will not trigger any alert\
or any action on the system operation.
– The rad")
2.81
ADAPTIVE CRUISE CONTROL (8/8)
Limitation of the system operation
– A vehicle travelling in the opposite direction will not trigger any alert\
or any action on the system operation.
– The radar-camera should be kept clean and free of any modifications in o\
rder to ensure the proper operation of the
system.
– Fixed obstacles (stationary vehicles, traffic jams, toll booths etc.) or objects travelling at low speed or of a \
small size ( motor-
bikes, bicycles, pedestrians etc.) may not be detected by the system.
– A vehicle entering the same lane will only be detected once it has entere\
d the detection zone. Sudden or late braking may then take place.
– When entering a bend or curve, the radar-camera may temporarily no longe\
r detect the vehicle in front, and this may lead to acceleration.
– When exiting a curve, the detection of the vehicle in front may be affected or delayed. Sudden or late braking may then take place.
– A slower vehicle travelling in an adjacent lane may be detected and cause\
a slowing down if one of the two vehicles is trav- elling too close to the lane of the other.
– A slower vehicle with a wide difference in speed may not be taken into account by the system.
– The system is deactivated below around 31 mph (50 km/h). Drivers must \
react accordingly.
– Sudden changes in situation are not instantly taken into account by the \
system. Drivers must remain vigilant at all times and
under all circumstances.
System disturbance
Some conditions can disturb or damage the operation of the system, such \
as:
– a complex environment (metal bridge, tunnel etc.) ;
– poor weather conditions (snow, hail, black ice etc.);
– poor visibility (night, fog etc.);
– poor contrast between objects;
– being dazzled (glaring sun, lights of vehicles travelling in the opposi\
te direction etc.).
Risk of unwanted braking or acceleration.
Page 204 of 364
2.84
An impact to the under-
side of the vehicle while
manoeuvring (e.g. strik-
ing a post, raised kerb or
other street furniture) may result in
damage to the vehicle (e.g. defor-
mation of an axle).
To avoid any risk of accident, have
your vehicle checked by an ap-
proved Dealer.
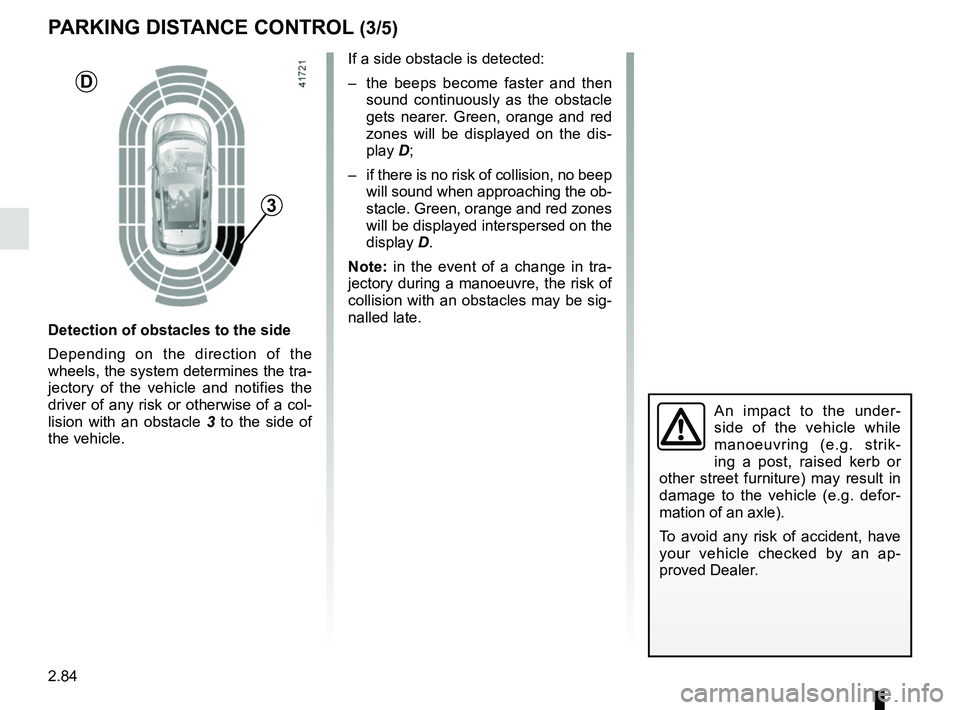
Detection of obstacles to the side
Depending on the direction of the
wheels, the system determines the tra-
jectory of the vehicle and notifies the
driver of any risk or otherwise of a col-
lision with an obstacle 3 to the side of
the vehicle.
PARKING DISTANCE CONTROL (3/5)
If a side obstacle is detected:
– the beeps become faster and then sound continuously as the obstacle
gets nearer. Green, orange and red
zones will be displayed on the dis-
play D;
– if there is no risk of collision, no beep will sound when approaching the ob-
stacle. Green, orange and red zones
will be displayed interspersed on the
display D.
Note: in the event of a change in tra-
jectory during a manoeuvre, the risk of
collision with an obstacles may be sig-
nalled late.
3
D
Page 225 of 364
3.9
10
AUTOMATIC CLIMATE CONTROL: Controls A (1/5)
15
6543
9
1216
17
18
19
11
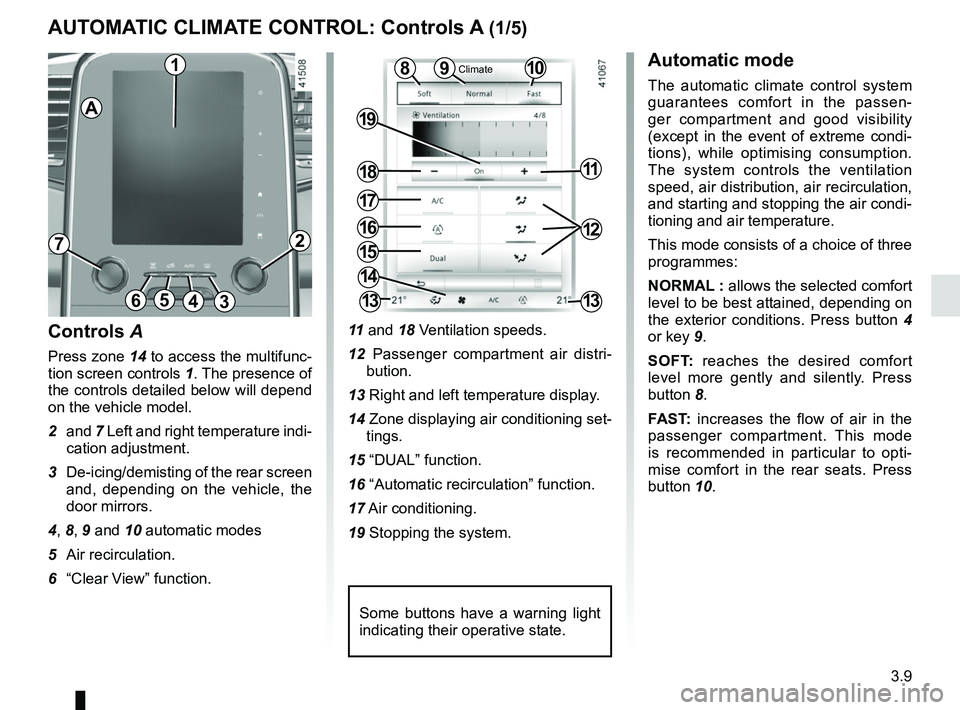
Controls A
Press zone 14 to access the multifunc-
tion screen controls 1. The presence of
the controls detailed below will depend
on the vehicle model.
2 and 7 Left and right temperature indi-
cation adjustment.
3 De-icing/demisting of the rear screen and, depending on the vehicle, the
door mirrors.
4, 8, 9 and 10 automatic modes
5 Air recirculation.
6 “Clear View” function. 11
and 18 Ventilation speeds.
12 Passenger compartment air distri- bution.
13 Right and left temperature display.
14 Zone displaying air conditioning set- tings.
15 “DUAL” function.
16 “Automatic recirculation” function.
17 Air conditioning.
19 Stopping the system.
Automatic mode
The automatic climate control system
guarantees comfort in the passen-
ger compartment and good visibility
(except in the event of extreme condi-
tions), while optimising consumption.
The system controls the ventilation
speed, air distribution, air recirculation,
and starting and stopping the air condi-
tioning and air temperature.
This mode consists of a choice of three
programmes:
NORMAL : allows the selected comfort
level to be best attained, depending on
the exterior conditions. Press button 4
or key 9.
SOFT: reaches the desired comfort
level more gently and silently. Press
button 8.
FAST: increases the flow of air in the
passenger compartment. This mode
is recommended in particular to opti-
mise comfort in the rear seats. Press
button 10.8
14
13
72
13
1
Some buttons have a warning light
indicating their operative state.
A
Climate
Page 228 of 364
3.12
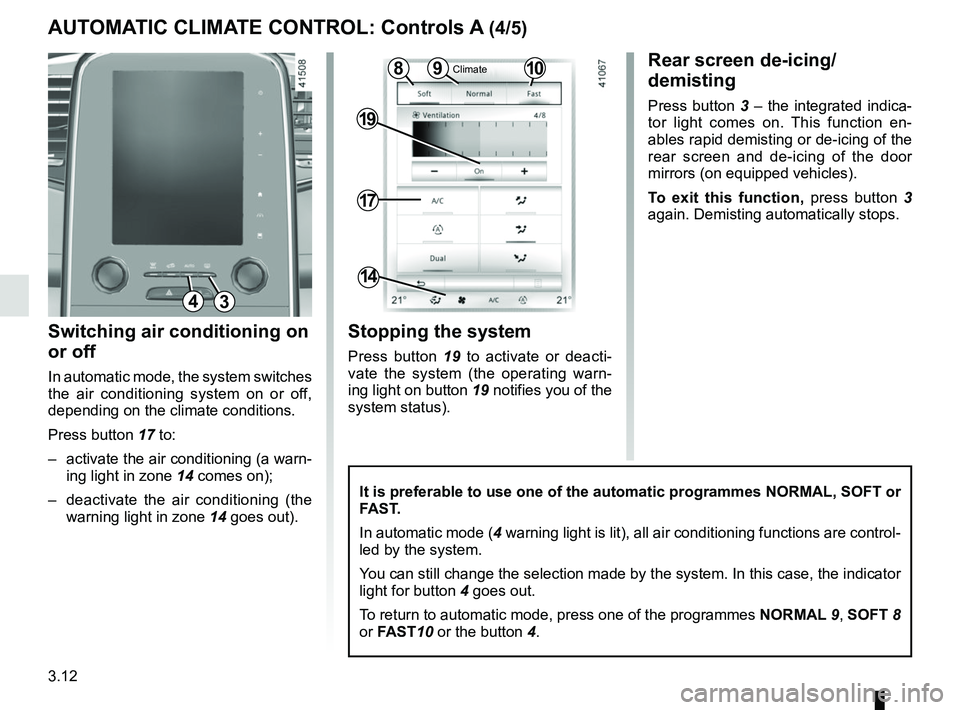
Switching air conditioning on
or off
In automatic mode, the system switches
the air conditioning system on or off,
depending on the climate conditions.
Press button 17 to:
– activate the air conditioning (a warn-ing light in zone 14 comes on);
– deactivate the air conditioning (the warning light in zone 14 goes out).
17
19
14
Stopping the system
Press button 19 to activate or deacti-
vate the system (the operating warn-
ing light on button 19 notifies you of the
system status).
It is preferable to use one of the automatic programmes NORMAL, SOFT or
FAST.
In automatic mode (4 warning light is lit), all air conditioning functions are control-
led by the system.
You can still change the selection made by the system. In this case, the \
indicator
light for button 4 goes out.
To return to automatic mode, press one of the programmes NORMAL 9, SOFT 8
or FAST10 or the button 4.
Rear screen de-icing/
demisting
Press button 3 – the integrated indica-
tor light comes on. This function en-
ables rapid demisting or de-icing of the
rear screen and de-icing of the door
mirrors (on equipped vehicles).
To exit this function, press button 3
again. Demisting automatically stops.
AUTOMATIC CLIMATE CONTROL: Controls A (4/5)
1098Climate
43
Page 229 of 364
3.13
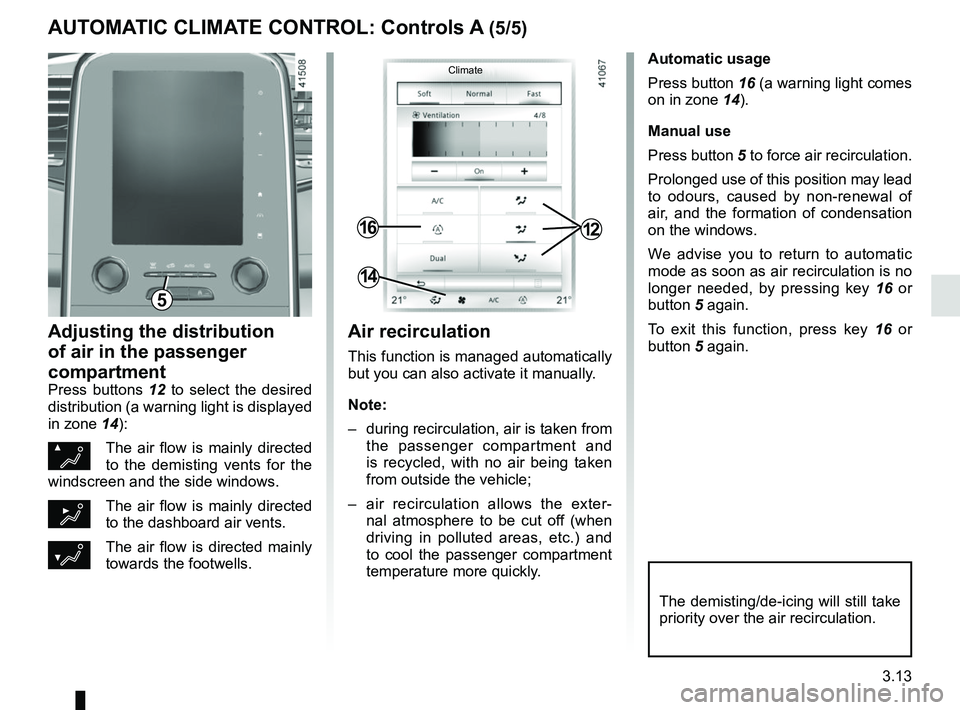
Automatic usage
Press button 16 (a warning light comes
on in zone 14).
Manual use
Press button 5 to force air recirculation.
Prolonged use of this position may lead
to odours, caused by non-renewal of
air, and the formation of condensation
on the windows.
We advise you to return to automatic
mode as soon as air recirculation is no
longer needed, by pressing key 16 or
button 5 again.
To exit this function, press key 16 or
button 5 again.
Adjusting the distribution
of air in the passenger
compartment
Press buttons 12 to select the desired
distribution (a warning light is displayed
in zone 14):
ØThe air flow is mainly directed
to the demisting vents for the
windscreen and the side windows.
½The air flow is mainly directed
to the dashboard air vents.
¿The air flow is directed mainly
towards the footwells.
The demisting/de-icing will still take
priority over the air recirculation.
1216
14
Air recirculation
This function is managed automatically
but you can also activate it manually.
Note:
– during recirculation, air is taken from the passenger compartment and
is recycled, with no air being taken
from outside the vehicle;
– air recirculation allows the exter- nal atmosphere to be cut off (when
driving in polluted areas, etc.) and
to cool the passenger compartment
temperature more quickly.
AUTOMATIC CLIMATE CONTROL: Controls A (5/5)
Climate
5
Page 233 of 364
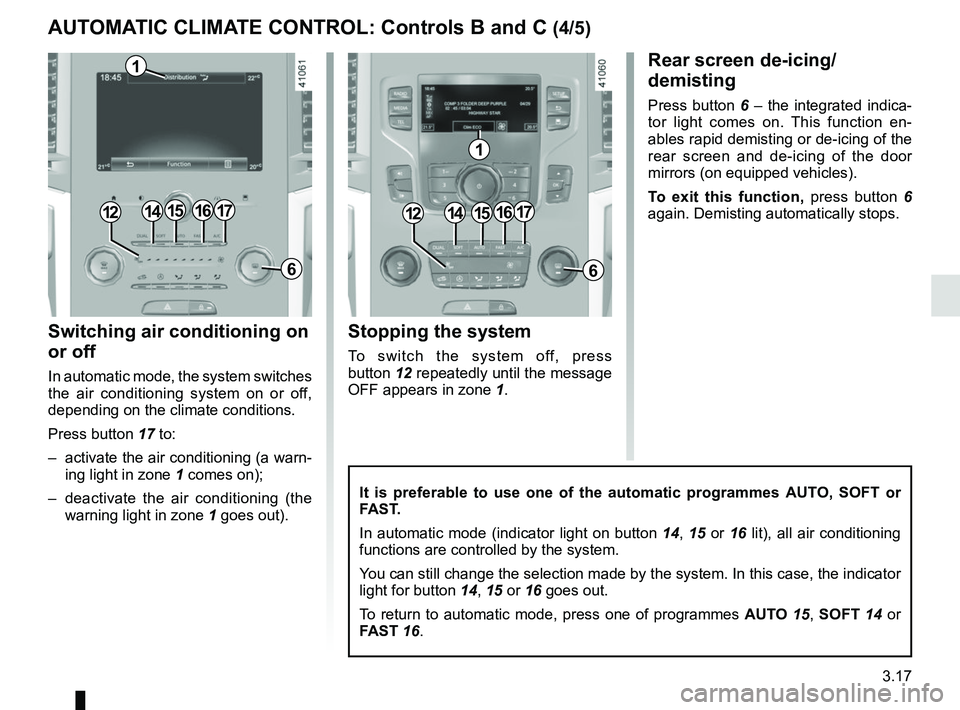
3.17
Switching air conditioning on
or off
In automatic mode, the system switches
the air conditioning system on or off,
depending on the climate conditions.
Press button 17 to:
– activate the air conditioning (a warn-ing light in zone 1 comes on);
– deactivate the air conditioning (the warning light in zone 1 goes out).
Rear screen de-icing/
demisting
Press button 6 – the integrated indica-
tor light comes on. This function en-
ables rapid demisting or de-icing of the
rear screen and de-icing of the door
mirrors (on equipped vehicles).
To exit this function, press button 6
again. Demisting automatically stops.
It is preferable to use one of the automatic programmes AUTO, SOFT or
FAST.
In automatic mode (indicator light on button 14, 15 or 16 lit), all air conditioning
functions are controlled by the system.
You can still change the selection made by the system. In this case, the \
indicator
light for button 14, 15 or 16 goes out.
To return to automatic mode, press one of programmes AUTO 15, SOFT 14 or
FAST 16.
15
6
1715
6
1714161416
1
1
Stopping the system
To switch the system off, press
button 12 repeatedly until the message
OFF appears in zone 1.
1212
AUTOMATIC CLIMATE CONTROL: Controls B and C (4/5)