LED RENAULT SCENIC 2018 Service Manual
[x] Cancel search | Manufacturer: RENAULT, Model Year: 2018, Model line: SCENIC, Model: RENAULT SCENIC 2018Pages: 364, PDF Size: 10.43 MB
Page 234 of 364
3.18
Automatic usage
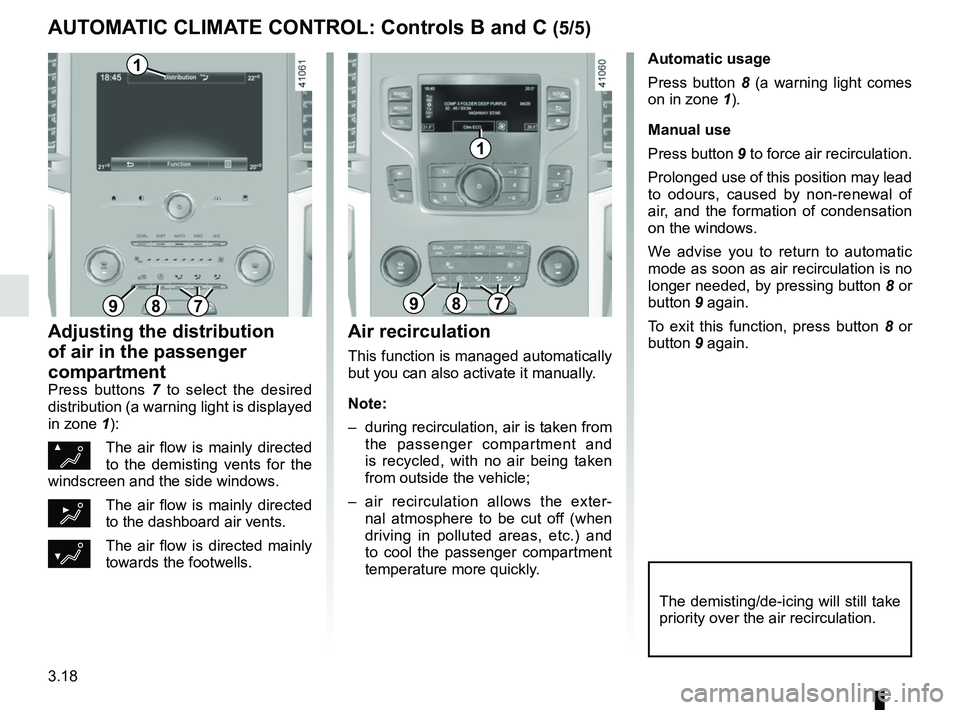
Press button 8 (a warning light comes
on in zone 1).
Manual use
Press button 9 to force air recirculation.
Prolonged use of this position may lead
to odours, caused by non-renewal of
air, and the formation of condensation
on the windows.
We advise you to return to automatic
mode as soon as air recirculation is no
longer needed, by pressing button 8 or
button 9 again.
To exit this function, press button 8 or
button 9 again.
Adjusting the distribution
of air in the passenger
compartment
Press buttons 7 to select the desired
distribution (a warning light is displayed
in zone 1):
ØThe air flow is mainly directed
to the demisting vents for the
windscreen and the side windows.
½The air flow is mainly directed
to the dashboard air vents.
¿The air flow is directed mainly
towards the footwells.
The demisting/de-icing will still take
priority over the air recirculation.
Air recirculation
This function is managed automatically
but you can also activate it manually.
Note:
– during recirculation, air is taken from the passenger compartment and
is recycled, with no air being taken
from outside the vehicle;
– air recirculation allows the exter- nal atmosphere to be cut off (when
driving in polluted areas, etc.) and
to cool the passenger compartment
temperature more quickly.
897897
1
1
AUTOMATIC CLIMATE CONTROL: Controls B and C (5/5)
Page 259 of 364
3.43
REAR SEATS (4/6)
To automatically fold down
the seats (flat position)
The rear seats are electrically unlocked
to fold down in order to create a flat
floor.
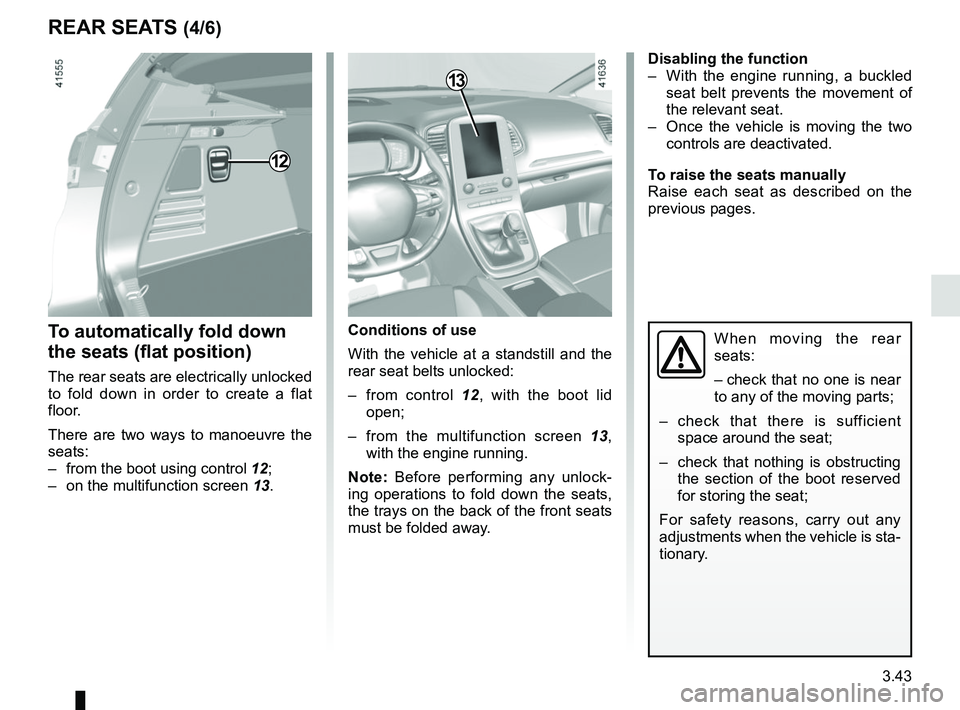
There are two ways to manoeuvre the
seats:
– from the boot using control 12;
– on the multifunction screen 13. Disabling the function
– With the engine running, a buckled
seat belt prevents the movement of
the relevant seat.
– Once the vehicle is moving the two controls are deactivated.
To raise the seats manually
Raise each seat as described on the
previous pages.
13
Conditions of use
With the vehicle at a standstill and the
rear seat belts unlocked:
– from control 12, with the boot lid
open;
– from the multifunction screen 13, with the engine running.
Note: Before performing any unlock-
ing operations to fold down the seats,
the trays on the back of the front seats
must be folded away.
12
When moving the rear
seats:
– check that no one is near
to any of the moving parts;
– check that there is sufficient space around the seat;
– check that nothing is obstructing the section of the boot reserved
for storing the seat;
For safety reasons, carry out any
adjustments when the vehicle is sta-
tionary.
Page 260 of 364
3.44
REAR SEATS (5/6)
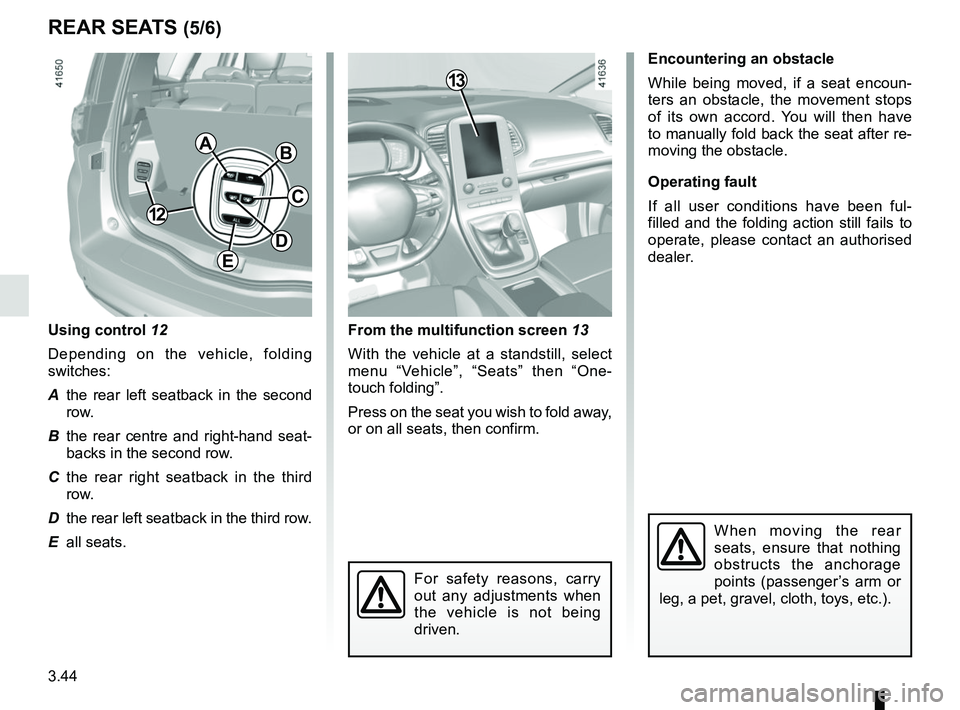
From the multifunction screen 13
With the vehicle at a standstill, select
menu “Vehicle”, “Seats” then “One-
touch folding”.
Press on the seat you wish to fold away,
or on all seats, then confirm. Encountering an obstacle
While being moved, if a seat encoun-
ters an obstacle, the movement stops
of its own accord. You will then have
to manually fold back the seat after re-
moving the obstacle.
Operating fault
If all user conditions have been ful-
filled and the folding action still fails to
operate, please contact an authorised
dealer.
When moving the rear
seats, ensure that nothing
obstructs the anchorage
points (passenger’s arm or
leg, a pet, gravel, cloth, toys, etc.).
AB
D
E
C
Using control 12
Depending on the vehicle, folding
switches:
A the rear left seatback in the second row.
B the rear centre and right-hand seat- backs in the second row.
C the rear right seatback in the third row.
D the rear left seatback in the third row.
E all seats.
13
For safety reasons, carry
out any adjustments when
the vehicle is not being
driven.
12
Page 281 of 364
4.9
LEVELS (2/3)
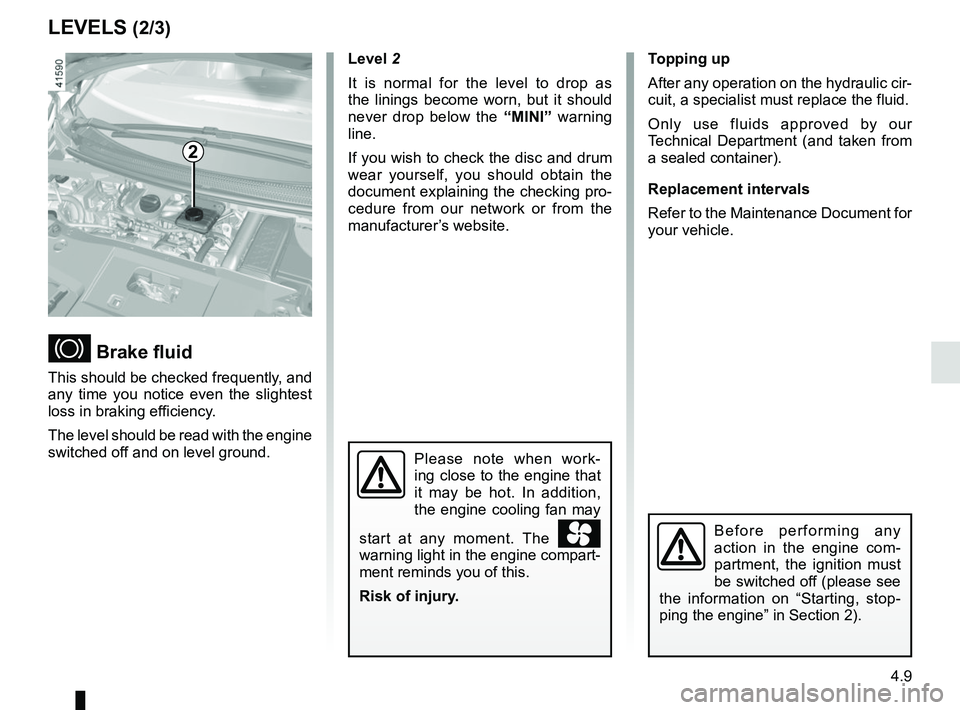
Brake fluid
This should be checked frequently, and
any time you notice even the slightest
loss in braking efficiency.
The level should be read with the engine
switched off and on level ground.Level 2
It is normal for the level to drop as
the linings become worn, but it should
never drop below the “MINI” warning
line.
If you wish to check the disc and drum
wear yourself, you should obtain the
document explaining the checking pro-
cedure from our network or from the
manufacturer’s website. Topping up
After any operation on the hydraulic cir-
cuit, a specialist must replace the fluid.
Only use fluids approved by our
Technical Department (and taken from
a sealed container).
Replacement intervals
Refer to the Maintenance Document for
your vehicle.
Please note when work-
ing close to the engine that
it may be hot. In addition,
the engine cooling fan may
start at any moment. The
warning light in the engine compart-
ment reminds you of this.
Risk of injury.
2
Before performing any
action in the engine com-
partment, the ignition must
be switched off (please see
the information on “Starting, stop-
ping the engine” in Section 2).
Page 282 of 364
4.10
LEVELS (3/3)/FILTERS
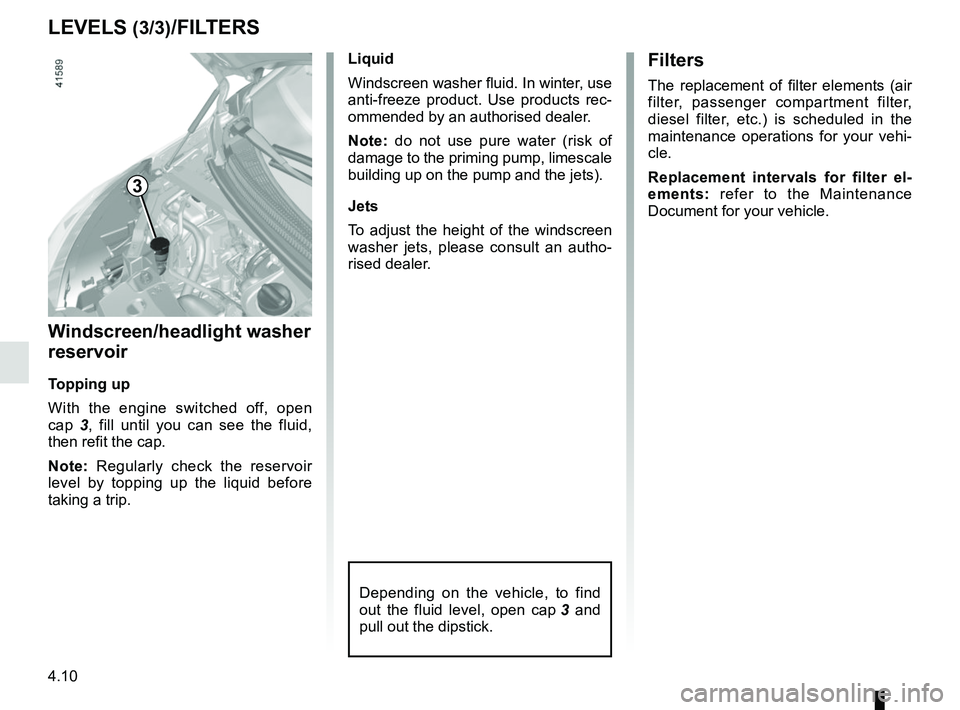
Windscreen/headlight washer
reservoir
Topping up
With the engine switched off, open
cap 3, fill until you can see the fluid,
then refit the cap.
Note: Regularly check the reservoir
level by topping up the liquid before
taking a trip. Liquid
Windscreen washer fluid. In winter, use
anti-freeze product. Use products rec-
ommended by an authorised dealer.
Note: do not use pure water (risk of
damage to the priming pump, limescale
building up on the pump and the jets).
Jets
To adjust the height of the windscreen
washer jets, please consult an autho-
rised dealer.
Depending on the vehicle, to find
out the fluid level, open cap
3 and
pull out the dipstick.
Filters
The replacement of filter elements (air
filter, passenger compartment filter,
diesel filter, etc.) is scheduled in the
maintenance operations for your vehi-
cle.
Replacement intervals for filter el-
ements: refer to the Maintenance
Document for your vehicle.
3
Page 287 of 364
4.15
BODYWORK MAINTENANCE (1/3)
You should
Wash your car frequently, with the
engine off, with cleaning products rec-
ommended by the manufacturer (never
use abrasive products). Rinse thor-
oughly beforehand with a jet:
– spots of tree resin and industrial
grime;
– mud in the wheel arches and under-
neath the body which forms damp
patches;
– bird droppings , which cause a
chemical reaction with the paint that
rapidly discolours paintwork and
may even cause the paint to peel
off;
wash the vehicle immediately to
remove these marks since it is im-
possible to remove them by polish-
ing;
– salt, particularly in the wheel arches
and underneath the body after driv-
ing in areas where the roads have
been gritted.
Remove any plant matter (resin, leaves,
etc.) from the vehicle regularly.
A well-maintained vehicle will last
longer. It is therefore recommended to
maintain the exterior of the vehicle reg-
ularly.
Your vehicle has been treated with very
effective anti-corrosion products. It is
nevertheless subject to various outside
influences.
Corrosive agents in the atmosphere
–
atmospheric pollution (built-up and
industrial areas);
– saline atmospheres (near the sea,
particularly in hot weather);
– seasonal and damp weather condi-
tions (e.g. road salt in winter, water
from road cleaners, etc.).
Minor impacts
Abrasive action
Dust and sand in the air, mud, road grit
thrown up by other vehicles, etc.
You should take a number of minor pre-
cautions in order to safeguard your ve-
hicle against such risks. Respect local regulations about wash-
ing vehicles (e.g. do not wash your ve-
hicle on a public highway).
Observe the vehicle stopping distances
when driving on gravelled surfaces to
prevent paint damage.
Repair, or have repaired quickly, areas
where the paint has been damaged, to
prevent corrosion spreading.
Remember to visit the body shop pe-
riodically in order to maintain your
anti-corrosion warranty. Refer to the
Maintenance Document.
If it is necessary to clean mechani-
cal components, hinges, etc., spray
them with products approved by our
Technical Department to protect them
after they have been cleaned.
We have selected special products
to care for your vehicle and you can
obtain these from the manufactur-
er’s accessory outlets.
Page 310 of 364
5.18
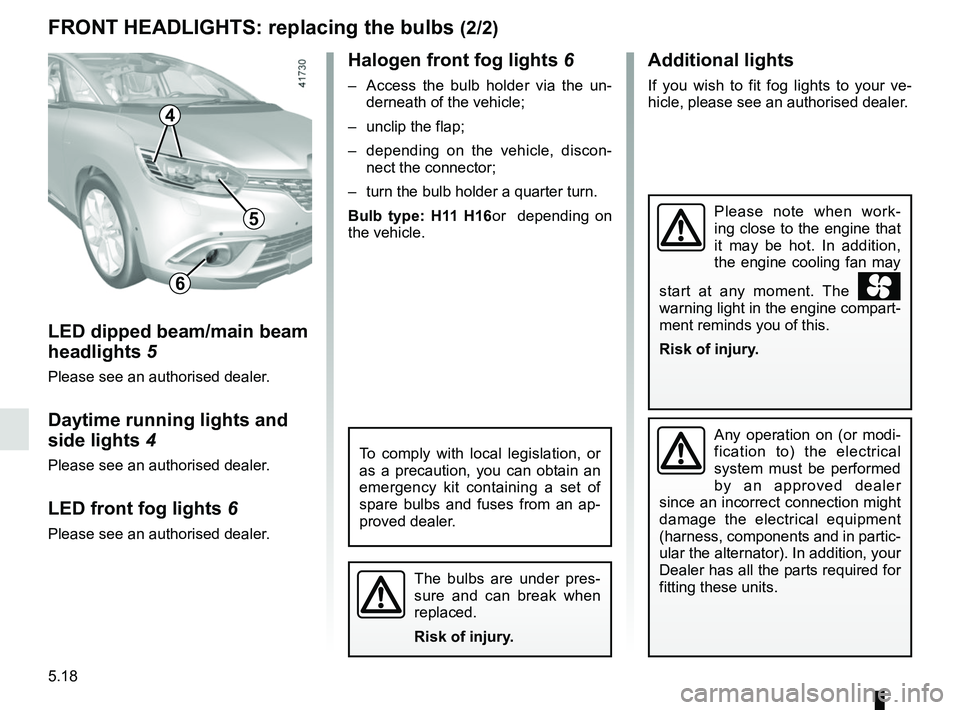
Halogen front fog lights 6
– Access the bulb holder via the un-
derneath of the vehicle;
– unclip the flap;
– depending on the vehicle, discon- nect the connector;
– turn the bulb holder a quarter turn.
Bulb type: H11 H16or depending on
the vehicle.
The bulbs are under pres-
sure and can break when
replaced.
Risk of injury.
FRONT HEADLIGHTS: replacing the bulbs (2/2)
To comply with local legislation, or
as a precaution, you can obtain an
emergency kit containing a set of
spare bulbs and fuses from an ap-
proved dealer.
Any operation on (or modi-
fication to) the electrical
system must be performed
by an approved dealer
since an incorrect connection might
damage the electrical equipment
(harness, components and in partic-
ular the alternator). In addition, your
Dealer has all the parts required for
fitting these units.
LED dipped beam/main beam
headlights 5
Please see an authorised dealer.
Daytime running lights and
side lights 4
Please see an authorised dealer.
LED front fog lights 6
Please see an authorised dealer.
6
Additional lights
If you wish to fit fog lights to your ve-
hicle, please see an authorised dealer.
4
5Please note when work-
ing close to the engine that
it may be hot. In addition,
the engine cooling fan may
start at any moment. The
warning light in the engine compart-
ment reminds you of this.
Risk of injury.
Page 314 of 364
5.22
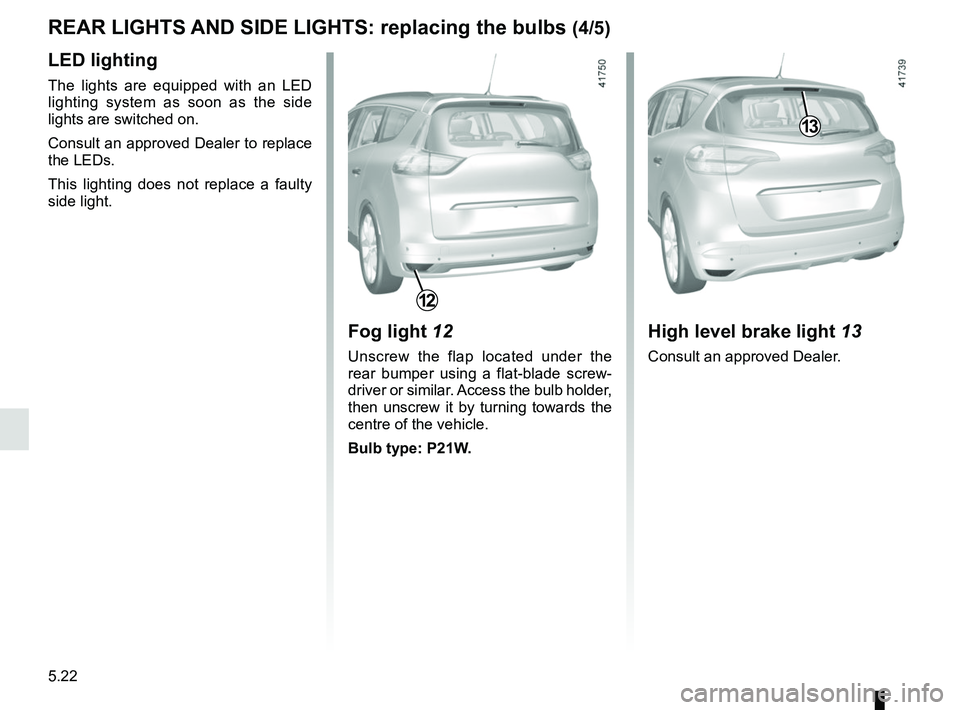
Fog light 12
Unscrew the flap located under the
rear bumper using a flat-blade screw-
driver or similar. Access the bulb holder,
then unscrew it by turning towards the
centre of the vehicle.
Bulb type: P21W.
REAR LIGHTS AND SIDE LIGHTS: replacing the bulbs (4/5)
12
LED lighting
The lights are equipped with an LED
lighting system as soon as the side
lights are switched on.
Consult an approved Dealer to replace
the LEDs.
This lighting does not replace a faulty
side light.
13
High level brake light 13
Consult an approved Dealer.
Page 332 of 364
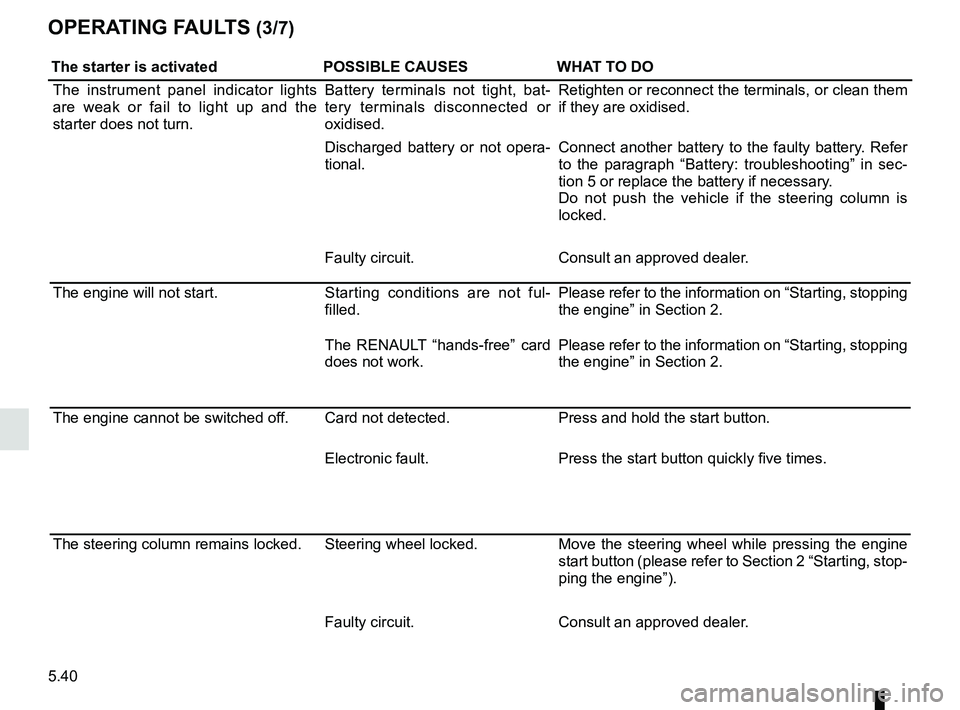
5.40
OPERATING FAULTS (3/7)
The starter is activatedPOSSIBLE CAUSESWHAT TO DO
The instrument panel indicator lights
are weak or fail to light up and the
starter does not turn. Battery terminals not tight, bat-
tery terminals disconnected or
oxidised.Retighten or reconnect the terminals, or clean them
if they are oxidised.
Discharged battery or not opera-
tional. Connect another battery to the faulty battery. Refer
to the paragraph “Battery: troubleshooting” in sec-
tion 5 or replace the battery if necessary.
Do not push the vehicle if the steering column is
locked.
Faulty circuit. Consult an approved dealer.
The engine will not start. Starting conditions are not ful-
filled.Please refer to the information on “Starting, stopping
the engine” in Section 2.
The RENAULT “hands-free” card
does not work. Please refer to the information on “Starting, stopping
the engine” in Section 2.
The engine cannot be switched off. Card not detected. Press and hold the start button.
Electronic fault. Press the start button quickly five times.
The steering column remains locked. Steering wheel locked. Move the steering wheel while pressing the engine
start button (please refer to Section 2 “Starting, stop-
ping the engine”).
Faulty circuit. Consult an approved dealer.
Page 334 of 364
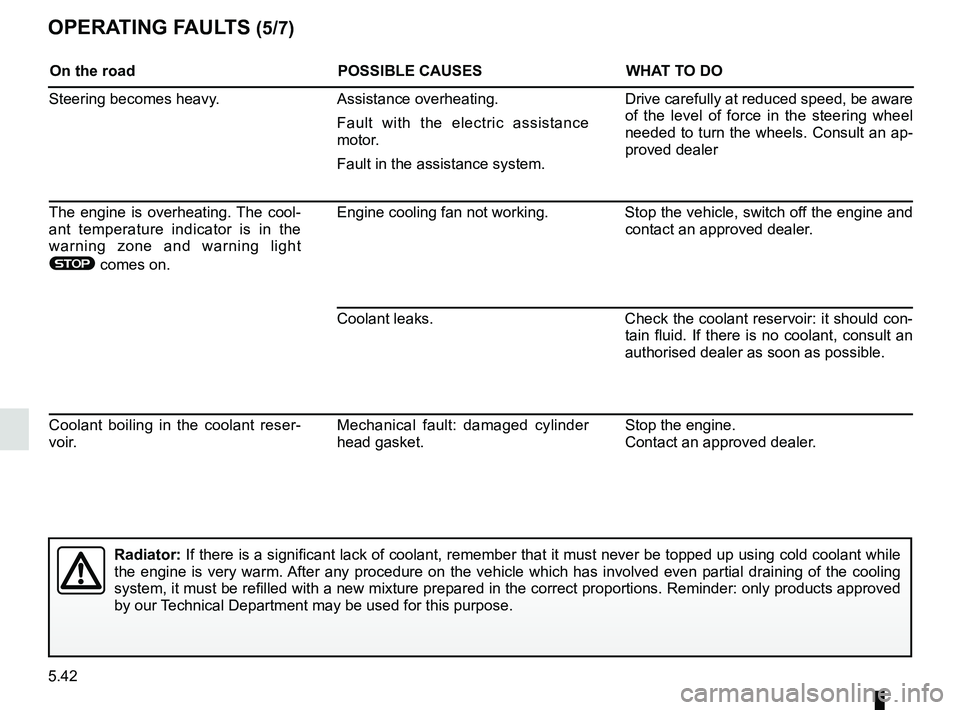
5.42
OPERATING FAULTS (5/7)
On the roadPOSSIBLE CAUSESWHAT TO DO
Steering becomes heavy. Assistance overheating.
Fault with the electric assistance
motor.
Fault in the assistance system. Drive carefully at reduced speed, be aware
of the level of force in the steering wheel
needed to turn the wheels. Consult an ap-
proved dealer
The engine is overheating. The cool-
ant temperature indicator is in the
warning zone and warning light
® comes on. Engine cooling fan not working. Stop the vehicle, switch off the engine and
contact an approved dealer.
Coolant leaks. Check the coolant reservoir: it should con- tain fluid. If there is no coolant, consult an
authorised dealer as soon as possible.
Coolant boiling in the coolant reser-
voir. Mechanical fault: damaged cylinder
head gasket. Stop the engine.
Contact an approved dealer.
Radiator:
If there is a significant lack of coolant, remember that it must never b\
e topped up using cold coolant while
the engine is very warm. After any procedure on the vehicle which has involved even partial drain\
ing of the cooling
system, it must be refilled with a new mixture prepared in the correct p\
roportions. Reminder: only products approved
by our Technical Department may be used for this purpose.