boot RENAULT TALISMAN 2016 1.G Owner's Manual
[x] Cancel search | Manufacturer: RENAULT, Model Year: 2016, Model line: TALISMAN, Model: RENAULT TALISMAN 2016 1.GPages: 328, PDF Size: 3.39 MB
Page 225 of 328
3.35
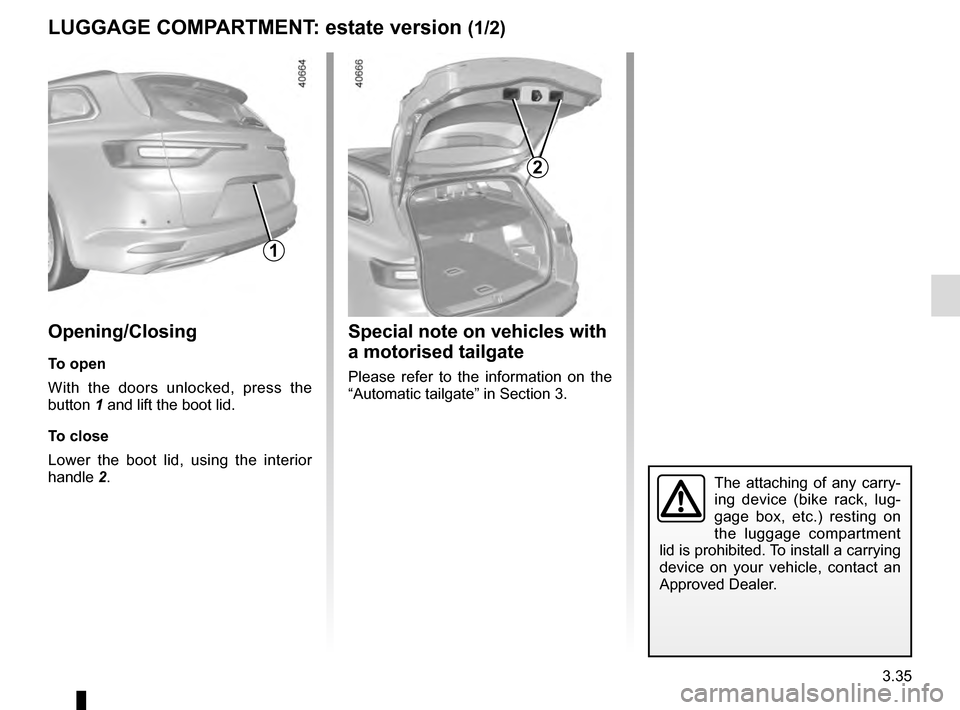
LUGGAGE COMPARTMENT: estate version (1/2)
1
Opening/Closing
To open
With the doors unlocked, press the
button 1 and lift the boot lid.
To close
Lower the boot lid, using the interior
handle 2.
2
Special note on vehicles with
a motorised tailgate
Please refer to the information on the
“Automatic tailgate” in Section 3.
The attaching of any carry-
ing device (bike rack, lug-
gage box, etc.) resting on
the luggage compartment
lid is prohibited. To install a carrying
device on your vehicle, contact an
Approved Dealer.
Page 226 of 328
3.36
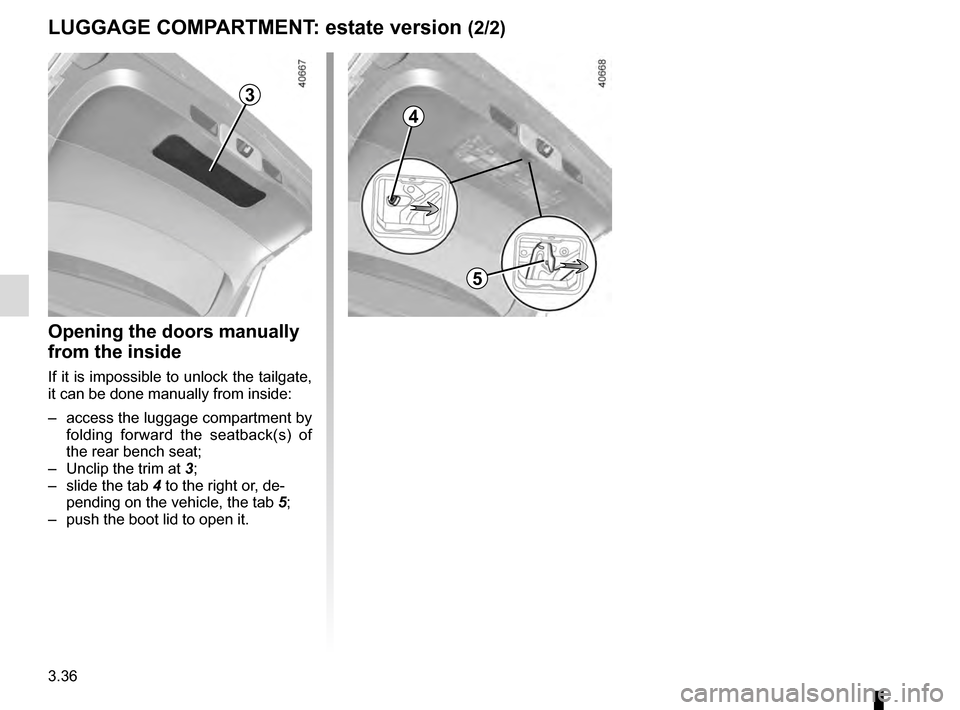
LUGGAGE COMPARTMENT: estate version (2/2)
3
Opening the doors manually
from the inside
If it is impossible to unlock the tailgate,
it can be done manually from inside:
– access the luggage compartment by folding forward the seatback(s) of
the rear bench seat;
– Unclip the trim at 3;
– slide the tab 4 to the right or, de- pending on the vehicle, the tab 5;
– push the boot lid to open it.
4
5
Page 229 of 328

3.39
Do not keep your foot in the air. Carry
out the movement without stopping.
Note: With the tailgate open, after de-
tecting a closure control, it waits around
3 seconds before triggering the closure
(a beep is emitted every second).
Using the dashboard control
Press and hold switch
4.
Using the hands-free function
The hands-free function grants access
to the boot or allows it to be closed
while you have your hands full.
With the RENAULT card on your person
and with the ignition off, perform a for-
wards/backwards movement with your
foot in the area delimited by the sen-
sors 5.
The sensor detects the approach and
removal of your foot and triggers the
opening or closing of the tailgate.
AUTOMATIC TAILGATE (3/5)
Activation/deactivation of the
hands-free function
Using the multifunction screen, select
menu “Vehicle”, “User settings” then
“Use handsfree card: open/close”.
Select “ON” or “OFF” to activate or de-
activate the function.
Usage features of the hands-free
function
– the hands-free function is no longer available after a few days of lack of
movement of the vehicle, or after
around 15 minutes if the vehicle is
unlocked. To reactivate it, use the
unlocking button on the RENAULT
card.
– The “Hands-free” function is only available if the vehicle is stationary
and the engine is switched off (and
not on standby with the Stop and
Start function).
– The «hands-free» feature may not work if the vehicle is equipped with a
towbar or is in an area of high elec-
tromagnetic radiation.
5
4
Page 232 of 328
3.42
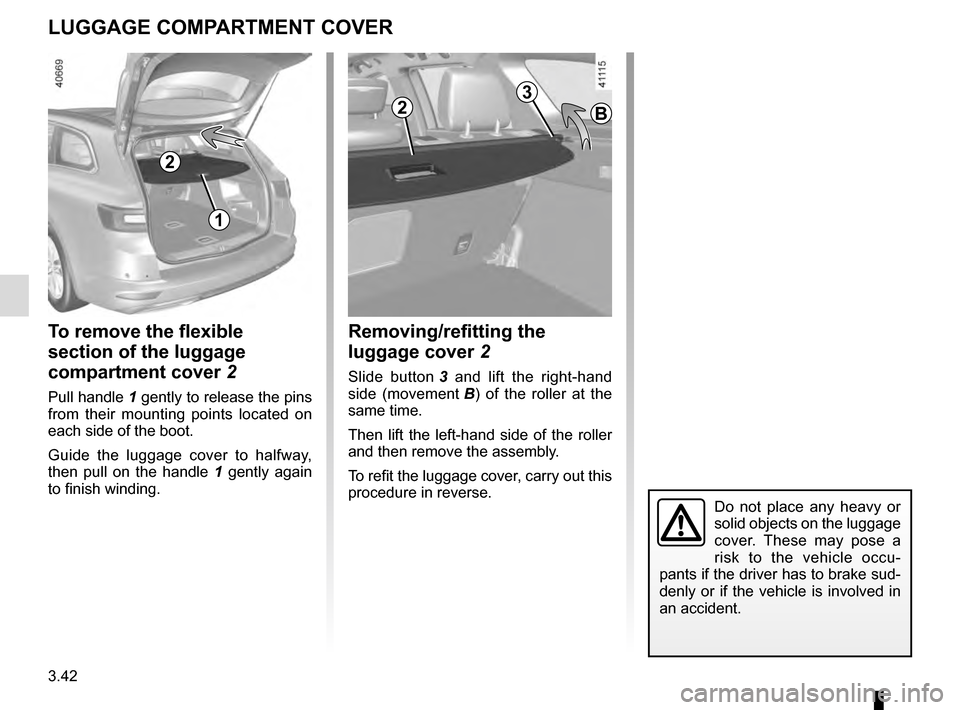
To remove the flexible
section of the luggage
compartment cover 2
Pull handle 1 gently to release the pins
from their mounting points located on
each side of the boot.
Guide the luggage cover to halfway,
then pull on the handle 1 gently again
to finish winding.
LUGGAGE COMPARTMENT COVER
Do not place any heavy or
solid objects on the luggage
cover. These may pose a
risk to the vehicle occu-
pants if the driver has to brake sud-
denly or if the vehicle is involved in
an accident.
1
Removing/refitting the
luggage cover 2
Slide button 3 and lift the right-hand
side (movement B) of the roller at the
same time.
Then lift the left-hand side of the roller
and then remove the assembly.
To refit the luggage cover, carry out this
procedure in reverse.
B
3
2
2
Page 235 of 328
3.45
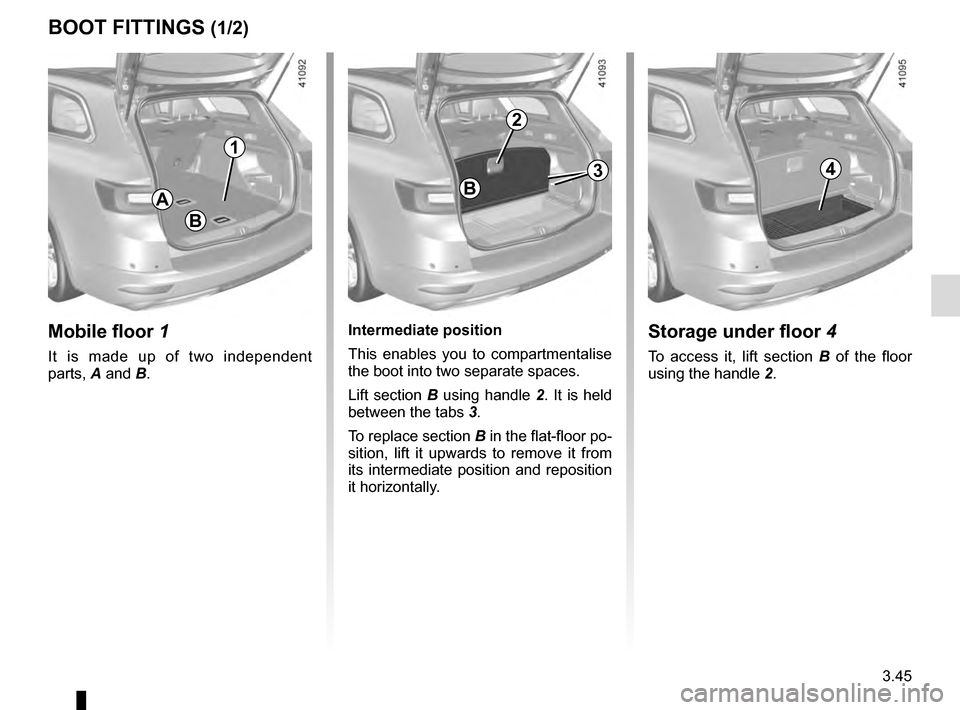
BOOT FITTINGS (1/2)
A
Mobile floor 1
It is made up of two independent
parts, A and B.
Intermediate position
This enables you to compartmentalise
the boot into two separate spaces.
Lift section B using handle 2. It is held
between the tabs 3.
To replace section B in the flat-floor po-
sition, lift it upwards to remove it from
its intermediate position and reposition
it horizontally.
B
1
2
B
Storage under floor 4
To access it, lift section B of the floor
using the handle 2.
43
Page 236 of 328
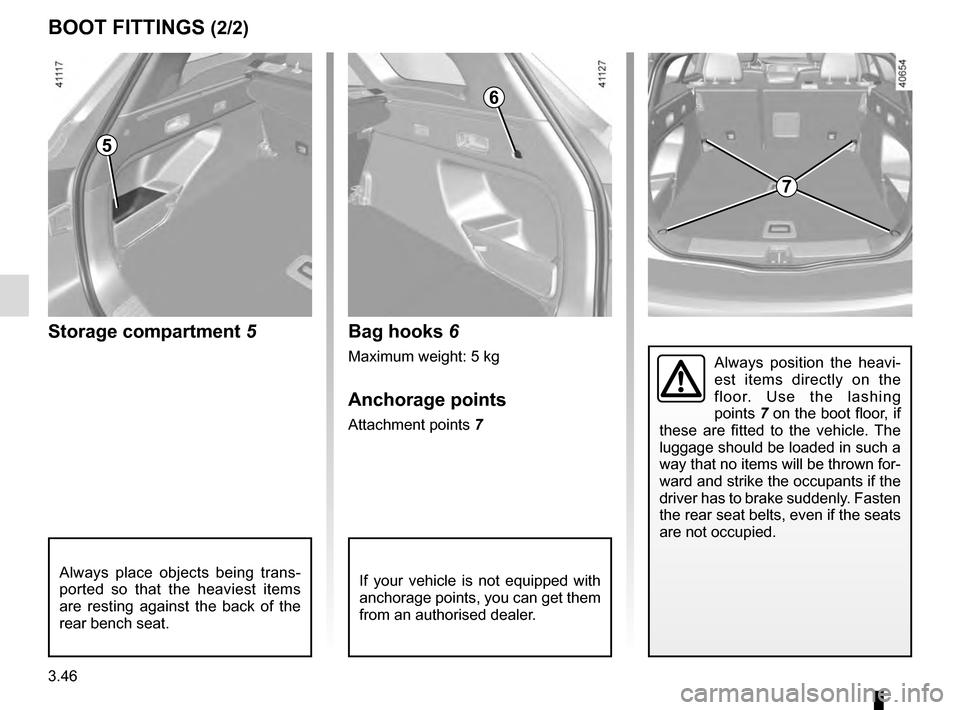
3.46
BOOT FITTINGS (2/2)
If your vehicle is not equipped with
anchorage points, you can get them
from an authorised dealer.
7
Bag hooks 6
Maximum weight: 5 kg
Anchorage points
Attachment points 7
Storage compartment 5
5
Always position the heavi-
est items directly on the
floor. Use the lashing
points 7 on the boot floor, if
these are fitted to the vehicle. The
luggage should be loaded in such a
way that no items will be thrown for-
ward and strike the occupants if the
driver has to brake suddenly. Fasten
the rear seat belts, even if the seats
are not occupied.
Always place objects being trans-
ported so that the heaviest items
are resting against the back of the
rear bench seat.
6
Page 237 of 328
3.47
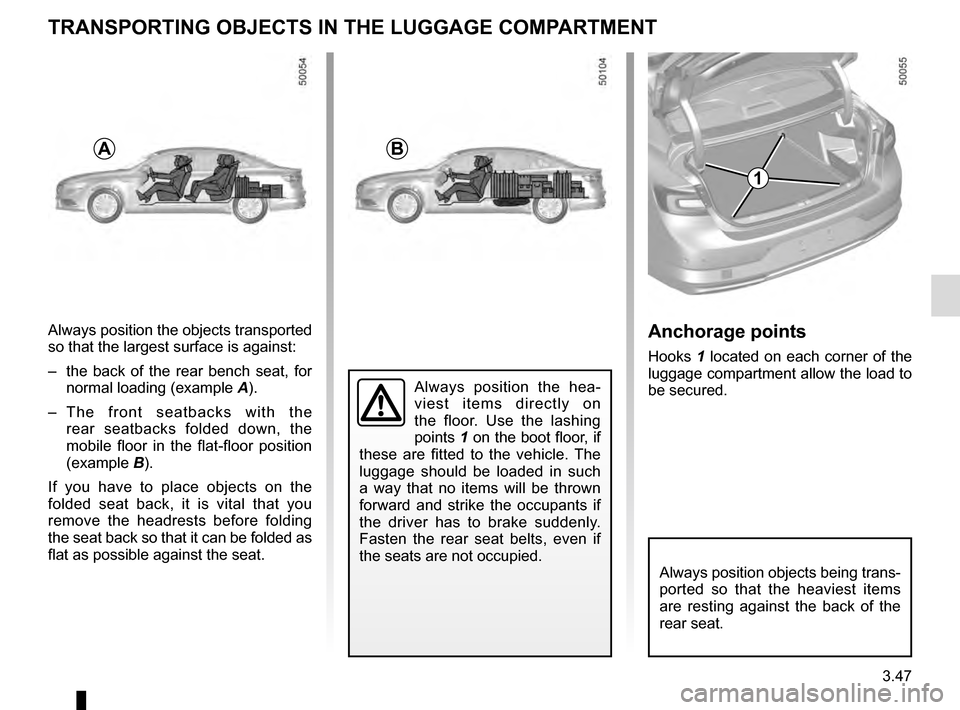
Always position the objects transported
so that the largest surface is against:
– the back of the rear bench seat, for normal loading (example A).
– The front seatbacks with the rear seatbacks folded down, the
mobile floor in the flat-floor position
(example B).
If you have to place objects on the
folded seat back, it is vital that you
remove the headrests before folding
the seat back so that it can be folded as
flat as possible against the seat.
TRANSPORTING OBJECTS IN THE LUGGAGE COMPARTMENT
A
Always position the hea-
viest items directly on
the floor. Use the lashing
points 1 on the boot floor, if
these are fitted to the vehicle. The
luggage should be loaded in such
a way that no items will be thrown
forward and strike the occupants if
the driver has to brake suddenly.
Fasten the rear seat belts, even if
the seats are not occupied.
Anchorage points
Hooks 1 located on each corner of the
luggage compartment allow the load to
be secured.
Always position objects being trans-
ported so that the heaviest items
are resting against the back of the
rear seat.
1
B
Page 262 of 328
5.2
PUNCTURE, EMERGENCY SPARE WHEEL
If the vehicle is parked on
the hard shoulder, you must
warn other road users of
your vehicle’s presence
with a warning triangle or with other
devices as per the legislation apply-
ing to the country you are in.
Special note
The Tyre Pressure Monitor function
does not check the emergency spare
wheel (the wheel replaced by the emer-
gency spare wheel disappears from the
instrument panel display).
Refer to the information on the “Tyre
pressure monitoring system” in
Section 2.Emergency spare wheel
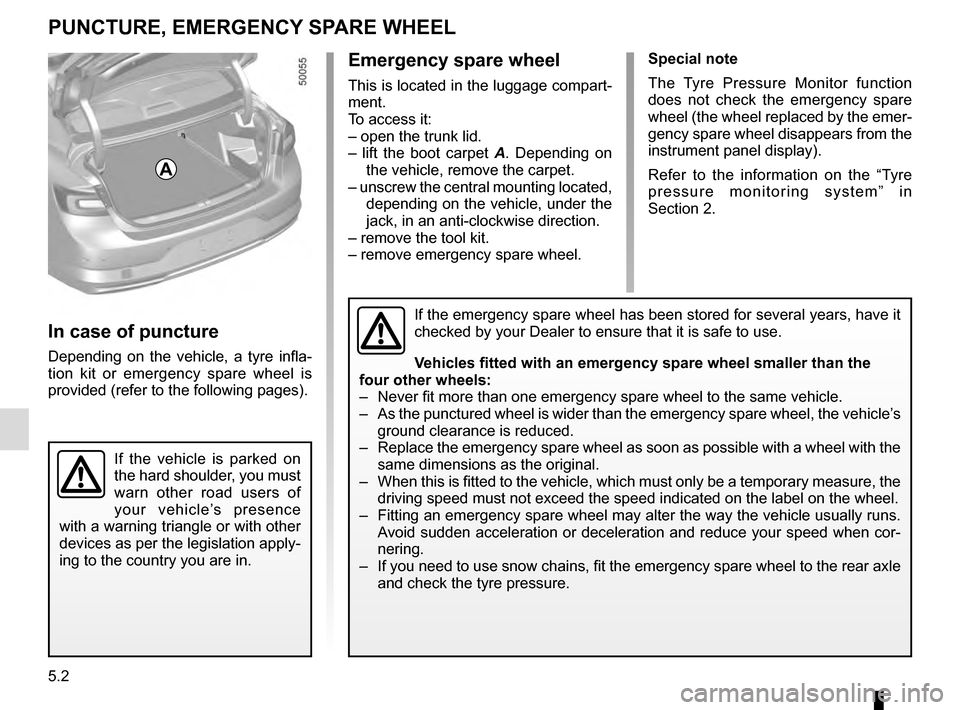
This is located in the luggage compart-
ment.
To access it:
– open the trunk lid.
– lift the boot carpet A . Depending on
the vehicle, remove the carpet.
– unscrew the central mounting located, depending on the vehicle, under the
jack, in an anti-clockwise direction.
– remove the tool kit.
– remove emergency spare wheel.
If the emergency spare wheel has been stored for several years, have it \
checked by your Dealer to ensure that it is safe to use.
Vehicles fitted with an emergency spare wheel smaller than the
four other wheels:
– Never fit more than one emergency spare wheel to the same vehicle.
– As the punctured wheel is wider than the emergency spare wheel, the vehi\
cle’s ground clearance is reduced.
– Replace the emergency spare wheel as soon as possible with a wheel with \
the same dimensions as the original.
– When this is fitted to the vehicle, which must only be a temporary measu\
re, the driving speed must not exceed the speed indicated on the label on the wh\
eel.
– Fitting an emergency spare wheel may alter the way the vehicle usually r\
uns. Avoid sudden acceleration or deceleration and reduce your speed when cor-\
nering.
– If you need to use snow chains, fit the emergency spare wheel to the rea\
r axle and check the tyre pressure.
A
In case of puncture
Depending on the vehicle, a tyre infla-
tion kit or emergency spare wheel is
provided (refer to the following pages).
Page 267 of 328
5.7
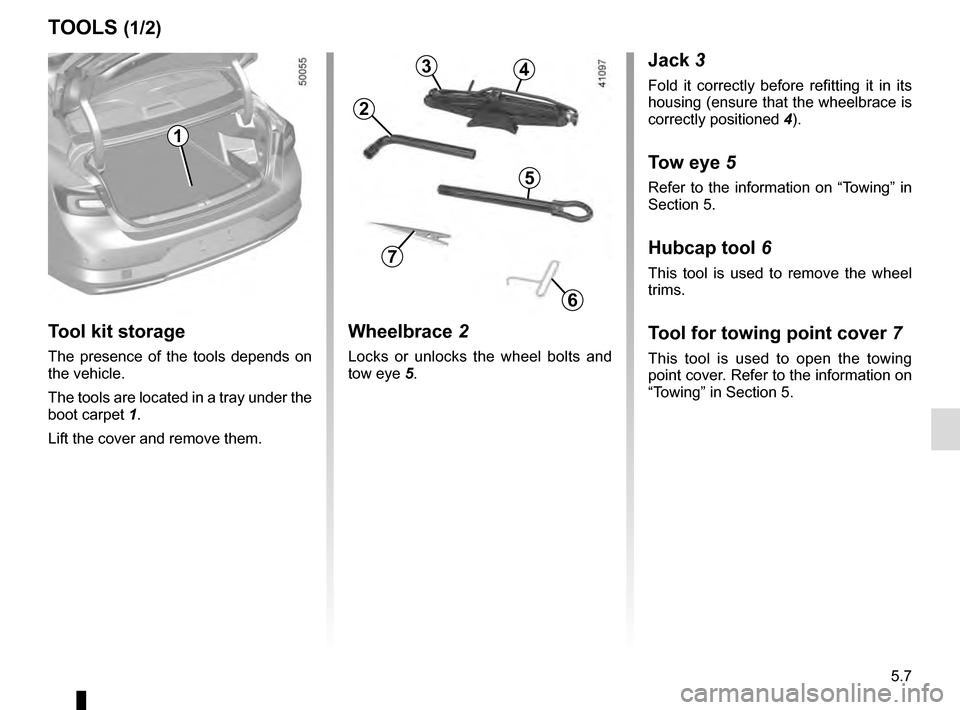
Jack 3
Fold it correctly before refitting it in its
housing (ensure that the wheelbrace is
correctly positioned 4).
Tow eye 5
Refer to the information on “Towing” in
Section 5.
Hubcap tool 6
This tool is used to remove the wheel
trims.
Tool for towing point cover 7
This tool is used to open the towing
point cover. Refer to the information on
“Towing” in Section 5.
Wheelbrace 2
Locks or unlocks the wheel bolts and
tow eye 5.
TOOLS (1/2)
3
2
5
64
B
Tool kit storage
The presence of the tools depends on
the vehicle.
The tools are located in a tray under the
boot carpet 1.
Lift the cover and remove them.
1
6
7
Page 276 of 328
5.16
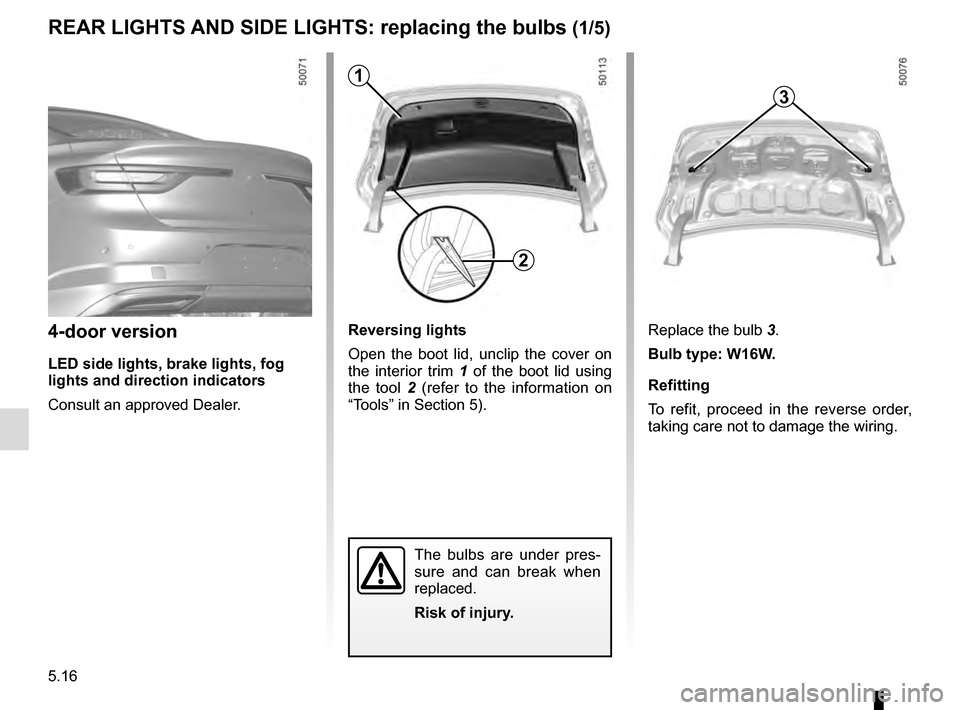
Reversing lights
Open the boot lid, unclip the cover on
the interior trim 1 of the boot lid using
the tool 2 (refer to the information on
“Tools” in Section 5). Replace the bulb
3.
Bulb type: W16W.
Refitting
To refit, proceed in the reverse order,
taking care not to damage the wiring.
REAR LIGHTS AND SIDE LIGHTS: replacing the bulbs (1/5)
The bulbs are under pres-
sure and can break when
replaced.
Risk of injury.
4-door version
LED side lights, brake lights, fog
lights and direction indicators
Consult an approved Dealer.
1
3
2