stop start RENAULT TRAFIC 2015 X82 / 3.G Owner's Guide
[x] Cancel search | Manufacturer: RENAULT, Model Year: 2015, Model line: TRAFIC, Model: RENAULT TRAFIC 2015 X82 / 3.GPages: 292, PDF Size: 6.66 MB
Page 170 of 292
3.8
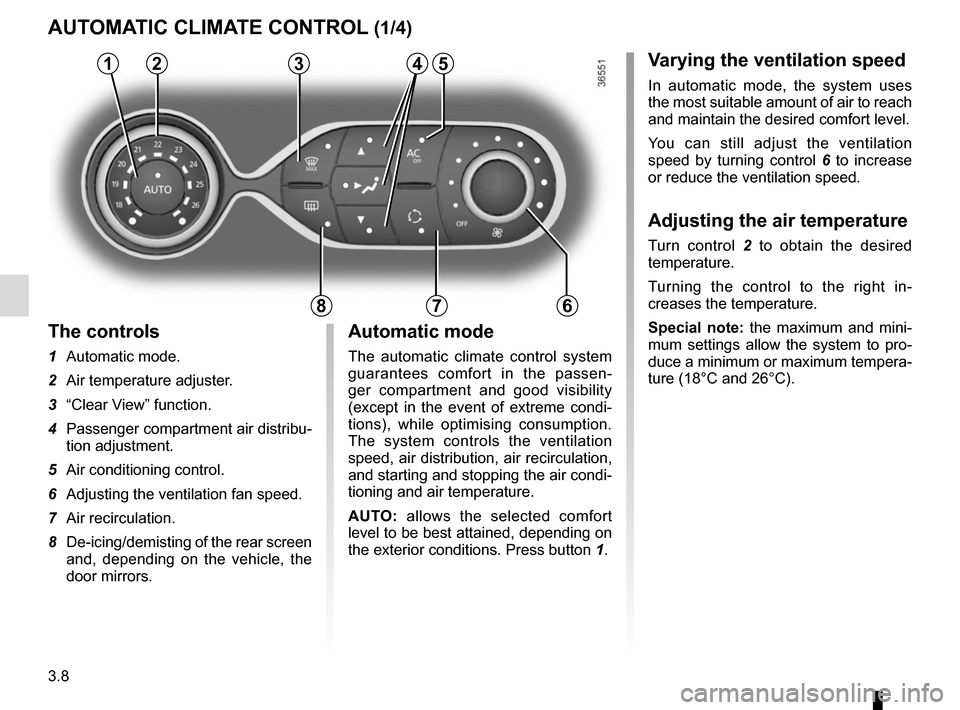
Varying the ventilation speed
In automatic mode, the system uses
the most suitable amount of air to reach
and maintain the desired comfort level.
You can still adjust the ventilation
speed by turning control 6 to increase
or reduce the ventilation speed.
Adjusting the air temperature
Turn control 2 to obtain the desired
temperature.
Turning the control to the right in-
creases the temperature.
Special note: the maximum and mini-
mum settings allow the system to pro-
duce a minimum or maximum tempera-
ture (18°C and 26°C).
The controls
1 Automatic mode.
2 Air temperature adjuster.
3 “Clear View” function.
4 Passenger compartment air distribu-
tion adjustment.
5 Air conditioning control.
6 Adjusting the ventilation fan speed.
7 Air recirculation.
8 De-icing/demisting of the rear screen
and, depending on the vehicle, the
door mirrors.
AUTOMATIC CLIMATE CONTROL (1/4)
235
786
Automatic mode
The automatic climate control system
guarantees comfort in the passen-
ger compartment and good visibility
(except in the event of extreme condi-
tions), while optimising consumption.
The system controls the ventilation
speed, air distribution, air recirculation,
and starting and stopping the air condi-
tioning and air temperature.
AUTO: allows the selected comfort
level to be best attained, depending on
the exterior conditions. Press button 1.
14
Page 173 of 292
3.11
AUTOMATIC CLIMATE CONTROL (4/4)
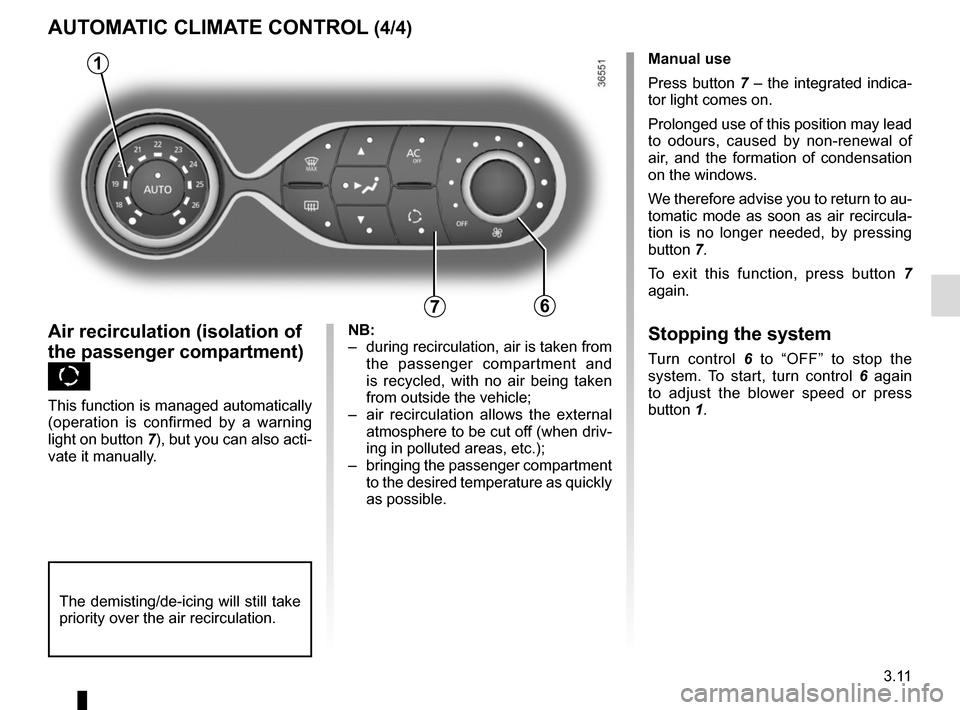
76
Air recirculation (isolation of
the passenger compartment)
K
This function is managed automatically
(operation is confirmed by a warning
light on button 7), but you can also acti-
vate it manually.Manual use
Press button 7 – the integrated indica-
tor light comes on.
Prolonged use of this position may lead
to odours, caused by non-renewal of
air, and the formation of condensation
on the windows.
We therefore advise you to return to au-
tomatic mode as soon as air recircula-
tion is no longer needed, by pressing
button 7.
To exit this function, press button
7
again.
Stopping the system
Turn control 6 to “OFF” to stop the
system. To start, turn control 6 again
to adjust the blower speed or press
button 1.
1
NB:
– during recirculation, air is taken from the passenger compartment and
is recycled, with no air being taken
from outside the vehicle;
– air recirculation allows the external atmosphere to be cut off (when driv-
ing in polluted areas, etc.);
– bringing the passenger compartment to the desired temperature as quickly
as possible.
The demisting/de-icing will still take
priority over the air recirculation.
Page 174 of 292
3.12
Operating faults
As a general rule, contact your ap-
proved dealer in the event of an oper-
ating fault.
– Reduction in de-icing, demisting or air conditioning performance.
This may be caused by the passen-
ger compartment filter cartridge be-
coming clogged.
– No cold air is being produced .
Check that the controls are set cor-
rectly and that the fuses are sound.
Otherwise, switch off the system.
Presence of water under the
vehicle
After prolonged use of the air condi-
tioning system, it is normal for water
to be present under the vehicle. This is
caused by condensation.
AIR CONDITIONING: information and advice on use
Do not open the refriger-
ant fluid circuit. The fluid
may damage eyes or skin.
Fuel consumption
You will normally notice an increase in
fuel consumption (especially in town)
when the air conditioning is operating.
Advice for reducing consumption
and helping to preserve the environ-
ment
Switch off the system when it is not re-
quired.
Drive with the air vents open and the
windows closed.
If the vehicle has been parked in the
sun, open the doors for a few moments
to let the hot air escape before starting
the engine.
Vehicles fitted with an
auxiliary heater
Some vehicles are fitted with an auxil-
iary heater which heats the passenger
compartment more quickly.
This device operates only when the
engine is running and in cold weather.
When the device is functioning you
can normally see a small amount of
smoke on the right-hand side of the ve-
hicle coming from the heater’s exhaust
system.
Advice on useIn some situations, (air conditioning
off, air recirculation activated, ventila-
tion speed at zero or low, etc.) you may
notice that condensation starts to form
on the windows and windscreen.
If there is condensation, use the “Clear
View” function to remove it, then use
the air conditioning in automatic mode
to stop it forming again.
MaintenanceRefer to the Maintenance Document
for your vehicle for the inspection fre-
quency.
Do not add anything to the
vehicle’s ventilation circuit
(for example, to remove
bad odours).
There is a risk of damage or of
fire.
Fuel consumption increases when
the air conditioning is being used
(switch it off when it is not required).
Page 206 of 292
4.2
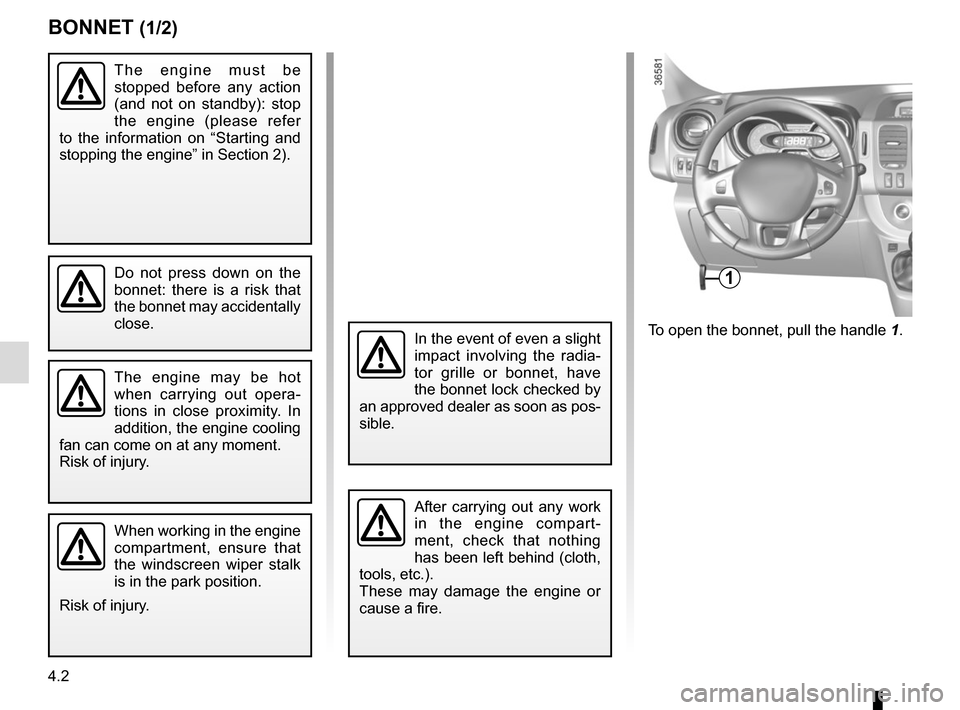
To open the bonnet, pull the handle 1.
BONNET (1/2)
1
The engine may be hot
when carrying out opera-
tions in close proximity. In
addition, the engine cooling
fan can come on at any moment.
Risk of injury.
Do not press down on the
bonnet: there is a risk that
the bonnet may accidentally
close.
When working in the engine
compartment, ensure that
the windscreen wiper stalk
is in the park position.
Risk of injury.
The engine must be
stopped before any action
(and not on standby): stop
the engine (please refer
to the information on “Starting and
stopping the engine” in Section 2).
In the event of even a slight
impact involving the radia-
tor grille or bonnet, have
the bonnet lock checked by
an approved dealer as soon as pos-
sible.
After carrying out any work
in the engine compart-
ment, check that nothing
has been left behind (cloth,
tools, etc.).
These may damage the engine or
cause a fire.
Page 208 of 292
4.4
It is normal for an engine to use oil for
lubrication and cooling of moving parts
and it is normal to top up the level be-
tween oil changes.
However, contact your approved
Dealer if more than 0.5 litres is being
consumed every 600 miles (1,000 km)
after the running in period.
Oil change frequency: check the oil
level from time to time and certainly
before any long journey to avoid the
risk of damaging your engine.
ENGINE OIL LEVEL: general information
Exceeding the maximum
engine oil level
Under no circumstances
should maximum filling
level B be exceeded: this could
damage the engine and the cata-
lytic converter.
If the oil level exceeds the maximum
level, do not start your vehicle and
contact an approved Dealer.
In order to prevent splashback, it is
recommended that a funnel be used
when topping up/filling with oil.
Reading the oil level
The oil level should be read with the ve-
hicle on level ground, after the engine
has been switched off for some time.
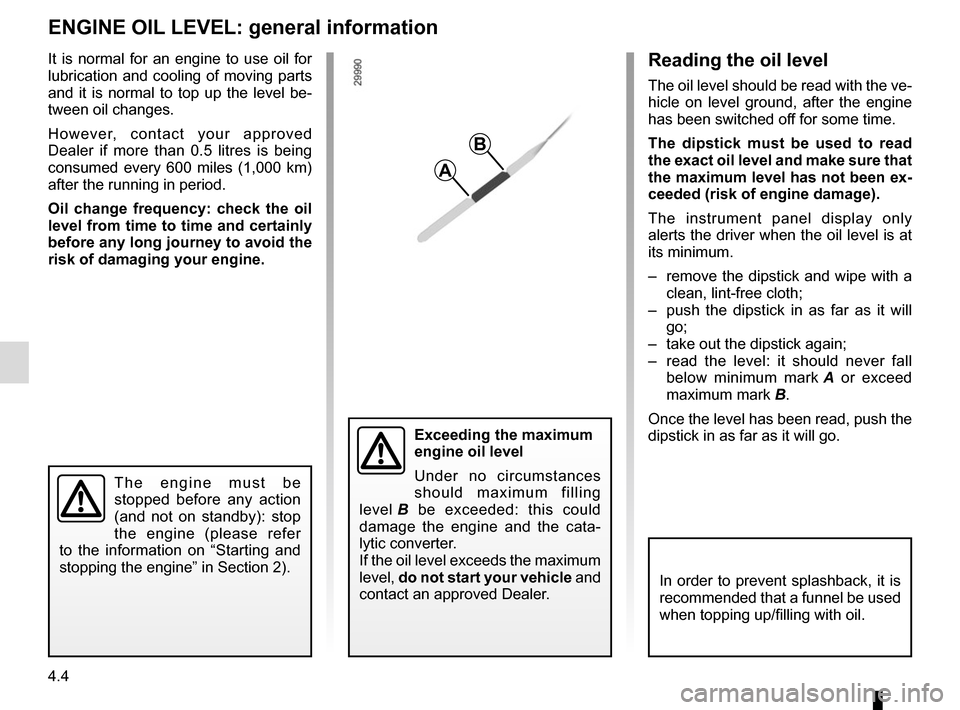
The dipstick must be used to read
the exact oil level and make sure that
the maximum level has not been ex-
ceeded (risk of engine damage).
The instrument panel display only
alerts the driver when the oil level is at
its minimum.
– remove the dipstick and wipe with a clean, lint-free cloth;
– push the dipstick in as far as it will go;
– take out the dipstick again;
– read the level: it should never fall below minimum mark A or exceed
maximum mark B.
Once the level has been read, push the
dipstick in as far as it will go.
A
B
The engine must be
stopped before any action
(and not on standby): stop
the engine (please refer
to the information on “Starting and
stopping the engine” in Section 2).
Page 209 of 292
4.5
ENGINE OIL LEVEL: topping up/filling (1/2)
The engine must be
stopped before any action
(and not on standby): stop
the engine (please refer
to the information on “Starting and
stopping the engine” in Section 2).
Never run the engine in an
enclosed space as exhaust
gases are poisonous.
Engine oil change : if you
are changing the oil when
the engine is hot, be careful
not to scald yourself if the
oil overflows.
When working in the engine
compartment, ensure that
the windscreen wiper stalk
is in the park position.
Risk of injury.
The engine may be hot
when carrying out opera-
tions in close proximity. In
addition, the engine cooling
fan can come on at any moment.
Risk of injury.
Filling: take care when
topping up the oil that
no oil drips onto engine
components - risk of fire.
Remember to refit the cap securely
as there is a risk of fire if oil splashes
onto hot engine components.
Exceeding the maximum
engine oil level
Under no circumstances
must the maximum fill level
be exceeded: risk of damage to the
engine and catalytic converter.
If the oil level exceeds the maximum
level, do not start your vehicle and
contact an approved Dealer.
Page 211 of 292
4.7
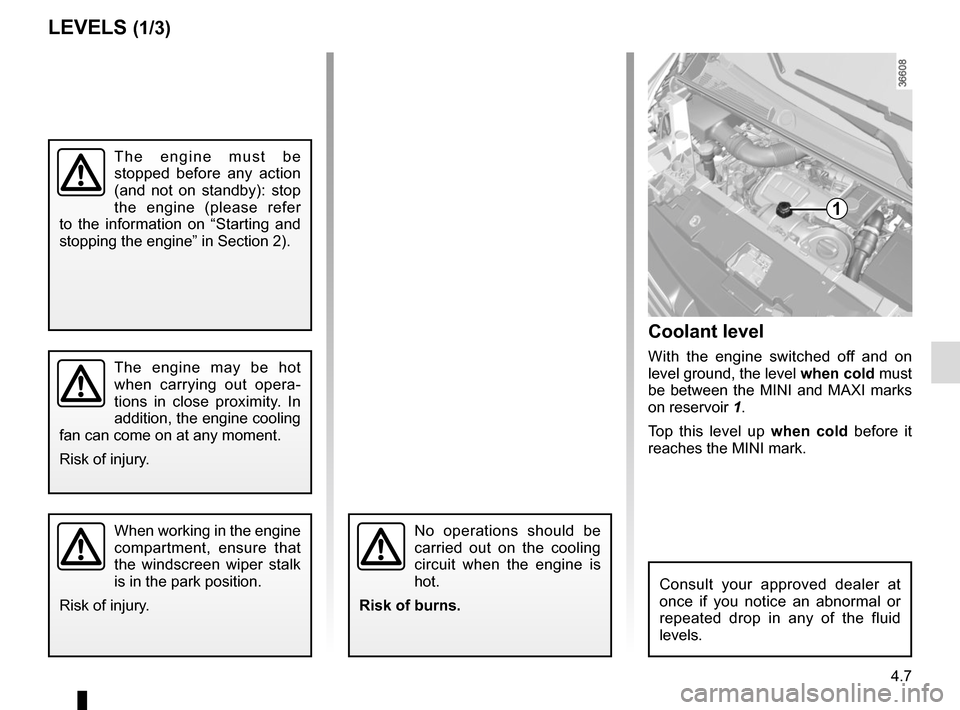
Coolant level
With the engine switched off and on
level ground, the level when cold must
be between the MINI and MAXI marks
on reservoir 1.
Top this level up when cold before it
reaches the MINI mark.
No operations should be
carried out on the cooling
circuit when the engine is
hot.
Risk of burns.
LEVELS (1/3)
1
When working in the engine
compartment, ensure that
the windscreen wiper stalk
is in the park position.
Risk of injury.
The engine must be
stopped before any action
(and not on standby): stop
the engine (please refer
to the information on “Starting and
stopping the engine” in Section 2).
The engine may be hot
when carrying out opera-
tions in close proximity. In
addition, the engine cooling
fan can come on at any moment.
Risk of injury.
Consult your approved dealer at
once if you notice an abnormal or
repeated drop in any of the fluid
levels.
Page 216 of 292
4.12
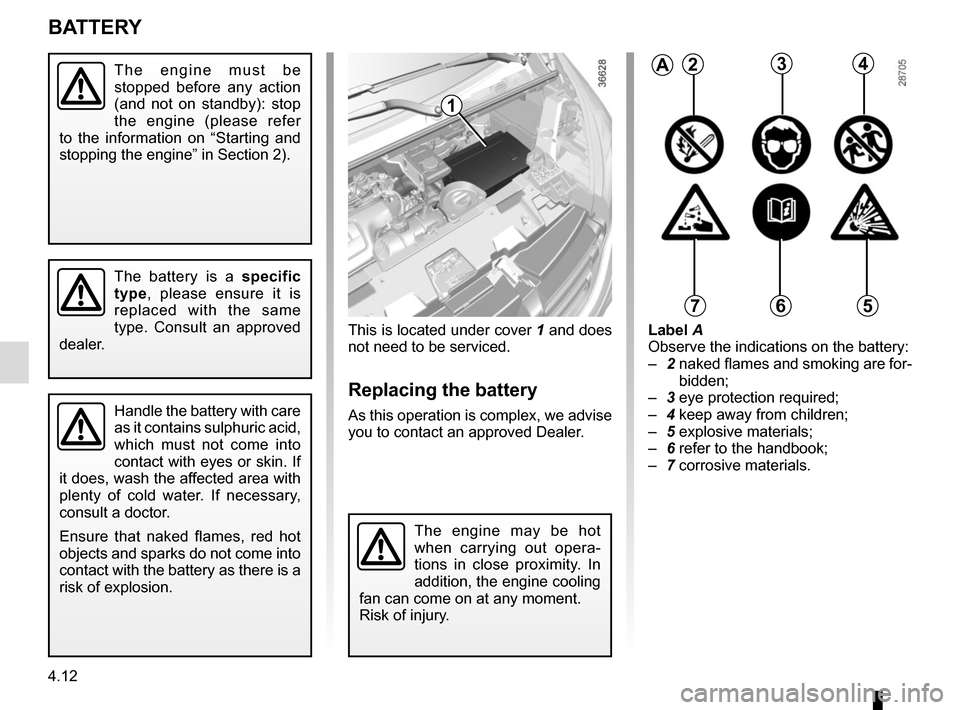
This is located under cover 1 and does
not need to be serviced.
Replacing the battery
As this operation is complex, we advise
you to contact an approved Dealer.
Label A
Observe the indications on the battery:
– 2 naked flames and smoking are for-
bidden;
– 3 eye protection required;
– 4 keep away from children;
– 5 explosive materials;
– 6 refer to the handbook;
– 7 corrosive materials.
BATTERY
1
2
Handle the battery with care
as it contains sulphuric acid,
which must not come into
contact with eyes or skin. If
it does, wash the affected area with
plenty of cold water. If necessary,
consult a doctor.
Ensure that naked flames, red hot
objects and sparks do not come into
contact with the battery as there is a
risk of explosion.
The battery is a specific
type, please ensure it is
replaced with the same
type. Consult an approved
dealer.
A234
567
The engine may be hot
when carrying out opera-
tions in close proximity. In
addition, the engine cooling
fan can come on at any moment.
Risk of injury.
The engine must be
stopped before any action
(and not on standby): stop
the engine (please refer
to the information on “Starting and
stopping the engine” in Section 2).
Page 226 of 292
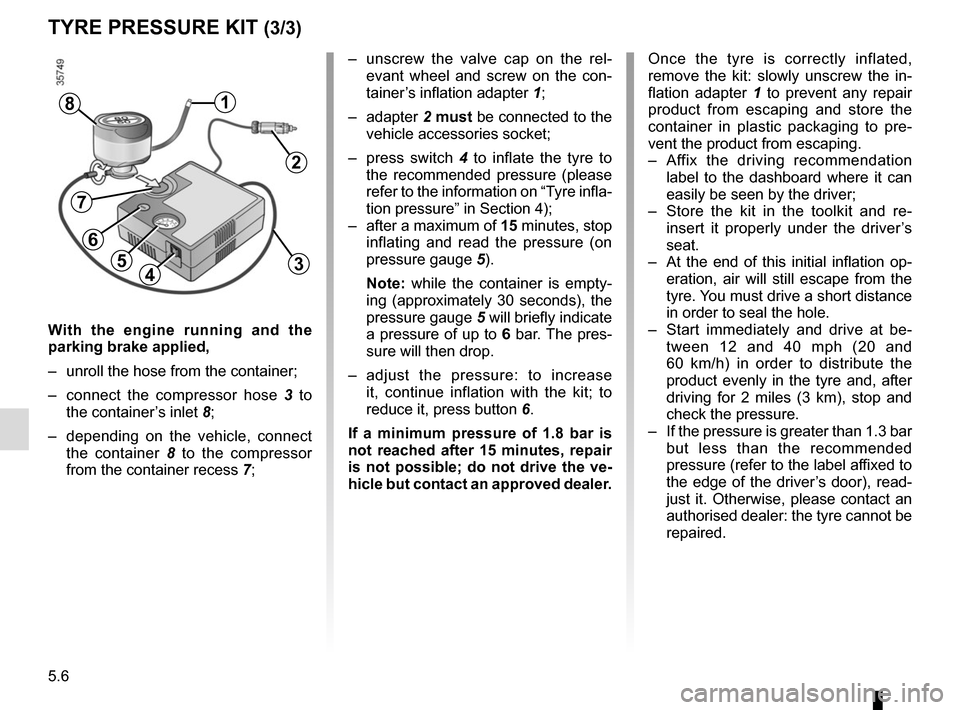
5.6
With the engine running and the
parking brake applied,
– unroll the hose from the container;
– connect the compressor hose 3 to
the container’s inlet 8;
– depending on the vehicle, connect the container 8 to the compressor
from the container recess 7;
45
1
TYRE PRESSURE KIT (3/3)
Once the tyre is correctly inflated,
remove the kit: slowly unscrew the in-
flation adapter 1 to prevent any repair
product from escaping and store the
container in plastic packaging to pre-
vent the product from escaping.
– Affix the driving recommendation label to the dashboard where it can
easily be seen by the driver;
– Store the kit in the toolkit and re- insert it properly under the driver’s
seat.
– At the end of this initial inflation op- eration, air will still escape from the
tyre. You must drive a short distance
in order to seal the hole.
– Start immediately and drive at be- tween 12 and 40 mph (20 and
60 km/h) in order to distribute the
product evenly in the tyre and, after
driving for 2 miles (3 km), stop and
check the pressure.
– If the pressure is greater than 1.3 bar but less than the recommended
pressure (refer to the label affixed to
the edge of the driver’s door), read-
just it. Otherwise, please contact an
authorised dealer: the tyre cannot be
repaired.
8
– unscrew the valve cap on the rel-evant wheel and screw on the con-
tainer’s inflation adapter 1;
– adapter 2 must be connected to the
vehicle accessories socket;
– press switch 4 to inflate the tyre to
the recommended pressure (please
refer to the information on “Tyre infla-
tion pressure” in Section 4);
– after a maximum of 15 minutes, stop inflating and read the pressure (on
pressure gauge 5).
Note: while the container is empty-
ing (approximately 30 seconds), the
pressure gauge 5 will briefly indicate
a pressure of up to 6 bar. The pres-
sure will then drop.
– adjust the pressure: to increase it, continue inflation with the kit; to
reduce it, press button 6.
If a minimum pressure of 1.8 bar is
not reached after 15 minutes, repair
is not possible; do not drive the ve-
hicle but contact an approved dealer.
2
3
7
6
Page 234 of 292

5.14
FRONT HEADLIGHTS: changing bulbs (1/2)
Take care when working in
the engine compartment
as the engine cooling fan
may start to operate at any
moment without warning.
Risk of injury.
Main headlight and dipped
beam headlight
Turn the cover B a quarter turn.
Disconnect the wiring 2.
Unclip spring 1 and remove the bulb.
Bulb type: H4.
Do not touch the bulb glass. Hold it
by its base.
Replace the bulb, replace the connec-
tors and check that the cover B is re-
placed correctly.
B
A
2
1Any operation on (or modi-
fication to) the electrical
system must be performed
by an approved dealer
since an incorrect connection might
damage the electrical equipment
(harness, components and in partic-
ular the alternator). In addition, your
Dealer has all the parts required for
fitting these units.
The bulbs are under pres-
sure and can break when
replaced.
Risk of injury.
The engine must be
stopped before any action
(and not on standby): stop
the engine (please refer
to the information on “Starting and
stopping the engine” in Section 2).
Daytime running lights
Turn the bulb holder A a quarter of a
turn and remove.
Bulb type: W21W/5W.
Change the bulb and replace the bulb
holder.