wiper RENAULT TRAFIC 2016 X82 / 3.G Owners Manual
[x] Cancel search | Manufacturer: RENAULT, Model Year: 2016, Model line: TRAFIC, Model: RENAULT TRAFIC 2016 X82 / 3.GPages: 292, PDF Size: 3.35 MB
Page 7 of 292
1.1
Section 1: Getting to know your vehicle
Key, remote controls . . . . . . . . . . . . . . . . . . . . . . . . . . . . . . . . . . . .\
. . . . . . . . . . . . . . . . . . . . . . . . . 1.2
RENAULT card: General information, use, deadlocking . . . . . . . . . . . . . . . . . . . . . . . . . . . . . . . . . . 1.7
Opening and closing the doors . . . . . . . . . . . . . . . . . . . . . . . . . . . . . . . . . . . .\
. . . . . . . . . . . . . . . . . 1.14
Tailgate . . . . . . . . . . . . . . . . . . . . . . . . . . . . . . . . . . . .\
. . . . . . . . . . . . . . . . . . . . . . . . . . . . . . . . . . . 1.22
Locking, unlocking the opening elements . . . . . . . . . . . . . . . . . . . . . . . . . . . . . . . . . . . .\
. . . . . . . . . 1.23
Automatic locking when driving . . . . . . . . . . . . . . . . . . . . . . . . . . . . . . . . . . . . \
. . . . . . . . . . . . . . . . . 1.27
Headrests - Seats . . . . . . . . . . . . . . . . . . . . . . . . . . . . . . . . . . . .\
. . . . . . . . . . . . . . . . . . . . . . . . . . . 1.28
Steering wheel/Power-assisted steering . . . . . . . . . . . . . . . . . . . . . . . . . . . . . . . . . . . . \
. . . . . . . . . . 1.31
Seat belts. . . . . . . . . . . . . . . . . . . . . . . . . . . . . . . \
. . . . . . . . . . . . . . . . . . . . . . . . . . . . . . . . . . . . . . . 1.32
Additional methods of restraint . . . . . . . . . . . . . . . . . . . . . . . . . . . . . . . . . . . .\
. . . . . . . . . . . . . . . . . 1.37in addition to the front seat belts . . . . . . . . . . . . . . . . . . . . . . . . . . . . . . . . . . . .\
. . . . . . . . . . 1.37
to the rear seatbelt . . . . . . . . . . . . . . . . . . . . . . . . . . . . . . . . . . . . \
. . . . . . . . . . . . . . . . . . . . . 1.41
side . . . . . . . . . . . . . . . . . . . . . . . . . . . . . . . . . . . . \
. . . . . . . . . . . . . . . . . . . . . . . . . . . . . . . . . 1.42
Child safety: General information . . . . . . . . . . . . . . . . . . . . . . . . . . . . . . . . . . . .\
. . . . . . . . . . . . . . . 1.44 Choosing a child seat mounting . . . . . . . . . . . . . . . . . . . . . . . . . . . . . . . . . . . . \
. . . . . . . . . . . 1.47
fitting a child seat, general information . . . . . . . . . . . . . . . . . . . . . . . . . . . . . . . . . . . . \
. . . . . . 1.49
Child seats: attachment by seat belt or by Isofix system . . . . . . . . . . . . . . . . . . . . . . . . . . . . . . . . . . 1.51
Child safety: deactivating/activating the front passenger airbag . . . . . . . . . . . . . . . . . . . . . . . . . . . . 1.77
Driving position . . . . . . . . . . . . . . . . . . . . . . . . . . . . . . . . . . . .\
. . . . . . . . . . . . . . . . . . . . . . . . . . . . . 1.80
Instrument panel . . . . . . . . . . . . . . . . . . . . . . . . . . . . . . . . . . . .\
. . . . . . . . . . . . . . . . . . . . . . . . . . . . 1.84 Trip computer and warning system . . . . . . . . . . . . . . . . . . . . . . . . . . . . . . . . . . . .\
. . . . . . . . 1.90
Clock and outdoor temperature . . . . . . . . . . . . . . . . . . . . . . . . . . . . . . . . . . . . \
. . . . . . . . . . . . . . . . . 1.99
Rear view mirrors . . . . . . . . . . . . . . . . . . . . . . . . . . . . . . . . . . . .\
. . . . . . . . . . . . . . . . . . . . . . . . . . . 1.101
Exterior lighting and signals. . . . . . . . . . . . . . . . . . . . . .\
. . . . . . . . . . . . . . . . . . . . . . . . . . . . . . . . . . 1.103
Headlight beam adjustment . . . . . . . . . . . . . . . . . . . . . . . . . . . . . . . . . . . . \
. . . . . . . . . . . . . . . . . . . . 1.106
Audible and visual signals . . . . . . . . . . . . . . . . . . . . . . . . . . . . . . . . . . . . \
. . . . . . . . . . . . . . . . . . . . . 1.108
Washers, wipers . . . . . . . . . . . . . . . . . . . . . . . . . . . . . . . . . . . .\
. . . . . . . . . . . . . . . . . . . . . . . . . . . . 1.109
Fuel tank (filling with fuel) . . . . . . . . . . . . . . . . . . . . . . . . . . . . . . . . . . . .\
. . . . . . . . . . . . . . . . . . . . . 1.112
Additive tank . . . . . . . . . . . . . . . . . . . . . . . . . . . . . . . . . . . .\
. . . . . . . . . . . . . . . . . . . . . . . . . . . . . . . 1.115
Page 87 of 292
1.81
DRIVING POSITION: LEFT-HAND DRIVE (2/2)
The equipment fitted, described below, DEPENDS ON THE VERSION AND COUNTRY.
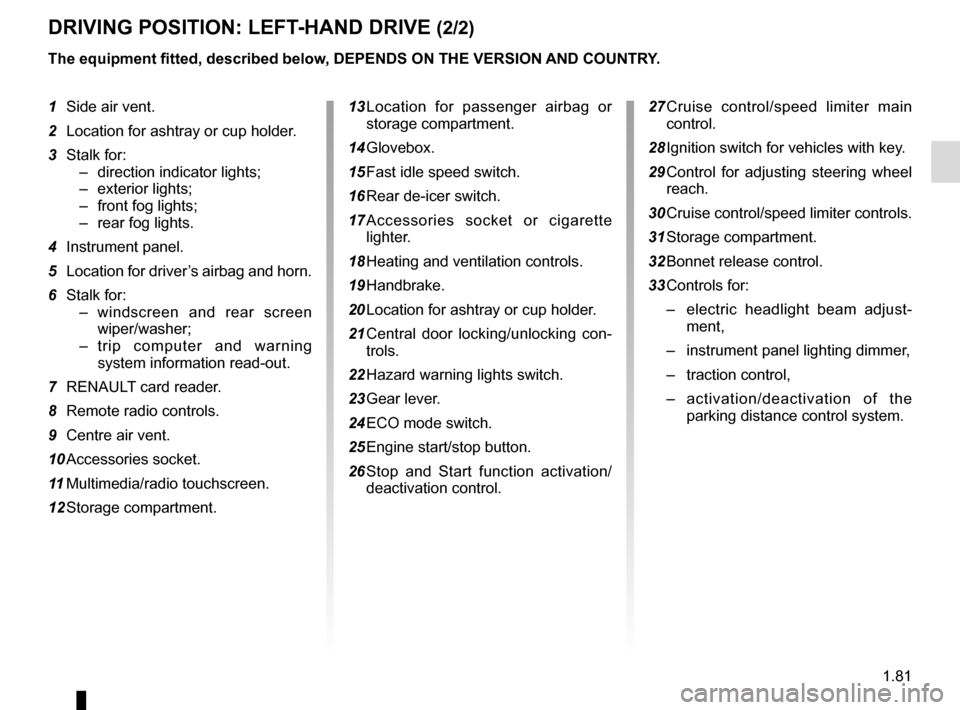
1 Side air vent.
2 Location for ashtray or cup holder.
3 Stalk for:– direction indicator lights;
– exterior lights;
– front fog lights;
– rear fog lights.
4 Instrument panel.
5 Location for driver’s airbag and horn.
6 Stalk for: – windscreen and rear screen wiper/washer;
– trip computer and warning system information read-out.
7 RENAULT card reader.
8 Remote radio controls.
9 Centre air vent.
10 Accessories socket.
11 Multimedia/radio touchscreen.
12 Storage compartment. 13 Location for passenger airbag or
storage compartment.
14 Glovebox.
15 Fast idle speed switch.
16 Rear de-icer switch.
17 Accessories socket or cigarette lighter.
18 Heating and ventilation controls.
19 Handbrake.
20 Location for ashtray or cup holder.
21 Central door locking/unlocking con- trols.
22 Hazard warning lights switch.
23 Gear lever.
24 ECO mode switch.
25 Engine start/stop button.
26 Stop and Start function activation/ deactivation control.
27 Cruise control/speed limiter main control.
28 Ignition switch for vehicles with key.
29 Control for adjusting steering wheel reach.
30 Cruise control/speed limiter controls.
31 Storage compartment.
32 Bonnet release control.
33 Controls for: – electric headlight beam adjust-
ment,
– instrument panel lighting dimmer,
– traction control,
– activation/deactivation of the
parking distance control system.
Page 89 of 292
1.83
DRIVING POSITION: RIGHT-HAND DRIVE (2/2)
The equipment fitted, described below, DEPENDS ON THE VERSION AND COUNTRY.
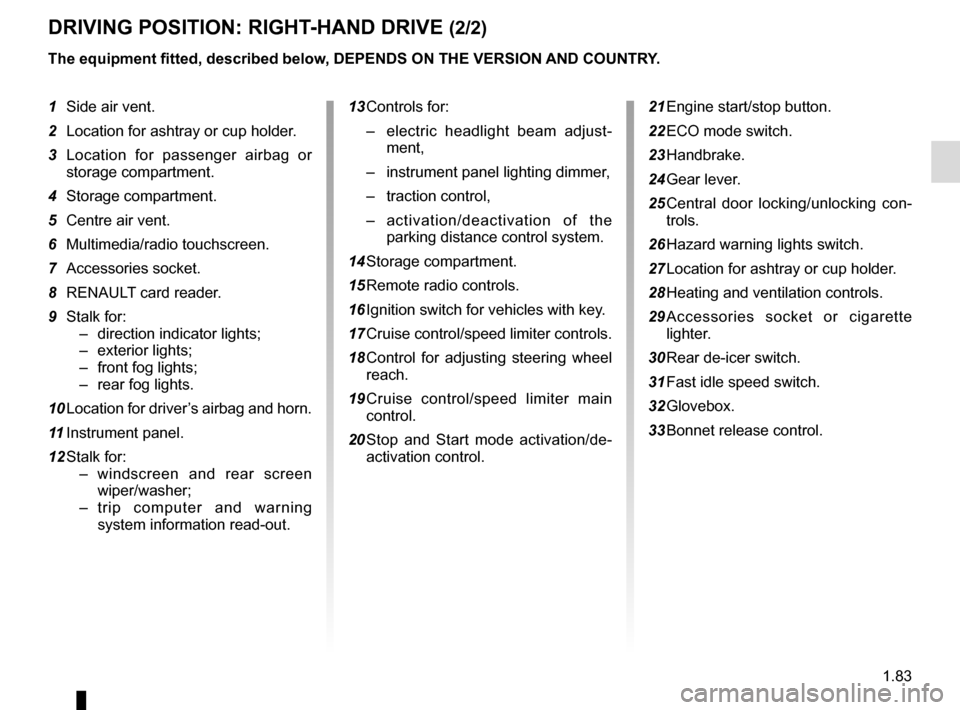
1 Side air vent.
2 Location for ashtray or cup holder.
3 Location for passenger airbag or storage compartment.
4 Storage compartment.
5 Centre air vent.
6 Multimedia/radio touchscreen.
7 Accessories socket.
8 RENAULT card reader.
9 Stalk for: – direction indicator lights;
– exterior lights;
– front fog lights;
– rear fog lights.
10 Location for driver’s airbag and horn.
11 Instrument panel.
12 Stalk for: – windscreen and rear screen wiper/washer;
– trip computer and warning system information read-out. 13 Controls for:
– electric headlight beam adjust-
ment,
– instrument panel lighting dimmer,
– traction control,
– activation/deactivation of the
parking distance control system.
14 Storage compartment.
15 Remote radio controls.
16 Ignition switch for vehicles with key.
17 Cruise control/speed limiter controls.
18 Control for adjusting steering wheel reach.
19 Cruise control/speed limiter main control.
20 Stop and Start mode activation/de- activation control. 21 Engine start/stop button.
22 ECO mode switch.
23 Handbrake.
24 Gear lever.
25 Central door locking/unlocking con-
trols.
26 Hazard warning lights switch.
27 Location for ashtray or cup holder.
28 Heating and ventilation controls.
29 Accessories socket or cigarette lighter.
30 Rear de-icer switch.
31 Fast idle speed switch.
32 Glovebox.
33 Bonnet release control.
Page 115 of 292
1.109
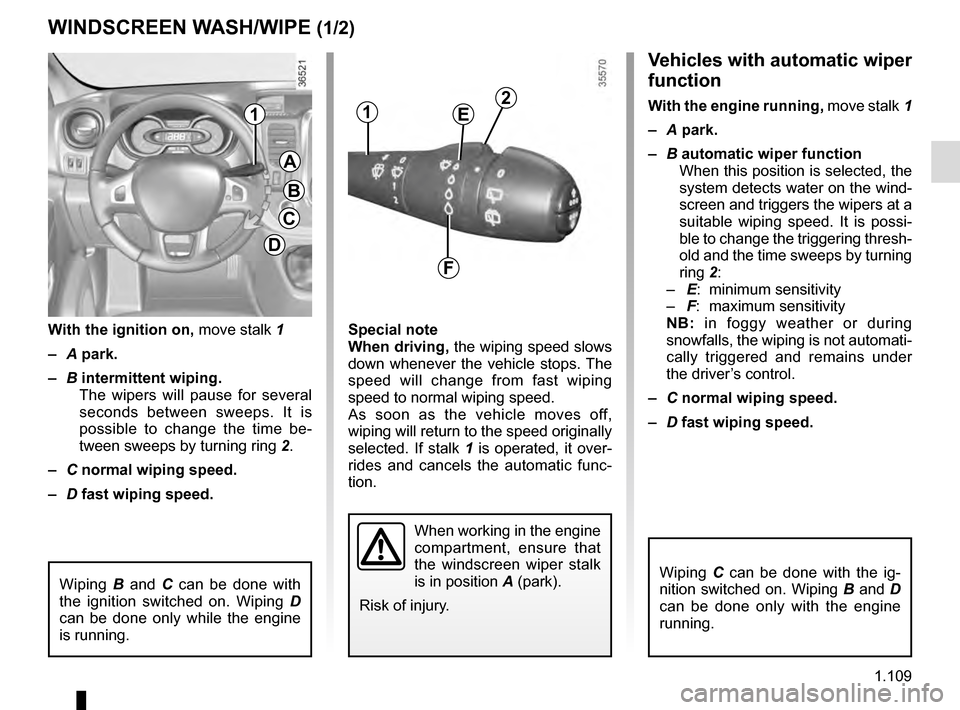
Vehicles with automatic wiper
function
With the engine running, move stalk 1
– A park.
– B automatic wiper function
When this position is selected, the
system detects water on the wind-
screen and triggers the wipers at a
suitable wiping speed. It is possi-
ble to change the triggering thresh-
old and the time sweeps by turning
ring 2:
– E: minimum sensitivity
– F: maximum sensitivity
NB: in foggy weather or during
snowfalls, the wiping is not automati-
cally triggered and remains under
the driver’s control.
– C normal wiping speed.
– D fast wiping speed.
Special note
When driving,
the wiping speed slows
down whenever the vehicle stops. The
speed will change from fast wiping
speed to normal wiping speed.
As soon as the vehicle moves off,
wiping will return to the speed originally
selected. If stalk 1 is operated, it over-
rides and cancels the automatic func-
tion.
With the ignition on,
move stalk 1
– A park.
– B intermittent wiping.
The wipers will pause for several
seconds between sweeps. It is
possible to change the time be-
tween sweeps by turning ring 2.
– C normal wiping speed.
– D fast wiping speed.
WINDSCREEN WASH/WIPE (1/2)
A
B
C
D
11
When working in the engine
compartment, ensure that
the windscreen wiper stalk
is in position A (park).
Risk of injury.
2E
F
Wiping B and C can be done with
the ignition switched on. Wiping D
can be done only while the engine
is running.Wiping C can be done with the ig-
nition switched on. Wiping B and D
can be done only with the engine
running.
Page 116 of 292
1.110
Before any action involving the windscreen (washing the vehicle, de-ic-\
ing, cleaning the windscreen, etc.) return stalk 1 to position A (park).
Risk of injury and/or damage.
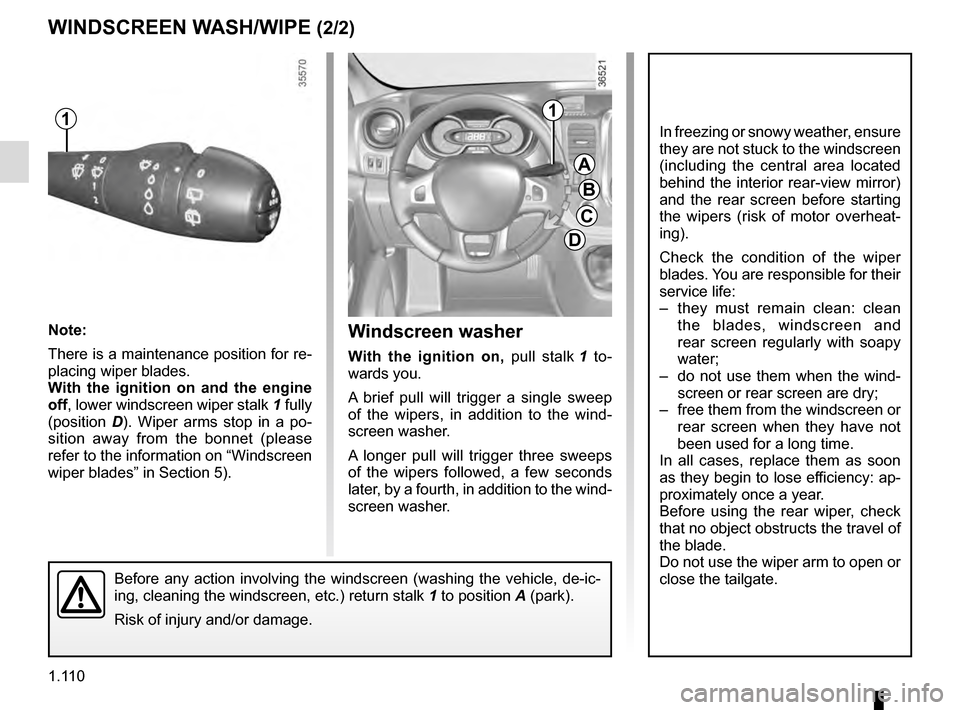
Windscreen washer
With the ignition on, pull stalk 1 to-
wards you.
A brief pull will trigger a single sweep
of the wipers, in addition to the wind-
screen washer.
A longer pull will trigger three sweeps
of the wipers followed, a few seconds
later, by a fourth, in addition to the wind-
screen washer.
WINDSCREEN WASH/WIPE (2/2)
A
B
C
D
11
In freezing or snowy weather, ensure
they are not stuck to the windscreen
(including the central area located
behind the interior rear-view mirror)
and the rear screen before starting
the wipers (risk of motor overheat-
ing).
Check the condition of the wiper
blades. You are responsible for their
service life:
– they must remain clean: clean the blades, windscreen and
rear screen regularly with soapy
water;
– do not use them when the wind- screen or rear screen are dry;
– free them from the windscreen or rear screen when they have not
been used for a long time.
In all cases, replace them as soon
as they begin to lose efficiency: ap-
proximately once a year.
Before using the rear wiper, check
that no object obstructs the travel of
the blade.
Do not use the wiper arm to open or
close the tailgate.
Note:
There is a maintenance position for re-
placing wiper blades.
With the ignition on and the engine
off, lower windscreen wiper stalk 1 fully
(position D). Wiper arms stop in a po-
sition away from the bonnet (please
refer to the information on “Windscreen
wiper blades” in Section 5).
Page 117 of 292
1 . 111
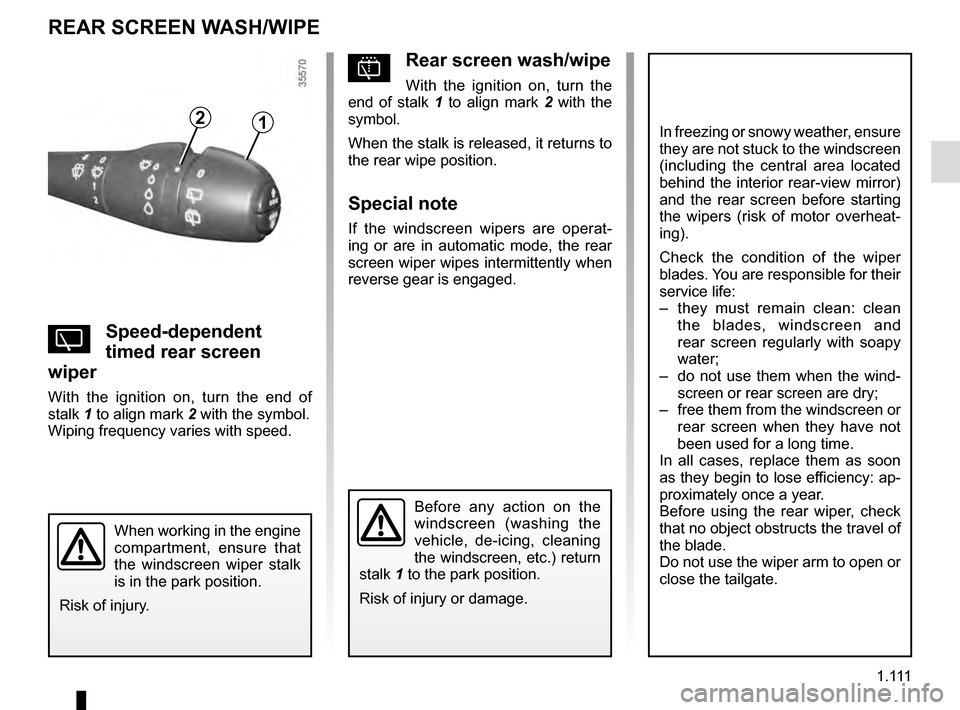
pRear screen wash/wipe
With the ignition on, turn the
end of stalk 1 to align mark 2 with the
symbol.
When the stalk is released, it returns to
the rear wipe position.
Special note
If the windscreen wipers are operat-
ing or are in automatic mode, the rear
screen wiper wipes intermittently when
reverse gear is engaged.
YSpeed-dependent
timed rear screen
wiper
With the ignition on, turn the end of
stalk 1 to align mark 2 with the symbol.
Wiping frequency varies with speed.
REAR SCREEN WASH/WIPE
12In freezing or snowy weather, ensure
they are not stuck to the windscreen
(including the central area located
behind the interior rear-view mirror)
and the rear screen before starting
the wipers (risk of motor overheat-
ing).
Check the condition of the wiper
blades. You are responsible for their
service life:
– they must remain clean: clean the blades, windscreen and
rear screen regularly with soapy
water;
– do not use them when the wind- screen or rear screen are dry;
– free them from the windscreen or rear screen when they have not
been used for a long time.
In all cases, replace them as soon
as they begin to lose efficiency: ap-
proximately once a year.
Before using the rear wiper, check
that no object obstructs the travel of
the blade.
Do not use the wiper arm to open or
close the tailgate.
Before any action on the
windscreen (washing the
vehicle, de-icing, cleaning
the windscreen, etc.) return
stalk 1 to the park position.
Risk of injury or damage.
When working in the engine
compartment, ensure that
the windscreen wiper stalk
is in the park position.
Risk of injury.
Page 129 of 292
2.5
STARTING, STOPPING THE ENGINE: vehicle with RENAULT CARD (2/3)
Operating faults
In certain cases, the hands-free
RENAULT card may not work:
– when the RENAULT card battery is drained, flat battery, etc.
– near to appliances operating on the same frequency as the card (moni-
tor, mobile phone, video game, etc.);
– vehicle located in a high electromag- netic radiation zone.
The message “PLEASE INSERT
KEYCARD” appears on the instrument
panel.
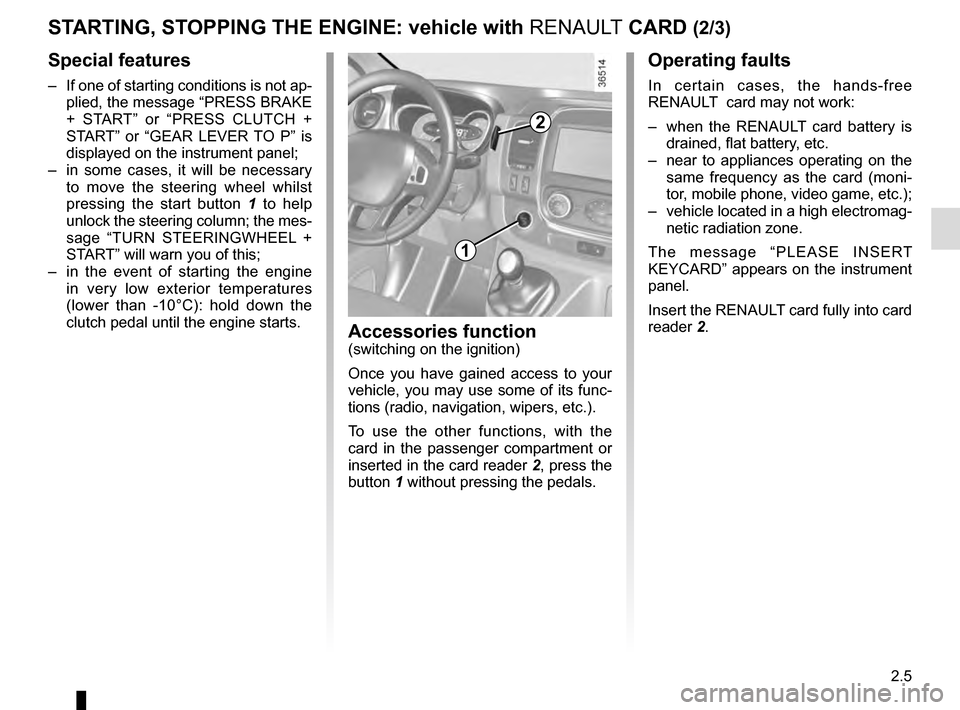
Insert the RENAULT card fully into card
reader 2.
Accessories function(switching on the ignition)
Once you have gained access to your
vehicle, you may use some of its func-
tions (radio, navigation, wipers, etc.).
To use the other functions, with the
card in the passenger compartment or
inserted in the card reader 2, press the
button 1 without pressing the pedals.
1
2
Special features
– If one of starting conditions is not ap- plied, the message “PRESS BRAKE
+ START” or “PRESS CLUTCH +
START” or “GEAR LEVER TO P” is
displayed on the instrument panel;
– in some cases, it will be necessary to move the steering wheel whilst
pressing the start button 1 to help
unlock the steering column; the mes-
sage “TURN STEERINGWHEEL +
START” will warn you of this;
– in the event of starting the engine in very low exterior temperatures
(lower than -10°C): hold down the
clutch pedal until the engine starts.
Page 206 of 292
4.2
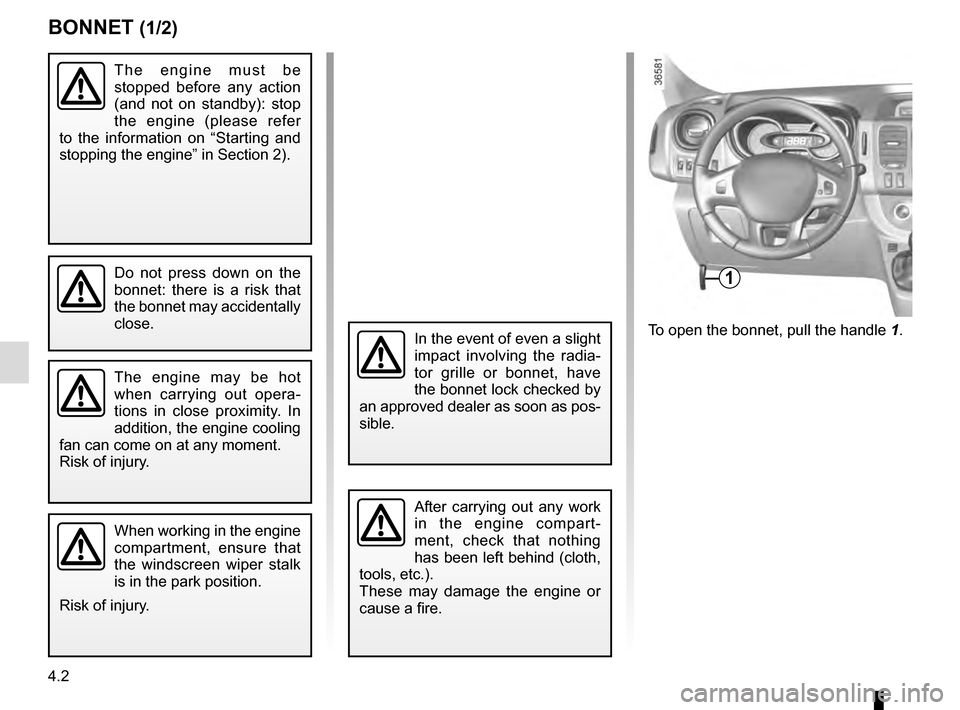
To open the bonnet, pull the handle 1.
BONNET (1/2)
1
The engine may be hot
when carrying out opera-
tions in close proximity. In
addition, the engine cooling
fan can come on at any moment.
Risk of injury.
Do not press down on the
bonnet: there is a risk that
the bonnet may accidentally
close.
When working in the engine
compartment, ensure that
the windscreen wiper stalk
is in the park position.
Risk of injury.
The engine must be
stopped before any action
(and not on standby): stop
the engine (please refer
to the information on “Starting and
stopping the engine” in Section 2).
In the event of even a slight
impact involving the radia-
tor grille or bonnet, have
the bonnet lock checked by
an approved dealer as soon as pos-
sible.
After carrying out any work
in the engine compart-
ment, check that nothing
has been left behind (cloth,
tools, etc.).
These may damage the engine or
cause a fire.
Page 209 of 292
4.5
ENGINE OIL LEVEL: topping up/filling (1/2)
The engine must be
stopped before any action
(and not on standby): stop
the engine (please refer
to the information on “Starting and
stopping the engine” in Section 2).
Never run the engine in an
enclosed space as exhaust
gases are poisonous.
Engine oil change : if you
are changing the oil when
the engine is hot, be careful
not to scald yourself if the
oil overflows.
When working in the engine
compartment, ensure that
the windscreen wiper stalk
is in the park position.
Risk of injury.
The engine may be hot
when carrying out opera-
tions in close proximity. In
addition, the engine cooling
fan can come on at any moment.
Risk of injury.
Filling: take care when
topping up the oil that
no oil drips onto engine
components - risk of fire.
Remember to refit the cap securely
as there is a risk of fire if oil splashes
onto hot engine components.
Exceeding the maximum
engine oil level
Under no circumstances
must the maximum fill level
be exceeded: risk of damage to the
engine and catalytic converter.
If the oil level exceeds the maximum
level, do not start your vehicle and
contact an approved Dealer.
Page 211 of 292
4.7
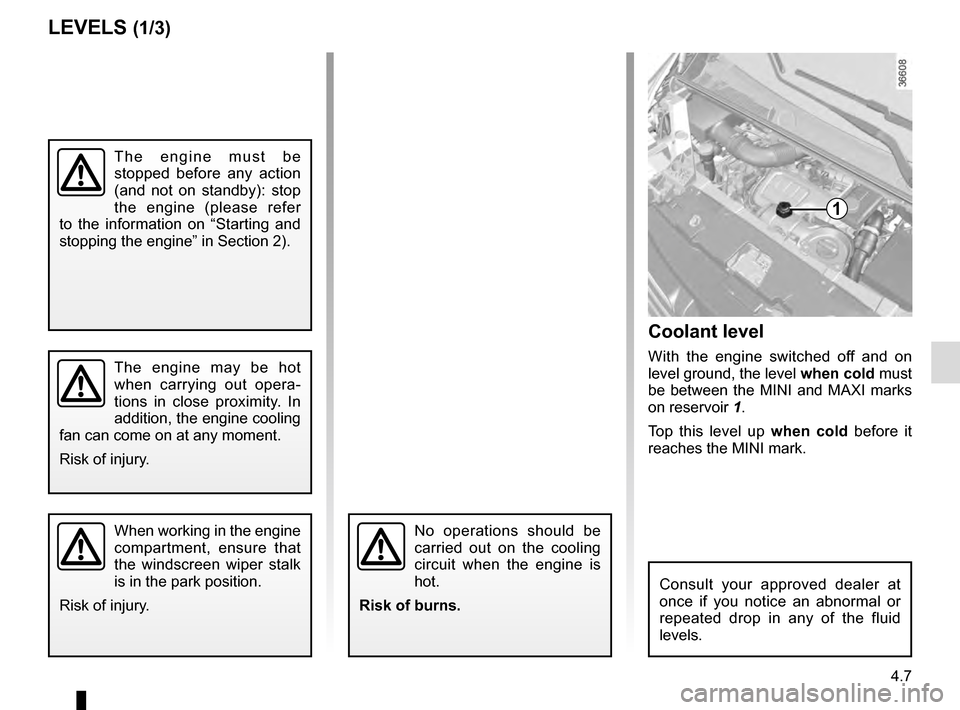
Coolant level
With the engine switched off and on
level ground, the level when cold must
be between the MINI and MAXI marks
on reservoir 1.
Top this level up when cold before it
reaches the MINI mark.
No operations should be
carried out on the cooling
circuit when the engine is
hot.
Risk of burns.
LEVELS (1/3)
1
When working in the engine
compartment, ensure that
the windscreen wiper stalk
is in the park position.
Risk of injury.
The engine must be
stopped before any action
(and not on standby): stop
the engine (please refer
to the information on “Starting and
stopping the engine” in Section 2).
The engine may be hot
when carrying out opera-
tions in close proximity. In
addition, the engine cooling
fan can come on at any moment.
Risk of injury.
Consult your approved dealer at
once if you notice an abnormal or
repeated drop in any of the fluid
levels.