Headlight RENAULT TRAFIC 2018 User Guide
[x] Cancel search | Manufacturer: RENAULT, Model Year: 2018, Model line: TRAFIC, Model: RENAULT TRAFIC 2018Pages: 298, PDF Size: 8.05 MB
Page 114 of 298

1.108
HEADLIGHT BEAM ADJUSTMENT (2/2)
Temporary adjustment
Open the bonnet and identify the mark-
ing B next to one of the front headlight
projectors.
For each headlight, using a screw-
driver, turn the screw 1 by a quarter
turn towards the - symbol to lower the
beams.
Return to the starting point once your
trip is over: turn the screw 1 by a quar-
ter turn towards the + symbol to raise
the beams.
When driving on the left in a left-
hand drive vehicle (or vice versa),
you must adjust your lights tempo-
rarily during your stay.
B
1
Page 115 of 298
1.109
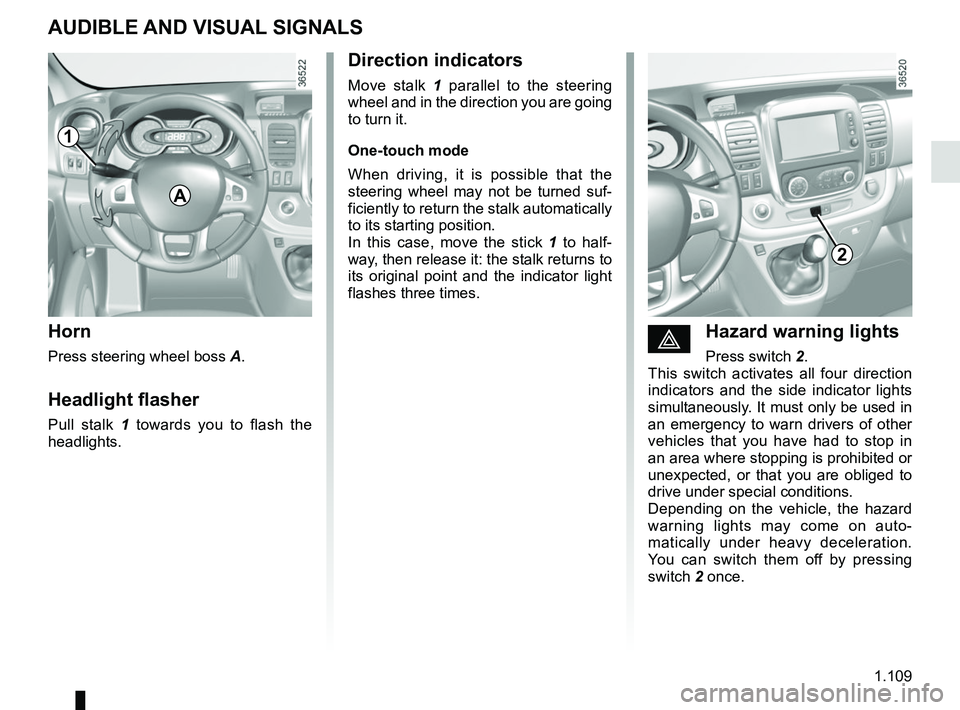
éHazard warning lights
Press switch 2.
This switch activates all four direction
indicators and the side indicator lights
simultaneously. It must only be used in
an emergency to warn drivers of other
vehicles that you have had to stop in
an area where stopping is prohibited or
unexpected, or that you are obliged to
drive under special conditions.
Depending on the vehicle, the hazard
warning lights may come on auto-
matically under heavy deceleration.
You can switch them off by pressing
switch 2 once.
Direction indicators
Move stalk 1 parallel to the steering
wheel and in the direction you are going
to turn it.
One-touch mode
When driving, it is possible that the
steering wheel may not be turned suf-
ficiently to return the stalk automatically
to its starting position.
In this case, move the stick 1 to half-
way, then release it: the stalk returns to
its original point and the indicator light
flashes three times.
Horn
Press steering wheel boss A.
Headlight flasher
Pull stalk 1 towards you to flash the
headlights.
AUDIBLE AND VISUAL SIGNALS
A
2
1
Page 224 of 298
4.16
Using a roller type car wash
Return the windscreen wiper stalk to
the Park position (refer to the informa-
tion on the “Windscreen washer, wiper”
in Section 1). Check the mounting of
external accessories, additional lights
and mirrors, and ensure that the wiper
blades are secured with adhesive tape.
Remove the radio aerial mast if your
vehicle is fitted with this equipment.
Remember to remove the tape and refit
the antenna after washing.
Vehicles with a matte paint
finish
This type of paint requires certain pre-
cautions.
You should do the following
Wash the vehicle by hand using plenty
of water, using a soft cloth or a gentle
sponge.
Do not do the following
Use wax-based products (polishing).
Rub too hard.
Wash the vehicle in a roller-type car
wash.
Attach stickers to the paintwork (risk of
leaving marks).
Wash the vehicle
using a high-pressure
cleaning device.
BODYWORK MAINTENANCE (3/3)Cleaning the headlights
As the headlights are made of plastic
“glass”, use a soft cloth or cotton wool
to clean them. If this does not clean
them properly, moisten the cloth with
soapy water, then wipe clean with a soft
damp cloth or cotton wool.
Finally, carefully dry off with a soft dry
cloth.
Do not use cleaning products con-
taining alcohol or utensils (e.g.: a
scraper).
Page 227 of 298

5.1
Section 5: Practical advice
Puncture, emergency spare wheel . . . . . . . . . . . . . . . . . . . . . . . . . . . . . . . . . . . .\
. . . . . . . . . . . . . . 5.2
Tyre inflation kit . . . . . . . . . . . . . . . . . . . . . . . . . . . . . . . . . . . .\
. . . . . . . . . . . . . . . . . . . . . . . . . . . . . 5.4
Tools . . . . . . . . . . . . . . . . . . . . . . . . . . . . . . . . . . . .\
. . . . . . . . . . . . . . . . . . . . . . . . . . . . . . . . . . . . . 5.7
Wheel trims . . . . . . . . . . . . . . . . . . . . . . . . . . . . . . \
. . . . . . . . . . . . . . . . . . . . . . . . . . . . . . . . . . . . . . 5.8
Changing a wheel . . . . . . . . . . . . . . . . . . . . . . . . . . . . . . . . . . . .\
. . . . . . . . . . . . . . . . . . . . . . . . . . . 5.9
Tyres (tyre and wheel safety, use in winter) . . . . . . . . . . . . . . . . . . . . . . . . . . . . . . . . . . . .\
. . . . . . . 5.11
Headlights (changing bulbs) . . . . . . . . . . . . . . . . . . . . . . . . . . . . . . . . . . . .\
. . . . . . . . . . . . . . . . . . . 5.14
Side lights . . . . . . . . . . . . . . . . . . . . . . . . . . . . . . . . . . . .\
. . . . . . . . . . . . . . . . . . . . . . . . . . . . . . . . . 5.16
Rear lights (changing bulbs) . . . . . . . . . . . . . . . . . . . . . . . . . . . . . . . . . . . .\
. . . . . . . . . . . . . . . . . . . 5.17
Indicator lights (changing bulbs) . . . . . . . . . . . . . . . . . . . . . . . . . . . . . . . . . . . .\
. . . . . . . . . . . . . . . . 5.20
Interior lighting (changing bulbs) . . . . . . . . . . . . . . . . . . . . . . . . . . . . . . . . . . . . \
. . . . . . . . . . . . . . . . 5.21
Key, radio frequency remote control: battery . . . . . . . . . . . . . . . . . . . . . . . . . . . . . . . . . . . . \
. . . . . . . 5.23
RENAULT card: battery . . . . . . . . . . . . . . . . . . . . . . . . . . . . . . . . . . . . \
. . . . . . . . . . . . . . . . . . . . . . . 5.24
Battery . . . . . . . . . . . . . . . . . . . . . . . . . . . . . . . . . . . . \
. . . . . . . . . . . . . . . . . . . . . . . . . . . . . . . . . . . . 5.25
Fuses . . . . . . . . . . . . . . . . . . . . . . . . . . . . . . . . . . . . \
. . . . . . . . . . . . . . . . . . . . . . . . . . . . . . . . . . . . . 5.27
Accessories . . . . . . . . . . . . . . . . . . . . . . . . . . . . . . . . . . . . \
. . . . . . . . . . . . . . . . . . . . . . . . . . . . . . . . 5.30
Wipers (replacing blades) . . . . . . . . . . . . . . . . . . . . . . . . . . . . . . . . . . . .\
. . . . . . . . . . . . . . . . . . . . . 5.31
Towing . . . . . . . . . . . . . . . . . . . . . . . . . . . . . . . . . . . . \
. . . . . . . . . . . . . . . . . . . . . . . . . . . . . . . . . . . . 5.33
Fitting a radio . . . . . . . . . . . . . . . . . . . . . . . . . . . . . . . . . . . . \
. . . . . . . . . . . . . . . . . . . . . . . . . . . . . . . 5.35
Operating faults . . . . . . . . . . . . . . . . . . . . . . . . . . . . . . . . . . . . \
. . . . . . . . . . . . . . . . . . . . . . . . . . . . . 5.36
Page 240 of 298
5.14
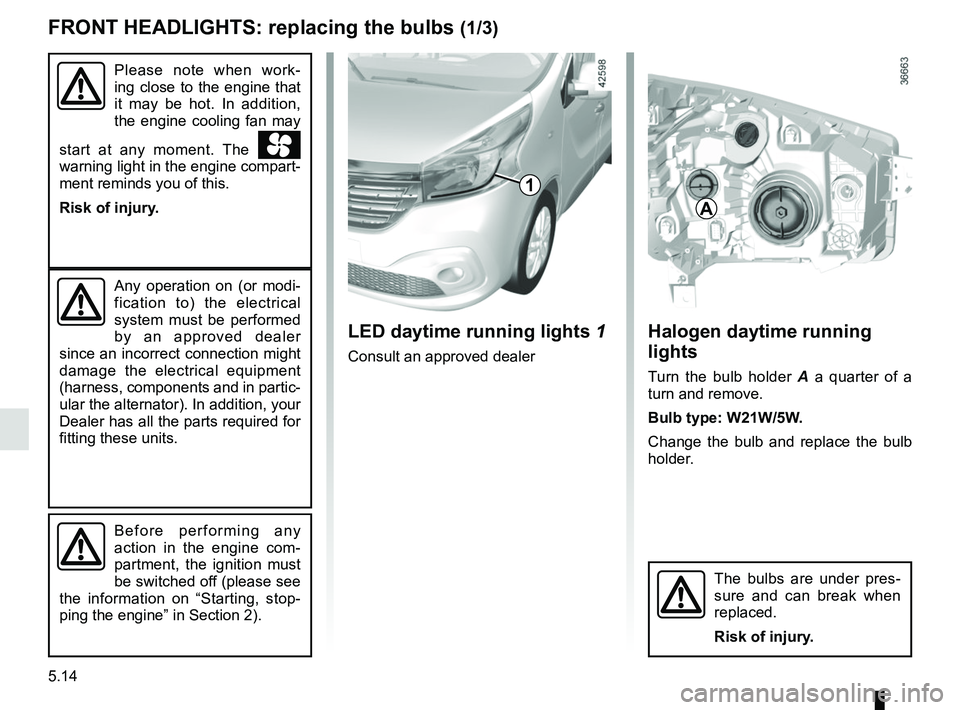
Halogen daytime running
lights
Turn the bulb holder A a quarter of a
turn and remove.
Bulb type: W21W/5W.
Change the bulb and replace the bulb
holder.
FRONT HEADLIGHTS: replacing the bulbs (1/3)
A
Any operation on (or modi-
fication to) the electrical
system must be performed
by an approved dealer
since an incorrect connection might
damage the electrical equipment
(harness, components and in partic-
ular the alternator). In addition, your
Dealer has all the parts required for
fitting these units.
The bulbs are under pres-
sure and can break when
replaced.
Risk of injury.
Before performing any
action in the engine com-
partment, the ignition must
be switched off (please see
the information on “Starting, stop-
ping the engine” in Section 2).
LED daytime running lights 1
Consult an approved dealer
1
Please note when work-
ing close to the engine that
it may be hot. In addition,
the engine cooling fan may
start at any moment. The
warning light in the engine compart-
ment reminds you of this.
Risk of injury.
Page 241 of 298
5.15
B
To comply with local legislation, or
as a precaution, you can obtain an
emergency kit containing a set of
spare bulbs and fuses from an ap-
proved dealer.
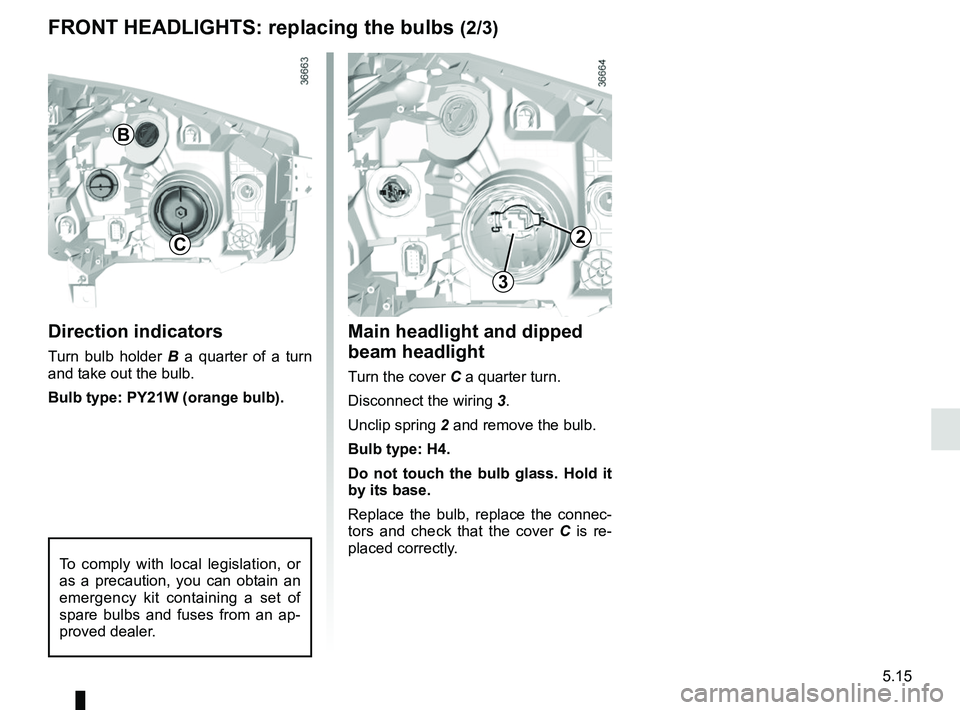
Direction indicators
Turn bulb holder B a quarter of a turn
and take out the bulb.
Bulb type: PY21W (orange bulb).
3
2
Main headlight and dipped
beam headlight
Turn the cover C a quarter turn.
Disconnect the wiring 3.
Unclip spring 2 and remove the bulb.
Bulb type: H4. Do not touch the bulb glass. Hold it
by its base.
Replace the bulb, replace the connec-
tors and check that the cover C is re-
placed correctly.
C
FRONT HEADLIGHTS: replacing the bulbs (2/3)
Page 242 of 298
5.16
HEADLIGHTS: changing bulbs (3/3)/SIDE LIGHTS
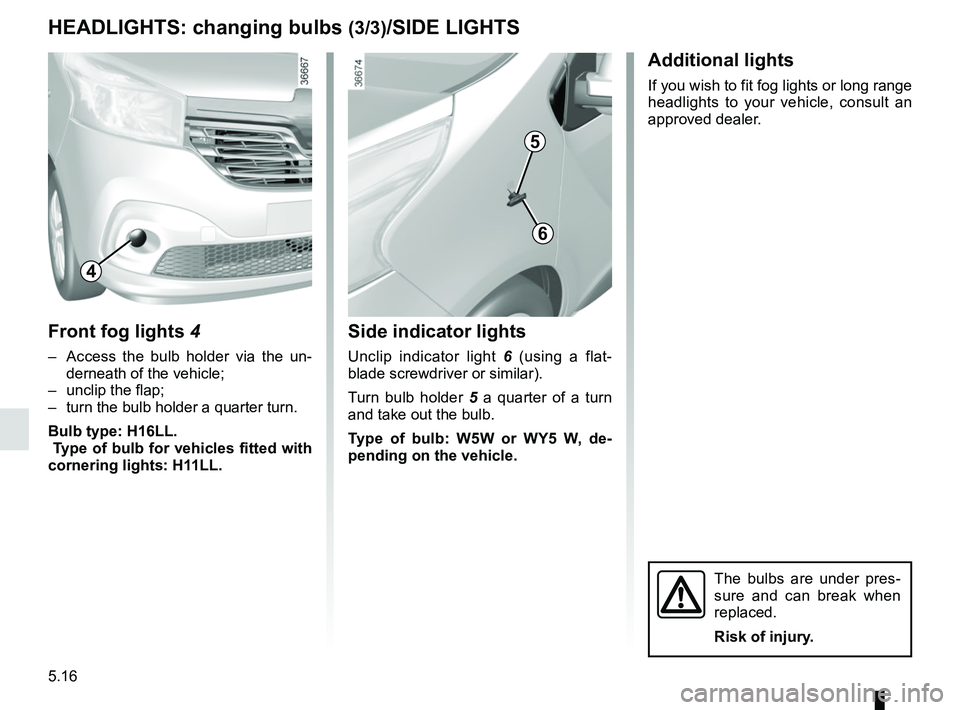
Front fog lights 4
– Access the bulb holder via the un-
derneath of the vehicle;
– unclip the flap;
– turn the bulb holder a quarter turn.
Bulb type: H16LL.
Type of bulb for vehicles fitted with
cornering lights: H11LL.
4
Side indicator lights
Unclip indicator light 6 (using a flat-
blade screwdriver or similar).
Turn bulb holder 5 a quarter of a turn
and take out the bulb.
Type of bulb: W5W or WY5 W, de-
pending on the vehicle.
5
6
Additional lights
If you wish to fit fog lights or long range
headlights to your vehicle, consult an
approved dealer.
The bulbs are under pres-
sure and can break when
replaced.
Risk of injury.
Page 244 of 298
5.18
REAR LIGHTS: changing bulbs (2/4)
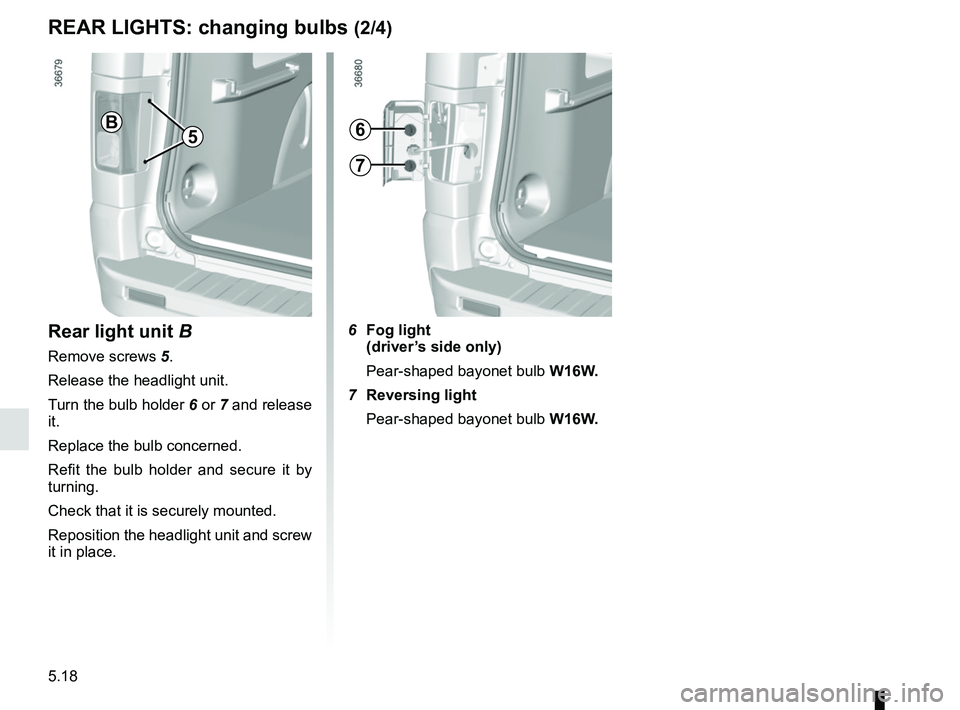
Rear light unit B
Remove screws 5.
Release the headlight unit.
Turn the bulb holder 6 or 7 and release
it.
Replace the bulb concerned.
Refit the bulb holder and secure it by
turning.
Check that it is securely mounted.
Reposition the headlight unit and screw
it in place.
6 Fog light (driver’s side only)
Pear-shaped bayonet bulb W16W.
7 Reversing light Pear-shaped bayonet bulb W16W.
B56
7
Page 255 of 298
5.29
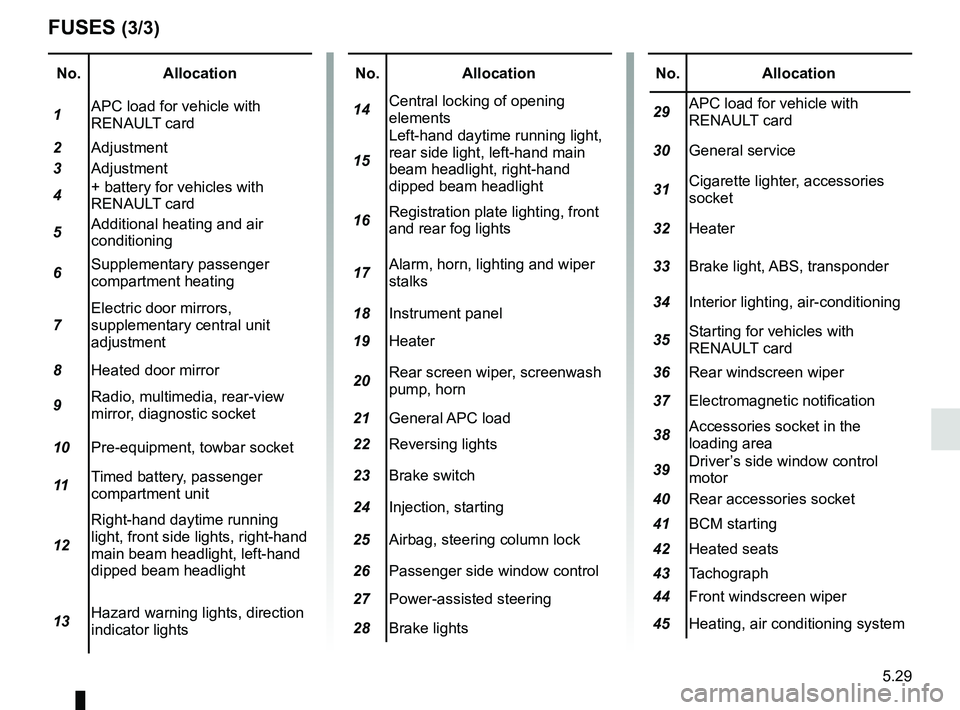
No.Allocation
1 APC load for vehicle with
RENAULT card
2 Adjustment
3 Adjustment
4 + battery for vehicles with
RENAULT card
5 Additional heating and air
conditioning
6 Supplementary passenger
compartment heating
7 Electric door mirrors,
supplementary central unit
adjustment
8 Heated door mirror
9 Radio, multimedia, rear-view
mirror, diagnostic socket
10 Pre-equipment, towbar socket
11 Timed battery, passenger
compartment unit
12 Right-hand daytime running
light, front side lights, right-hand
main beam headlight, left-hand
dipped beam headlight
13 Hazard warning lights, direction
indicator lights
FUSES (3/3)
No.
Allocation
14 Central locking of opening
elements
15 Left-hand daytime running light,
rear side light, left-hand main
beam headlight, right-hand
dipped beam headlight
16 Registration plate lighting, front
and rear fog lights
17 Alarm, horn, lighting and wiper
stalks
18 Instrument panel
19 Heater
20 Rear screen wiper, screenwash
pump, horn
21 General APC load
22 Reversing lights
23 Brake switch
24 Injection, starting
25 Airbag, steering column lock
26 Passenger side window control
27 Power-assisted steering
28 Brake lightsNo. Allocation
29 APC load for vehicle with
RENAULT card
30 General service
31 Cigarette lighter, accessories
socket
32 Heater
33 Brake light, ABS, transponder
34 Interior lighting, air-conditioning
35 Starting for vehicles with
RENAULT card
36 Rear windscreen wiper
37 Electromagnetic notification
38 Accessories socket in the
loading area
39 Driver’s side window control
motor
40 Rear accessories socket
41 BCM starting
42 Heated seats
43 Tachograph
44 Front windscreen wiper
45 Heating, air conditioning system
Page 267 of 298

5.41
OPERATING FAULTS (6/7)
Electrical equipmentPOSSIBLE CAUSESWHAT TO DO
The wipers do not work. Wiper blades stuck. Free the blades before using the wipers.
Faulty electrical circuit. Consult an approved dealer.
Fuse damaged. Replace the fuse or have it replaced; refer
to the information on “Fuses” in section 5.
The wiper does not stop. Faulty electrical controls.Consult an approved dealer.
Direction indicators flashing more
quickly. Blown bulb.
See information on “Headlights: changing
bulbs” or “Rear and side lights: changing
bulbs”.
The direction indicators do not work. Faulty electrical circuit or control. Consult an approved dealer. Fuse damaged.Replace the fuse or have it replaced; refer
to the information on “Fuses” in section 5.
The lights do not come on or go off. Faulty electrical circuit or control. Consult an approved dealer.
Fuse damaged.Replace the fuse or have it replaced; refer
to the information on “Fuses” in section 5.