Injector RENAULT TWINGO 2009 2.G Engine And Peripherals Workshop Manual
[x] Cancel search | Manufacturer: RENAULT, Model Year: 2009, Model line: TWINGO, Model: RENAULT TWINGO 2009 2.GPages: 652
Page 4 of 652
Contents
Air resonator : Removal -
Refitting 12A-19
Throttle valve: Removal -
Refitting 12A-20
Throttle valve: Cleaning 12A-26
Air flowmeter: Removal -
Refitting 12A-28
Inlet distributor: Removal -
Refitting 12A-29
Injector holder shim:
Removal - Refitting 12A-45
Exhaust manifold: Removal -
Refitting 12A-48
12B TURBOCHARGING
Turbocharging: Precautions
for the repair 12B-1
Turbocharger: Removal -
Refitting 12B-4
Turbocharger oil pipe:
Removal - Refitting 12B-12
Intercooler : Removal -
Refitting 12B-18
13A FUEL SUPPLY
Diesel supply circuit:
Operating diagram 13A-1
Manual pr iming pump:
Removal - Refitting 13A-2
Fuel filter : Removal -
Refitting 13A-4
Electric diesel fuel heater:
Removal - Refitting 13A-7
Fuel circuit: Operating
diagram 13A-8 12A FUEL MIXTUREFuel pressure: Check 13A-9
Fuel flow: Check 13A-14
13B DIESEL INJECTION
Diesel injection: Precautions
for the repair 13B-1
Diesel injection: List and
location of components 13B-8
Diesel injection computer:
Removal - Refitting 13B-13
Camshaft position sensor:
Removal - Refitting 13B-14
Crankshaft position sensor:
Removal - Refitting 13B-15
High pressure pump:
Removal - Refitting 13B-16
Flow actuator: Removal -
Refitting 13B-26
Venturi: Removal - Refitting 13B-31
High pressure pipe: Check 13B-34
High pressure pipe between
pump and rail: Removal -
Refitting 13B-35
High pressure pipe between
rail and injector: Removal -
Refitting 13B-39
Injector rail: Removal -
Refitting 13B-43
Rail pressure sensor:
Removal - Refitting 13B-48
Fuel temperature sensor:
Removal - Refitting 13B-49
Injector leak flow: Check 13B-51
Accelerometer : Removal -
Refitting 13B-53 13A FUEL SUPPLY
Page 5 of 652
Contents
13C PREHEATING
Pre-postheating unit:
Removal - Refitting 13C-1
Heater plugs: Removal -
Refitting 13C-2
14A ANTIPOLLUTION
Oil vapour rebreathing
circuit: Descriptions 14A-1
Fuel vapour recirculation
circuit: Operating diagram 14A-2
Fuel vapour recirculation
circuit: Check 14A-3
Fuel vapour absorber:
Removal - Refitting 14A-4
Fuel vapour absorber: Check 14A-7
Fuel vapour absorber bleed
solenoid valve: Removal -
Refitting 14A-8
Exhaust gas recirculation
solenoid valve: Removal -
Refitting 14A-10
Exhaust gas cooler: Removal
- Refitting 14A-11
Exhaust gas recirculation
assembly: Removal -
Refitting 14A-15
Exhaust gas recirculation
rigid pipe: Removal -
Refitting 14A-19
16A STARTING - CHARGING
Alternator: Removal -
Refitting 16A-1
Star ter: Removal - Refitting 16A-10
Alternator pulley: Removal -
Refitting 16A-1717A IGNITION
Coils: Removal - Refitting 17A-1
Plugs: Removal - Refitting 17A-12
17B PETROL INJECTION
Petrol injection: List and
location of components 17B-1
Oxygen sensors: Removal -
Refitting 17B-13
Petrol injection computer:
Removal - Refitting 17B-20
Pinking sensor: Removal -
Refitting 17B-23
Crankshaft position sensor:
Removal - Refitting 17B-25
Injector rail - Injectors:
Removal - Refitting 17B-27
19A COOLING
Engine cooling system:
Specifications 19A-1
Engine cooling system:
Check 19A-2
Engine cooling circuit: List
and location of components 19A-4
Engine cooling system:
Operating diagram 19A-5
Cooling system: Draining -
Refilling 19A-9
Cooling radiator: Removal -
Refitting 19A-12
Coolant pump: Removal -
Refitting 19A-24
Thermostat: Removal -
Refitting 19A-34
Water chamber: Removal -
Refitting 19A-40
Page 109 of 652
10A-103
ENGINE AND CYLINDER BLOCK ASSEMBLY
Engine - gearbox assembly: Removal - Refitting
K4M
10A
-the rubber pad mounting from the suspended en-
gine mounting on the gearbox.
aRemove the right-hand suspended engine mounting
(see 19D, Engine mounting, Right-hand sus-
pended engine mounting: Removal - Refitting,
page 19D-13) .
aLift the vehicle to remove the "engine and gearbox"
assembly.
REFITTING
I - REFITTING PREPARATION OPERATION
aFor standard engine replacement (see Standard re-
placement) (Technical Note 6023A, 10A, Engine
and peripherals).
II - REFITTING OPERATION
aPosition the "engine and gearbox" assembly in the
body.
aRefit the right-hand suspended engine mounting
(see 19D, Engine mounting, Right-hand sus-
pended engine mounting: Removal - Refitting,
page 19D-13) .
aRefit the rubber pad mounting from the suspended
engine mounting on the gearbox.
aTorque tighten the rubber pad mounting bolts for
the suspended engine mounting on the gearbox
(21 N.m).
aRefit the suspended engine mounting rubber pad.
aTorque tighten:
-the bolts of the suspended mounting rubber
pad (62 N.m),
-the suspended engine mounting shaft nut (62
N.m).
III - FINAL OPERATION
aRemove the.
aRemove the blanking plugs.
aConnect:
-the union of the brake servo vacuum pipe,
-the « compressor - condenser » connecting pipe,-the « compressor - intermediate pipe » connecting
pipe,
-the pressure sensor connector,
aConnect the hose on the coolant pump inlet pipe.
aFit the hose clip on the coolant pump inlet pipe using
the (Mot. 1448).
aRefit the earth nuts.
aClip:
-the relay plates on the engine compartment con-
nection unit,
-the fuse holders.
aConnect the fuses.
aRefit the engine compartment connection unit on the
body.
aConnect the connector to the engine compartment
connection unit.
aRefit the engine compartment connection unit cover.
aClip:
-the wiring on the engine cooling fan assembly,
-the cooling radiator top and bottom hoses on the
engine cooling fan assembly.
aConnect:
-the engine cooling fan assembly resistor connec-
tor,
-the engine cooling fan assembly connector.
aRemove the blanking plug from the fuel supply pipe
opening and the injector rail fuel opening.
aReconnect the fuel supply pipe.
aClip the fuel supply pipe in place.
aConnect:
-the fuel vapour absorber bleed solenoid valve con-
nector,
-the fuel vapour absorber bleed solenoid valve pipe.
aFit the gearbox control cables.
aClip the manual gearbox control cables onto:
-the gear selectors,
-the cable sleeve stops.
aRemove the blanking plug from the hydraulic clutch
control pipe opening and the opening of the clutch
thrust bearing.
aConnect the hydraulic clutch control pipe.
aClip the hydraulic clutch control pipe on the gearbox. Note:
Check no component obstructs the movement of
the body around the engine - gearbox assembly.
Page 118 of 652
11A-1
TOP AND FRONT OF ENGINE
Pressure at end of compression: Check
K4M
11A
CHECK
I - PREPARATION OPERATION FOR CHECK
aRemove:
-the coils (see 17A, Ignition, Coils: Removal - Re-
fitting, page 17A-1) ,
-the spark plugs (see 17A, Ignition, Plugs: Re-
moval - Refitting, page 17A-12) .
aDisconnect the injector wiring connector (1) .aConnect a petrol compression gauge (2) .
aPut the vehicle under the starting conditions by posi-
tioning the gear lever in neutral.
II - TEST OPERATION
aActivate the starter until the needle of the petrol
compression gauge stabilises.
aMeasure the cylinder compressions, cylinder by cyl-
inder.
aFully depress the accelerator pedal in order to open
the throttle valve during the compression measure-
ments.
III - FINAL OPERATION
aDisconnect the petrol compression gauge.
aConnect the injector wiring connector.
aRefit:
-the spark plugs (see 17A, Ignition, Plugs: Re-
moval - Refitting, page 17A-12) ,
-the coils (see 17A, Ignition, Coils: Removal - Re-
fitting, page 17A-1) . Equipment required
petrol compression gauge
132371
132338
Note:
It is necessar y to wait for at least 10 seconds
before starting the engine each time (the starter
will not run due to its ther mal protection).
Page 231 of 652
11A-114
TOP AND FRONT OF ENGINE
Cylinder head: Removal - Refitting
K9K
11A
REMOVAL
I - REMOVAL PREPARATION OPERATION
aPosition the vehicle on a two-post lift (see Vehicle:
Towing and lifting) (02A, Lifting equipment).
aRemove the front engine cover.
aDisconnect the battery (see ) (80A, Battery).
aRemove:
-the windscreen wiper arms (see Windscreen wip-
er arm: Removal - Refitting) (85A, Wiping -
Washing),
-the scuttle panel grille (see Scuttle panel grille:
Removal - Refitting) (56A, Exterior equipment),
-the scoop under the scuttle panel grille (see Scoop
under the scuttle panel grille: Removal - Refit-
ting) (56A, Exterior equipment),-the front wheels (see Wheel: Removal - Refitting)
(35A, Wheels and tyres),
-the front wheel arch liners (see Front wheel arch
liner: Removal - Refitting) (55A, Exterior protec-
tion),
-the front bumper (see Front bumper: Removal -
Refitting) (55A, Exterior protection),
-the halogen headlights (see Halogen headlight:
Removal - Refitting) (80B, Headlights),
-the front upper cross member (see Front upper
cross member: Removal - Refitting) (42A, Upper
front structure),
-the accessories belt (see 11A, Top and front of
engine, Accessories belt: Removal - Refitting,
page 11A-3) ,
-the timing belt (see 11A, Top and front of engine,
Timing belt: Removal - Refitting, page 11A-27) .
aDrain the cooling system (see 19A, Cooling, Cool-
ing system: Draining - Refilling, page 19A-9) .
aRemove:
-the nut from the dipstick guide,
-the dipstick guide.
aDisconnect:
-the injector connectors,
-the heater plug connectors ,
-the connectors to the high pressure pump,
-injector rail pressure sensor connector,
-the accelerometer connector.
aRemove the nut from the engine wiring channel.
aMove aside the engine wiring.
aDisconnect the fuel inlet and return pipes from the
high pressure pump. Special tooling required
Mot. 1202-01Clip pliers for hose clips
(large size).
Mot. 1202-02Clip pliers for hose clips
(small size)
Mot. 1448Remote operation pliers for
hose clips .
Equipment required
cylinder head bolt tightening gauge (angular mea-
suring type)
Tightening torquesm
cylinder head bolts (ini-
tial torque)25 N.m
cylinder head bolts270˚ ±± ± ±
10˚
IMPORTANT
Wear goggles with side protectors for this opera-
tion.
IMPORTANT
Wear leaktight gloves (Nitrile type) for this opera-
tion.
WARNING
To avoid any corrosion or damage, protect the
areas on which fuel is likely to r un.
IMPORTANT
Dur ing this operation, be sure to:
-refrain from smoking or bringing red hot objects
close to the working area,
-be careful of fuel splashes when disconnecting
the union.
Page 232 of 652
11A-115
TOP AND FRONT OF ENGINE
Cylinder head: Removal - Refitting
K9K
11A
aFit blanking plugs to the fuel pipes and the high pres-
sure pump (see 13B, Diesel injection, Diesel in-
jection: Precautions for the repair, page 13B-1) .
aRemove the air filter unit (see 12A, Fuel mixture,
Air filter unit: Removal - Refitting, page 12A-13) .
aUnclip:
-the breather pipe on the gearbox,
-the wiring on the engine lifting eye on the gearbox
side.
aMove aside the engine wiring.
aDisconnect the brake servo pipe from the vacuum
pump.
aRemove the cooling hose clip from the EGR cooler
using the (Mot. 1202-01) or (Mot. 1202-02) or (Mot.
1448).
aDisconnect the cooling hose from the EGR cooler.
aSeparate the clip on the cooling hose of the coolant
pump inlet pipe using the tool (Mot. 1202-01) or
(Mot. 1202-02) or (Mot. 1448).
aDisconnect the cooling hose from the coolant pump
inlet pipe.
aRemove the heater matrix cooling hose clip from the
water chamber using the (Mot. 1202-01) or (Mot.
1202-02) or (Mot. 1448).
aDisconnect:
-the heater matrix cooling hose from the water
chamber,
-the coolant temperature sensor connector.
aRemove the catalytic converter (see 19B, Exhaust,
Catalytic converter: Removal - Refitting, page
19B-12) .aRemove:
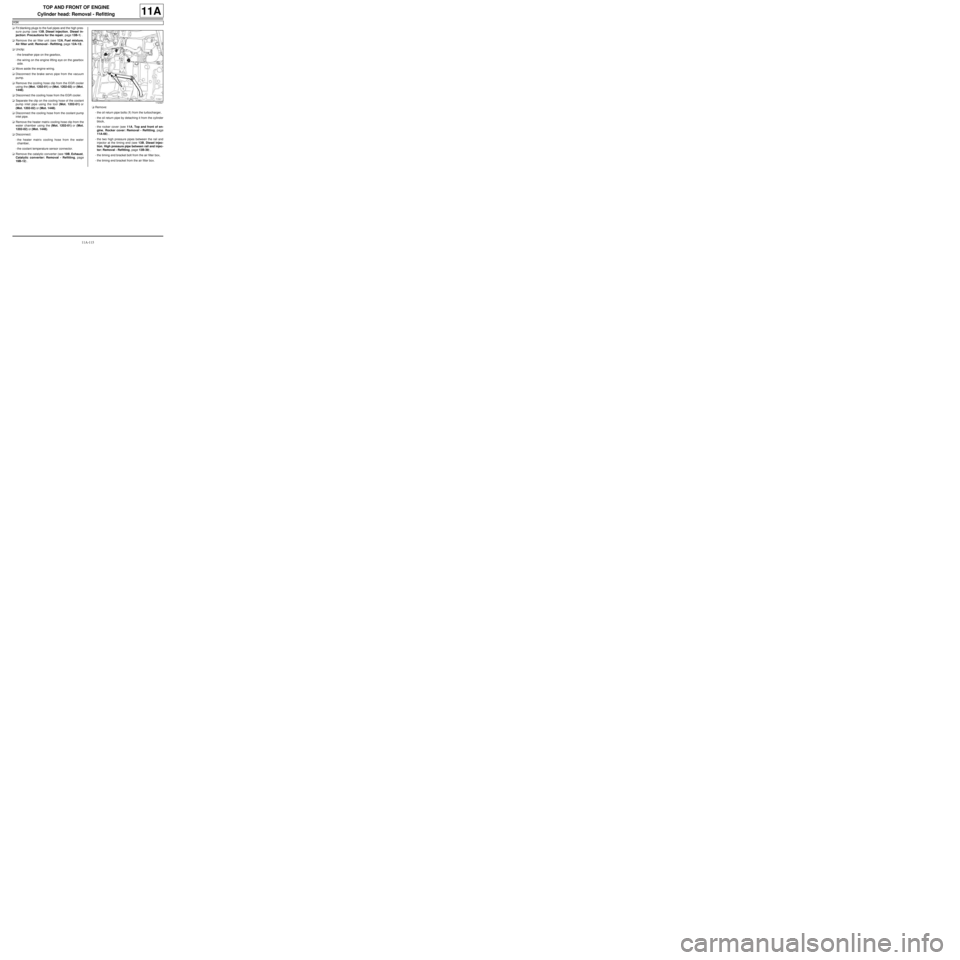
-the oil return pipe bolts (1) from the turbocharger,
-the oil return pipe by detaching it from the cylinder
block,
-the rocker cover (see 11A, Top and front of en-
gine, Rocker cover: Removal - Refitting, page
11A-66) ,
-the two high pressure pipes between the rail and
injector at the timing end (see 13B, Diesel injec-
tion, High pressure pipe between rail and injec-
tor: Removal - Refitting, page 13B-39) ,
-the timing end bracket bolt from the air filter box,
-the timing end bracket from the air filter box.
112327
Page 234 of 652
11A-117
TOP AND FRONT OF ENGINE
Cylinder head: Removal - Refitting
K9K
11A
aIf necessary, carry out a complete check of the cylin-
der head (see Cylinder head: Check) .
II - REFITTING OPERATION FOR PART
CONCERNED
aBring the pistons to mid-stroke position to prevent
them from coming into contact with the valves during
the tightening of the cylinder head.
aRefit:
-a new cylinder head gasket,
-the cylinder head.
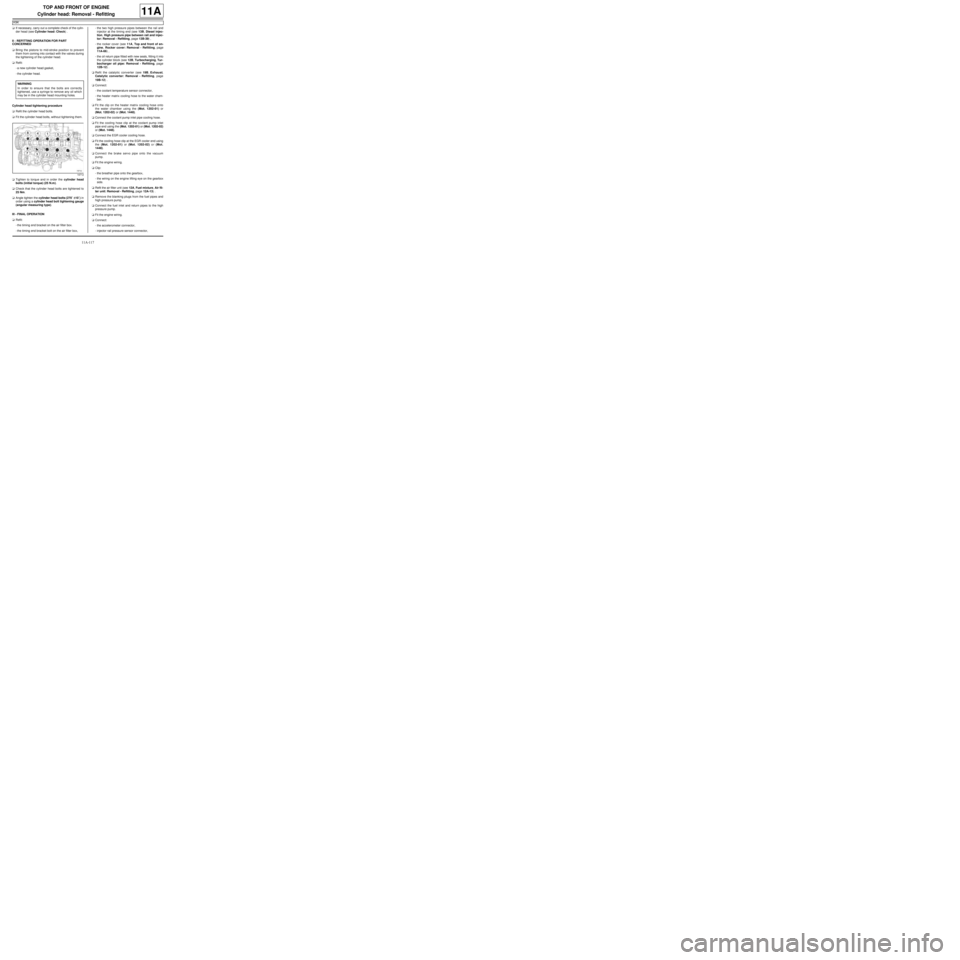
Cylinder head tightening procedure
aRefit the cylinder head bolts.
aFit the cylinder head bolts, without tightening them.
aTighten to torque and in order the cylinder head
bolts (initial torque) (25 N.m).
aCheck that the cylinder head bolts are tightened to
25 Nm.
aAngle tighten the cylinder head bolts (270˚ ±± ± ±
10˚) in
order using a cylinder head bolt tightening gauge
(angular measuring type).
III - FINAL OPERATION
aRefit:
-the timing end bracket on the air filter box.
-the timing end bracket bolt on the air filter box,-the two high pressure pipes between the rail and
injector at the timing end (see 13B, Diesel injec-
tion, High pressure pipe between rail and injec-
tor: Removal - Refitting, page 13B-39) ,
-the rocker cover (see 11A, Top and front of en-
gine, Rocker cover: Removal - Refitting, page
11A-66) ,
-the oil return pipe fitted with new seals, fitting it into
the cylinder block (see 12B, Turbocharging, Tur-
bocharger oil pipe: Removal - Refitting, page
12B-12) .
aRefit the catalytic converter (see 19B, Exhaust,
Catalytic converter: Removal - Refitting, page
19B-12) .
aConnect:
-the coolant temperature sensor connector,
-the heater matrix cooling hose to the water cham-
ber.
aFit the clip on the heater matrix cooling hose onto
the water chamber using the (Mot. 1202-01) or
(Mot. 1202-02) or (Mot. 1448).
aConnect the coolant pump inlet pipe cooling hose.
aFit the cooling hose clip at the coolant pump inlet
pipe end using the (Mot. 1202-01) or (Mot. 1202-02)
or (Mot. 1448).
aConnect the EGR cooler cooling hose.
aFit the cooling hose clip at the EGR cooler end using
the (Mot. 1202-01) or (Mot. 1202-02) or (Mot.
1448).
aConnect the brake servo pipe onto the vacuum
pump.
aFit the engine wiring.
aClip:
-the breather pipe onto the gearbox,
-the wiring on the engine lifting eye on the gearbox
side.
aRefit the air filter unit (see 12A, Fuel mixture, Air fil-
ter unit: Removal - Refitting, page 12A-13) .
aRemove the blanking plugs from the fuel pipes and
high pressure pump.
aConnect the fuel inlet and return pipes to the high
pressure pump.
aFit the engine wiring.
aConnect:
-the accelerometer connector,
-injector rail pressure sensor connector, WARNING
In order to ensure that the bolts are correctly
tightened, use a syringe to remove any oil which
may be in the cylinder head mounting holes.
19712
Page 235 of 652
11A-118
TOP AND FRONT OF ENGINE
Cylinder head: Removal - Refitting
K9K
11A
-the connectors to the high pressure pump,
-the heater plug connectors ,
-the injector connectors.
aRefit:
-the engine wiring channel nut,
-the dipstick guide,
-the dipstick guide nut.
aRefit:
-the timing belt (see 11A, Top and front of engine,
Timing belt: Removal - Refitting, page 11A-27) .
-the accessories belt (see 11A, Top and front of
engine, Accessories belt: Removal - Refitting,
page 11A-3) ,
-the front upper cross member (see Front upper
cross member: Removal - Refitting) (42A, Upper
front structure),
-the halogen headlights (see Halogen headlight:
Removal - Refitting) (80B, Headlights),
-the front bumper (see Front bumper: Removal -
Refitting) (55A, Exterior protection),
-the front wheel arch liners (see Front wheel arch
liner: Removal - Refitting) (55A, Exterior protec-
tion),
-the front wheels (see Wheel: Removal - Refitting)
(35A, Wheels and tyres),
-the scoop under the scuttle panel grille (see Scoop
under the scuttle panel grille: Removal - Refit-
ting) (56A, Exterior equipment),
-the scuttle panel grille (see Scuttle panel grille:
Removal - Refitting) (56A, Exterior equipment),
-the windscreen wiper arms (see Windscreen wip-
er arm: Removal - Refitting) (85A, Wiping -
Washing),
aConnect the battery (see ) (80A, Battery).
aFill and bleed the cooling system (see 19A, Cool-
ing, Cooling system: Draining - Refilling, page
19A-9) .
aRefit the engine cover.
Page 238 of 652

11A-121
TOP AND FRONT OF ENGINE
Cylinder head: Removal - Refitting
K4M
11A
aRemove:
-the bolts (5) of the engine wiring channel,
-the wiring bracket bolt (6) .
aMove the wiring bracket away from the water cham-
ber.
aDisconnect the injector connectors (7) .
aMove the injector wiring to one side.II - REMOVAL OPERATION
aRemove:
-the cylinder head bolts,
-the cylinder head,
-the cylinder head gasket.
REMOVAL
I - REFITTING PREPARATION OPERATION
aparts always to be replaced: cylinder head bolts.
parts always to be replaced: Cylinder head gas-
ket.
127347
132390
103259
Page 240 of 652

11A-123
TOP AND FRONT OF ENGINE
Cylinder head: Removal - Refitting
K4M
11A
II - REFITTING OPERATION
aRefit:
-the cylinder head,
-the new cylinder head bolts.
aWithout tightening, fit the cylinder head bolts in or-
der.
aPretighten to torque and in order the cylinder head
bolts (initial torque) (20 N.m).
aCheck that all of the new cylinder head bolts are
tightened to the correct torque (20 N.m).
aAngle tighten in order the cylinder head bolts (240˚
±± ± ±
6˚).III - FINAL OPERATION
aPosition the injector wiring.
aConnect the injector connectors.
aFit the wiring bracket on the water chamber.
aRefit:
-the wiring bracket bolt on the water chamber,
-the bolts of the engine wiring channel.
aClip on the water chamber wiring.
aConnect:
-the coolant temperature sensor connector,
-the heater matrix inlet hose to the water chamber,
-the cooling radiator top hose to the water chamber.
aUsing the (Mot. 1448) or (Mot. 1202-01) or (Mot.
1202-02) fit:
-the cooling radiator top hose clip on the water
chamber,
-the heater matrix inlet hose clip on the water cham-
ber.
aRefit:
-dipstick guide ,
-the dipstick,
-the exhaust manifold (see 12A, Fuel mixture, Ex-
haust manifold: Removal - Refitting, page 12A-
48) .
-the front right-hand wheel driveshaft (see Front
right-hand driveshaft: Removal - Refitting)
(29A, Driveshafts),
-the camshafts (see 11A, Top and front of engine,
Camshaft: Removal - Refitting, page 11A-82) ,
-the rocker cover (see 11A, Top and front of en-
gine, Rocker cover: Removal - Refitting, page
11A-66) ,
-the camshaft seals on the timing end (see 11A,
Top and front of engine, Camshaft seal, timing
end: Removal - Refitting, page 11A-138) ,
-the camshaft dephaser (see 11A, Top and front of
engine, Camshaft dephaser: Removal - Refit-
ting, page 11A-135) ,
-the timing belt (see 11A, Top and front of engine,
Timing belt: Removal - Refitting, page 11A-27) ,
-the crankshaft accessories pulley (see 11A, Top
and front of engine, Crankshaft accessories
pulley: Removal - Refitting, page 11A-20) ,
103259
WARNING
In order to ensure that the bolts are correctly
tightened, use a syringe to remove any oil which
may be in the cylinder head mounting holes.
WARNING
Do not oil the new bolts. Be sure to oil bolts
being reused.
WARNING
Do not retighten the cylinder head bolts after
applying this procedure.