steering RENAULT TWINGO 2012 2.G User Guide
[x] Cancel search | Manufacturer: RENAULT, Model Year: 2012, Model line: TWINGO, Model: RENAULT TWINGO 2012 2.GPages: 220, PDF Size: 6.73 MB
Page 73 of 220
2.1
ENG_UD30794_17
Sommaire 2 (X44 - Renault)
ENG_NU_952-4_X44_Renault_2
Section 2: Driving
(Advice on use relating to fuel economy and the environment)
Running in - Ignition switch . . . . . . . . . . . . . . . . . . . . . . . . . . . . . . . . . . . . . . . . . . . . . . . . . . . . . . . . 2.2
Starting, stopping the engine . . . . . . . . . . . . . . . . . . . . . . . . . . . . . . . . . . . . . . . . . . . . . . . . . . . . . . . 2.3
Special features of petrol versions . . . . . . . . . . . . . . . . . . . . . . . . . . . . . . . . . . . . . . . . . . . . . . . . . . 2.4
Special features of diesel versions . . . . . . . . . . . . . . . . . . . . . . . . . . . . . . . . . . . . . . . . . . . . . . . . . . 2.5
Gear lever – Power-assisted steering . . . . . . . . . . . . . . . . . . . . . . . . . . . . . . . . . . . . . . . . . . . . . . . . 2.6
Handbrake . . . . . . . . . . . . . . . . . . . . . . . . . . . . . . . . . . . . . . . . . . . . . . . . . . . . . . . . . . . . . . . . . . . . . 2.7
Advice on emission control and fuel economy . . . . . . . . . . . . . . . . . . . . . . . . . . . . . . . . . . . . . . . . . 2.8
Environment . . . . . . . . . . . . . . . . . . . . . . . . . . . . . . . . . . . . . . . . . . . . . . . . . . . . . . . . . . . . . . . . . . . 2.11
Driving correction devices . . . . . . . . . . . . . . . . . . . . . . . . . . . . . . . . . . . . . . . . . . . . . . . . . . . . . . . . . 2.12
Cruise control, Speed limiter: speed limiter . . . . . . . . . . . . . . . . . . . . . . . . . . . . . . . . . . . . . . . . . . . . 2.15
Cruise control, Speed limiter: cruise control function . . . . . . . . . . . . . . . . . . . . . . . . . . . . . . . . . . . . 2.18
Quickshift gearbox . . . . . . . . . . . . . . . . . . . . . . . . . . . . . . . . . . . . . . . . . . . . . . . . . . . . . . . . . . . . . . . 2.22
Page 74 of 220
engine immobiliser (switch) .................. (up to the end of the DU)
ignition switch ....................................... (up to the end of the DU)
starting the engine ................................ (up to the end of the DU)
running in .............................................. (up to the end of the DU)
driving ................................................... (up to the end of the DU)
2.2
ENG_UD30504_4
Rodage (X44 - Renault)
ENG_NU_952-4_X44_Renault_2
Running in - Ignition switch
Petrol version
Up to 600 miles (1 000 km) , do not
exceed 78 mph (130 km/h) in top gear
or 3,000 to 3,500 rpm.
You may only expect top performance
from your vehicle after approximately
1,800 miles (3 000 km).
S e r v i c e i n t e r v a l s : r e f e r t o t h e
Maintenance Service Booklet for your
vehicle.
Diesel version
For the first 1,000 miles (1,500 km),
do not exceed 80 mph (130 km/h) in
the highest gear, or 2,500 rpm. After
completing this mileage you may drive
faster, although it is only after approxi -
mately 3,600 miles (6,000 km) have
been covered that you may reasonably
expect full performance.
During the running in period, do not ac-
celerate hard while the engine is still
cold and do not let the engine over-rev.
S e r v i c e i n t e r v a l s : r e f e r t o t h e
Maintenance Service Booklet for your
vehicle.
RUNNING IN/IGNItIoN SwItch
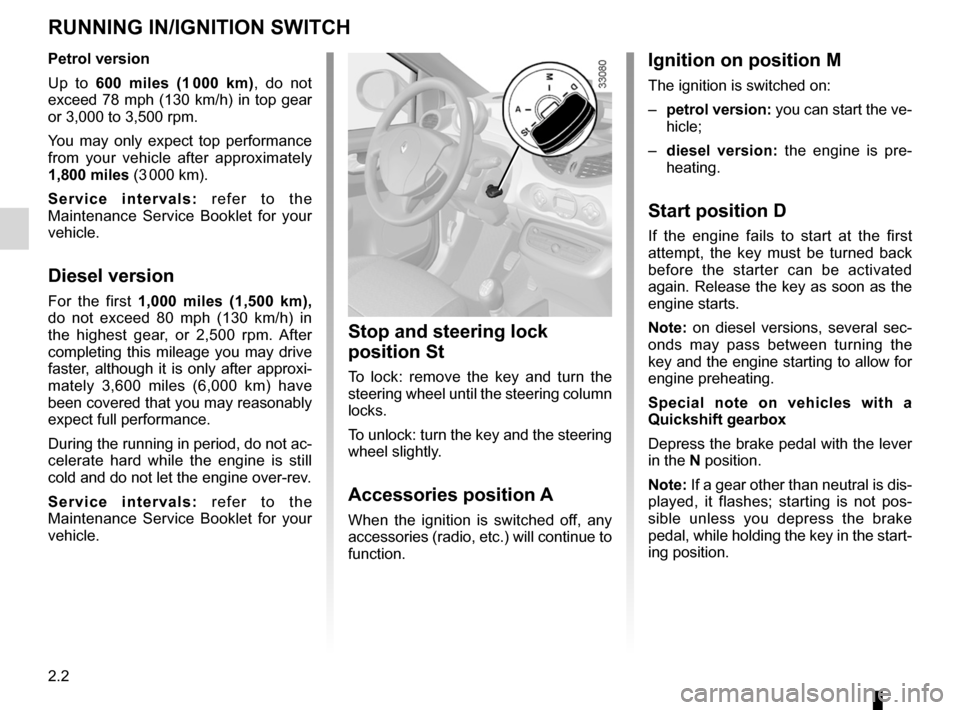
Stop and steering lock
position St
To lock: remove the key and turn the
steering wheel until the steering column
locks.
To unlock: turn the key and the steering
wheel slightly.
Accessories position A
When the ignition is switched off, any
accessories (radio, etc.) will continue to
function.
Ignition on position M
The ignition is switched on:
– petrol version: you can start the ve-
hicle;
– diesel version: the engine is pre -
heating.
Start position D
If the engine fails to start at the first
attempt, the key must be turned back
before the starter can be activated
again. Release the key as soon as the
engine starts.
Note: on diesel versions, several sec -
onds may pass between turning the
key and the engine starting to allow for
engine preheating.
Special note on vehicles with a
Quickshift gearbox
Depress the brake pedal with the lever
in the N position.
Note: If a gear other than neutral is dis-
played, it flashes; starting is not pos -
sible unless you depress the brake
pedal, while holding the key in the start-
ing position.
Page 75 of 220
starting the engine ................................ (up to the end of the DU)
starting the engine ................................ (up to the end of the DU)
stopping the engine ............................................... (current page)
2.3
ENG_UD28739_4
Démarrage / Arrêt du moteur (X44 - Renault)
ENG_NU_952-4_X44_Renault_2
Starting, Stopping the engine
St ARtING/StoPPING the eNGINe
Starting the engine
In very cold conditions (temperatures
below –20°C): so that it is easier to
start the engine, switch on the ignition
for several seconds before starting the
engine.
Feature when starting the engine, if the
outdoor temperature is very low (below
- 10 ° C): hold down the clutch pedal
until the engine starts.
– Petrol injection
engine warm or cold:
– activate the starter without ac-
celerating;
– release the key as soon as the
engine starts.ÉDiesel injection indicator
light
Turn the ignition key to the “Ignition
on” position and hold this position
until the preheating indicator light
goes out.
Turn the key to the “Start” position
without depressing the accelera -
tor pedal. Release the key as soon
as the engine starts.
Stopping the engine
With the engine idling, turn the key
back to the “Stop” position.
Driver’s responsibility
Never leave your vehicle
with the key inside the vehi-
cle and never leave a child
(or a pet) unsupervised, even for a
short while.
There is a risk that they could start
the engine or operate electrical
equipment (electric windows etc.)
and trap part of their body (neck,
arms, hands, etc.).
Risk of serious injury.
Never switch off the ignition
before the vehicle has stopped
completely . Once the engine has
stopped, the brake servo, pow -
erassisted steering, etc., and the
passive safety devices such as
air bags and pretensioners will no
longer operate.
The steering is locked when the key
is removed.
Page 78 of 220
power-assisted steering........................(up to the end of the DU)
power-assisted steering ........................(up to the end of the DU)
gear lever .............................................. (up to the end of the DU)
reverse gear selecting .......................................... (up to the end of the DU)
changing gear ....................................... (up to the end of the DU)
2.6
ENG_UD24713_4
Levier de vitesses / Direction assistée (X44 - Renault)
ENG_NU_952-4_X44_Renault_2
Gear lever - Power-assisted steering
GeAR leveR/PoweR-ASSISteD SteeRING
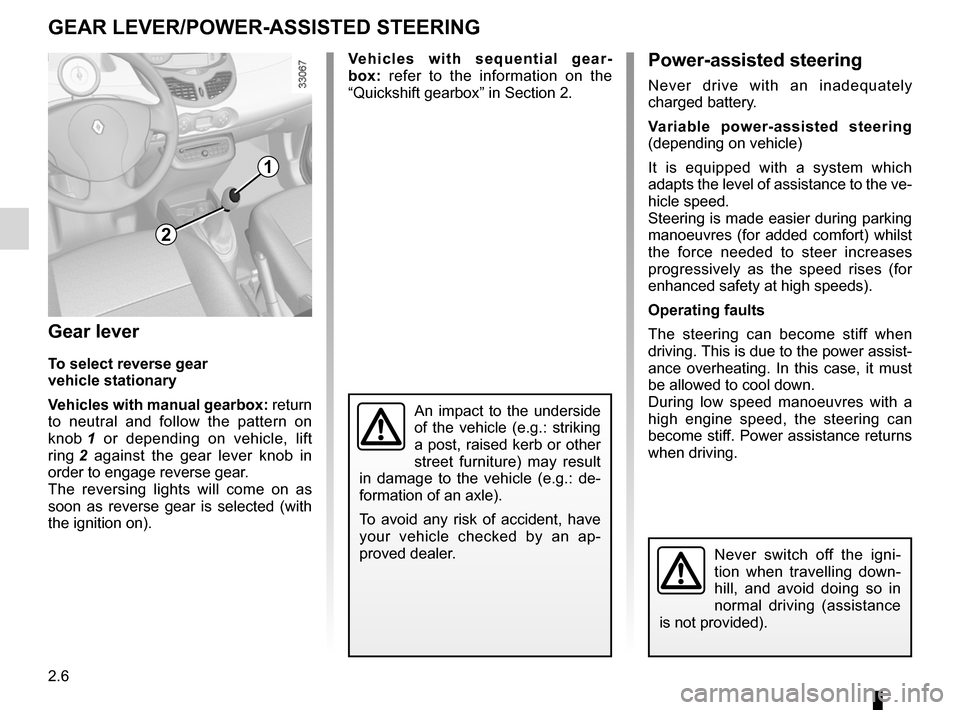
Gear lever
t o select reverse gear
vehicle stationary
v ehicles with manual gearbox: return
to neutral and follow the pattern on
knob 1 or depending on vehicle, lift
ring 2 against the gear lever knob in
order to engage reverse gear.
The reversing lights will come on as
soon as reverse gear is selected (with
the ignition on).
2
1
Power-assisted steering
Never drive with an inadequately
charged battery.
v ariable power-assisted steering
(depending on vehicle)
It is equipped with a system which
adapts the level of assistance to the ve-
hicle speed.
Steering is made easier during parking
manoeuvres (for added comfort) whilst
the force needed to steer increases
progressively as the speed rises (for
enhanced safety at high speeds).
operating faults
The steering can become stiff when
driving. This is due to the power assist-
ance overheating. In this case, it must
be allowed to cool down.
During low speed manoeuvres with a
high engine speed, the steering can
become stiff. Power assistance returns
when driving.
Never switch off the igni -
tion when travelling down -
hill, and avoid doing so in
normal driving (assistance
is not provided).
v ehicles with sequential gear -
box: refer to the information on the
“Quickshift gearbox” in Section 2.
An impact to the underside
of the vehicle (e.g.: striking
a post, raised kerb or other
street furniture) may result
in damage to the vehicle (e.g.: de -
formation of an axle).
To avoid any risk of accident, have
your vehicle checked by an ap -
proved dealer.
Page 85 of 220
JauneNoirNoir texte
2.13
ENG_UD25058_2
Dispositifs de correction de conduite (X44 - Renault)
ENG_NU_952-4_X44_Renault_2
DRIvING coRRectIoN DevIce (continued)
electronic stability program
(eSP) with understeer control
and traction control (ASR)
Warning light on the instrument
panel flashes when the function starts
operating. electronic Stability Program (eSP)
This system helps you to keep control
of the vehicle in critical driving condi
-
tions (avoiding an obstacle, loss of grip
on a bend, etc.).
operating principle
A sensor in the steering wheel detects
the direction selected by the driver.
Other sensors throughout the vehicle
measure the actual direction.
The system compares the direction se-
lected by the driver and the actual di -
rection of the vehicle and corrects this
as necessary by applying the brakes
selectively and/or acting on the engine
power.
Understeer control
This system optimises the action of the
ESP in the case of pronounced unders-
teering (loss of front axle road holding). t
raction control (ASR)
This system helps to limit wheelspin of
the drive wheels and to control the ve-
hicle when pulling away accelerating or
decelerating.
operating principle
Using the wheel sensors, the system
measures and compares the speed of
the drive wheels at all times and slows
down their over-rotation. If a wheel is
starting to slip, the system brakes au -
tomatically until the drive supplied be -
comes compatible with the level of grip
under the wheel again.
The system also adjusts the engine
speed to the grip available under the
wheels, independently of the pressure
exerted on the accelerator pedal.
Page 138 of 220
multimedia equipment .......................... (up to the end of the DU)
telephone .............................................. (up to the end of the DU)
hands-free telephone integrated control
(up to the end of the DU)
navigation ............................................. (up to the end of the DU)
radio...................................................... (up to the end of the DU)
3.40
ENG_UD30800_2
Equipement multimédia (X44 - Renault)
ENG_NU_952-4_X44_Renault_3
Multimedia equipment
Mul TIMEDIA EquIPMENT
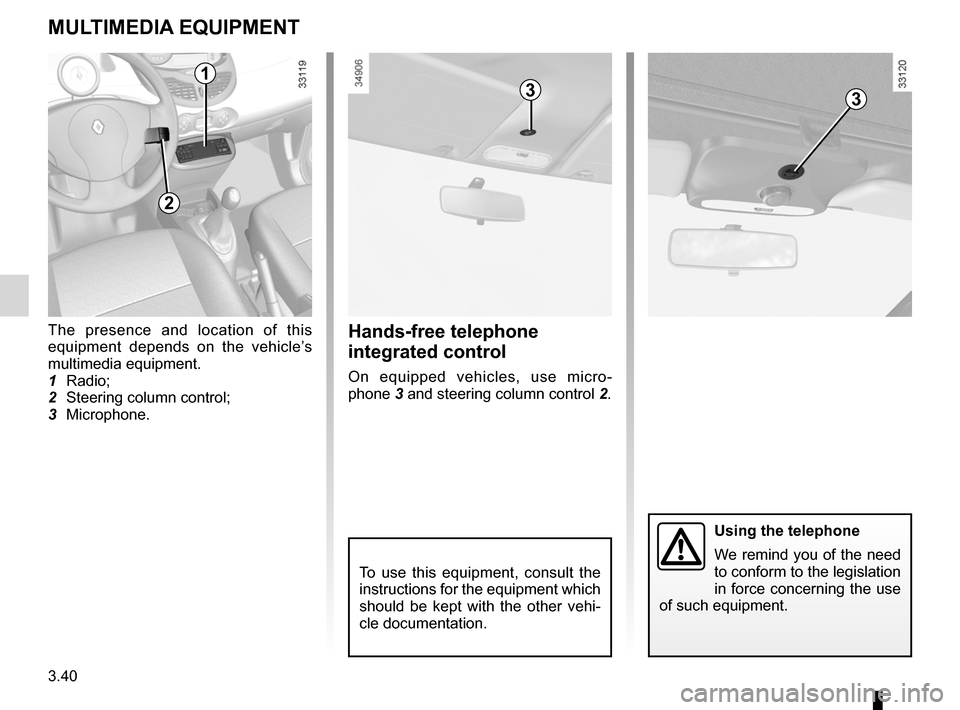
The presence and location of this
equipment depends on the vehicle’s
multimedia equipment.
1 Radio;
2 Steering column control;
3 Microphone.
To use this equipment, consult the
instructions for the equipment which
should be kept with the other vehi -
cle documentation.
3
using the telephone
We remind you of the need
to conform to the legislation
in force concerning the use
of such equipment.
1
hands-free telephone
integrated control
On equipped vehicles, use micro -
phone 3 and steering column control 2.
3
2
Page 165 of 220
JauneNoirNoir texte
5.11
ENG_UD19374_3
Pneumatiques (X44 - Renault)
ENG_NU_952-4_X44_Renault_5
tYreS (2/3)
t yre pressures
Tyre pressures must be adhered to (in-
cluding the emergency spare wheel).
Pressures must be checked at least
once a month and always before a
long journey (refer to the information on
“Tyre pressures”). Pressures should be checked when the
tyres are cold; ignore higher pressures
which may be reached in hot weather
or following a fast journey.
If tyre pressures cannot be checked
when the tyres are
cold, the normal
pressures must be increased by 0.2 to
0.3 bar (or 3 PSI).
never deflate a hot tyre.
note: a label (depending on country or
model) fixed to the edge or frame of the
driver’s door gives the recommended
tyre pressures.
Fitting new tyres
changing wheels around
This practice is not recommended.
emergency spare wheel
Refer to the information on the
“Emergency spare wheel” and in -
structions on “Changing a wheel” in
Section 5.
For safety reasons, this op-
eration must be carried out
by a specialist.
Fitting different tyres may
change your vehicle as follows:
– it may mean that your vehicle no
longer conforms to current regu-
lations;
– it may change the way it handles
when cornering;
– it may cause the steering to be
heavy;
– it may affect the use of snow
chains.
Please be aware that a
missing valve cap can
make the tyres less airtight
and lead to pressure loss.
Always use valve caps identical to
those fitted originally and tighten
them fully.
Incorrect tyre pressures
lead to abnormal tyre wear
and unusually hot running.
These are factors which
may seriously affect safety and lead
to:
– poor road holding;
– the risk of blow-outs or of throw-
ing a tread.
Tyre pressures depend on the load
and the driving speed. Adjust the
pressures according to the condi -
tions of use. (Refer to the informa -
tion on “Tyre pressures”).
Page 181 of 220
fuses ..................................................... (up to the end of the DU)
5.27
ENG_UD24741_10
Fusibles (X44 - Renault)
ENG_NU_952-4_X44_Renault_5
Fuses
Fuse box
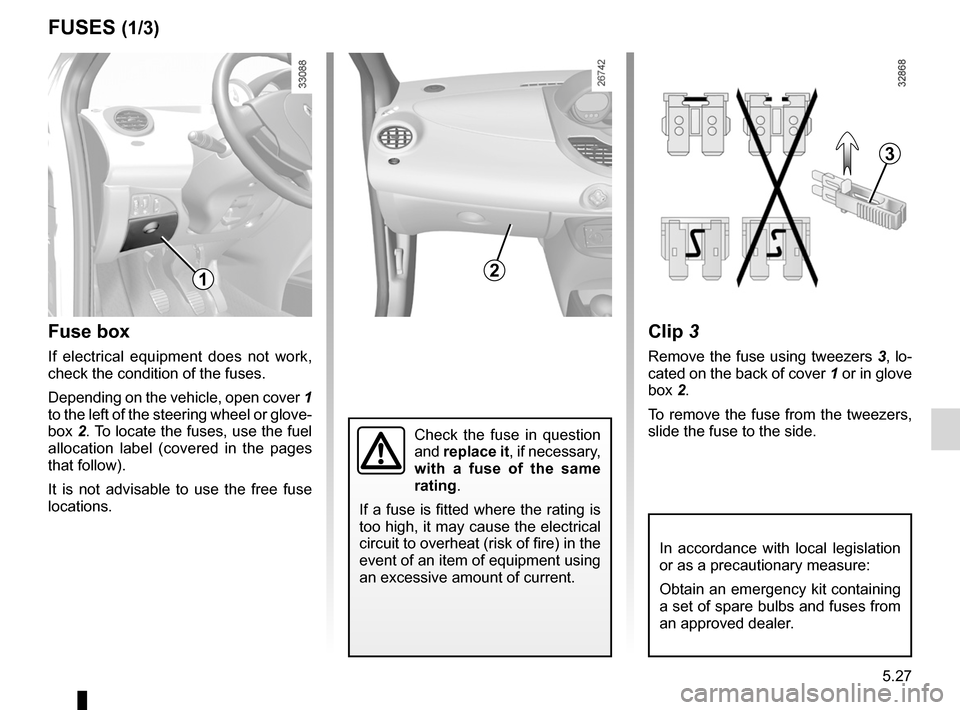
If electrical equipment does not work,
check the condition of the fuses.
Depending on the vehicle, open cover 1
to the left of the steering wheel or glove -
box 2. To locate the fuses, use the fuel
allocation label (covered in the pages
that follow).
It is not advisable to use the free fuse
locations.
FuSeS (1/3)
In accordance with local legislation
or as a precautionary measure:
Obtain an emergency kit containing
a set of spare bulbs and fuses from
an approved dealer.
clip 3
Remove the fuse using tweezers 3, lo-
cated on the back of cover 1 or in glove
box 2.
To remove the fuse from the tweezers,
slide the fuse to the side.
2
3
1
Check the fuse in question
and replace it, if necessary,
with a fuse of the same
rating.
If a fuse is fitted where the rating is
too high, it may cause the electrical
circuit to overheat (risk of fire) in the
event of an item of equipment using
an excessive amount of current.
Page 182 of 220
5.28
ENG_UD24741_10
Fusibles (X44 - Renault)
ENG_NU_952-4_X44_Renault_5
Jaune NoirNoir texte
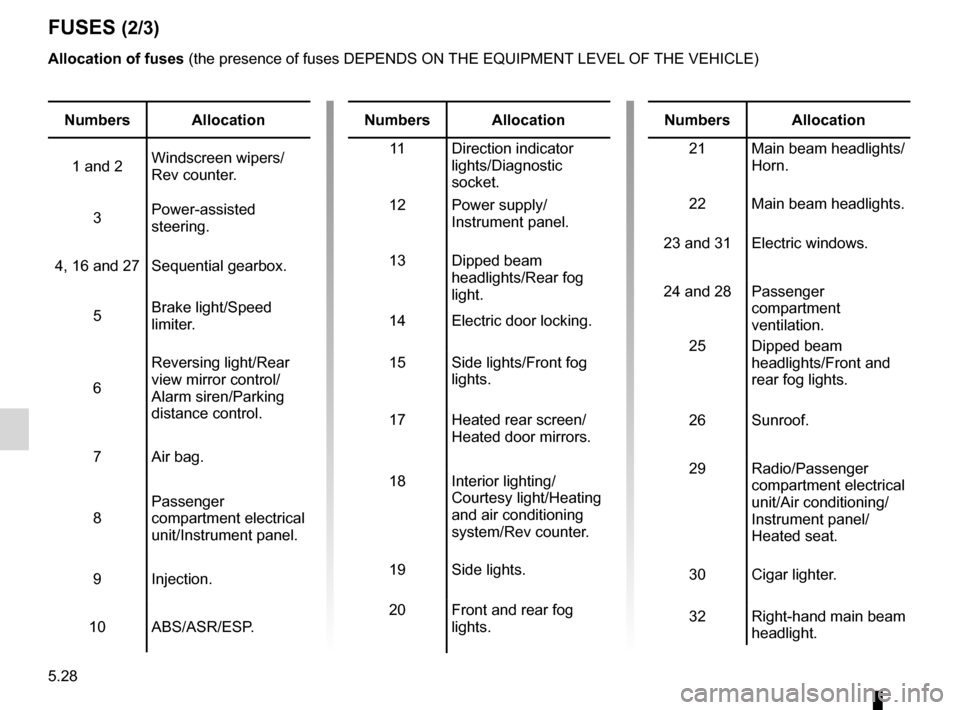
FuSeS (2/3)
numbers Allocation
1 and 2 Windscreen wipers/
Rev counter.
3 Power-assisted
steering.
4, 16 and 27 Sequential gearbox.
5 Brake light/Speed
limiter.
6 Reversing light/Rear
view mirror control/
Alarm siren/Parking
distance control.
7 Air bag.
8 Passenger
compartment electrical
unit/Instrument panel.
9 Injection.
10 ABS/ASR/ESP.numbers Allocation
11 Direction indicator
lights/Diagnostic
socket.
12 Power supply/
Instrument panel.
13 Dipped beam
headlights/Rear fog
light.
14 Electric door locking.
15 Side lights/Front fog
lights.
17 Heated rear screen/
Heated door mirrors.
18 Interior lighting/
Courtesy light/Heating
and air conditioning
system/Rev counter.
19 Side lights.
20 Front and rear fog
lights.numbers Allocation
21 Main beam headlights/
Horn.
22 Main beam headlights.
23 and 31 Electric windows.
24 and 28 Passenger
compartment
ventilation.
25 Dipped beam
headlights/Front and
rear fog lights.
26 Sunroof.
29 Radio/Passenger
compartment electrical
unit/Air conditioning/
Instrument panel/
Heated seat.
30 Cigar lighter.
32 Right-hand main beam
headlight.
Allocation of fuses
(the presence of fuses DEPENDS ON THE EQUIPMENT LEVEL OF THE VEHICLE)
Page 184 of 220
towingbreakdown ...................................... (up to the end of the DU)
towing towing equipment ............................ (up to the end of the DU)
towing hitch ........................................... (up to the end of the DU)
towing a caravan .................................. (up to the end of the DU)
5.30
ENG_UD24739_3
Remorquage : dépannage (X44 - Renault)
ENG_NU_952-4_X44_Renault_5
Jaune NoirNoir texte
Towing (breakdown – attachments)
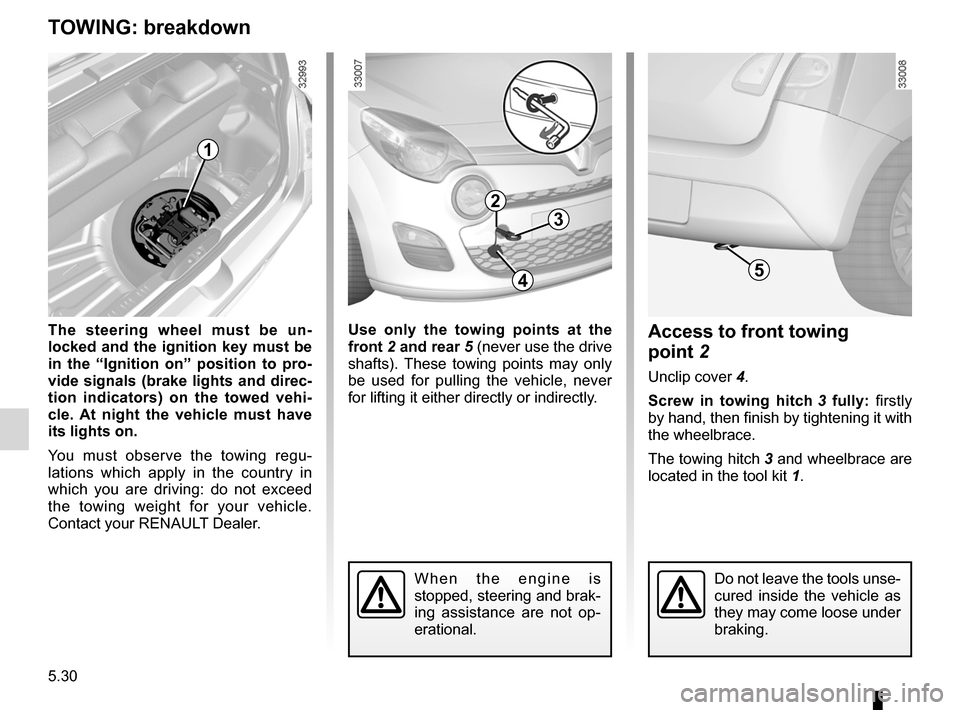
tOWIng: breakdown
the steering wheel must be un -
locked and the ignition key must be
in the “Ignition on” position to pro -
vide signals (brake lights and direc-
tion indicators) on the towed vehi -
cle. At night the vehicle must have
its lights on.
You must observe the towing regu -
lations which apply in the country in
which you are driving: do not exceed
the towing weight for your vehicle.
Contact your RENAULT Dealer. u
se only the towing points at the
front 2 and rear 5 (never use the drive
shafts). These towing points may only
be used for pulling the vehicle, never
for lifting it either directly or indirectly.Access to front towing
point 2
Unclip cover 4.
Screw in towing hitch 3 fully: firstly
by hand, then finish by tightening it with
the wheelbrace.
The towing hitch 3 and wheelbrace are
located in the tool kit 1.
W h e n t h e e n g i n e i s
stopped, steering and brak-
ing assistance are not op -
erational.
1
Do not leave the tools unse-
cured inside the vehicle as
they may come loose under
braking.
3
2
45