ESP RENAULT TWINGO 2012 2.G Owner's Manual
[x] Cancel search | Manufacturer: RENAULT, Model Year: 2012, Model line: TWINGO, Model: RENAULT TWINGO 2012 2.GPages: 220, PDF Size: 6.73 MB
Page 130 of 220
rear bench seat..................................... (up to the end of the DU)
3.32
ENG_UD24500_4
Banquette arrière : fonctionnalité (X44 - Renault)
ENG_NU_952-4_X44_Renault_3
Rear bench seat: functions
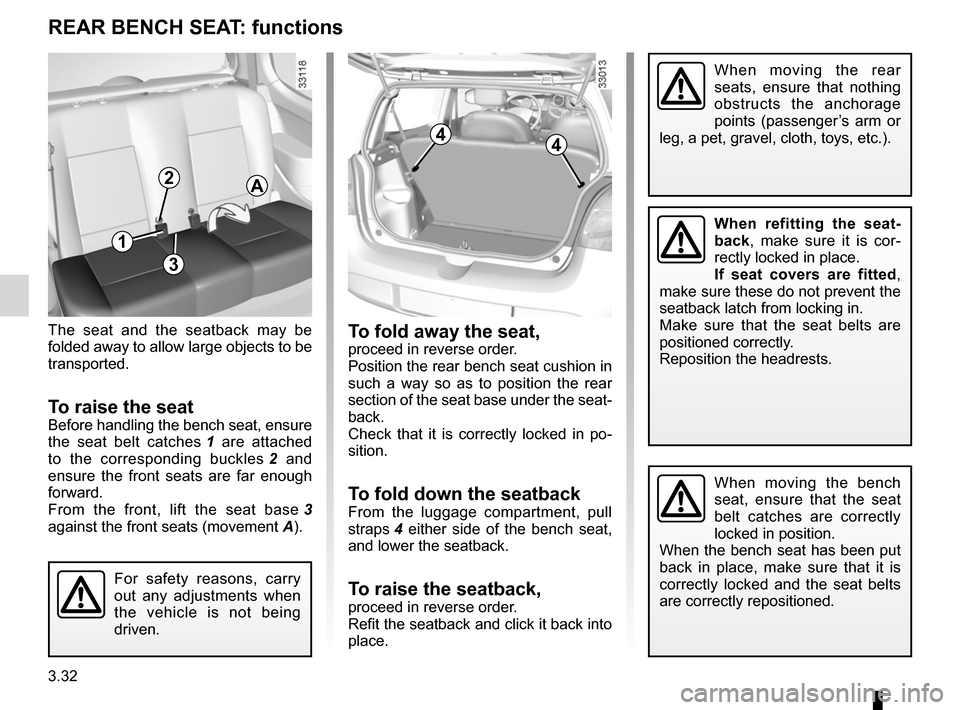
The seat and the seatback may be
folded away to allow large objects to be
transported.
To raise the seatBefore handling the bench seat, ensure
the seat belt catches 1 are attached
to the corresponding buckles 2 and
ensure the front seats are far enough
forward.
From the front, lift the seat base 3
against the front seats (movement A).
To fold away the seat, proceed in reverse order.
Position the rear bench seat cushion in
such a way so as to position the rear
section of the seat base under the seat-
back.
Check that it is correctly locked in po -
sition.
To fold down the seatbackFrom the luggage compartment, pull
straps 4 either side of the bench seat,
and lower the seatback.
To raise the seatback, proceed in reverse order.
Refit the seatback and click it back into
place.
For safety reasons, carry
out any adjustments when
the vehicle is not being
driven.
REAR BENCh SEAT: functions
When moving the bench
seat, ensure that the seat
belt catches are correctly
locked in position.
When the bench seat has been put
back in place, make sure that it is
correctly locked and the seat belts
are correctly repositioned.
When refitting the seat -
back , make sure it is cor -
rectly locked in place.
If seat covers are fitted ,
make sure these do not prevent the
seatback latch from locking in.
Make sure that the seat belts are
positioned correctly.
Reposition the headrests.
When moving the rear
seats, ensure that nothing
obstructs the anchorage
points (passenger’s arm or
leg, a pet, gravel, cloth, toys, etc.).
A
3
2
44
1
Page 132 of 220
rear parcel shelf .................................... (up to the end of the DU)
3.34
ENG_UD24694_3
Coffre à bagages (X44 - Renault)
ENG_NU_952-4_X44_Renault_3
Jaune NoirNoir texte
Rear parcel shelf
REAR PARCEl ShElF (1/2)
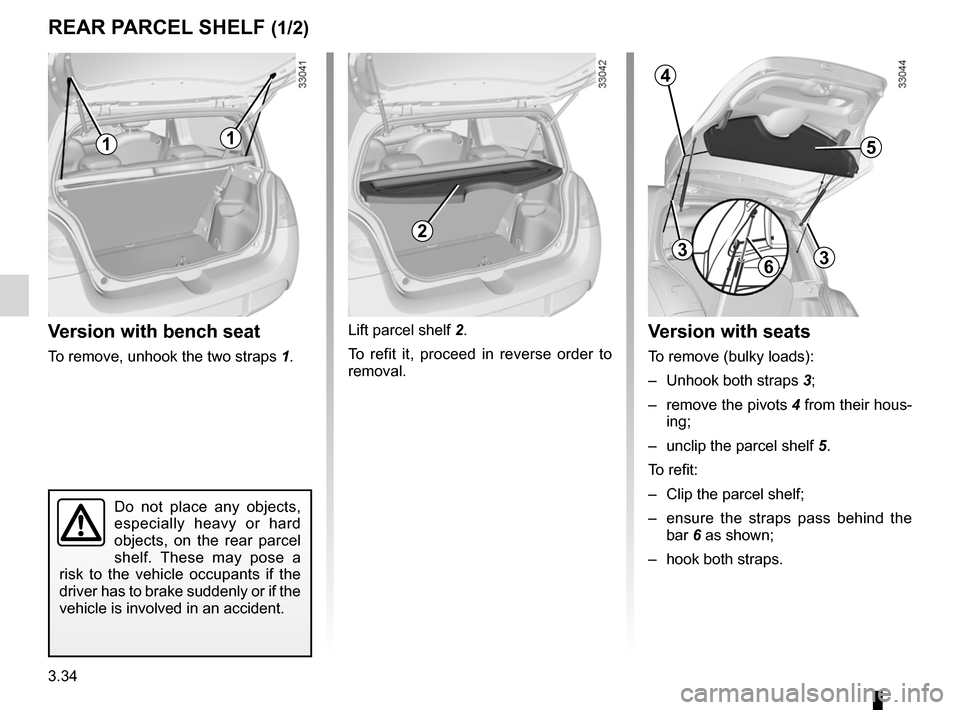
Version with bench seat
To remove, unhook the two straps 1.Lift parcel shelf 2.
To refit it, proceed in reverse order to
removal.
Version with seats
To remove (bulky loads):
–
Unhook both straps 3;
– remove the pivots 4 from their hous-
ing;
– unclip the parcel shelf 5.
To refit:
– Clip the parcel shelf;
– ensure the straps pass behind the
bar 6 as shown;
– hook both straps.
Do not place any objects,
especially heavy or hard
objects, on the rear parcel
shelf. These may pose a
risk to the vehicle occupants if the
driver has to brake suddenly or if the
vehicle is involved in an accident.
11
2
5
4
3
63
Page 134 of 220

luggage compartment cover ................. (up to the end of the DU)
3.36
ENG_UD24695_2
Cache-bagages : versions société (X44 - Renault)
ENG_NU_952-4_X44_Renault_3
Luggage cover: utility versions
luggAgE CoMPARTMENT CoVER: utility versions
The luggage cover consists of three
rigid sections.
It can be used in one of three ways:
– The luggage compartment cover is
in the unfolded position or the semi-
folded position.– The luggage cover is removed.
To remove it, in the semi-folded po -
sition, lift the luggage compartment
cover, holding it at either end.
Do not place any objects,
especially heavy or solid
objects on the luggage
compartment cover. These
may pose a risk to the vehicle occu-
pants if the driver has to brake sud-
denly or if the vehicle is involved in
an accident.
Page 152 of 220
4.14
ENG_UD26811_2
Entretien de la carrosserie (peinture mate) (X44 - X77 - J77 - X85 - \
B90 - X61 - TEST - X77 ph2 - X95 - B95 - D95 - K95 - J95 - R95 - L90 Ph2 - F90 Ph2 - R90\
Ph2 - X62
ENG_NU_952-4_X44_Renault_4
Respect local regulations about wash -
ing vehicles (e.g. do not wash your ve-
hicle on a public highway).
Observe the vehicle stopping distances
when driving on gravelled surfaces to
prevent paint damage.
Repair, or have repaired quickly, areas
where the paint has been damaged, to
prevent corrosion spreading.
Remember to visit the body shop pe -
riodically in order to maintain your
anti-corrosion warranty. Refer to the
Maintenance Document.
If it is necessary to clean mechani -
cal components, hinges, etc., spray
them with products approved by our
Technical Department to protect them
after they have been cleaned.
BODyWORk MAINTENANCE (2/2)
We have selected special products
to care for your vehicle and you can
obtain these from the manufactur -
er’s accessory outlets.
Using a roller type car wash
Return the windscreen wiper stalk to
the Park position (refer to the informa-
tion on the “Windscreen washer, wiper”
in Section 1). Check the mounting of
external accessories, additional lights
and mirrors, and ensure that the wiper
blades are secured with adhesive tape.
Remove the radio aerial mast if your
vehicle is fitted with this equipment.
Remember to remove the tape and refit
the antenna after washing.
Cleaning the headlights
As the headlights are made of plastic
“glass”, use a soft cloth or cotton wool
to clean them. If this does not clean
them properly, moisten the cloth with
soapy water, then wipe clean with a soft
damp cloth or cotton wool.
Finally, carefully dry off with a soft dry
cloth.
Cleaning products containing alco -
hol must not be used.
Vehicles with a matte paint
finish
This type of paint requires certain pre-
cautions.
Do not do the following
– use wax-based products (polishing);
– rub hard;
– wash the vehicle in a roller-type car
wash;
– wash the vehicle using a high-pres-
sure device;
– attach stickers to the paintwork (risk
of leaving marks).
y ou should do the following
Wash the vehicle by hand using plenty
of water, using a soft cloth or a gentle
sponge.
Page 167 of 220
wiper blades ......................................... (up to the end of the DU)
5.13
ENG_UD24735_3
Balais d essuie-vitres (X44 - Renault)
ENG_NU_952-4_X44_Renault_5
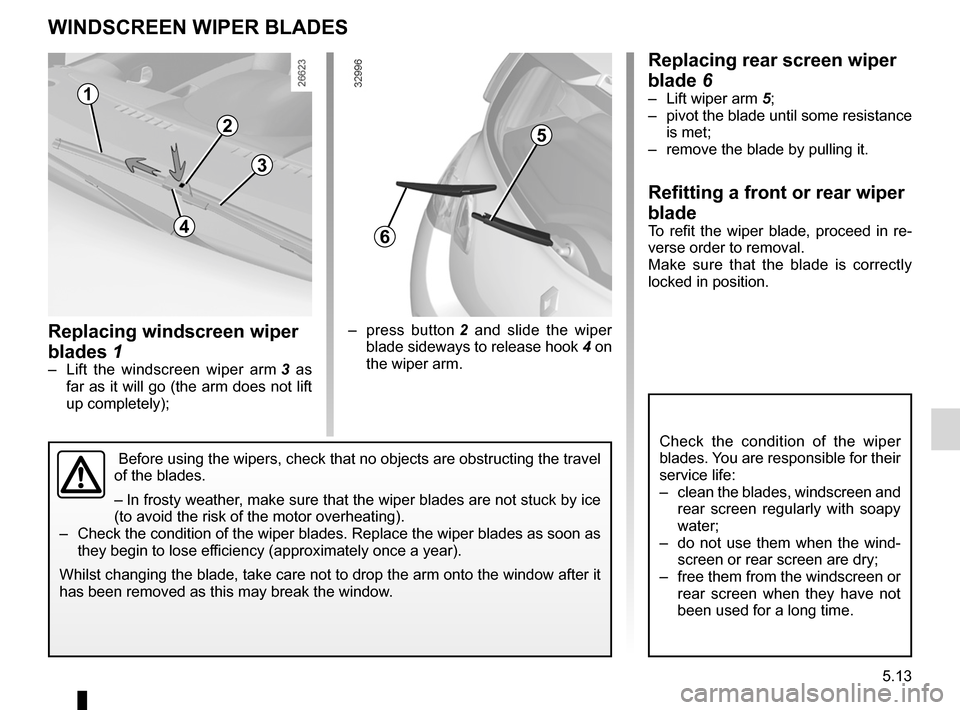
replacing windscreen wiper
blades 1
– Lift the windscreen wiper arm 3 as
far as it will go (the arm does not lift
up completely);
Wiper blades
WInDScreen WIPer BLADeS
replacing rear screen wiper
blade 6
– Lift wiper arm 5;
– pivot the blade until some resistance
is met;
– remove the blade by pulling it.
refitting a front or rear wiper
blade
To refit the wiper blade, proceed in re-
verse order to removal.
Make sure that the blade is correctly
locked in position.
– press button 2 and slide the wiper
blade sideways to release hook 4 on
the wiper arm.
Before using the wipers, check that no objects are obstructing the travel
of the blades.
– In frosty weather, make sure that the wiper blades are not stuck by ice
(to avoid the risk of the motor overheating).
– Check the condition of the wiper blades. Replace the wiper blades as soon as
they begin to lose efficiency (approximately once a year).
Whilst changing the blade, take care not to drop the arm onto the window after it
has been removed as this may break the window.
3
1
2
4
5
6
Check the condition of the wiper
blades. You are responsible for their
service life:
– clean the blades, windscreen and
rear screen regularly with soapy
water;
– do not use them when the wind-
screen or rear screen are dry;
– free them from the windscreen or
rear screen when they have not
been used for a long time.
Page 178 of 220
batterytroubleshooting ............................... (up to the end of the DU)
5.24
ENG_UD24705_3
Batterie : dépannage (X44 - Renault)
ENG_NU_952-4_X44_Renault_5
Jaune NoirNoir texte
Battery: troubleshooting
BAtter Y: troubleshooting
to avoid all risk of sparks:
– Ensure that any consumers are
switched off before disconnecting or
reconnecting the battery;
– When charging, stop the charger
before connecting or disconnecting
the battery.
– Do not place metal objects on the
battery to avoid creating a short cir-
cuit between the terminals.
connecting a battery charger
the battery charger should be com-
patible with a battery with nominal
voltage of 12 Volts.
With the engine off, it is essential to dis-
connect the leads connected to both
battery terminals , starting with the
negative terminal.
Do not disconnect the battery when the
engine is running. Follow the instruc-
tions given by the manufacturer of
the battery charger you are using. Only a fully charged and well
-main -
tained battery will have a long and
useful service life and enable you to
start the vehicle’s engine normally.
The battery must be kept clean and dry.
Have the battery’s charge status
checked regularly:
– especially if you use your vehicle for
short journeys or for frequent driving
in town;
– when the exterior temperature drops
(in winter), the charge decreases .
In winter, only use the electrical
equipment that is really necessary;
– finally, you should understand that
the charge decreases naturally as a
result of certain permanent electrical
consumers such as the clock, after-
sales accessories, etc.
When many accessories are fitted to
the vehicle, have them connected to
the + after ignition feed. In this case,
it is advisable to have your vehicle
fitted with a battery which has an in -
creased nominal capacity. Contact an
approved Dealer. If your vehicle is to
be left stationary for a relatively long
time, disconnect the battery or have it
recharged regularly, particularly during
cold weather. The equipment with a
memory, radio, etc. will then have to
be reprogrammed. The battery must
be stored in a cool dry place, protected
from frost.
Special procedures may be
required to charge some
batteries. Contact an ap -
proved Dealer.
Avoid all risk of sparks which may
cause an immediate explosion, and
charge the battery in a well-venti -
lated area. Risk of serious injury.
Page 180 of 220
remote control electric door lockingbatteries ........................................................... (current page)
battery (remote control) ......................................... (current page)
5.26
ENG_UD14469_2
Télécommande à radiofréquence : piles (X44 - E33 - X33 - Re\
nault)
ENG_NU_952-4_X44_Renault_5
Radio frequency remote control: batteries
rADIO FreQuencY reMOte cOntrOL: BAtterIeS
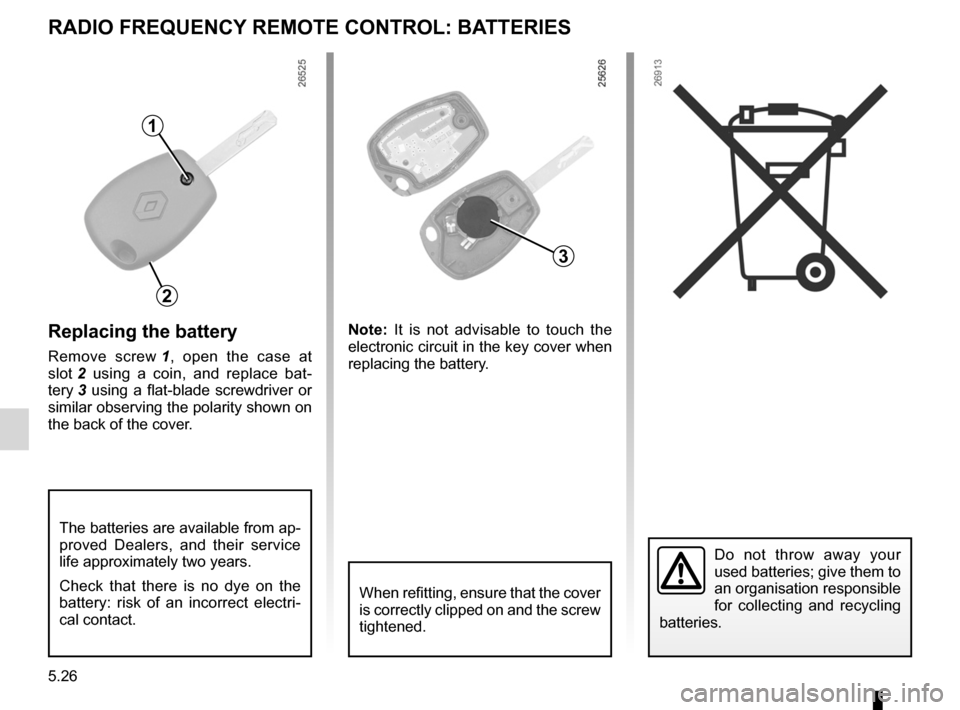
replacing the battery
Remove screw 1 , open the case at
slot 2 using a coin, and replace bat -
tery 3 using a flat-blade screwdriver or
similar observing the polarity shown on
the back of the cover. n
ote: It is not advisable to touch the
electronic circuit in the key cover when
replacing the battery.
Do not throw away your
used batteries; give them to
an organisation responsible
for collecting and recycling
batteries.
1
3
2
When refitting, ensure that the cover
is correctly clipped on and the screw
tightened.
The batteries are available from ap-
proved Dealers, and their service
life approximately two years.
Check that there is no dye on the
battery: risk of an incorrect electri -
cal contact.
Page 182 of 220
5.28
ENG_UD24741_10
Fusibles (X44 - Renault)
ENG_NU_952-4_X44_Renault_5
Jaune NoirNoir texte
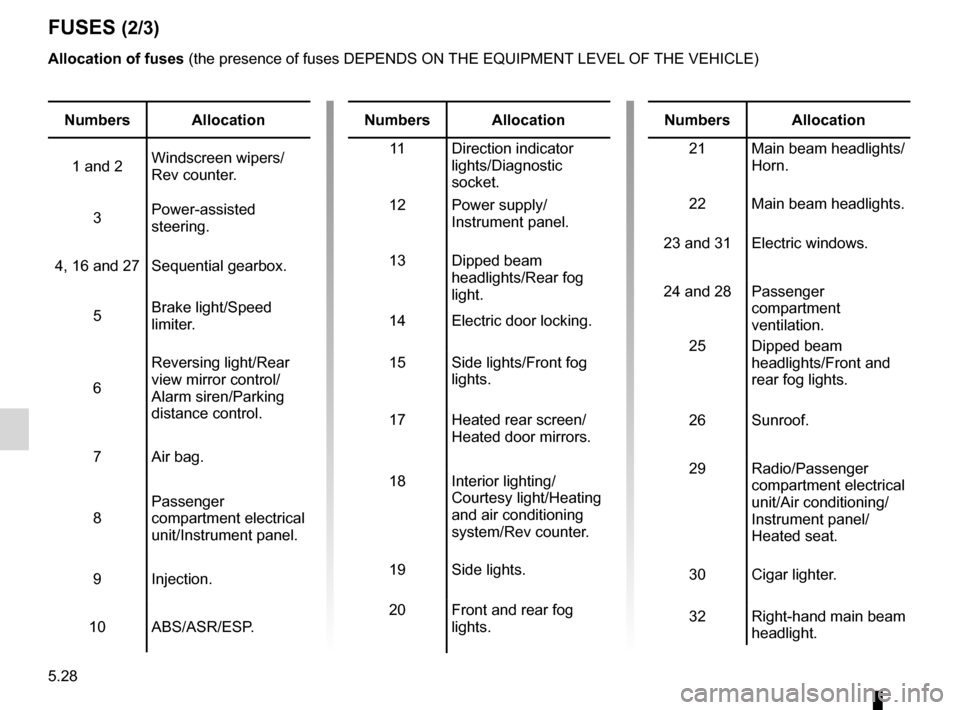
FuSeS (2/3)
numbers Allocation
1 and 2 Windscreen wipers/
Rev counter.
3 Power-assisted
steering.
4, 16 and 27 Sequential gearbox.
5 Brake light/Speed
limiter.
6 Reversing light/Rear
view mirror control/
Alarm siren/Parking
distance control.
7 Air bag.
8 Passenger
compartment electrical
unit/Instrument panel.
9 Injection.
10 ABS/ASR/ESP.numbers Allocation
11 Direction indicator
lights/Diagnostic
socket.
12 Power supply/
Instrument panel.
13 Dipped beam
headlights/Rear fog
light.
14 Electric door locking.
15 Side lights/Front fog
lights.
17 Heated rear screen/
Heated door mirrors.
18 Interior lighting/
Courtesy light/Heating
and air conditioning
system/Rev counter.
19 Side lights.
20 Front and rear fog
lights.numbers Allocation
21 Main beam headlights/
Horn.
22 Main beam headlights.
23 and 31 Electric windows.
24 and 28 Passenger
compartment
ventilation.
25 Dipped beam
headlights/Front and
rear fog lights.
26 Sunroof.
29 Radio/Passenger
compartment electrical
unit/Air conditioning/
Instrument panel/
Heated seat.
30 Cigar lighter.
32 Right-hand main beam
headlight.
Allocation of fuses
(the presence of fuses DEPENDS ON THE EQUIPMENT LEVEL OF THE VEHICLE)
Page 196 of 220
technical specifications ......................... (up to the end of the DU)
paintwork reference ......................................... (up to the end of the DU)
vehicle identification plates ................... (up to the end of the DU)
vehicle identification ............................. (up to the end of the DU)
6.2
ENG_UD29237_7
Plaques d identification (X44 - Renault)
ENG_NU_952-4_X44_Renault_6
Jaune NoirNoir texte
Vehicle identification plates
VEHICLE IDENTIFICATION PLATES (1/2)
A
B
A
10
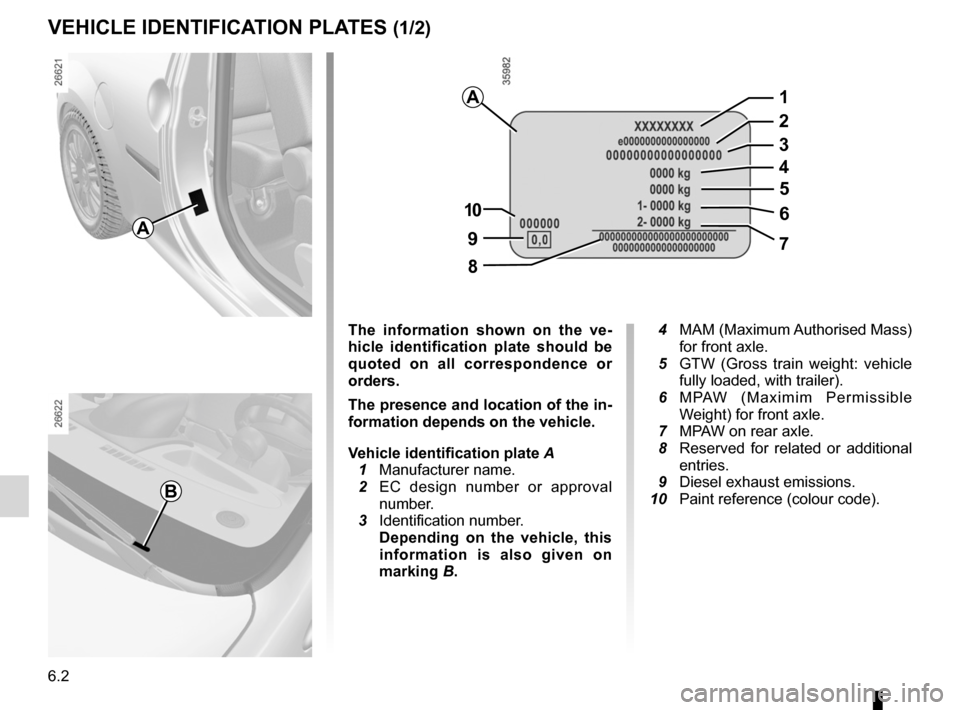
The information shown on the ve -
hicle identification plate should be
quoted on all correspondence or
orders.
The presence and location of the in-
formation depends on the vehicle.
Vehicle identification plate A
1 Manufacturer name.
2 EC design number or approval
number.
3 Identification number.
Depending on the vehicle, this
information is also given on
marking B.
4 MAM (Maximum Authorised Mass)
for front axle.
5 GTW (Gross train weight: vehicle
fully loaded, with trailer).
6 MPAW (Maximim Permissible
Weight) for front axle.
7 MPAW on rear axle.
8 Reserved for related or additional
entries.
9 Diesel exhaust emissions.
10 Paint reference (colour code).
9
8
7
6
5
4
3
2
1
Page 213 of 220
7.1
FRA_UD30806_17
Index (X44 - Renault)
ENG_NU_952-4_X44_Renault_7
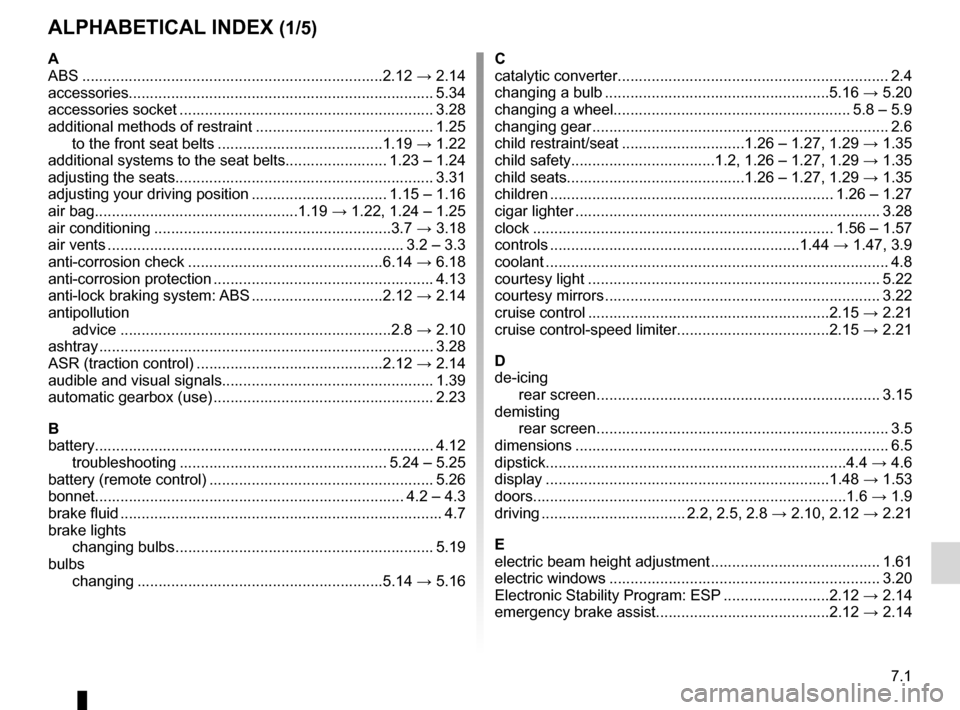
AlphAbeticAl index (1/5)
A
ABS ....................................................................... 2.12 → 2.14
accessories........................................................................ 5.34
accessories socket ............................................................ 3.28
additional methods of restraint .......................................... 1.25
to the front seat belts ....................................... 1.19 → 1.22
additional systems to the seat belts ........................1.23 – 1.24
adjusting the seats ............................................................. 3.31
adjusting your driving position ................................ 1.15 – 1.16
air bag ................................................ 1.19 → 1.22, 1.24 – 1.25
air conditioning ........................................................ 3.7 → 3.18
air vents ...................................................................... 3.2 – 3.3
anti-corrosion check .............................................. 6.14 → 6.18
anti-corrosion protection .................................................... 4.13
anti-lock braking system: ABS ...............................2.12 → 2.14
antipollution advice ................................................................ 2.8 → 2.10
ashtray ............................................................................... 3.28
ASR (traction control) ............................................ 2.12 → 2.14
audible and visual signals .................................................. 1.39
automatic gearbox (use) .................................................... 2.23
b
battery ................................................................................ 4.12
troubleshooting ................................................. 5.24 – 5.25
battery (remote control) ..................................................... 5.26
bonnet ......................................................................... 4.2 – 4.3
brake fluid ............................................................................ 4.7
brake lights changing bulbs ............................................................. 5.19
bulbs changing .......................................................... 5.14 → 5.16c
catalytic converter
................................................................ 2.4
changing a bulb ..................................................... 5.16 → 5.20
changing a wheel ........................................................ 5.8 – 5.9
changing gear ...................................................................... 2.6
child restraint/seat ............................. 1.26 – 1.27, 1.29 → 1.35
child safety .................................. 1.2, 1.26 – 1.27, 1.29 → 1.35
child seats .......................................... 1.26 – 1.27, 1.29 → 1.35
children ................................................................... 1.26 – 1.27
cigar lighter ........................................................................ 3.28
clock ....................................................................... 1.56 – 1.57
controls ........................................................... 1.44 → 1.47, 3.9
coolant ................................................................................. 4.8
courtesy light ..................................................................... 5.22
courtesy mirrors ................................................................. 3.22
cruise control ......................................................... 2.15 → 2.21
cruise control-speed limiter.................................... 2.15 → 2.21
d
de-icing rear screen ................................................................... 3.15
demisting rear screen ..................................................................... 3.5
dimensions .......................................................................... 6.5
dipstick....................................................................... 4.4 → 4.6
display ................................................................... 1.48 → 1.53
doors .......................................................................... 1.6 → 1.9
driving .................................. 2.2, 2.5, 2.8 → 2.10, 2.12 → 2.21
e
electric beam height adjustment ........................................ 1.61
electric windows ................................................................ 3.20
Electronic Stability Program: ESP .........................2.12 → 2.14
emergency brake assist ......................................... 2.12 → 2.14