seats RENAULT TWINGO 2016 3.G User Guide
[x] Cancel search | Manufacturer: RENAULT, Model Year: 2016, Model line: TWINGO, Model: RENAULT TWINGO 2016 3.GPages: 216, PDF Size: 7.15 MB
Page 36 of 216
1.30
CHILD SAFETY: fitting a child seat, general information (2/2)
In the rear side seat
A carrycot can be installed across the
vehicle and will take up at least two
seats.
Position the child with their feet nearest
the door.
Move the front seat as far forward as
possible to install a rear-facing child
seat, then move back the seat in front
as far as it will go, although without al-
lowing it to come into contact with the
child seat.
For the safety of the child in the for-
ward-facing seat, do not move the seat
in front back past the middle of the
runner, do not tilt the seatback too far
(maximum of 25°) and raise the seat as
much as possible.
In all situations, remove the rear head-
rests (refer to the information on the
“Rear headrests” in Section 3). This
must be done before fitting the child
seat.
Check that the forward-facing child seat
is resting against the back of the vehi-
cle seat.
Fit the child seat in a rear
seat wherever possible.
Page 37 of 216
1.31
CHILD SAFETY: attachment by seat belt (1/2)
RISK OF DEATH OR
SERIOUS INJURY: Before
installing a child seat on the
front passenger seat, check
that the airbag has been deacti-
vated (please refer to “Child safety:
front passenger airbag deactivation
and activation” in Section 1).
Using a child safety system
which is not approved for
this vehicle will not correctly
protect the baby or child.
They risk serious or even fatal injury.
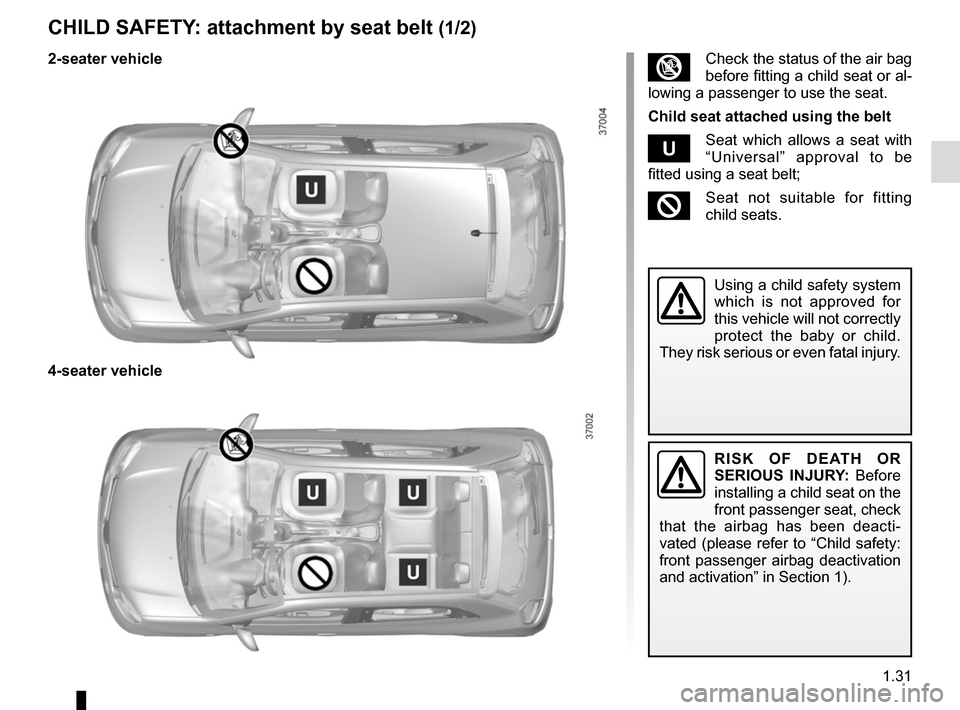
³Check the status of the air bag
before fitting a child seat or al-
lowing a passenger to use the seat.
Child seat attached using the belt
¬Seat which allows a seat with
“Universal” approval to be
fitted using a seat belt;
²Seat not suitable for fitting
child seats.
2-seater vehicle
4-seater vehicle
Page 38 of 216
1.32
CHILD SAFETY: attachment by seat belt (2/2)
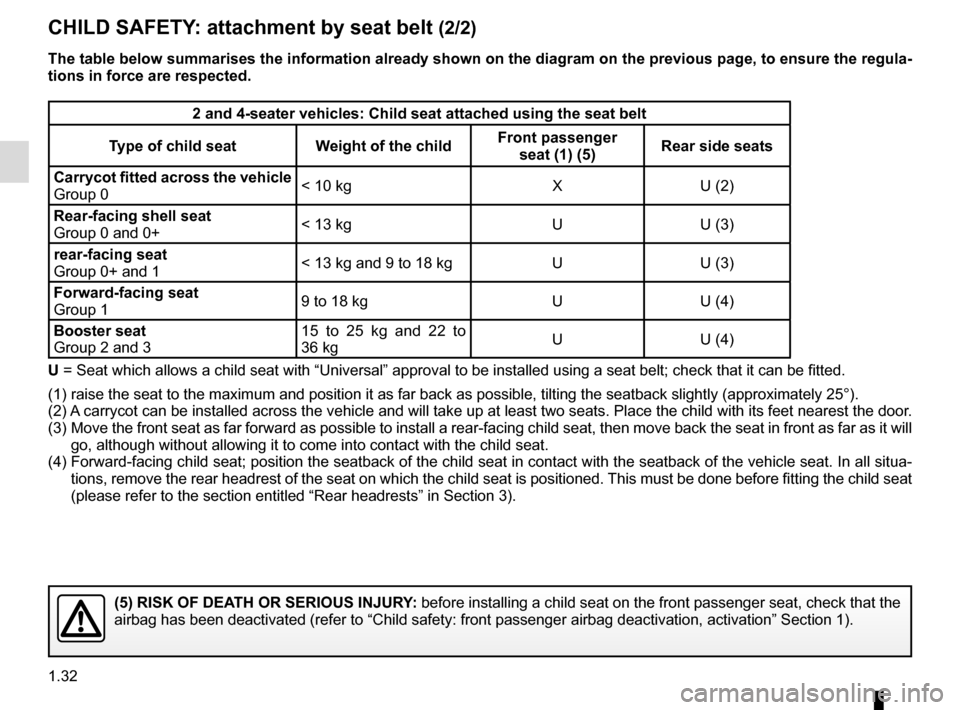
The table below summarises the information already shown on the diagram \
on the previous page, to ensure the regula-
tions in force are respected.
2 and 4-seater vehicles: Child seat attached using the seat belt
Type of child seat Weight of the child Front passenger
seat (1) (5) Rear side seats
Carrycot fitted across the vehicle
Group 0 < 10 kg X U (2)
Rear-facing shell seat
Group 0 and 0+ < 13 kg U U (3)
rear-facing seat
Group 0+ and 1 < 13 kg and 9 to 18 kg U U (3)
Forward-facing seat
Group 1 9 to 18 kg U U (4)
Booster seat
Group 2 and 3 15 to 25 kg and 22 to
36 kg
U U (4)
U = Seat which allows a child seat with “Universal” approval to be ins\
talled using a seat belt; check that it can be fitted.
(1) raise the seat to the maximum and position it as far back as possi\
ble, tilting the seatback slightly (approximately 25°).
(2) A carrycot can be installed across the vehicle and will take up at least \
two seats. Place the child with its feet nearest the d oor.
(3) Move the front seat as far forward as possible to install a rear-facing \
child seat, then move back the seat in front as far as it will
go, although without allowing it to come into contact with the child sea\
t.
(4) Forward-facing child seat; position the seatback of the child seat in co\
ntact with the seatback of the vehicle seat. In all sit ua-
tions, remove the rear headrest of the seat on which the child seat is p\
ositioned. This must be done before fitting the child s eat
(please refer to the section entitled “Rear headrests” in Section\
3).
(5) RISK OF DEATH OR SERIOUS INJURY: before installing a child seat on the front passenger seat, check that \
the
airbag has been deactivated (refer to “Child safety: front passenger\
airbag deactivation, activation” Section 1).
Page 39 of 216
1.33
CHILD SAFETY: attachment using the ISOFIX system (1/3)
RISK OF DEATH OR
SERIOUS INJURY: Before
installing a child seat on the
front passenger seat, check
that the airbag has been deacti-
vated (please refer to “Child safety:
front passenger airbag deactivation
and activation” in Section 1).
Using a child safety system
which is not approved for
this vehicle will not correctly
protect the baby or child.
They risk serious or even fatal injury.
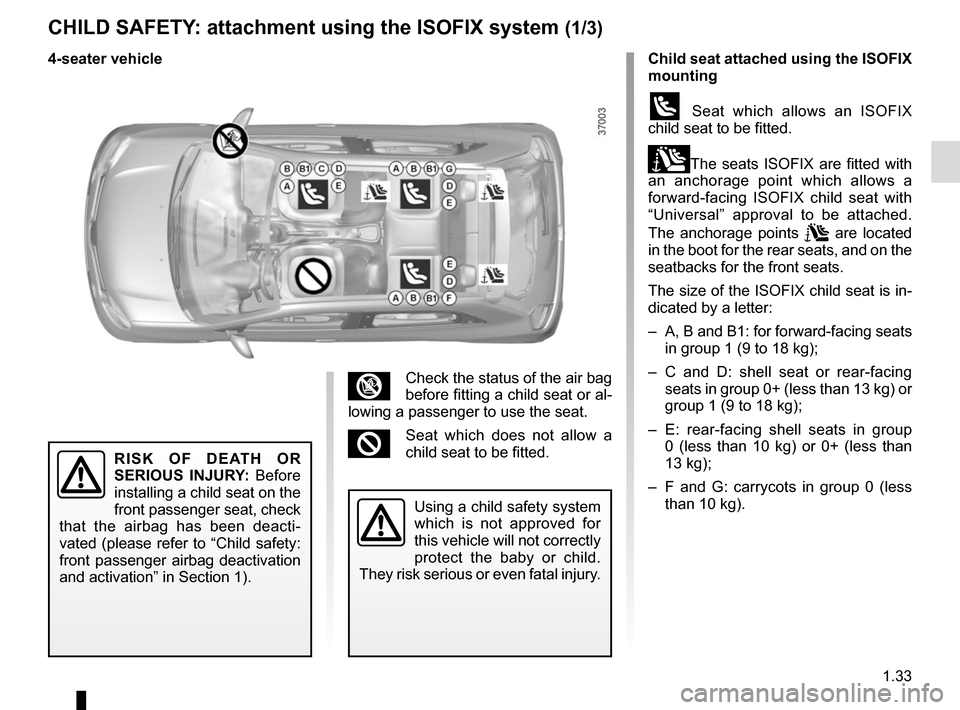
³Check the status of the air bag
before fitting a child seat or al-
lowing a passenger to use the seat.
²Seat which does not allow a
child seat to be fitted.
4-seater vehicle Child seat attached using the
ISOFIX
mounting
ü Seat which allows an ISOFIX
child seat to be fitted.
±The seats ISOFIX are fitted with
an anchorage point which allows a
forward-facing ISOFIX child seat with
“Universal” approval to be attached.
The anchorage points
are located
in the boot for the rear seats, and on the
seatbacks for the front seats.
The size of the ISOFIX child seat is in-
dicated by a letter:
– A, B and B1: for forward-facing seats in group 1 (9 to 18 kg);
– C and D: shell seat or rear-facing seats in group 0+ (less than 13 kg) or
group 1 (9 to 18 kg);
– E: rear-facing shell seats in group 0 (less than 10 kg) or 0+ (less than
13 kg);
– F and G: carrycots in group 0 (less than 10 kg).
Page 40 of 216
1.34
CHILD SAFETY: attachment using the ISOFIX system (2/3)
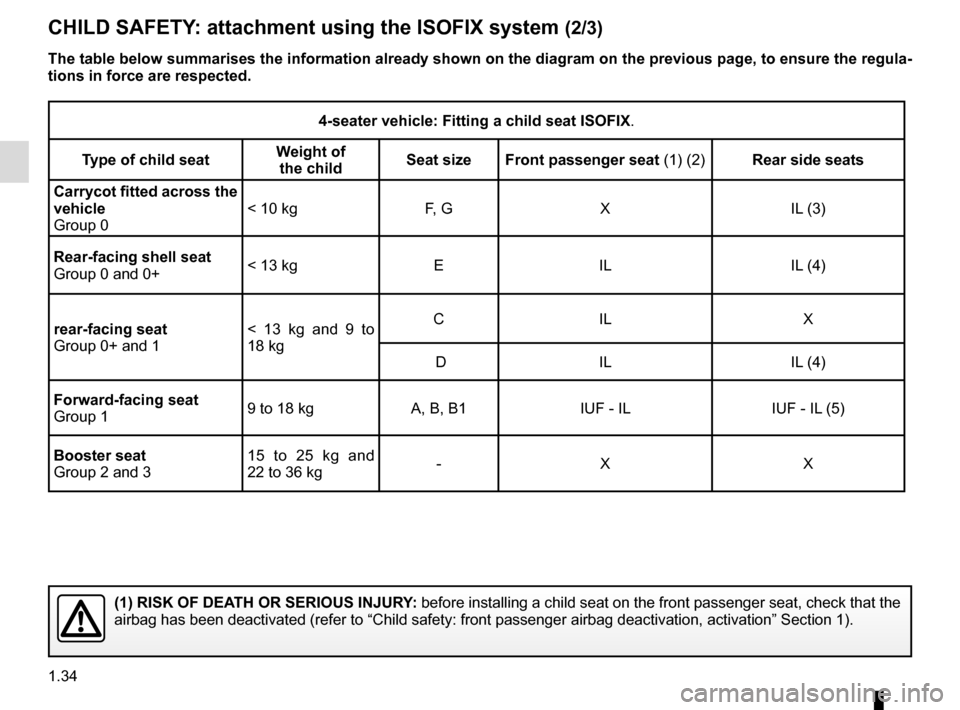
The table below summarises the information already shown on the diagram \
on the previous page, to ensure the regula-
tions in force are respected.
4-seater vehicle: Fitting a child seat ISOFIX.
Type of child seat Weight of
the child Seat size Front passenger seat (1) (2)
Rear side seats
Carrycot fitted across the
vehicle
Group 0 < 10 kg
F, GX IL (3)
Rear-facing shell seat
Group 0 and 0+ < 13 kg
EIL IL (4)
rear-facing seat
Group 0+ and 1 < 13 kg and 9 to
18 kgCI
L X
D IL IL (4)
Forward-facing seat
Group 1 9 to 18 kg
A, B, B1 IUF - IL IUF - IL (5)
Booster seat
Group 2 and 3 15 to 25 kg and
22 to 36 kg
-X X
(1) RISK OF DEATH OR SERIOUS INJURY: before installing a child seat on the front passenger seat, check that \
the
airbag has been deactivated (refer to “Child safety: front passenger\
airbag deactivation, activation” Section 1).
Page 41 of 216
1.35
CHILD SAFETY: attachment using the ISOFIX system (3/3)
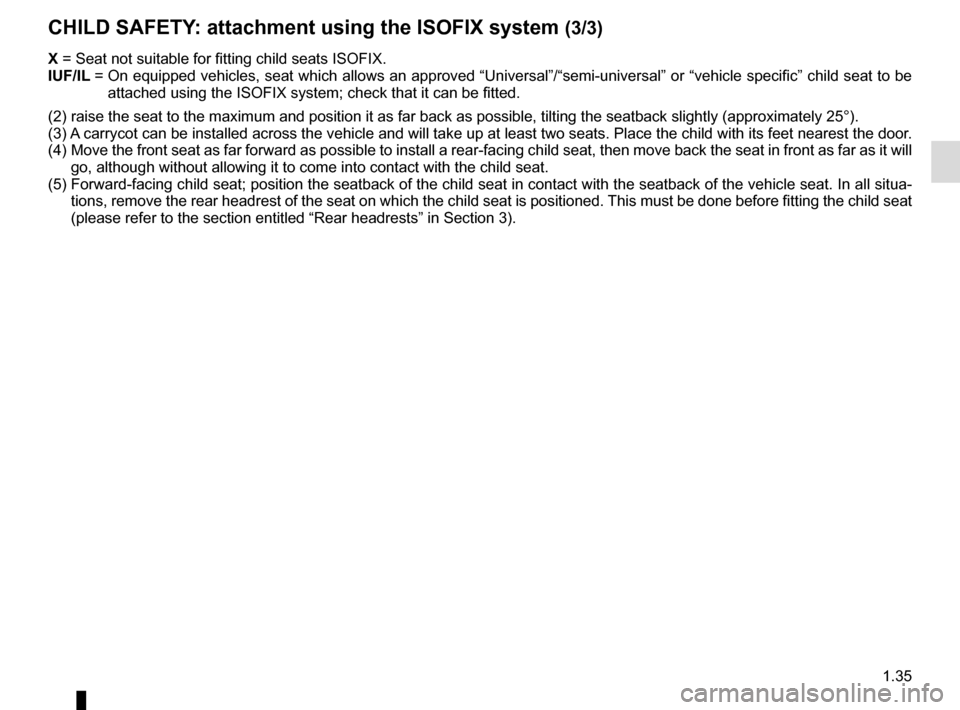
X = Seat not suitable for fitting child seats ISOFIX.
IUF/IL = On equipped vehicles, seat which allows an approved “Universal”/“\
semi-universal” or “vehicle specific” child seat to be
attached using the ISOFIX system; check that it can be fitted.
(2) raise the seat to the maximum and position it as far back as possi\
ble, tilting the seatback slightly (approximately 25°).
(3) A carrycot can be installed across the vehicle and will take up at least \
two seats. Place the child with its feet nearest the d oor.
(4) Move the front seat as far forward as possible to install a rear-facing \
child seat, then move back the seat in front as far as it will
go, although without allowing it to come into contact with the child sea\
t.
(5) Forward-facing child seat; position the seatback of the child seat in co\
ntact with the seatback of the vehicle seat. In all sit ua-
tions, remove the rear headrest of the seat on which the child seat is p\
ositioned. This must be done before fitting the child s eat
(please refer to the section entitled “Rear headrests” in Section\
3).
Page 68 of 216
1.62
HEADLIGHT BEAM ADJUSTMENT (1/2)
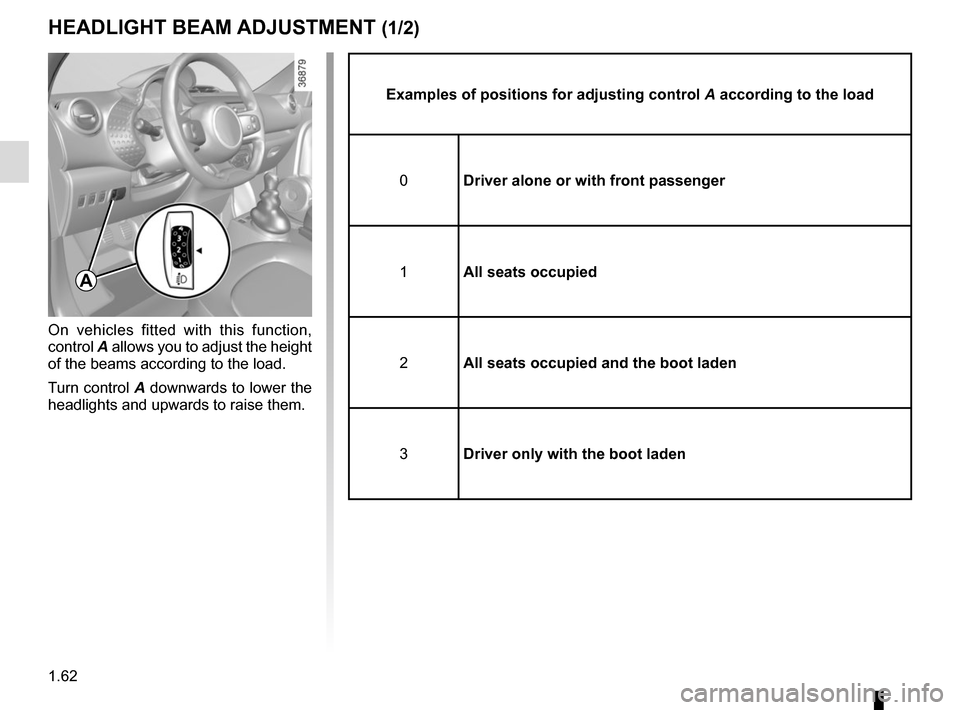
On vehicles fitted with this function,
control A allows you to adjust the height
of the beams according to the load.
Turn control A downwards to lower the
headlights and upwards to raise them.
Examples of positions for adjusting control A according to the load
0 Driver alone or with front passenger
1 All seats occupied
2 All seats occupied and the boot laden
3 Driver only with the boot laden
A
Page 134 of 216
3.22
REAR BENCH SEAT
B
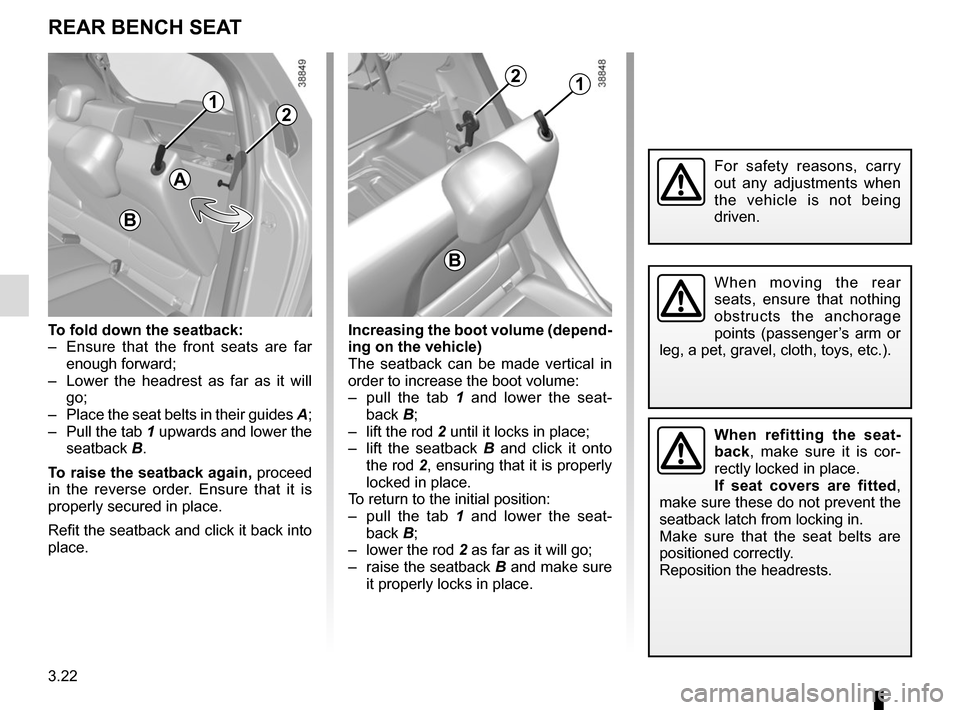
To fold down the seatback:
– Ensure that the front seats are far enough forward;
– Lower the headrest as far as it will go;
– Place the seat belts in their guides A;
– Pull the tab 1 upwards and lower the seatback B.
To raise the seatback again, proceed
in the reverse order. Ensure that it is
properly secured in place.
Refit the seatback and click it back into
place. Increasing the boot volume (depend-
ing on the vehicle)
The seatback can be made vertical in
order to increase the boot volume:
– pull the tab 1 and lower the seat-
back B;
– lift the rod 2 until it locks in place;
– lift the seatback B and click it onto
the rod 2, ensuring that it is properly
locked in place.
To return to the initial position:
– pull the tab 1 and lower the seat-
back B;
– lower the rod 2 as far as it will go;
– raise the seatback B and make sure it properly locks in place.
For safety reasons, carry
out any adjustments when
the vehicle is not being
driven.
When moving the rear
seats, ensure that nothing
obstructs the anchorage
points (passenger’s arm or
leg, a pet, gravel, cloth, toys, etc.).
When refitting the seat-
back, make sure it is cor-
rectly locked in place.
If seat covers are fitted ,
make sure these do not prevent the
seatback latch from locking in.
Make sure that the seat belts are
positioned correctly.
Reposition the headrests.
1
A
2
12
B
Page 138 of 216
3.26
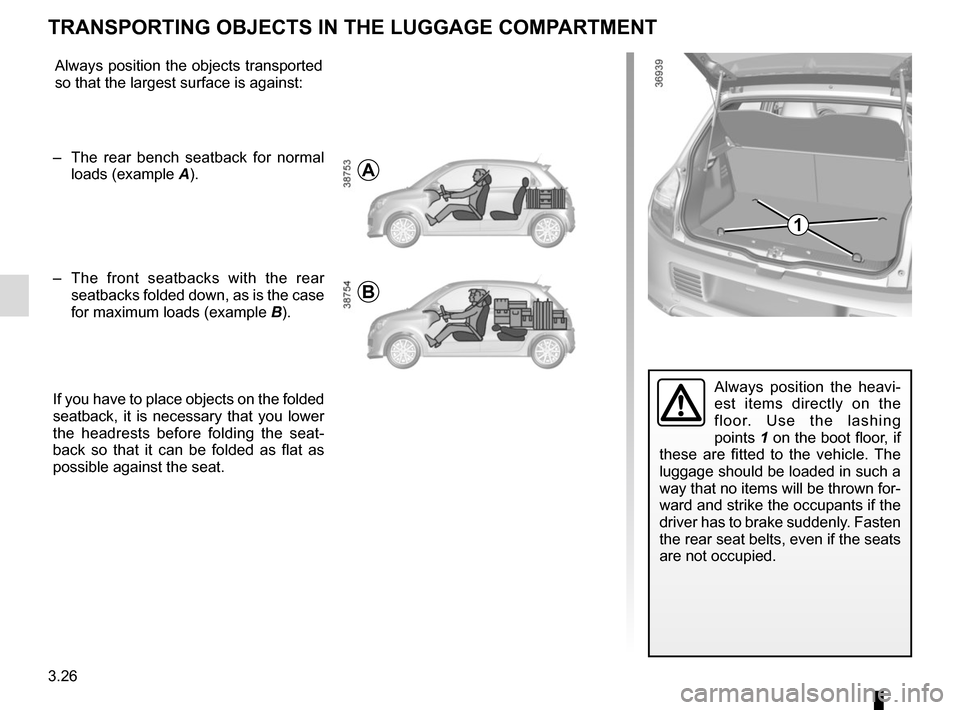
Always position the heavi-
est items directly on the
floor. Use the lashing
points 1 on the boot floor, if
these are fitted to the vehicle. The
luggage should be loaded in such a
way that no items will be thrown for-
ward and strike the occupants if the
driver has to brake suddenly. Fasten
the rear seat belts, even if the seats
are not occupied.
TRANSPORTING OBJECTS IN THE LUGGAGE COMPARTMENT
Always position the objects transported
so that the largest surface is against:
– The rear bench seatback for normal loads (example A).
– The front seatbacks with the rear
seatbacks folded down, as is the case
for maximum loads (example B).
If you have to place objects on the folded
seatback, it is necessary that you lower
the headrests before folding the seat-
back so that it can be folded as flat as
possible against the seat.
B
A
1
Page 156 of 216
4.16
Glass instrument panel(e.g.: instrument panel, clock, exterior
temperature display, radio display, mul-
timedia or multifunction display etc.)
Use a soft cloth (or cotton wool).
If this does not clean them properly,
use a soft cloth (or cotton wool) slightly
moistened with soapy water and then
wipe clean with another soft damp cloth
or cotton wool.
Finally, carefully dry off with a soft dry
cloth.
Do not use products containing alco-
hol and/or spray fluids on the area.
Seat belts
These must be kept clean.
Use products selected by our Technical
Department (Approved outlets) or
warm, soapy water and a sponge and
wipe with a dry cloth.
Detergents or dyes must not be used
under any circumstances.
INTERIOR TRIM MAINTENANCE (1/2)
Textiles (seats, door trim, etc)
Vacuum-clean the textiles regularly.
Liquid stain
Use soapy water.
Dab lightly (never rub) with a soft cloth,
rinse and remove the excess.
Solid or pasty stain
Carefully remove the excess solid or
pasty material immediately with a
spatula (working from the edges to the
centre to avoid spreading the stain).
Clean as for a liquid stain.
Special instructions for sweets or
chewing gum
Put an ice cube on the stain to solidify
it, then proceed as for a solid stain.
A well-maintained vehicle will last
longer. It is therefore recommended to
maintain the interior of the vehicle regu-
larly.
A stain should always be dealt with
swiftly.
Whatever type of stain is on the trim,
use
cold (or warm) soapy water with
natural soap.
Detergents (washing-up liquid, pow-
dered products, alcohol-based prod-
ucts) should not be used.
Use a soft cloth.
Rinse and soak up the excess.
For further recommendations for
maintaining the interior, and/or for
any unsatisfactory results, please
see an authorised dealer.