RENAULT TWIZY 2018 Repair Manual
Manufacturer: RENAULT, Model Year: 2018, Model line: TWIZY, Model: RENAULT TWIZY 2018Pages: 118, PDF Size: 2.51 MB
Page 61 of 118
3.3
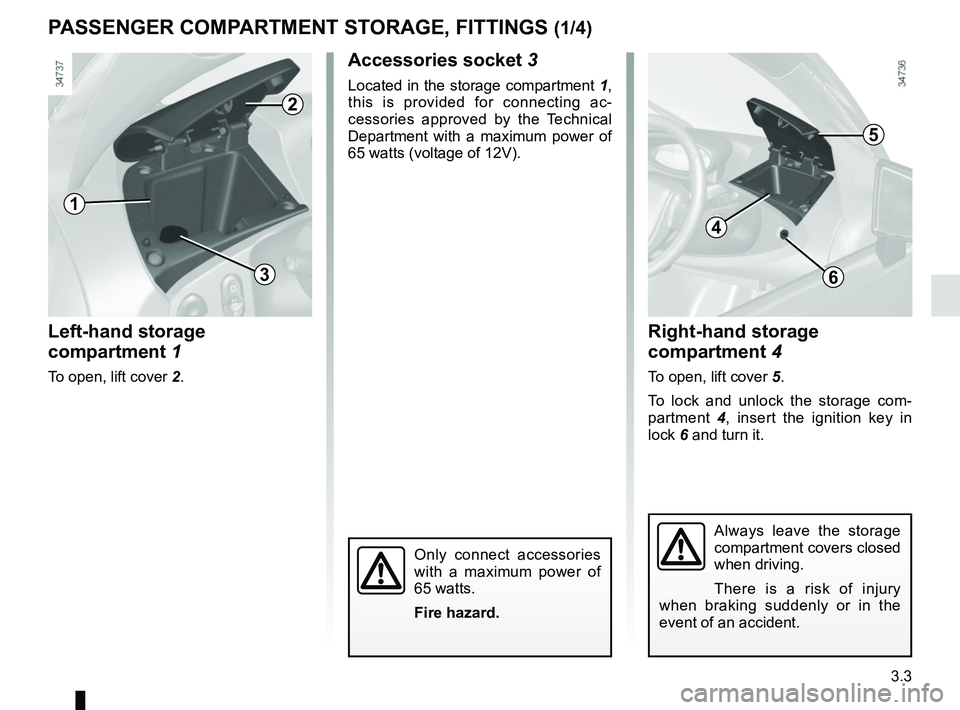
Left-hand storage
compartment 1
To open, lift cover 2.
Right-hand storage
compartment 4
To open, lift cover 5.
To lock and unlock the storage com-
partment 4, insert the ignition key in
lock 6 and turn it.
PASSENGER COMPARTMENT STORAGE, FITTINGS (1/4)
Accessories socket 3
Located in the storage compartment 1,
this is provided for connecting ac-
cessories approved by the Technical
Department with a maximum power of
65 watts (voltage of 12V).
Only connect accessories
with a maximum power of
65 watts.
Fire hazard.
1
2
4
5
63
Always leave the storage
compartment covers closed
when driving.
There is a risk of injury
when braking suddenly or in the
event of an accident.
Page 62 of 118
3.4
PASSENGER COMPARTMENT STORAGE, FITTINGS (2/4)
Ensure that no hard, heavy
or pointed objects are
placed in the “open” storage
compartments in such a
way that they may fall onto passen-
gers during sudden turning, braking
or in the event of an accident.
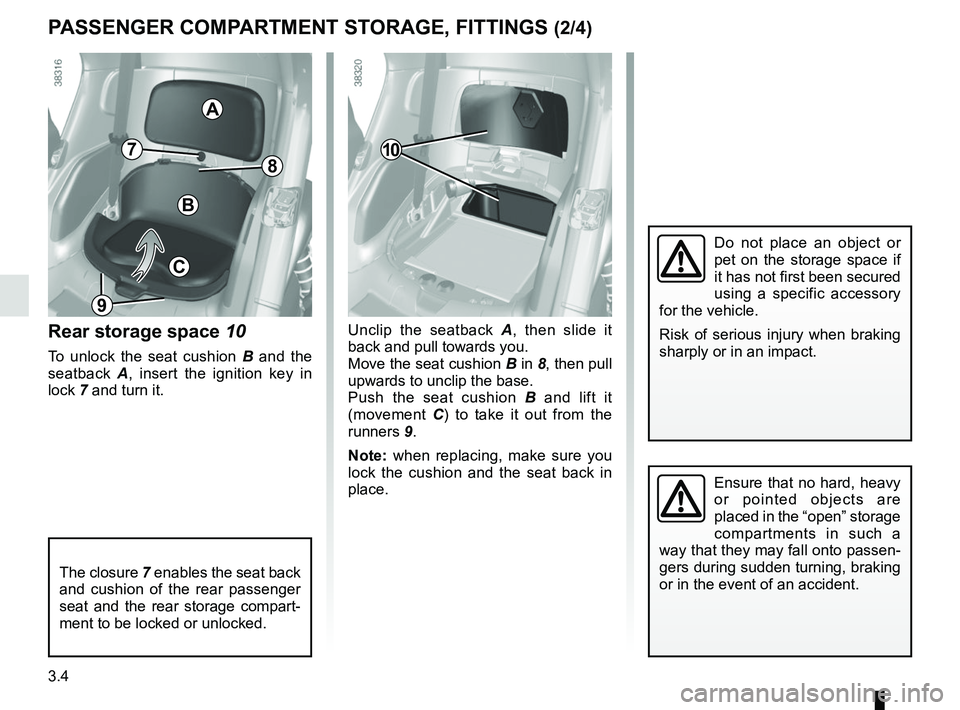
Rear storage space 10
To unlock the seat cushion B and the
seatback A, insert the ignition key in
lock 7 and turn it. Unclip the seatback
A, then slide it
back and pull towards you.
Move the seat cushion B in 8, then pull
upwards to unclip the base.
Push the seat cushion B and lift it
(movement C) to take it out from the
runners 9.
Note: when replacing, make sure you
lock the cushion and the seat back in
place.
The closure 7 enables the seat back
and cushion of the rear passenger
seat and the rear storage compart-
ment to be locked or unlocked.
B
8
A
10
Do not place an object or
pet on the storage space if
it has not first been secured
using a specific accessory
for the vehicle.
Risk of serious injury when braking
sharply or in an impact.
9
7
C
Page 63 of 118
3.5
PASSENGER COMPARTMENT STORAGE, FITTINGS (3/4)
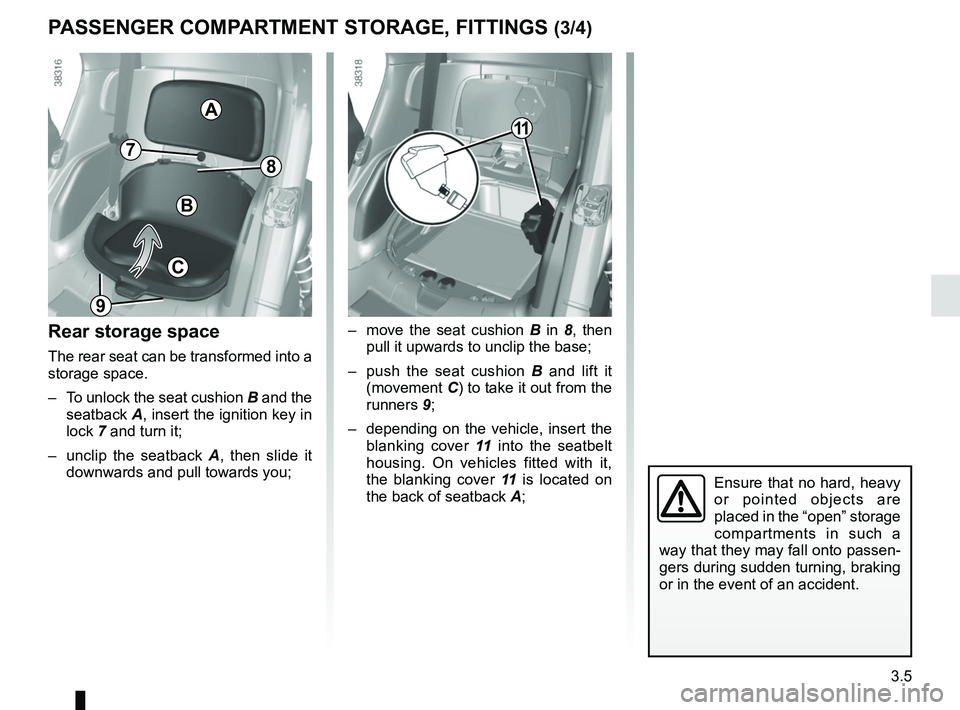
Rear storage space
The rear seat can be transformed into a
storage space.
– To unlock the seat cushion B and the
seatback A, insert the ignition key in
lock 7 and turn it;
– unclip the seatback A, then slide it
downwards and pull towards you;
Ensure that no hard, heavy
or pointed objects are
placed in the “open” storage
compartments in such a
way that they may fall onto passen-
gers during sudden turning, braking
or in the event of an accident.
– move the seat cushion B in 8 , then
pull it upwards to unclip the base;
– push the seat cushion B and lift it
(movement C) to take it out from the
runners 9;
– depending on the vehicle, insert the blanking cover 11 into the seatbelt
housing. On vehicles fitted with it,
the blanking cover 11 is located on
the back of seatback A;
11
B
8
A
9
7
C
Page 64 of 118
3.6
Driver’s responsibility
Never use the storage
space as a booster seat for
a person or pet. Otherwise,
this could place your child or pet in
danger, or endanger the driver, in
the event of hard braking or impact.
Risk of death or serious injury.
Driver’s responsibility
Do not place any objects
in the storage space if this
space is not secured using
the specific accessory for your ve-
hicle.
Please see an authorised dealer.
Risk of serious injury when braking
sharply or in heavy impacts.
PASSENGER COMPARTMENT STORAGE, FITTINGS (4/4)
B
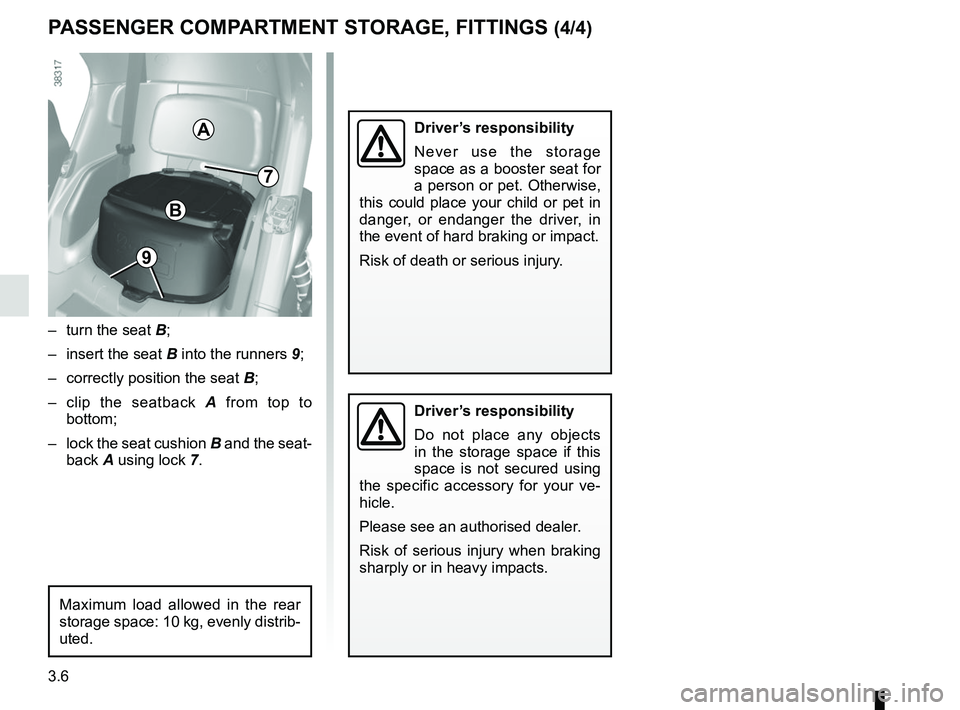
– turn the seat B;
– insert the seat B into the runners 9;
– correctly position the seat B;
– clip the seatback A from top to
bottom;
– lock the seat cushion B and the seat-
back A using lock 7.
7
A
9
Maximum load allowed in the rear
storage space: 10 kg, evenly distrib-
uted.
Page 65 of 118
4.1
Section 4: Maintenance
Levels . . . . . . . . . . . . . . . . . . . . . . . . . . . . . . . . . . . .\
. . . . . . . . . . . . . . . . . . . . . . . . . . . . . . . . . . . . 4.2Brake fluid . . . . . . . . . . . . . . . . . . . . . . . . . . . . . . . . . . . .\
. . . . . . . . . . . . . . . . . . . . . . . . . . . 4.2
windscreen washer reservoir . . . . . . . . . . . . . . . . . . . . . . . . . . . . . . . . . . . . \
. . . . . . . . . . . . . 4.3
12 volt battery . . . . . . . . . . . . . . . . . . . . . . . . . . . . . . . . . . . .\
. . . . . . . . . . . . . . . . . . . . . . . . . . . . . . 4.4
Bodywork maintenance . . . . . . . . . . . . . . . . . . . . . . . . . . . . . . . . . . . . \
. . . . . . . . . . . . . . . . . . . . . . . 4.6
Interior trim maintenance . . . . . . . . . . . . . . . . . . . . . . . . . . . . . . . . . . . . \
. . . . . . . . . . . . . . . . . . . . . . 4.8
Page 66 of 118
4.2
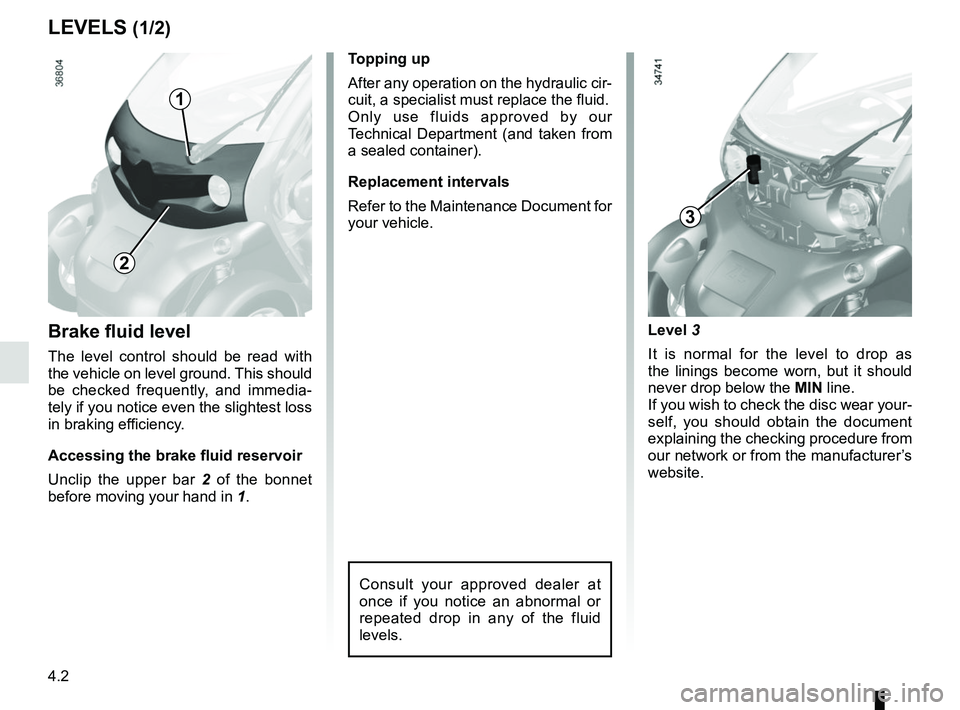
Brake fluid level
The level control should be read with
the vehicle on level ground. This should
be checked frequently, and immedia-
tely if you notice even the slightest loss
in braking efficiency.
Accessing the brake fluid reservoir
Unclip the upper bar 2 of the bonnet
before moving your hand in 1.Topping up
After any operation on the hydraulic cir-
cuit, a specialist must replace the fluid.
Only use fluids approved by our
Technical Department (and taken from
a sealed container).
Replacement intervals
Refer to the Maintenance Document for
your vehicle.
Consult your approved dealer at
once if you notice an abnormal or
repeated drop in any of the fluid
levels.
LEVELS (1/2)
Level 3
It is normal for the level to drop as
the linings become worn, but it should
never drop below the
MIN line.
If you wish to check the disc wear your-
self, you should obtain the document
explaining the checking procedure from
our network or from the manufacturer’s
website.
1
2
3
Page 67 of 118
4.3
4
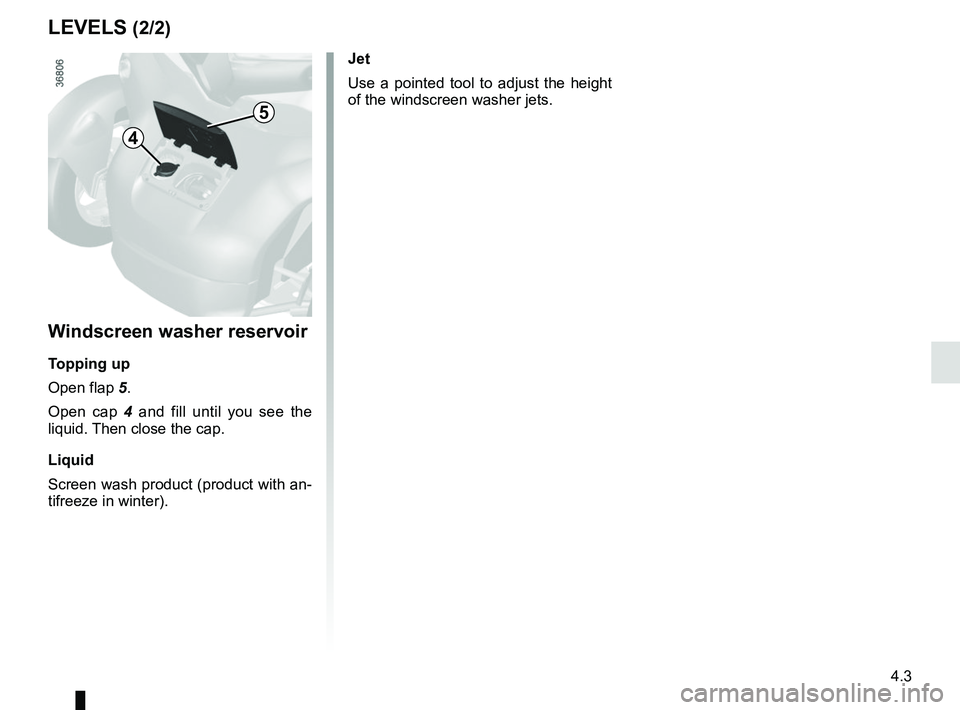
Windscreen washer reservoir
Topping up
Open flap 5.Open cap 4 and fill until you see the
liquid. Then close the cap.
Liquid
Screen wash product (product with an-
tifreeze in winter).
LEVELS (2/2)
Jet
Use a pointed tool to adjust the height
of the windscreen washer jets.
5
Page 68 of 118
4.4
12V BATTERY (1/2)
The secondary battery is a 12 V battery:
this supplies the energy required to op-
erate vehicle equipment (lights, wind-
screen wipers, audio system, etc) and
certain safety systems, such as ABS.
For your safety and the
proper operation of the
vehicle’s electrical equip-
ment (lights, windscreen
wipers, etc.), any work on the se-
condary 12V battery (removal, dis-
connection, etc.) must be carried
out by a specialist.
Risk of serious burns or electric
shocks.
Respect categorically the replace-
ment intervals (without exceeding
them) as stated in the maintenance
document.
The battery is a specific type.
Please ensure it is replaced with the
same type.
Contact an Authorised Dealer.
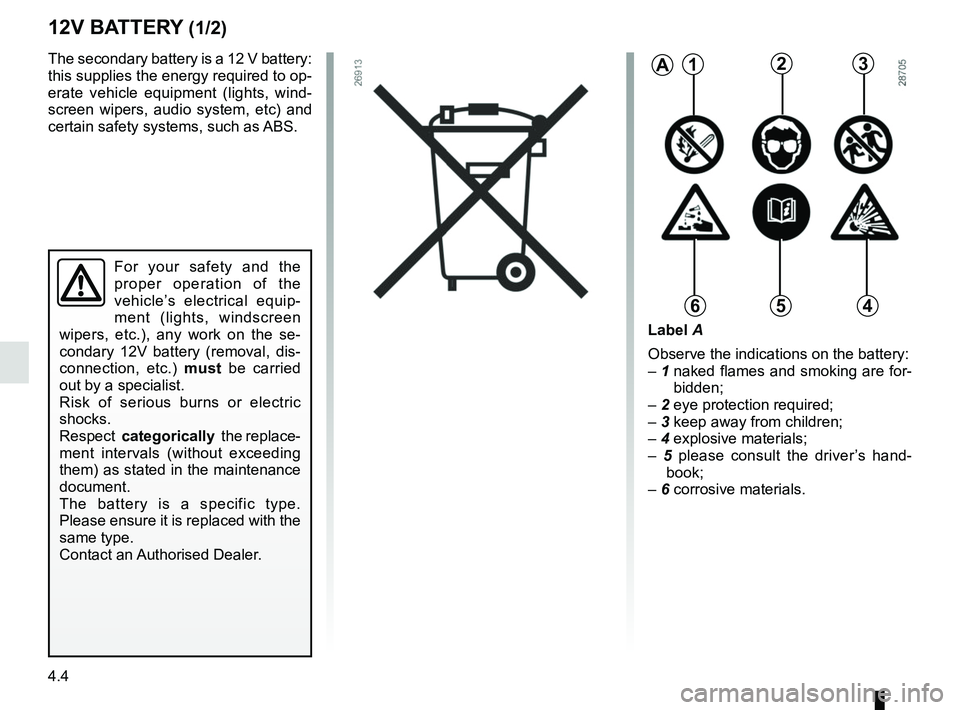
A123
456
Label A
Observe the indications on the battery:
– 1 naked flames and smoking are for-
bidden;
– 2 eye protection required;
– 3 keep away from children;
– 4 explosive materials;
– 5 please consult the driver’s hand-
book;
– 6 corrosive materials.
Page 69 of 118
4.5
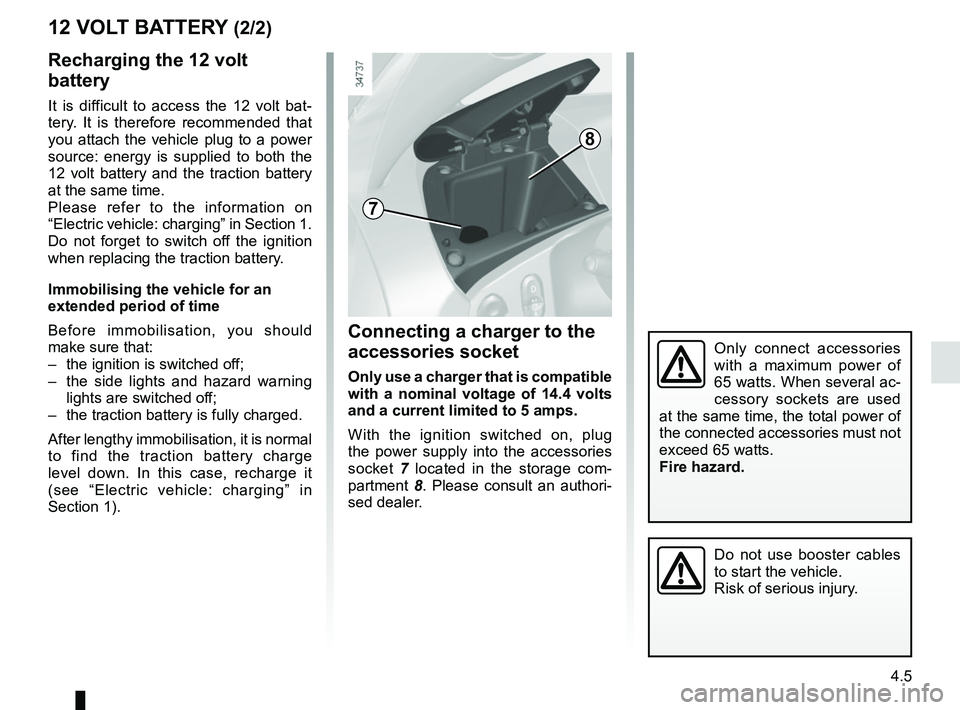
12 VOLT BATTERY (2/2)Connecting a charger to the
accessories socket
Only use a charger that is compatible
with a nominal voltage of 14.4 volts
and a current limited to 5 amps.
With the ignition switched on, plug
the power supply into the accessories
socket 7 located in the storage com-
partment 8. Please consult an authori-
sed dealer.
Recharging the 12 volt
battery
It is difficult to access the 12 volt bat-
tery. It is therefore recommended that
you attach the vehicle plug to a power
source: energy is supplied to both the
12 volt battery and the traction battery
at the same time.
Please refer to the information on
“Electric vehicle: charging” in Section 1.
Do not forget to switch off the ignition
when replacing the traction battery.
Immobilising the vehicle for an
extended period of time
Before immobilisation, you should
make sure that:
– the ignition is switched off;
– the side lights and hazard warning lights are switched off;
– the traction battery is fully charged.
After lengthy immobilisation, it is normal
to find the traction battery charge
level down. In this case, recharge it
(see “Electric vehicle: charging” in
Section 1).
Do not use booster cables
to start the vehicle.
Risk of serious injury.
8
7
Only connect accessories
with a maximum power of
65 watts. When several ac-
cessory sockets are used
at the same time, the total power of
the connected accessories must not
exceed 65 watts.
Fire hazard.
Page 70 of 118
4.6
BODYWORK MAINTENANCE (1/2)
A well-maintained vehicle will last
longer. It is therefore recommended to
maintain the exterior of the vehicle reg-
ularly.
Some parts may look different over time
(e.g.: bleaching, etc.)
Your vehicle has been treated with very
effective anti-corrosion products. It is
nevertheless subject to various outside
influences.
Corrosive agents in the atmosphere
– atmospheric pollution (built-up and
industrial areas);
– saline atmospheres (near the sea,
particularly in hot weather);
– seasonal and damp weather condi-
tions (e.g. road salt in winter, water
from road cleaners, etc.).
Minor impacts
Abrasive action
Dust and sand in the air, mud, road grit
thrown up by other vehicles, etc.
You should take a number of minor pre-
cautions in order to safeguard your ve-
hicle against such risks.You should
Wash your car frequently, with the
engine off , with cleaning products rec-
ommended by the manufacturer (never
use abrasive products). Rinse thor-
oughly beforehand with a jet:
– spots of tree resin and industrial
grime;
– mud in the wheel arches and under-
neath the body which forms damp
patches;
– bird droppings , which cause a
chemical reaction with the paint that
rapidly discolours paintwork and
may even cause the paint to peel
off;
wash the vehicle immediately to
remove these marks since it is im-
possible to remove them by polish-
ing;
– salt, particularly in the wheel arches
and underneath the body after driv-
ing in areas where the roads have
been gritted.
Remove any plant matter (resin, leaves,
etc.) from the vehicle regularly. Respect local regulations about wash-
ing vehicles (e.g. do not wash your ve-
hicle on a public highway).
Observe the vehicle stopping distances
when driving on gravelled surfaces to
prevent paint damage.
Repair, or have repaired quickly, areas
where the paint has been damaged, to
prevent corrosion spreading.
Remember to visit the body shop pe-
riodically in order to maintain your
anti-corrosion warranty. Refer to the
Maintenance Document.
If it is necessary to clean mechani-
cal components, hinges, etc., spray
them with products approved by our
Technical Department to protect them
after they have been cleaned.
We have selected special products
to care for your vehicle and you can
obtain these from the manufactur-
er’s accessory outlets.