RENAULT ZOE 2016 1.G Owners Manual
Manufacturer: RENAULT, Model Year: 2016, Model line: ZOE, Model: RENAULT ZOE 2016 1.GPages: 216, PDF Size: 6.48 MB
Page 111 of 216
2.19
Regenerative braking system
When braking, the regenerative brak-
ing system can convert the energy pro-
duced by the vehicle deceleration into
electric energy.
This will recharge the 400V traction bat-
tery and gain greater vehicle range.Operating faults
– © lights up on the instrument
panel, alongside the message
“Check braking system”: braking as-
sistance is available at all times.
Under these conditions, the feel of
applying the brake pedal may be dif-
ferent.
You are recommended to apply
strong continuous pressure to the
pedal.
Please see an authorised dealer.
–
û lights up on the instrument
panel, alongside the message
“Braking system fault”: this indi-
cates a fault in the braking system.
Please call an authorised dealer.
DRIVER CORRECTION DEVICES AND AIDS (4/4)
The û warning light re-
quires you to stop immedi-
ately, for your own safety,
as soon as traffic conditions allow.
Switch off the engine and do not
restart it. Contact an Authorised
Dealer.
Page 112 of 216
2.20
The speed limiter function helps you
stay within the driving speed limit that
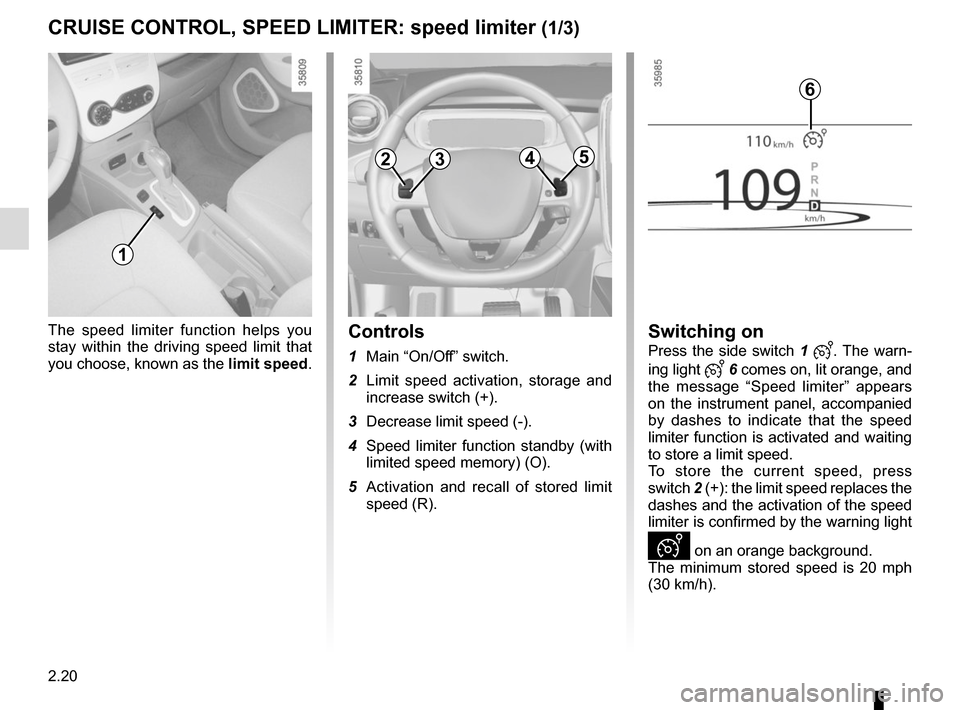
you choose, known as the limit speed.Controls
1 Main “On/Off” switch.
2 Limit speed activation, storage and increase switch (+).
3 Decrease limit speed (-).
4 Speed limiter function standby (with limited speed memory) (O).
5 Activation and recall of stored limit speed (R).
2354
Switching on
Press the side switch 1 . The warn-
ing light
6 comes on, lit orange, and
the message “Speed limiter” appears
on the instrument panel, accompanied
by dashes to indicate that the speed
limiter function is activated and waiting
to store a limit speed.
To store the current speed, press
switch 2 (+): the limit speed replaces the
dashes and the activation of the speed
limiter is confirmed by the warning light
Ð on an orange background.
The minimum stored speed is 20 mph
(30 km/h).
6
CRUISE CONTROL, SPEED LIMITER: speed limiter (1/3)
1
Page 113 of 216

2.21
Varying the limit speed
The limit speed may be changed by re-
peatedly pressing:
– switch 2 (+) to increase speed;
– switch 3 (-) to reduce speed.
The speed limiter function is
in no way linked to the brak-
ing system.
CRUISE CONTROL, SPEED LIMITER: speed limiter (2/3)
Driving
When a limited speed has been stored
and this speed is not reached, driving is
similar to driving a vehicle without the
speed limiter function.
Once you have reached the stored
speed, no effort on the accelera-
tor pedal will allow you to exceed
the programmed speed except in an
emergency (refer to information on
“Exceeding the limit speed”).
Exceeding the limit speed
It is possible to exceed the limit speed
at any time. To do this: press the accel-
erator pedal firmly and fully (beyond
the resistance point).
If the speed is exceeded, the limited
speed flashes on the instrument panel
and a beep sounds.
Then, release the accelerator: the
speed limiter function will return as
soon as you reach a speed lower than
the stored speed.
Limited speed cannot be maintained
If driving up or down a steep gradient,
the system is unable to maintain the
limit speed: the stored speed will flash
on the instrument panel information dis-
play to inform you of this situation.
2354
Page 114 of 216
2.22
CRUISE CONTROL, SPEED LIMITER: speed limiter (3/3)
Putting the function on
standby
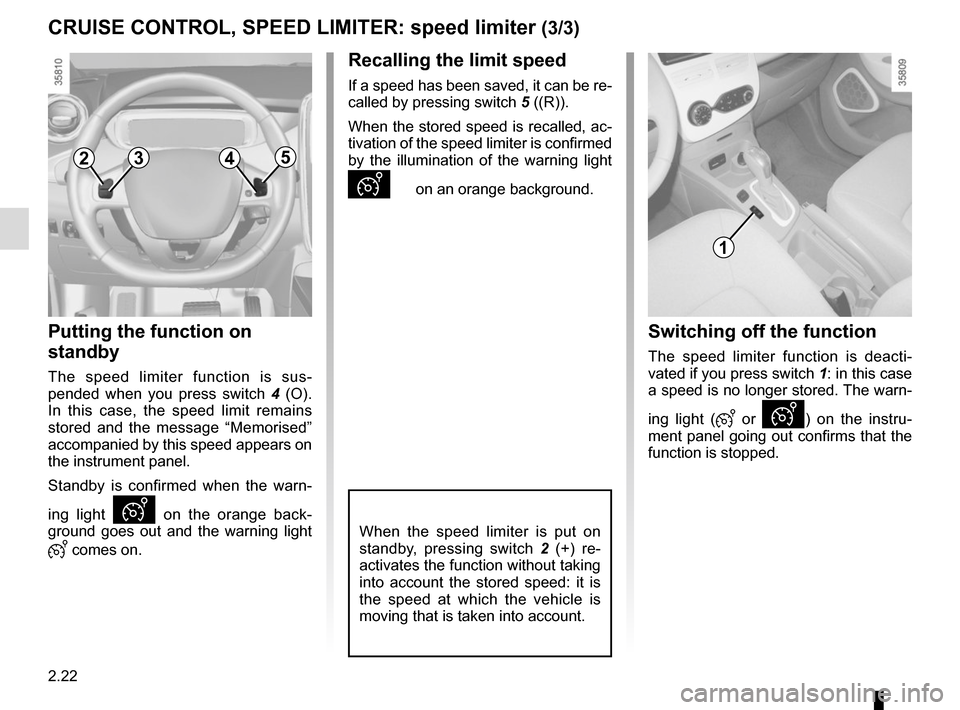
The speed limiter function is sus-
pended when you press switch 4 (O).
In this case, the speed limit remains
stored and the message “Memorised”
accompanied by this speed appears on
the instrument panel.
Standby is confirmed when the warn-
ing light
Ð on the orange back-
ground goes out and the warning light
comes on.
Recalling the limit speed
If a speed has been saved, it can be re-
called by pressing switch 5 ((R)).
When the stored speed is recalled, ac-
tivation of the speed limiter is confirmed
by the illumination of the warning light
Ð on an orange background.
When the speed limiter is put on
standby, pressing switch 2 (+) re-
activates the function without taking
into account the stored speed: it is
the speed at which the vehicle is
moving that is taken into account.
Switching off the function
The speed limiter function is deacti-
vated if you press switch 1: in this case
a speed is no longer stored. The warn-
ing light (
or Ð) on the instru-
ment panel going out confirms that the
function is stopped.
2354
1
Page 115 of 216
2.23
CRUISE CONTROL, SPEED LIMITER: cruise control function (1/4)
The cruise control function helps you to
maintain your driving speed at a speed
that you choose, called the cruising
speed.
This cruising speed may be set at any
speed above 20 mph (30 km/h).
The cruise control function
is in no way linked to the
braking system.
This function is an additio-
nal driving aid. However,
the function does not take
the place of the driver.
Therefore, it can under no circums-
tances replace the driver’s responsi-
bility to respect speed limits and to
be vigilant (the driver must always
be ready to brake). Cruise control
must not be used in heavy traffic, on
undulating or slippery roads (black
ice, aquaplaning, gravel) and during
bad weather (fog, rain, side winds
etc.).
There is a risk of accidents.
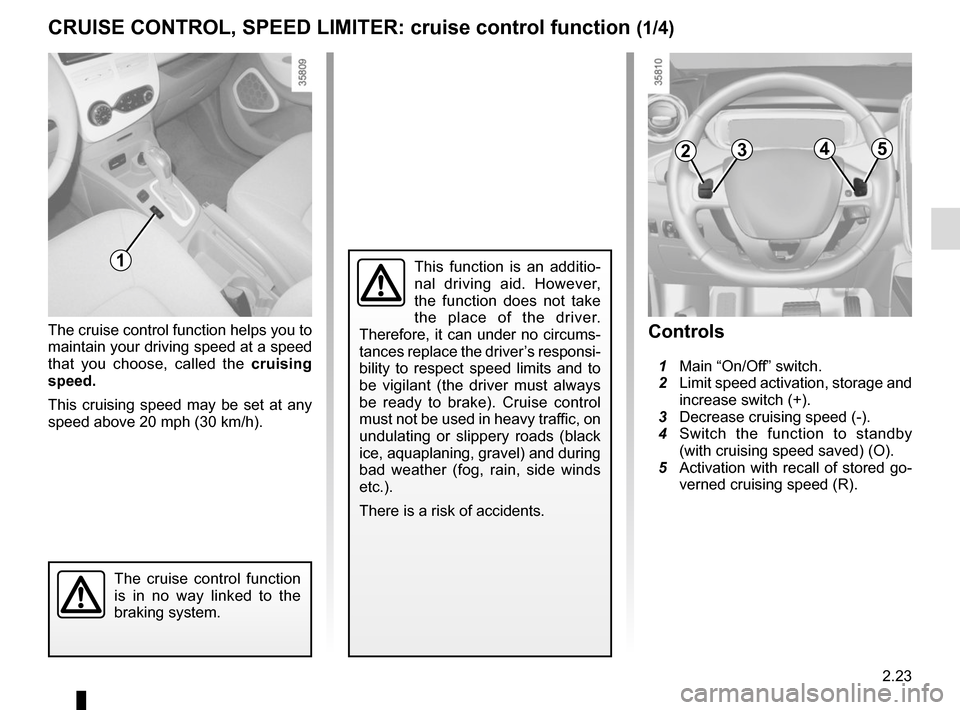
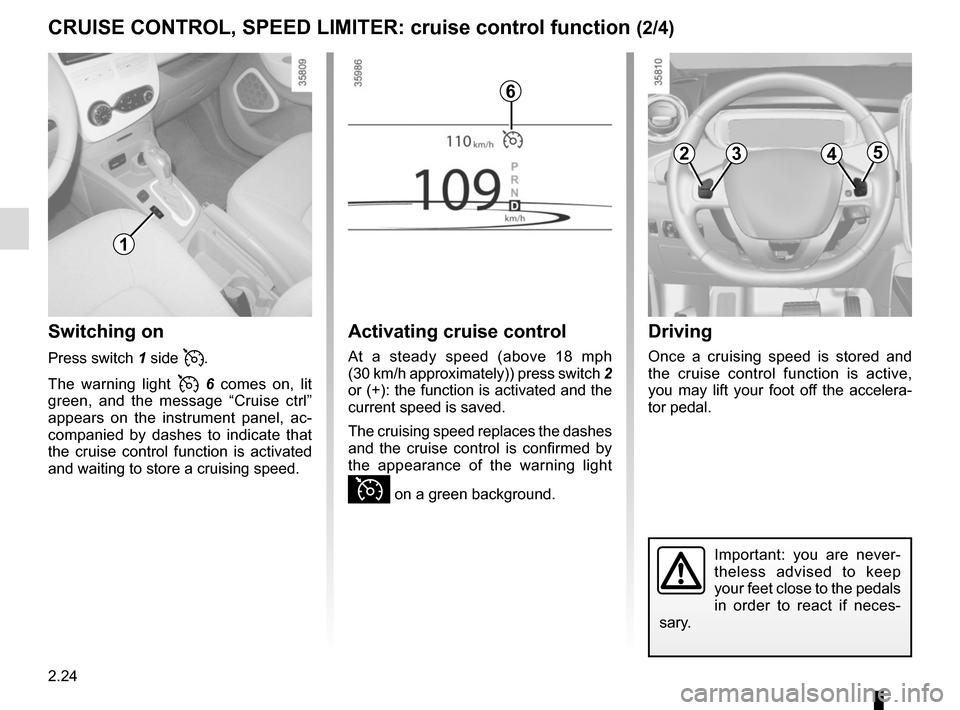
Controls
1 Main “On/Off” switch.
2 Limit speed activation, storage and
increase switch (+).
3 Decrease cruising speed (-).
4 Switch the function to standby
(with cruising speed saved) (O).
5 Activation with recall of stored go-
verned cruising speed (R).
2354
1
Page 116 of 216
2.24
CRUISE CONTROL, SPEED LIMITER: cruise control function (2/4)
Switching on
Press switch 1 side .
The warning light
6 comes on, lit
green, and the message “Cruise ctrl”
appears on the instrument panel, ac-
companied by dashes to indicate that
the cruise control function is activated
and waiting to store a cruising speed.
Activating cruise control
At a steady speed (above 18 mph
(30 km/h approximately)) press switch 2
or (+): the function is activated and the
current speed is saved.
The cruising speed replaces the dashes
and the cruise control is confirmed by
the appearance of the warning light
Ï on a green background.
Driving
Once a cruising speed is stored and
the cruise control function is active,
you may lift your foot off the accelera-
tor pedal.
Important: you are never-
theless advised to keep
your feet close to the pedals
in order to react if neces-
sary.
6
2354
1
Page 117 of 216
2.25
CRUISE CONTROL, SPEED LIMITER: cruise control function (3/4)
The cruise control function
is in no way linked to the
braking system.
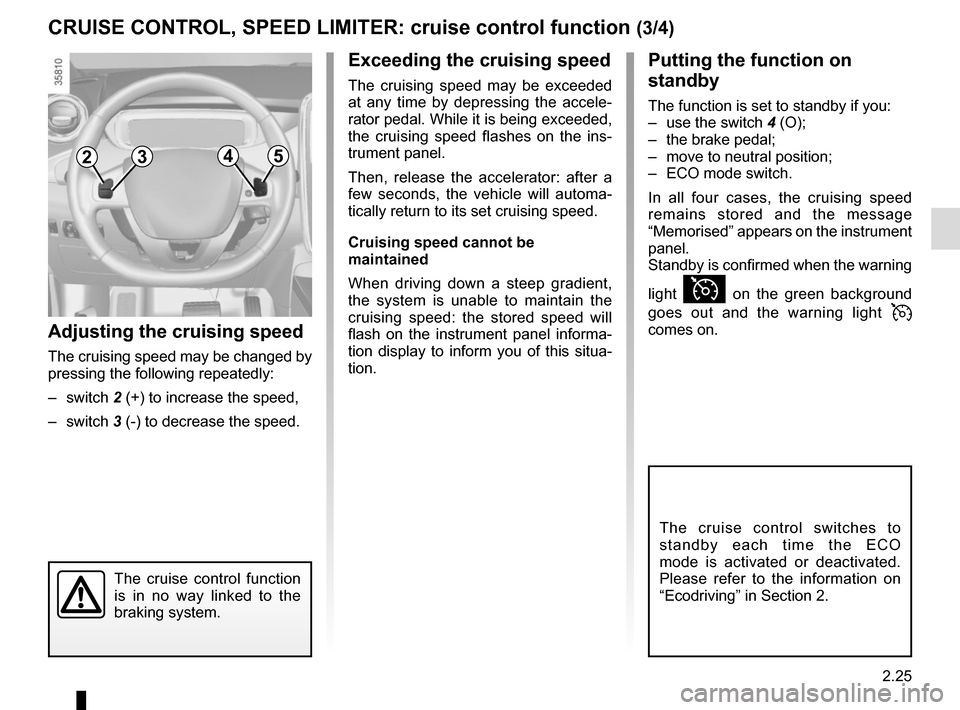
Adjusting the cruising speed
The cruising speed may be changed by
pressing the following repeatedly:
– switch 2 (+) to increase the speed,
– switch 3 (-) to decrease the speed.
Exceeding the cruising speed
The cruising speed may be exceeded
at any time by depressing the accele-
rator pedal. While it is being exceeded,
the cruising speed flashes on the ins-
trument panel.
Then, release the accelerator: after a
few seconds, the vehicle will automa-
tically return to its set cruising speed.
Cruising speed cannot be
maintained
When driving down a steep gradient,
the system is unable to maintain the
cruising speed: the stored speed will
flash on the instrument panel informa-
tion display to inform you of this situa-
tion.
2354
Putting the function on
standby
The function is set to standby if you:
– use the switch 4 (O);
– the brake pedal;
– move to neutral position;
– ECO mode switch.
In all four cases, the cruising speed
remains stored and the message
“Memorised” appears on the instrument
panel.
Standby is confirmed when the warning
light
Ï on the green background
goes out and the warning light
comes on.
The cruise control switches to
standby each time the ECO
mode is activated or deactivated.
Please refer to the information on
“Ecodriving” in Section 2.
Page 118 of 216
2.26
CRUISE CONTROL, SPEED LIMITER: cruise control function (4/4)
When the cruise control function is
put on standby, pressing switch 2
(+) reactivates the cruise control
function without taking into account
the stored speed: it is the speed at
which the vehicle is moving that is
taken into account.Putting the cruise control
on standby or switching it
off does not cause a rapid
reduction in speed: you
must brake by depressing the brake
pedal.
NB: if the speed previously stored is
much higher than the current speed,
the vehicle will accelerate more rapidly
to reach this threshold.
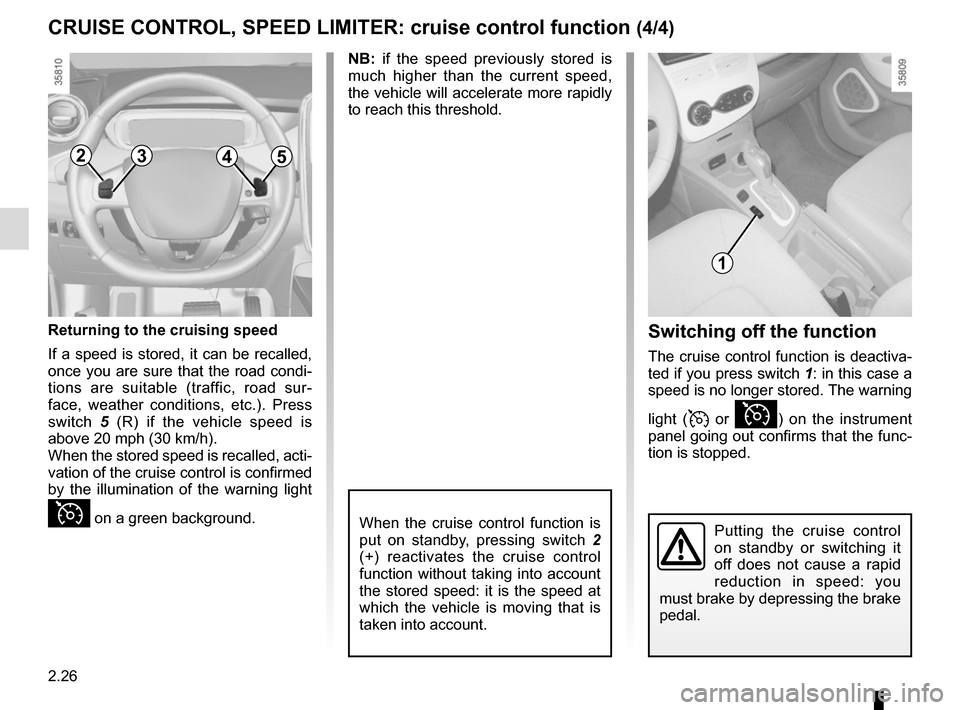
Switching off the function
The cruise control function is deactiva-
ted if you press switch 1: in this case a
speed is no longer stored. The warning
light (
or Ï) on the instrument
panel going out confirms that the func-
tion is stopped.
2354
1
Returning to the cruising speed
If a speed is stored, it can be recalled,
once you are sure that the road condi-
tions are suitable (traffic, road sur-
face, weather conditions, etc.). Press
switch 5 (R) if the vehicle speed is
above 20 mph (30 km/h).
When the stored speed is recalled, acti-
vation of the cruise control is confirmed
by the illumination of the warning light
Ï on a green background.
Page 119 of 216

2.27
PARKING DISTANCE CONTROL (1/2)
Operating principle
Ultrasonic detectors, installed in the
rear bumper (depending on the vehi-
cle), measure the distance between the
vehicle and an obstacle whilst revers-
ing.
This measurement is indicated by
beeps which become more frequent the
closer you come to the obstacle, until
they become a continuous beep when
the vehicle is approximately 30 centi-
metres from the obstacle.
NB: the display 1 shows the vehicle
surroundings in conjunction with the
beeps.
This function is an additional aid that indicates the distance between t\
he
vehicle and an obstacle whilst reversing, using sound signals.
Under no circumstances should it replace the driver’s care or responsibil-
ity whilst reversing.
The driver should always look out for sudden hazards during driving: alw\
ays
ensure that there are no moving obstacles (such as a child, animal, pra\
m or bi-
cycle, etc.) or small, narrow objects such as stones or posts in your p\
ath when
manoeuvring.
Operation
When reverse gear is selected, most
objects which are less than approxi-
mately 1.20 metres from the rear of the
vehicle are detected, a beep sounds
and the display 1 lights up.
1
Page 120 of 216
2.28
PARKING DISTANCE CONTROL (2/2)
In the event of an impact to
the underside of the vehicle
(e.g.: striking a post, raised
kerb or other street furni-
ture), this may result in damage to
the vehicle (e.g.: twisted axle), the
electrical circuit or the traction bat-
tery.
To avoid any risk of accident, have
your vehicle checked by an ap-
proved dealer.
Operating faults
Depending on the vehicle, when the
system detects an operating fault, the
message “check parking distance con-
trol” appears on the instrument panel,
accompanied by the warning light
© and a beep lasting approxi-
mately 5 seconds. Please contact an
authorised dealer.
Special features
Make sure that the ultrasonic sensors
are not obscured (by dirt, mud, snow,
etc.).
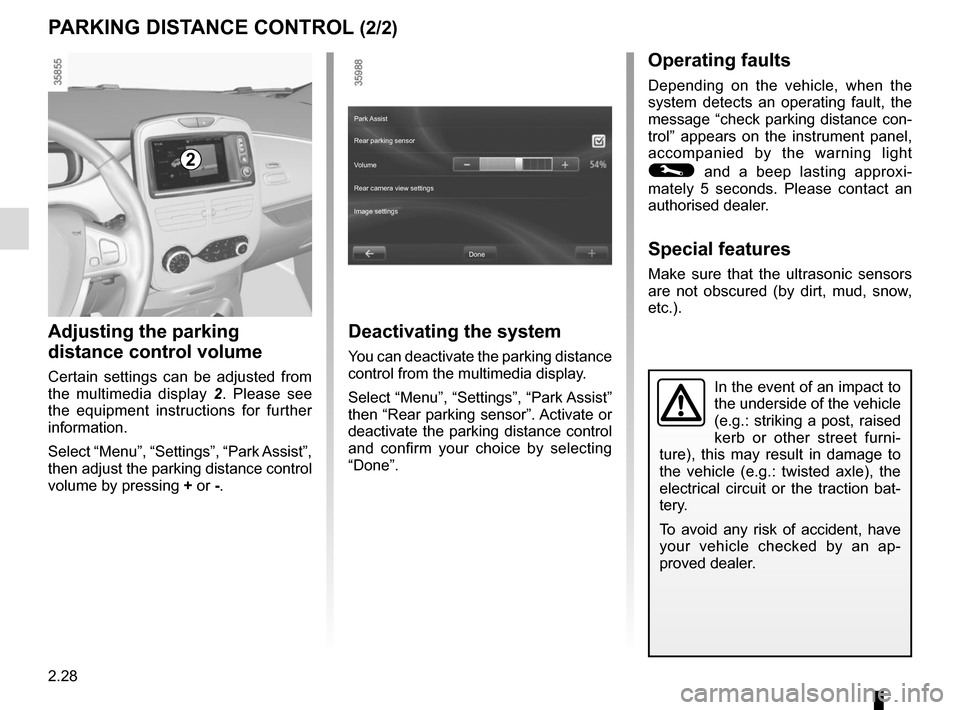
Adjusting the parking
distance control volume
Certain settings can be adjusted from
the multimedia display 2. Please see
the equipment instructions for further
information.
Select “Menu”, “Settings”, “Park Assist”,
then adjust the parking distance control
volume by pressing + or -.
2
Deactivating the system
You can deactivate the parking distance
control from the multimedia display.
Select “Menu”, “Settings”, “Park Assist”
then “Rear parking sensor”. Activate or
deactivate the parking distance control
and confirm your choice by selecting
“Done”.
Done
Park Assist
Rear parking sensor
Volume
Image settings Rear camera view settings