RENAULT ZOE 2016 1.G Owners Manual
Manufacturer: RENAULT, Model Year: 2016, Model line: ZOE, Model: RENAULT ZOE 2016 1.GPages: 216, PDF Size: 6.48 MB
Page 121 of 216
2.29
REVERSING CAMERA (1/2)
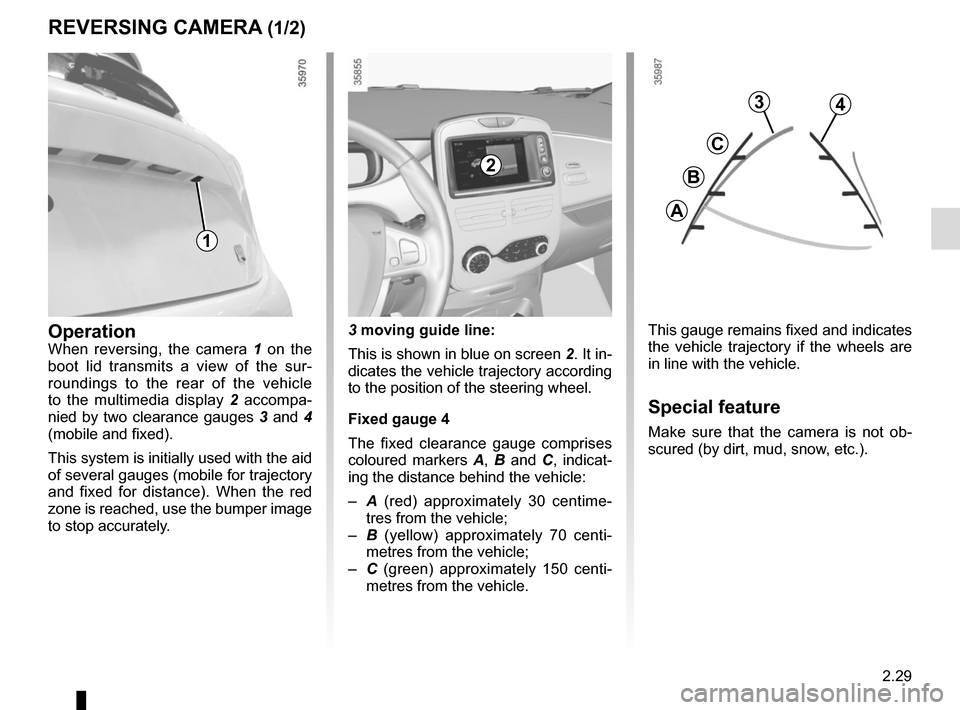
This gauge remains fixed and indicates
the vehicle trajectory if the wheels are
in line with the vehicle.
Special feature
Make sure that the camera is not ob-
scured (by dirt, mud, snow, etc.).
OperationWhen reversing, the camera 1 on the
boot lid transmits a view of the sur-
roundings to the rear of the vehicle
to the multimedia display 2 accompa-
nied by two clearance gauges 3 and 4
(mobile and fixed).
This system is initially used with the aid
of several gauges (mobile for trajectory
and fixed for distance). When the red
zone is reached, use the bumper image
to stop accurately. 3 moving guide line:
This is shown in blue on screen
2. It in-
dicates the vehicle trajectory according
to the position of the steering wheel.
Fixed gauge 4
The fixed clearance gauge comprises
coloured markers A, B and C , indicat-
ing the distance behind the vehicle:
– A (red) approximately 30 centime-
tres from the vehicle;
– B (yellow) approximately 70 centi-
metres from the vehicle;
– C (green) approximately 150 centi-
metres from the vehicle.
3
C
B
A
4
2
1
Page 122 of 216
2.30
REVERSING CAMERA (2/2)
This function is an additional aid. It cannot, therefore, under any circ\
um-
stances replace the vigilance or the responsibility of the driver.
The driver should always pay attention to sudden incidents during driv-
ing: always ensure that there are no moving obstacles (such as a child,\
animal, pram, bicycle, etc.) or small, narrow objects such as stones or\
posts in
your path when manoeuvring.
The screen shows a reverse image.
The frames are a representation
projected onto flat ground; this in-
formation must not be taken into
account when superimposed on a
vertical object or an object on the
ground.
Objects which appear on the edge
of the screen may be deformed.
In very bright light (snow, vehicle in
sunshine etc.), the camera vision
may be adversely affected.
If the boot is open or poorly closed,
the message “Boot open” appears
and the camera display disappears.
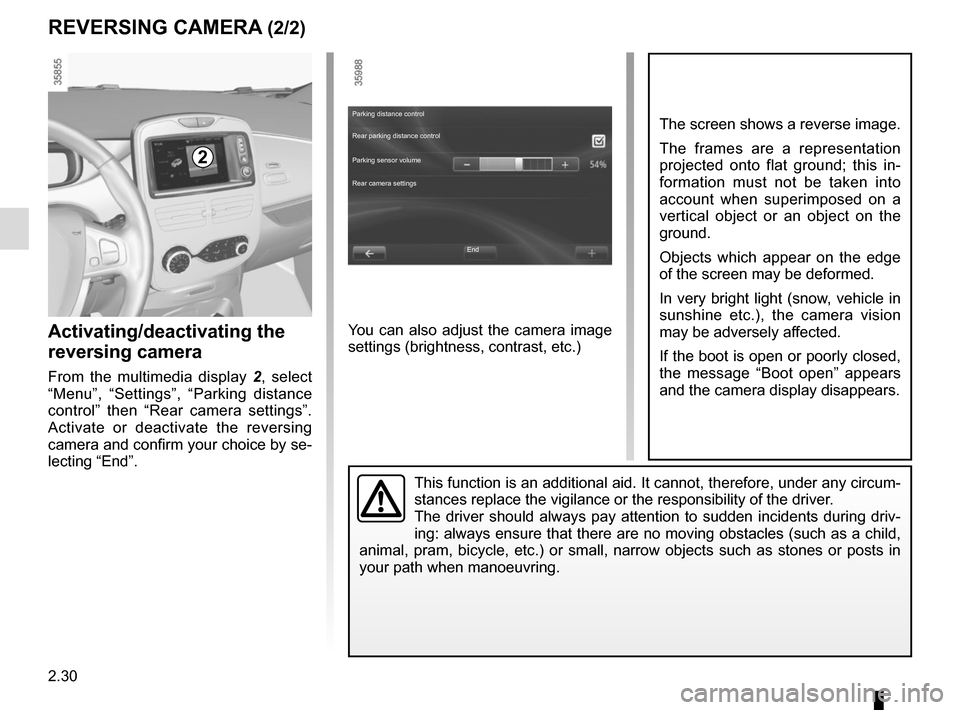
Activating/deactivating the
reversing camera
From the multimedia display 2 , select
“Menu”, “Settings”, “Parking distance
control” then “Rear camera settings”.
Activate or deactivate the reversing
camera and confirm your choice by se-
lecting “End”.
2
You can also adjust the camera image
settings (brightness, contrast, etc.)
End
Parking distance control
Rear parking distance control
Parking sensor volume
Rear camera settings
Page 123 of 216
3.1
Section 3: Your comfort
Air Vents . . . . . . . . . . . . . . . . . . . . . . . . . . . . . . . . . . . .\
. . . . . . . . . . . . . . . . . . . . . . . . . . . . . . . . . . 3.2
Automatic climate control . . . . . . . . . . . . . . . . . . . . . . . . . . . . . . . . . . . .\
. . . . . . . . . . . . . . . . . . . . . 3.4
Air conditioning: remote activation. . . . . . . . . . . . . . . . . . .\
. . . . . . . . . . . . . . . . . . . . . . . . . . . . . . . . 3.8
Air conditioning: programming . . . . . . . . . . . . . . . . . . . . . . . . . . . . . . . . . . . . \
. . . . . . . . . . . . . . . . . . 3.9
Fragrance diffuser. . . . . . . . . . . . . . . . . . . . . . . . . . . . . . . . . . . . . \
. . . . . . . . . . . . . . . . . . . . . . . . . . . 3.13
Air ioniser. . . . . . . . . . . . . . . . . . . . . . . . . . . . . . .\
. . . . . . . . . . . . . . . . . . . . . . . . . . . . . . . . . . . . . . . 3.14
Air conditioning: information and advice on use . . . . . . . . . . . . . . . . . . . . . . . . . . . . . . . . . . . .\
. . . . 3.15
Electric windows . . . . . . . . . . . . . . . . . . . . . . . . . . . . . . . . . . . .\
. . . . . . . . . . . . . . . . . . . . . . . . . . . . 3.16
Interior lighting . . . . . . . . . . . . . . . . . . . . . . . . . . . . . . . . . . . . \
. . . . . . . . . . . . . . . . . . . . . . . . . . . . . . 3.18
Sun visor . . . . . . . . . . . . . . . . . . . . . . . . . . . . . . . \
. . . . . . . . . . . . . . . . . . . . . . . . . . . . . . . . . . . . . . . 3.18
Passenger compartment storage/fittings . . . . . . . . . . . . . . . . . . . . . . . . . . . . . . . . . . . . \
. . . . . . . . . . 3.19
Ashtray . . . . . . . . . . . . . . . . . . . . . . . . . . . . . . . . . . . .\
. . . . . . . . . . . . . . . . . . . . . . . . . . . . . . . . . . . 3.22
Accessories socket . . . . . . . . . . . . . . . . . . . . . . . . . . . . . . . . . . . .\
. . . . . . . . . . . . . . . . . . . . . . . . . . 3.22
Rear bench seat: functions . . . . . . . . . . . . . . . . . . . . . . . . . . . . . . . . . . . .\
. . . . . . . . . . . . . . . . . . . . 3.24
Rear parcel shelf . . . . . . . . . . . . . . . . . . . . . . . . . . . . . . . . . . . . \
. . . . . . . . . . . . . . . . . . . . . . . . . . . . 3.25
Luggage cover . . . . . . . . . . . . . . . . . . . . . . . . . . . . . . . . . . . . \
. . . . . . . . . . . . . . . . . . . . . . . . . . . . . . 3.26
Luggage compartment. . . . . . . . . . . . . . . . . . . . . . . . . . .\
. . . . . . . . . . . . . . . . . . . . . . . . . . . . . . . . . 3.27
Spoiler . . . . . . . . . . . . . . . . . . . . . . . . . . . . . . . . . . . . \
. . . . . . . . . . . . . . . . . . . . . . . . . . . . . . . . . . . . 3.27
Transporting objects in the luggage compartment . . . . . . . . . . . . . . . . . . . . . . . . . . . . . . . . . . . .\
. . 3.28
Multimedia equipment . . . . . . . . . . . . . . . . . . . . . . . . . . . . . . . . . . . . \
. . . . . . . . . . . . . . . . . . . . . . . . 3.29
Page 124 of 216
3.2
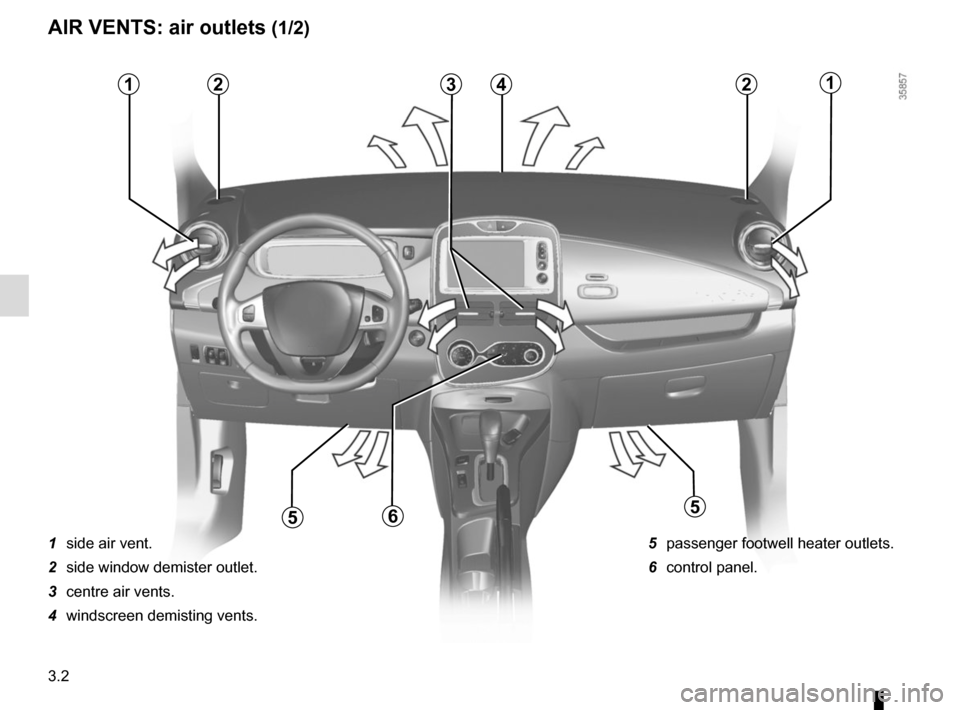
AIR VENTS: air outlets (1/2)
1 side air vent.
2 side window demister outlet.
3 centre air vents.
4 windscreen demisting vents.5 passenger footwell heater outlets.
6 control panel.
123421
565
Page 125 of 216
3.3
AIR VENTS: air outlets (2/2)
To remove bad odours from your ve-
hicles, only use the systems designed
for this purpose. Consult an approved
Dealer.
Do not add anything to the
vehicle’s ventilation circuit
(for example, to remove
bad odours).
There is a risk of damage or of
fire.
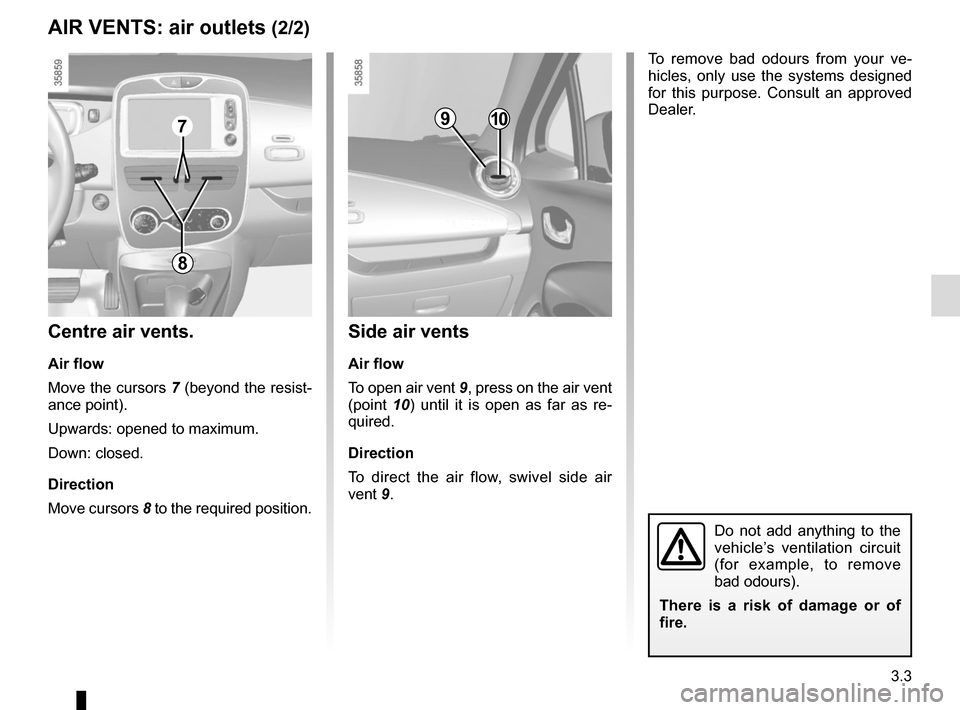
Side air vents
Air flow
To open air vent 9, press on the air vent
(point 10) until it is open as far as re-
quired.
Direction
To direct the air flow, swivel side air
vent 9.
Centre air vents.
Air flow
Move the cursors 7 (beyond the resist-
ance point).
Upwards: opened to maximum.
Down: closed.
Direction
Move cursors 8 to the required position.
9107
8
Page 126 of 216
3.4
AUTOMATIC AIR-CONDITIONING (1/4)
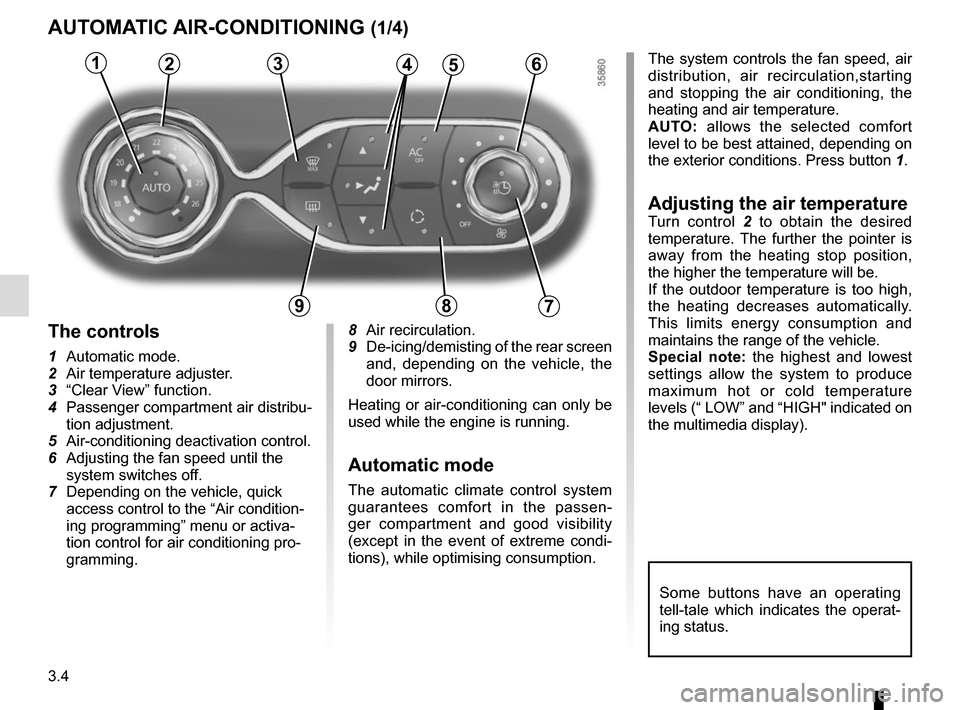
The system controls the fan speed, air
distribution, air recirculation,starting
and stopping the air conditioning, the
heating and air temperature.
AUTO: allows the selected comfort
level to be best attained, depending on
the exterior conditions. Press button 1.
Adjusting the air temperatureTurn control 2 to obtain the desired
temperature. The further the pointer is
away from the heating stop position,
the higher the temperature will be.
If the outdoor temperature is too high,
the heating decreases automatically.
This limits energy consumption and
maintains the range of the vehicle.
Special note: the highest and lowest
settings allow the system to produce
maximum hot or cold temperature
levels (“ LOW” and “HIGH" indicated on
the multimedia display).
8 Air recirculation.
9
De-icing/demisting of the rear screen
and, depending on the vehicle, the
door mirrors.
Heating or air-conditioning can only be
used while the engine is running.
Automatic mode
The automatic climate control system
guarantees comfort in the passen-
ger compartment and good visibility
(except in the event of extreme condi-
tions), while optimising consumption.
The controls
1 Automatic mode.
2 Air temperature adjuster.
3 “Clear View” function.
4 Passenger compartment air distribu- tion adjustment.
5 Air-conditioning deactivation control.
6 Adjusting the fan speed until the
system switches off.
7 Depending on the vehicle, quick access control to the “Air condition-
ing programming” menu or activa-
tion control for air conditioning pro-
gramming.
3456
897
12
Some buttons have an operating
tell-tale which indicates the operat-
ing status.
Page 127 of 216
3.5
3
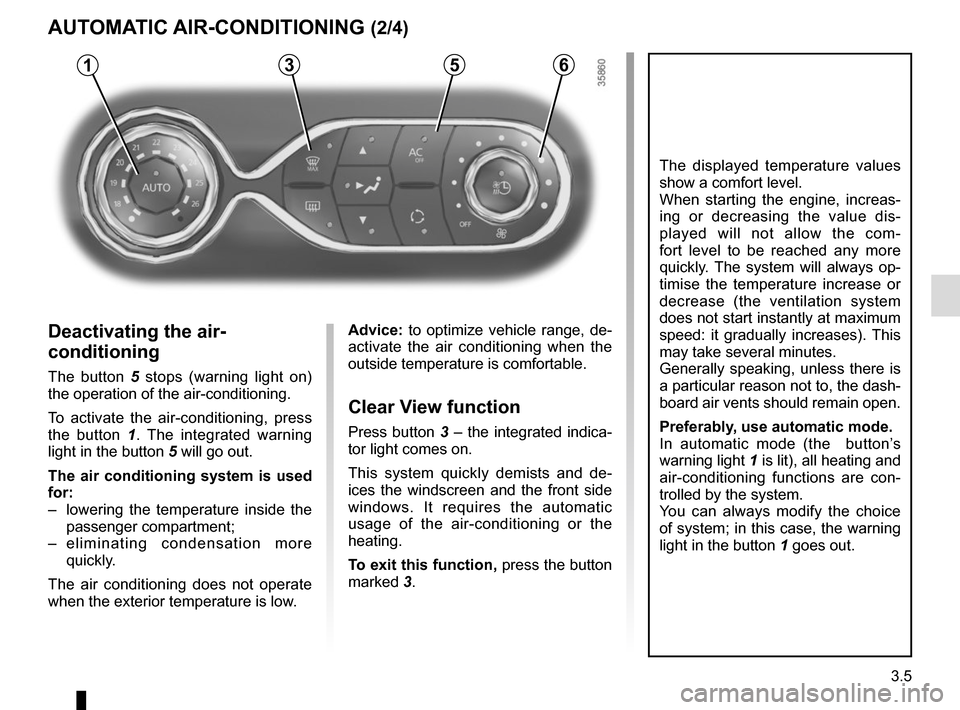
Deactivating the air-
conditioning
The button 5 stops (warning light on)
the operation of the air-conditioning.
To activate the air-conditioning, press
the button 1 . The integrated warning
light in the button 5 will go out.
The air conditioning system is used
for:
– lowering the temperature inside the passenger compartment;
– eliminating condensation more quickly.
The air conditioning does not operate
when the exterior temperature is low.
5
AUTOMATIC AIR-CONDITIONING (2/4)
The displayed temperature values
show a comfort level.
When starting the engine, increas-
ing or decreasing the value dis-
played will not allow the com-
fort level to be reached any more
quickly. The system will always op-
timise the temperature increase or
decrease (the ventilation system
does not start instantly at maximum
speed: it gradually increases). This
may take several minutes.
Generally speaking, unless there is
a particular reason not to, the dash-
board air vents should remain open.
Preferably, use automatic mode.
In automatic mode (the button’s
warning light 1 is lit), all heating and
air-conditioning functions are con-
trolled by the system.
You can always modify the choice
of system; in this case, the warning
light in the button 1 goes out.
Advice: to optimize vehicle range, de-
activate the air conditioning when the
outside temperature is comfortable.
Clear View function
Press button 3 – the integrated indica-
tor light comes on.
This system quickly demists and de-
ices the windscreen and the front side
windows. It requires the automatic
usage of the air-conditioning or the
heating.
To exit this function, press the button
marked 3.
61
Page 128 of 216
3.6
AUTOMATIC AIR-CONDITIONING (3/4)
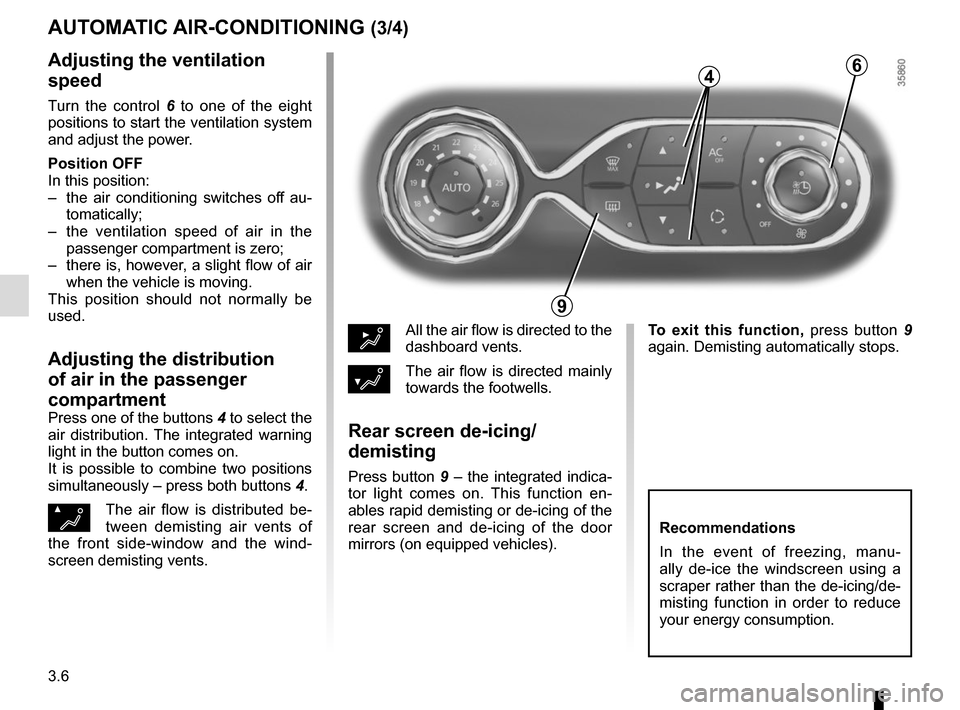
Adjusting the ventilation
speed
Turn the control 6 to one of the eight
positions to start the ventilation system
and adjust the power.
Position OFF
In this position:
– the air conditioning switches off au- tomatically;
– the ventilation speed of air in the passenger compartment is zero;
– there is, however, a slight flow of air when the vehicle is moving.
This position should not normally be
used.
Adjusting the distribution
of air in the passenger
compartment
Press one of the buttons 4 to select the
air distribution. The integrated warning
light in the button comes on.
It is possible to combine two positions
simultaneously – press both buttons 4.
ØThe air flow is distributed be-
tween demisting air vents of
the front side-window and the wind-
screen demisting vents.
½All the air flow is directed to the
dashboard vents.
¿The air flow is directed mainly
towards the footwells.
Rear screen de-icing/
demisting
Press button 9 – the integrated indica-
tor light comes on. This function en-
ables rapid demisting or de-icing of the
rear screen and de-icing of the door
mirrors (on equipped vehicles).
9
6
Recommendations
In the event of freezing, manu-
ally de-ice the windscreen using a
scraper rather than the de-icing/de-
misting function in order to reduce
your energy consumption.
To exit this function, press button 9
again. Demisting automatically stops.
4
Page 129 of 216

3.7
Depending on the vehicle, the system
determines whether or not air recircula-
tion is used, based on the quality of the
outside air.
The air quality is confirmed by the ap-
pearance of one of the following warn-
ing lights on the multimedia display (for
the cleanest and the least clean air re-
spectively):
.
AUTOMATIC AIR-CONDITIONING (4/4)
Air recirculation (isolation of
the passenger compartment)
K
This function is managed automatically
but you can also activate it manually. In
this case, the operation is confirmed by
a warning light on the button 8. NB:
– during recirculation, air is taken from
the passenger compartment and
is recycled, with no air being taken
from outside the vehicle;
– air recirculation allows the external atmosphere to be cut off (when driv-
ing in polluted areas, etc.);
– the recirculation of air makes it pos- sible to reach the desired passenger
compartment temperature quicker.
Manual use
Press button 8 – the integrated indica-
tor light comes on.
Prolonged use of this position may lead
to odours, caused by non-renewal of
air, and the formation of condensation
on the windows.
We therefore advise you to return to au-
tomatic mode as soon as air recircula-
tion is no longer needed, by pressing
button 8.
Stopping the function manually
Press the button 8 to stop the function.
Air recirculation is then automatic.
8
The demisting/de-icing will still take
priority over the air recirculation.
Page 130 of 216
3.8
AIR CONDITIONING: remote activation
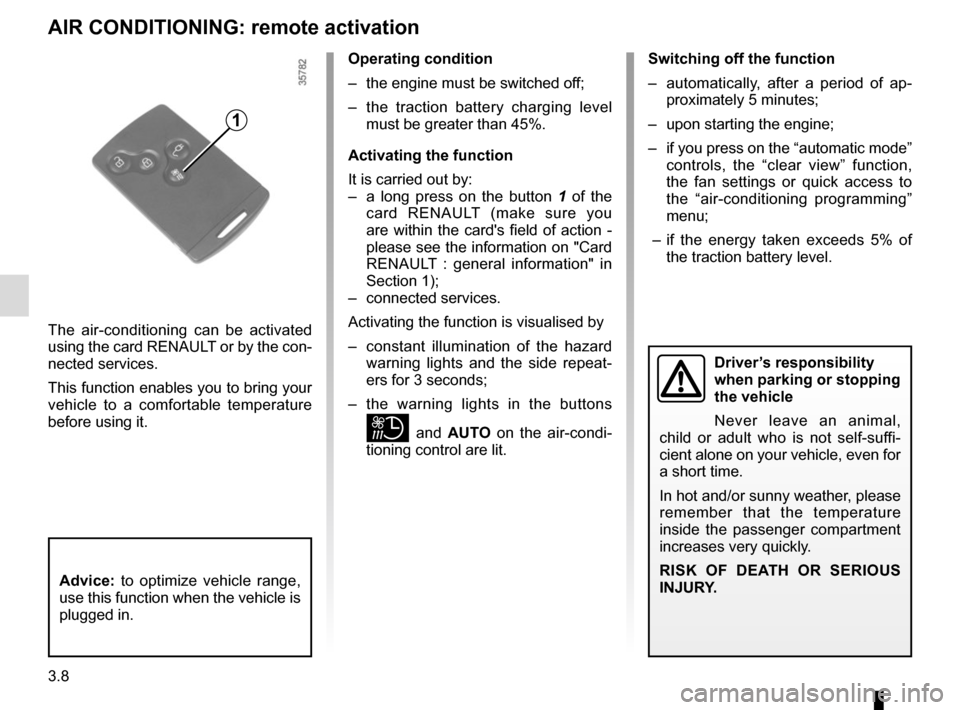
The air-conditioning can be activated
using the card RENAULT or by the con-
nected services.
This function enables you to bring your
vehicle to a comfortable temperature
before using it.
1
Operating condition
– the engine must be switched off;
– the traction battery charging level must be greater than 45%.
Activating the function
It is carried out by:
– a long press on the button 1 of the
card RENAULT (make sure you
are within the card's field of action -
please see the information on "Card
RENAULT : general information" in
Section 1);
– connected services.
Activating the function is visualised by
– constant illumination of the hazard warning lights and the side repeat-
ers for 3 seconds;
– the warning lights in the buttons
and AUTO on the air-condi-
tioning control are lit. Switching off the function
– automatically, after a period of ap-
proximately 5 minutes;
– upon starting the engine;
– if you press on the “automatic mode” controls, the “clear view” function,
the fan settings or quick access to
the “air-conditioning programming”
menu;
– if the energy taken exceeds 5% of the traction battery level.
Driver’s responsibility
when parking or stopping
the vehicle
Never leave an animal,
child or adult who is not self-suffi-
cient alone on your vehicle, even for
a short time.
In hot and/or sunny weather, please
remember that the temperature
inside the passenger compartment
increases very quickly.
RISK OF DEATH OR SERIOUS
INJURY.
Advice: to optimize vehicle range,
use this function when the vehicle is
plugged in.