load SAAB 9-3 2001 Owner's Manual
[x] Cancel search | Manufacturer: SAAB, Model Year: 2001, Model line: 9-3, Model: SAAB 9-3 2001Pages: 260, PDF Size: 12.01 MB
Page 130 of 260
130 Interior equipment, trunkSeatsThe following seat adjustments can be
made to achieve a comfortable driving
position:
• Height (driver´s seat)
Legroom
Backrest rake angle
Lumbar support
Head-restraint height
We recommend that adjustments to the
driver’s seat be performed in the following
order:
1 Height
2 Legroom
3 Backrest rake angle
Lastly, adjust the steering wheel (see
page 137). Side airbags (SRS)See page 30.Head restraintSee page 18.
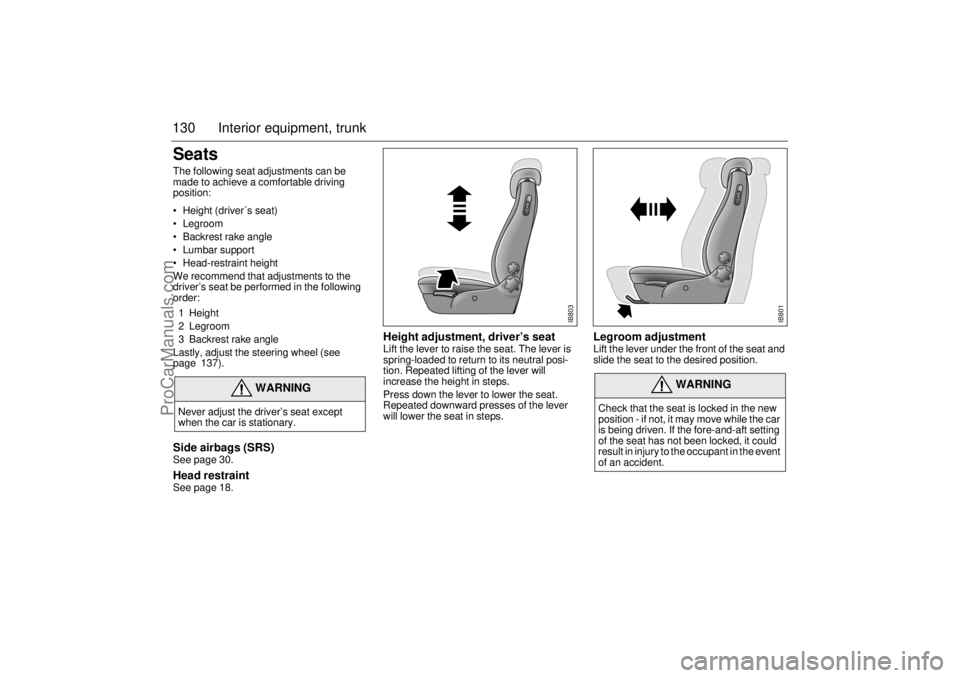
Height adjustment, driver’s seat Lift the lever to raise the seat. The lever is
spring-loaded to return to its neutral posi-
tion. Repeated lifting of the lever will
increase the height in steps.
Press down the lever to lower the seat.
Repeated downward presses of the lever
will lower the seat in steps.
Legroom adjustment Lift the lever under the front of the seat and
slide the seat to the desired position.
WARNING
Never adjust the driver’s seat except
when the car is stationary.
WARNING
Check that the seat is locked in the new
position - if not, it may move while the car
is being driven. If the fore-and-aft setting
of the seat has not been locked, it could
result in injury to the occupant in the event
of an accident.
IB803
IB801
ProCarManuals.com
Page 136 of 260
136 Interior equipment, trunkElectrical windows The electric window motors are equipped
with overload protection. If this protection
should trip, wait several seconds before
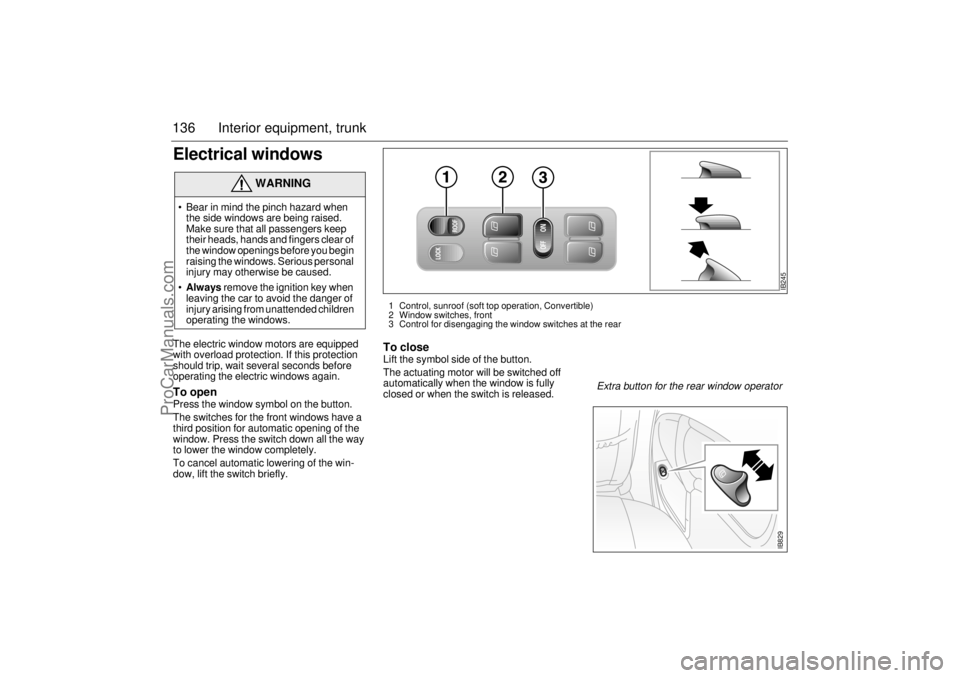
operating the electric windows again.To open Press the window symbol on the button.
The switches for the front windows have a
third position for automatic opening of the
window. Press the switch down all the way
to lower the window completely.
To cancel automatic lowering of the win-
dow, lift the switch briefly.
To close Lift the symbol side of the button.
The actuating motor will be switched off
automatically when the window is fully
closed or when the switch is released.
WARNING
Bear in mind the pinch hazard when
the side windows are being raised.
Make sure that all passengers keep
their heads, hands and fingers clear of
the window openings before you begin
raising the windows. Serious personal
injury may otherwise be caused.
Always remove the ignition key when
leaving the car to avoid the danger of
injury arising from unattended children
operating the windows.
IB245
1 Control, sunroof (soft top operation, Convertible)
2 Window switches, front
3 Control for disengaging the window switches at the rear
IB829
Extra button for the rear window operator
ProCarManuals.com
Page 144 of 260
144 Interior equipment, trunkTrunk, Coupé and 5-doorTrunk lid lockUnlock the trunk lid by pressing on the key, by pressing the
remote release button on the driver’s door or by using the key. The
alarm horn sounds three times and the lights flash when the trunk is
released with the remote control.
Programming features, see page 255.
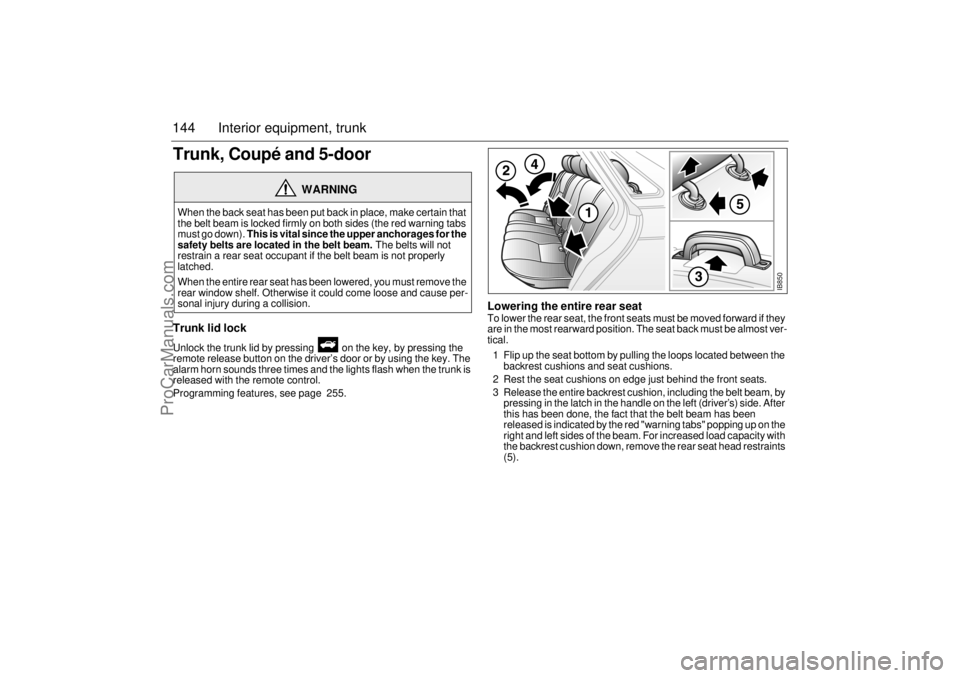
Lowering the entire rear seatTo lower the rear seat, the front seats must be moved forward if they
are in the most rearward position. The seat back must be almost ver-
tical.
1 Flip up the seat bottom by pulling the loops located between the
backrest cushions and seat cushions.
2 Rest the seat cushions on edge just behind the front seats.
3 Release the entire backrest cushion, including the belt beam, by
pressing in the latch in the handle on the left (driver’s) side. After
this has been done, the fact that the belt beam has been
released is indicated by the red "warning tabs" popping up on the
right and left sides of the beam. For increased load capacity with
the backrest cushion down, remove the rear seat head restraints
(5).
WARNING
When the back seat has been put back in place, make certain that
the belt beam is locked firmly on both sides (the red warning tabs
must go down). This is vital since the upper anchorages for the
safety belts are located in the belt beam. The belts will not
restrain a rear seat occupant if the belt beam is not properly
latched.
When the entire rear seat has been lowered, you must remove the
rear window shelf. Otherwise it could come loose and cause per-
sonal injury during a collision.
IB850
ProCarManuals.com
Page 145 of 260
145 Interior equipment, trunk
4 Lower the entire backrest cushion by pulling this same handle
(item 3) forward. At the same time, pivot the beam backwards.
IMPORTANT: When you replace the belt beam using the handle
(item 3), you must verify that it is properly locked and that the two
red "warning tabs" go down (thereby indicating that locking has
taken place properly).
5 To increase the volume, the rear head restraints can be removed
before the backrest cushion is lowered.
Lowering the right-hand part of the rear seat
WARNING
Never leave a child or animal unattended in the car. During sunny
weather the temperature in the cabin/luggage compartment can
climb to 160-180°F (70-80°C). Small children are very susceptible
to heat stroke.
The tail pipe of the exhaust system can become very hot during
driving. Bear this in mind when loading and unloading the car so
that children, for example, do not burn themselves.
WARNING
If the head restraints have been removed, they must be stored
safely so that they cannot be thrown about and injure someone
while braking or in a collision.
Do not ride in the rear seat without having remounted the head
restraints, and making sure they are properly locked in place.
Whenever you handle any system containing moving parts,
such as the belt beam, always be careful not to get pinched.
Never keep objects on the rear window shelf since they can be
thrown forward and cause personal injury during heavy brak-
ing or in the event of a collision.
When the back seat has been put back in place, make certain
that the belt beam is locked firmly on both sides (the red warn-
ing tabs must go down). This is vital since the upper anchor-
ages for the safety belts are located in the belt beam.
The
belts will not restrain a rear seat occupant if the belt beam is
not properly latched
ProCarManuals.com
Page 147 of 260
147 Interior equipment, trunk
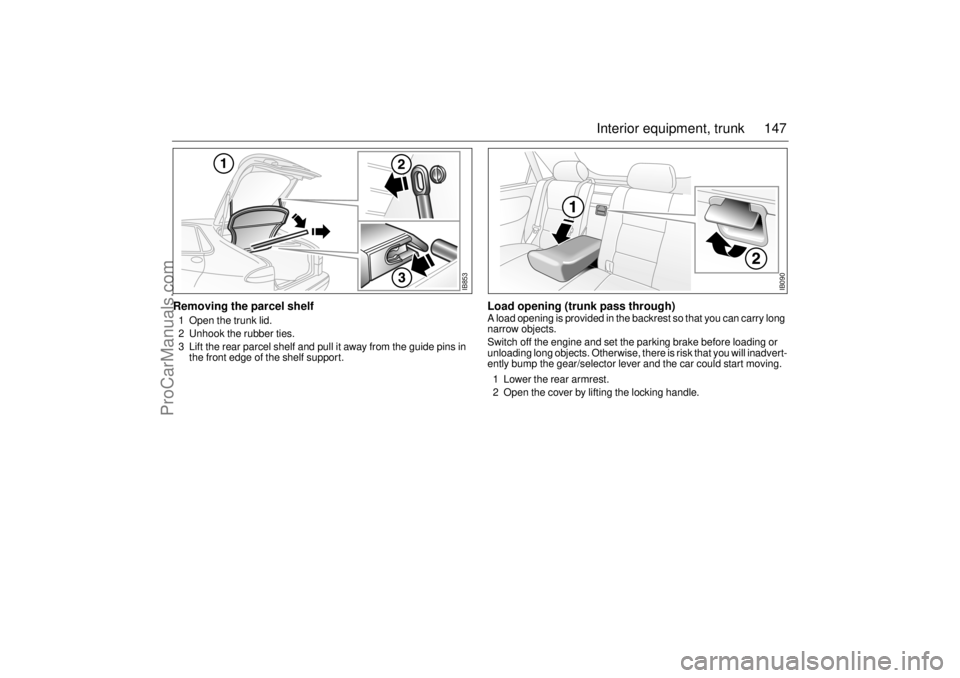
Removing the parcel shelf1 Open the trunk lid.
2 Unhook the rubber ties.
3 Lift the rear parcel shelf and pull it away from the guide pins in
the front edge of the shelf support.
Load opening (trunk pass through) A load opening is provided in the backrest so that you can carry long
narrow objects.
Switch off the engine and set the parking brake before loading or
unloading long objects. Otherwise, there is risk that you will inadvert-
ently bump the gear/selector lever and the car could start moving.
1 Lower the rear armrest.
2 Open the cover by lifting the locking handle.
IB853
IB090
ProCarManuals.com
Page 148 of 260
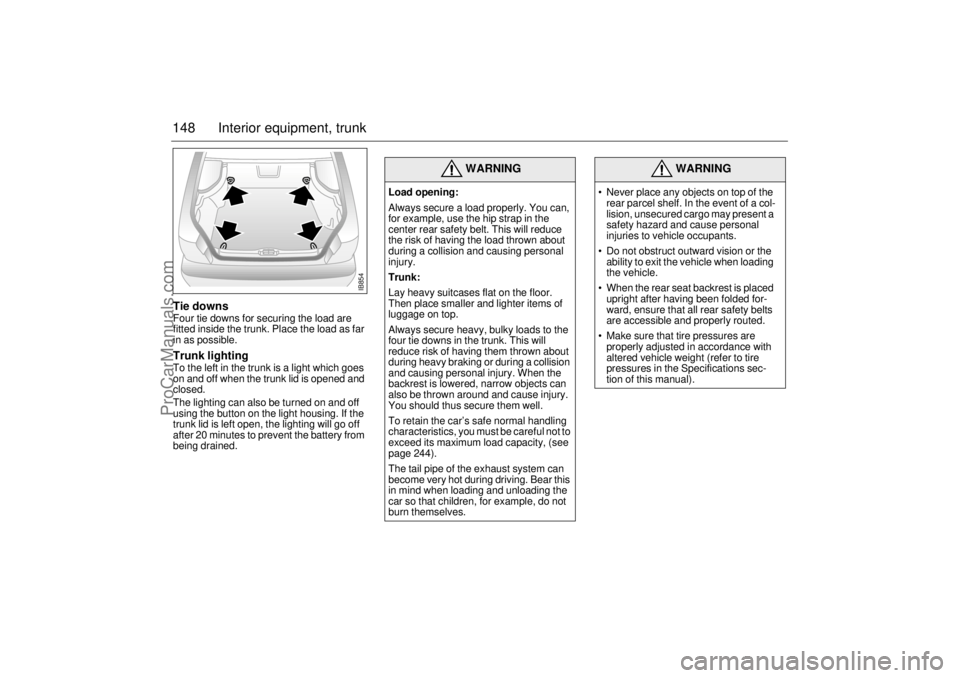
148 Interior equipment, trunkTie downsFour tie downs for securing the load are
fitted inside the trunk. Place the load as far
in as possible.Trunk lightingTo the left in the trunk is a light which goes
on and off when the trunk lid is opened and
closed.
The lighting can also be turned on and off
using the button on the light housing. If the
trunk lid is left open, the lighting will go off
after 20 minutes to prevent the battery from
being drained.
WARNING
Load opening:
Always secure a load properly. You can,
for example, use the hip strap in the
center rear safety belt. This will reduce
the risk of having the load thrown about
during a collision and causing personal
injury.
Trunk:
Lay heavy suitcases flat on the floor.
Then place smaller and lighter items of
luggage on top.
Always secure heavy, bulky loads to the
four tie downs in the trunk. This will
reduce risk of having them thrown about
during heavy braking or during a collision
and causing personal injury. When the
backrest is lowered, narrow objects can
also be thrown around and cause injury.
You should thus secure them well.
To retain the car’s safe normal handling
characteristics, you must be careful not to
exceed its maximum load capacity, (see
page 244).
The tail pipe of the exhaust system can
become very hot during driving. Bear this
in mind when loading and unloading the
car so that children, for example, do not
burn themselves.
WARNING
Never place any objects on top of the
rear parcel shelf. In the event of a col-
lision, unsecured cargo may present a
safety hazard and cause personal
injuries to vehicle occupants.
Do not obstruct outward vision or the
ability to exit the vehicle when loading
the vehicle.
When the rear seat backrest is placed
upright after having been folded for-
ward, ensure that all rear safety belts
are accessible and properly routed.
Make sure that tire pressures are
properly adjusted in accordance with
altered vehicle weight (refer to tire
pressures in the Specifications sec-
tion of this manual).
IB854
ProCarManuals.com
Page 151 of 260
151 Starting and driving
IB943
Starting and driving
Ignition switch ................. 152
Starting the engine .......... 153
Important considerations
for driving....................... 154
Refueling .......................... 157
Engine Break-in Period... 161
Manual transmission ...... 161
Automatic transmission . 162
Cruise Control ................. 169
Braking ............................. 170
Parking ............................. 174
Economical motoring ..... 176 Driving in cold weather ... 177
Driving in hot weather ..... 179
Towing a trailer ................ 179
Driving with a roof rack
load .................................. 182
Driving with the trunk lid
open ................................ 185
Driving in deep water....... 185
Towing the car.................. 185
Jump starting ................... 187
Driving considerations
with compact spare
wheel/tire fitted............... 190
For long trips .................... 190
ProCarManuals.com
Page 153 of 260
153 Starting and driving
If the car does not startIf the text "KEY NOT ACCEPTED" appears
on the SID when the engine refuses to start,
the trouble may be a fault in the transponder
of the key or in the receiver of the ignition
switch. Proceed as follows:
• Turn the key back to the LOCK position.
Turn the key to the ON position.
Press one of the buttons on the remote
control (the LED on top of the dash stops
flashing).
Start the engine.
Try the other key. If it works, the trouble is in
the first key.
Call on an authorized Saab dealer for
inspection and correction.
Starting the engine
Do not run the starter motor for more than
25 seconds at a time. Wait 20-30 seconds
before running the starter again, to give the
battery time to recover.
Avoid racing the engine or putting a heavy
load on it before it has warmed up. Let the
engine idle for at least 10 seconds and then
drive away as long as the engine oil warning
light has gone out to enable the engine to
attain its normal temperature as quickly as
possible.
It is possible for air to enter the lubricating
system in conjunction with an oil or oil-filter
change, or if the car has been stored for
some time. This air can cause the hydraulic
cam followers to emit a ticking noise, which
can persist for up to 15 minutes after start-
ing. Although this is quite normal and does
not indicate any malfunction, it is advisable
not to exceed 3,000 rpm before the noise
has disappeared.
The hydraulic cam lifters are completely
service free; the valve clearance is set up at
the factory and will not need any subse-
quent adjustment.
WARNING
Always remove the key before leaving
the car.
Always apply the parking brake before
removing the ignition key.NOTETake care not to spill drinks or to drop
crumbs over the ignition switch. If dirt or
liquid gets into it, the switch may not
operate properly.
WARNING
When starting the engine:
– Sit down in the driver’s seat.
– Depress the clutch pedal fully. If gear
lever is not in the neutral position, the
clutch pedal must be fully depressed
or the car will jump forwards or back-
wards, which may cause an accident.
– Never start the car from outside the
vehicle, e.g. through a wound down
window. This could lead to serious
personal injury.
Engage reverse (R) (position P for
automatic transmission) to remove the
ignition key. The key can only be
removed in this gear position.
Carbon monoxide (CO) is a colorless,
odorless, poisonous gas. Be alert to
the danger of CO – always open the
garage doors before starting the
engine in the garage.
There is also a danger of CO poison-
ing if the exhaust system is leaking.
Do not rest or sleep in the car when
parked with the engine running. There
is a risk of depressing the accelerator
which could lead to engine damage.
ProCarManuals.com
Page 154 of 260

154 Starting and drivingStarting the engine The engine has an automatic choke and
should be started as follows:
Cars with manual gearbox
To start the engine the clutch pedal must
be fully depressed.
1 Depress the clutch pedal but do not
touch the accelerator.
2 Start the engine. Let the ignition key
spring back as soon as the engine has
started and is running smoothly – at very
low temperatures, you may need to run
the starter for up to 50 seconds.
Let the engine idle for about 10 seconds. Do
not open the throttle wide for at least
2-3 minutes after starting.
Cars with automatic transmission
The selector lever must be in the P or N
position.
1 Keep your foot on the brake pedal.
2 Start the engine. Let the ignition key
spring back as soon as the engine has
started and is running smoothly – at very
low temperatures, you may need to run
the starter for up to 50 seconds.
Let the engine idle for about 10 seconds. Do
not open the throttle wide for at least
2–3 minutes after starting.
Useful tips on cold climate startingIf the engine has failed to start after several
attempts in very cold weather, press and
hold the accelerator down to the floor and
run the starter for 5–10 seconds. This will
prevent the engine being flooded (exces-
sively rich fuel-air mixture).
Now start the engine in the normal way – do
not touch the accelerator.
If the engine stalls immediately after starting
(e.g. if the clutch was released too quickly),
do not touch the accelerator when restarting
the engine.
Every time the engine is switched off the
spark plugs are automatically cleaned. If
your attempt to start nevertheless fails, let
go of the ignition key and allow it to spring
back. This initiates more vigorous cleaning
of the sparking plugs which goes on for
about 5 seconds. Then start in the ordinary
way. Do not touch the accelerator; if the
accelerator is pressed to the floor the fuel
supply is shut off.
Important
considerations for
drivingThe engine-management system in the
Saab 9-3 is called Saab Trionic T7. The
system manages the ignition, fuel injection
and turbo boost pressure.
The Trionic T7 system developed by Saab
is an intelligent engine-management
system designed to achieve optimum drive-
ability under differing driving conditions.
The system makes adjustments automati-
cally, for instance, if the car is being driven
at altitude (oxygen-deficient air), for differ-
ent grades of fuel (AON 87–93) and for dif-
ferent load conditions.
1 Starting and driving
Refrain from using full throttle before
the engine has warmed up (before
needle is in the mid-range on tempera-
ture gauge) to avoid unnecessary
wear. If the needle of the pressure
gauge repeatedly enters the red zone
the engine may suddenly lose power,
owing to the intervention of a monitor-
ing system which curtails the charging
pressure. Get in touch with an autho-
rized Saab dealer at once.
A safety function prevents the engine
from revving faster than 6,200 rpm by
temporarily shutting of the fuel injec-
tors.
ProCarManuals.com
Page 155 of 260

155 Starting and driving
2 Stopping the engine
Do not rev the engine immediately
before switching it off - stop the engine
when it is idling.
3 Regulating the charging pressure
The system is optimized for fuel with an
octane rating of AON 90. For cars with
205 hp engines and the Viggen, the
system is optimized for AON 93. One of
the advantages of the system is that it
enables the engine to be run safely on
lower-grade fuel, although not lower
than AON 87. However, engine perfor-
mance will fall off slightly, and heavy
loading should be avoided. For best
performance you should use the rec-
ommended grade of fuel, AON 90
(205 hp engine and Viggen AON 93).
The maximum boost pressure is
adjusted automatically to the knocking
or pinging tendency of the engine.
Occasional, short-lived knocking when
the engine is under a heavy load is per-
fectly normal; the extent will depend on
the grade of fuel in the tank.
Isolated instances of knocking are
more likely to occur with low-octane
fuel. This controlled form of knocking,
followed by a reduction in the boost
pressure, is a sign that the wastegate is
functioning and is perfectly safe for the
engine.Saab 9-3 Viggen: The Saab 9-3 Viggen has
a high-performance engine which means
that a certain amount of care should be
exercised, in particular when accelerating in
the lower gears. This is especially important
when the road surface is slippery to avoid
the driving wheels losing their grip.
Limp-homeThe car’s engine management system has
a diagnostics function that, once the engine
has been switched off, checks a number of
internal functions. If a throttle valve fault is
detected, the engine management system
will initiate limp-home mode for the valve.
This means, for example, that idling speed
regulation will be impaired, the cruise con-
trol system will be inoperative, and the
capacity of the A/C compressor will be lim-
ited.
When starting the car in limp-home mode at
temperatures below 32°F (0°C), depress
the accelerator slightly.
If the diagnosis function detects any faults in
the engine management system, the
“Engine malfunction (CHECK ENGINE)
“ indicator in the main instrument panel
will light up (see page 63). The car should
be checked as soon as possible at an
authorized Saab dealer.
NOTEIf constant knocking occurs every time a
load is put on the engine, this indicates a
malfunction in the system.
Have the car checked without delay by an
authorized Saab dealer. NOTEIf the engine is being run with the car on a
rolling road or dynamometer, longer than
for a standard state emission inspection,
to ensure adequate cooling, air must be
blown into the engine compartment and
under the car at a rate equivalent to the
ram-air effect that would be obtained at
the corresponding road speed.
ProCarManuals.com