SAAB 9-3 2003 Owners Manual
Manufacturer: SAAB, Model Year: 2003, Model line: 9-3, Model: SAAB 9-3 2003Pages: 256, PDF Size: 21.66 MB
Page 111 of 256
111 Interior equipment
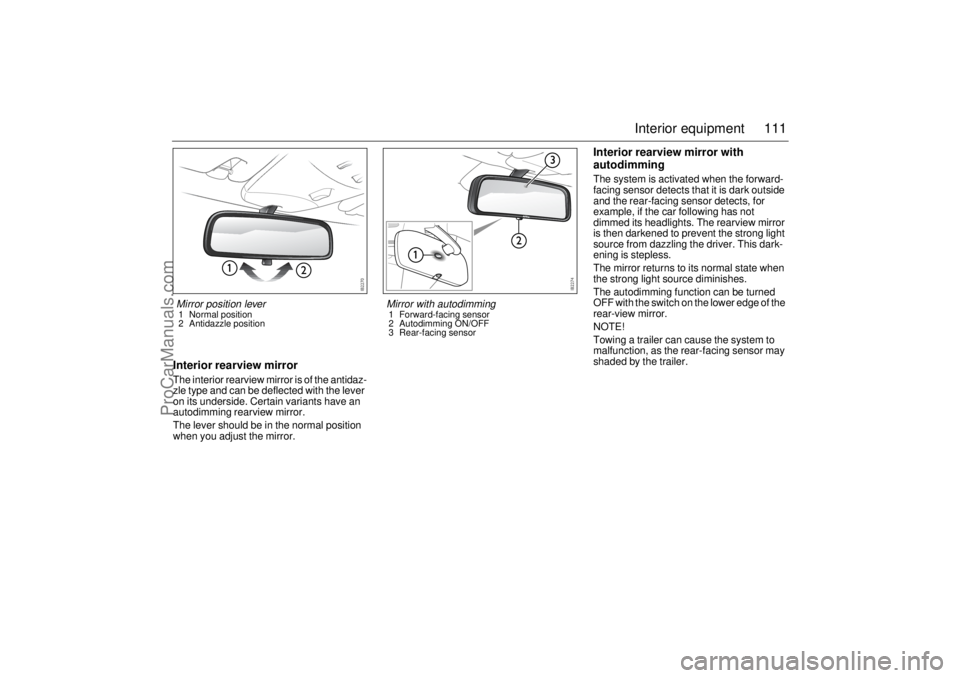
Interior rearview mirrorThe interior rearview mirror is of the antidaz-
zle type and can be deflected with the lever
on its underside. Certain variants have an
autodimming rearview mirror.
The lever should be in the normal position
when you adjust the mirror.
Interior rearview mirror with
autodimmingThe system is activated when the forward-
facing sensor detects that it is dark outside
and the rear-facing sensor detects, for
example, if the car following has not
dimmed its headlights. The rearview mirror
is then darkened to prevent the strong light
source from dazzling the driver. This dark-
ening is stepless.
The mirror returns to its normal state when
the strong light source diminishes.
The autodimming function can be turned
OFF with the switch on the lower edge of the
rear-view mirror.
NOTE!
Towing a trailer can cause the system to
malfunction, as the rear-facing sensor may
shaded by the trailer.
Mirror position lever1 Normal position
2 Antidazzle position
Mirror with autodimming1 Forward-facing sensor
2 Autodimming ON/OFF
3 Rear-facing sensor
ProCarManuals.com
Page 112 of 256
112 Interior equipmentInterior rearview mirror with garage
opener, autodimming function and
compass (certain variants only)
Retain your original garage door opener
(transmitter) for future programming proce-
dures (i.e., new vehicle purchase). It is also
suggested that upon the sale of the vehicle,
the programmed garage opener buttons be
erased for security purposes, see page 113.Preparations for first-time programming
Before programming the garage opener for
the first time, you must delete any factory
codes.
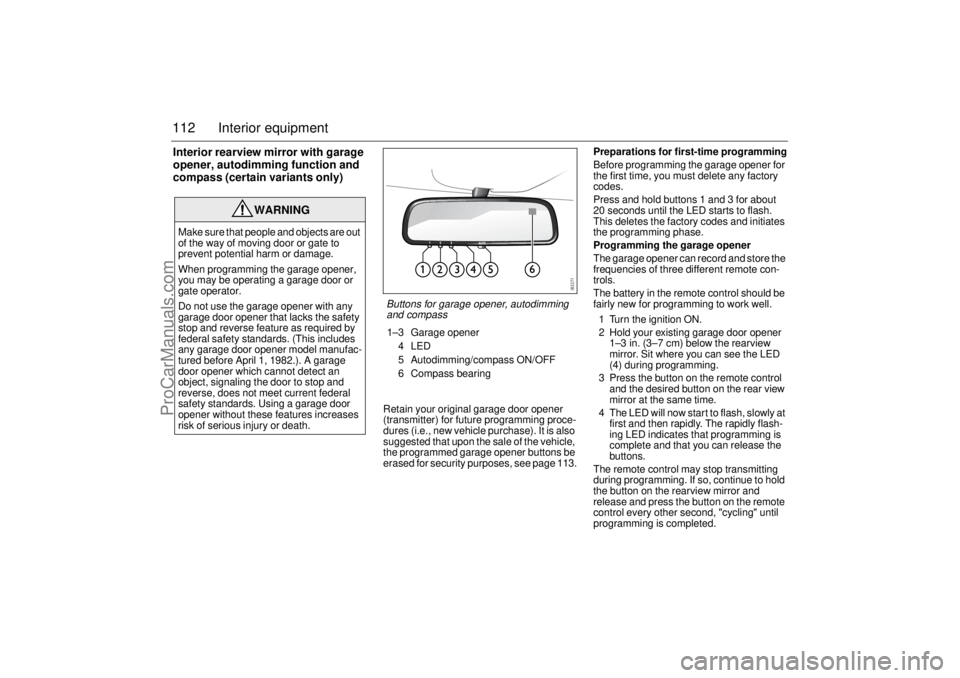
Press and hold buttons 1 and 3 for about
20 seconds until the LED starts to flash.
This deletes the factory codes and initiates
the programming phase.
Programming the garage opener
The garage opener can record and store the
frequencies of three different remote con-
trols.
The battery in the remote control should be
fairly new for programming to work well.
1 Turn the ignition ON.
2 Hold your existing garage door opener
1–3 in. (3–7 cm) below the rearview
mirror. Sit where you can see the LED
(4) during programming.
3 Press the button on the remote control
and the desired button on the rear view
mirror at the same time.
4 The LED will now start to flash, slowly at
first and then rapidly. The rapidly flash-
ing LED indicates that programming is
complete and that you can release the
buttons.
The remote control may stop transmitting
during programming. If so, continue to hold
the button on the rearview mirror and
release and press the button on the remote
control every other second, "cycling" until
programming is completed.
WARNING
Make sure that people and objects are out
of the way of moving door or gate to
prevent potential harm or damage.
When programming the garage opener,
you may be operating a garage door or
gate operator.
Do not use the garage opener with any
garage door opener that lacks the safety
stop and reverse feature as required by
federal safety standards. (This includes
any garage door opener model manufac-
tured before April 1, 1982.). A garage
door opener which cannot detect an
object, signaling the door to stop and
reverse, does not meet current federal
safety standards. Using a garage door
opener without these features increases
risk of serious injury or death.
Buttons for garage opener, autodimming
and compass1–3 Garage opener
4LED
5 Autodimming/compass ON/OFF
6 Compass bearing
ProCarManuals.com
Page 113 of 256

113 Interior equipment
The LED will flash slowly at first and then
rapidly. The rapidly flashing LED indicates
that programming is complete and that you
can release the buttons.
Reprogramming a button that has previ-
ously been programmed
1 Press and hold the desired button on the
rearview mirror for the entire program-
ming sequence.
2 The LED will start to flash slowly after
20 seconds.
3 Hold your existing garage door opener
1–3 in. (3–7 cm) from the rearview
mirror and press the button on the
remote control.
4 Reprogramming is complete when the
LED starts to flash rapidly.
The previous frequency is now erased and
replaced by the new one. Reprogramming
one button does not affect the other buttons.Complete erase
Completely erase the memory of the garage
opener by pressing and holding buttons
1 and 3 simultaneously for 20 seconds.
Confirmation is provided by the LED flash-
ing rapidly for 10 seconds.
A complete erase deletes the frequencies
from all three buttons. It is not possible to
erase the memory of a single button.
Opening a garage door
Press and hold the appropriate button until
the garage door starts to open.
You can of course still use your original
garage door opener even if you have pro-
grammed the garage opener in the rearview
mirror.Garage doors with rolling security codes
Garage doors with rolling security codes
manufactured after 1996 can be identified
as follows:
Read the instruction manual for the
garage door.
Programming the garage opener in the
rearview mirror seems to be successful
but the garage door does not open.
Press and hold the programmed button.
The garage door uses a rolling security
code if the LED flashes rapidly and after
2 seconds shines constantly.
If the garage door remote control uses roll-
ing security codes, proceed as follows
having programmed the garage opener:
1 Localise the button labelled "learn" or
"smart" on the motor unit of the garage
door. The location and color of this
button varies between makes.
2 Press and release the "learn" button on
the motor unit. Step 3 must be
performed within 30 seconds of Step 2.
3 Press the programmed button on the
rearview mirror twice (some garage
doors require the button to be pressed
three times; refer to the door’s instruc-
tion manual).NOTICESwitch off the power supply to the garage
door or gate (or park the car beyond the
range of the remote control) while
programming using the "cycling" method
to prevent damaging the electrical motor.
ProCarManuals.com
Page 114 of 256
114 Interior equipment
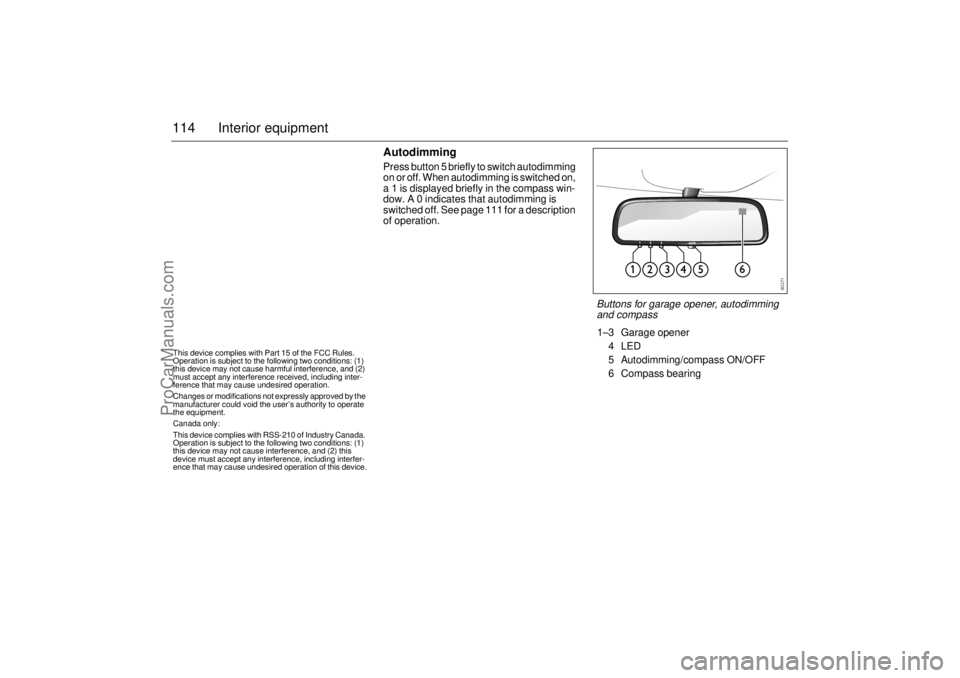
AutodimmingPress button 5 briefly to switch autodimming
on or off. When autodimming is switched on,
a 1 is displayed briefly in the compass win-
dow. A 0 indicates that autodimming is
switched off. See page 111 for a description
of operation.
This device complies with Part 15 of the FCC Rules.
Operation is subject to the following two conditions: (1)
this device may not cause harmful interference, and (2)
must accept any interference received, including inter-
ference that may cause undesired operation.
Changes or modifications not expressly approved by the
manufacturer could void the user’s authority to operate
the equipment.
Canada only:
This device complies with RSS-210 of Industry Canada.
Operation is subject to the following two conditions: (1)
this device may not cause interference, and (2) this
device must accept any interference, including interfer-
ence that may cause undesired operation of this device.
Buttons for garage opener, autodimming
and compass1–3 Garage opener
4LED
5 Autodimming/compass ON/OFF
6 Compass bearing
ProCarManuals.com
Page 115 of 256

115 Interior equipment
CompassThe compass is built into the rearview mir-
ror. The compass bearing is displayed in the
top right-hand corner of the mirror and is
updated every other second. The compass
displays the car’s direction of travel: N, NE,
E, etc.
Switch the compass display on and off by
pressing button 5 for 3 seconds, see illus-
tration on page 114.
Changing zones
The earth’s magnetic field varies depending
on one’s position on the globe. If you drive
your car from one magnetic zone to another
the compass setting will need to be changed
to ensure a correct bearing.
1 Study the illustrations to determine the
correct zone.
2 Press and hold button 5 until "ZONE" is
shown in the display on the mirror (6 s).
The zone number is now also shown.
3 Press button 5 repeatedly to change the
zone number. There are 15 zones from
which to choose. Once the correct zone
is selected, release the button and wait
4 seconds. The compass will now
display the bearing.Calibration
Calibration is performed automatically
during travel.
If, for any reason, a manual calibration is
needed perform as follows:
1 Press and hold button 5 until "CAL" and
the compass bearing are displayed
(approx. 9 s).
2 Drive in circles (max. 5 mph/8 km/h) or
drive as normal until "CAL" is no longer
displayed.
Compass zones in Canada
Compass zones in USA
ProCarManuals.com
Page 116 of 256
116 Interior equipmentTrunkFolding down the rear seatFor greater flexibility, the rear seat is split so that the narrow and
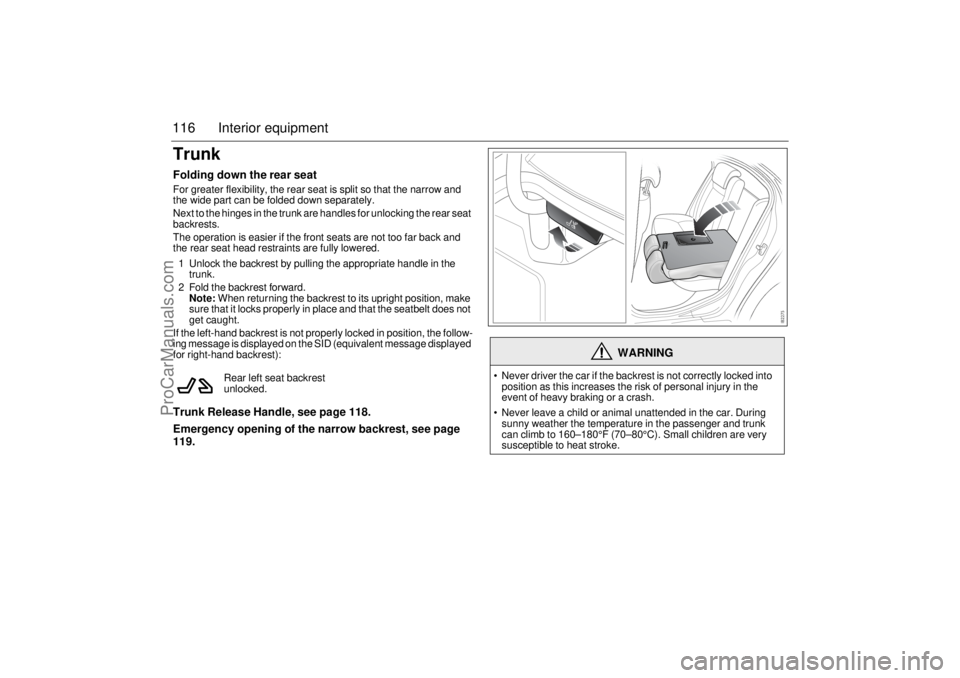
the wide part can be folded down separately.
Next to the hinges in the trunk are handles for unlocking the rear seat
backrests.
The operation is easier if the front seats are not too far back and
the rear seat head restraints are fully lowered.
1 Unlock the backrest by pulling the appropriate handle in the
trunk.
2 Fold the backrest forward.
Note: When returning the backrest to its upright position, make
sure that it locks properly in place and that the seatbelt does not
get caught.
If the left-hand backrest is not properly locked in position, the follow-
ing message is displayed on the SID (equivalent message displayed
for right-hand backrest):Trunk Release Handle, see page 118.
Emergency opening of the narrow backrest, see page
119.
Rear left seat backrest
unlocked.
WARNING
Never driver the car if the backrest is not correctly locked into
position as this increases the risk of personal injury in the
event of heavy braking or a crash.
Never leave a child or animal unattended in the car. During
sunny weather the temperature in the passenger and trunk
can climb to 160–180°F (70–80°C). Small children are very
susceptible to heat stroke.
ProCarManuals.com
Page 117 of 256
117 Interior equipment
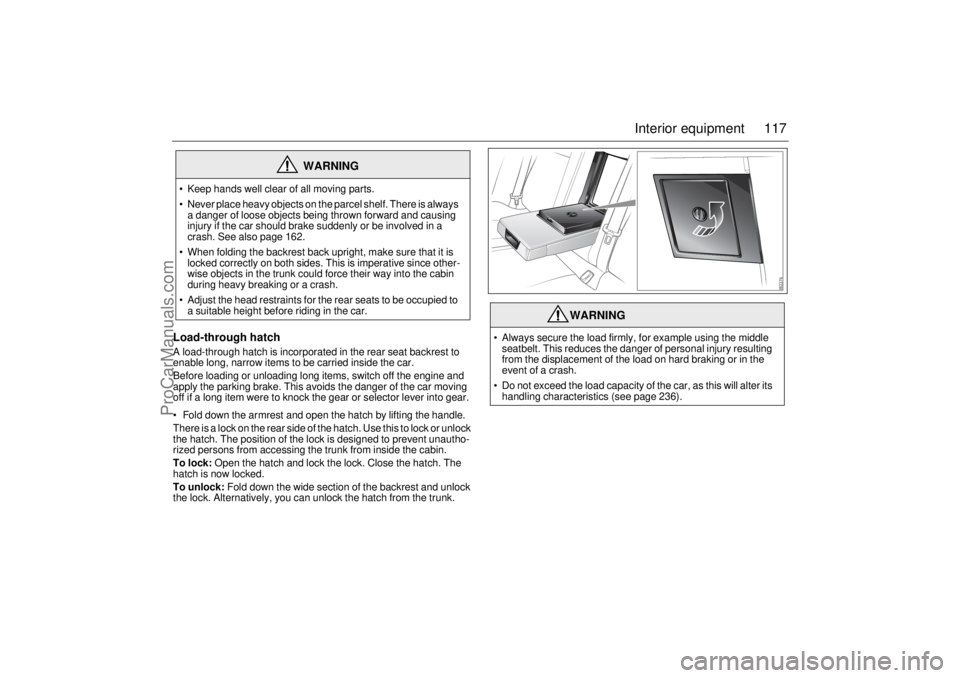
Load-through hatchA load-through hatch is incorporated in the rear seat backrest to
enable long, narrow items to be carried inside the car.
Before loading or unloading long items, switch off the engine and
apply the parking brake. This avoids the danger of the car moving
off if a long item were to knock the gear or selector lever into gear.
Fold down the armrest and open the hatch by lifting the handle.
There is a lock on the rear side of the hatch. Use this to lock or unlock
the hatch. The position of the lock is designed to prevent unautho-
rized persons from accessing the trunk from inside the cabin.
To lock: Open the hatch and lock the lock. Close the hatch. The
hatch is now locked.
To unlock: Fold down the wide section of the backrest and unlock
the lock. Alternatively, you can unlock the hatch from the trunk.
WARNING
Keep hands well clear of all moving parts.
Never place heavy objects on the parcel shelf. There is always
a danger of loose objects being thrown forward and causing
injury if the car should brake suddenly or be involved in a
crash. See also page 162.
When folding the backrest back upright, make sure that it is
locked correctly on both sides. This is imperative since other-
wise objects in the trunk could force their way into the cabin
during heavy breaking or a crash.
Adjust the head restraints for the rear seats to be occupied to
a suitable height before riding in the car.
WARNING
Always secure the load firmly, for example using the middle
seatbelt. This reduces the danger of personal injury resulting
from the displacement of the load on hard braking or in the
event of a crash.
Do not exceed the load capacity of the car, as this will alter its
handling characteristics (see page 236).
ProCarManuals.com
Page 118 of 256
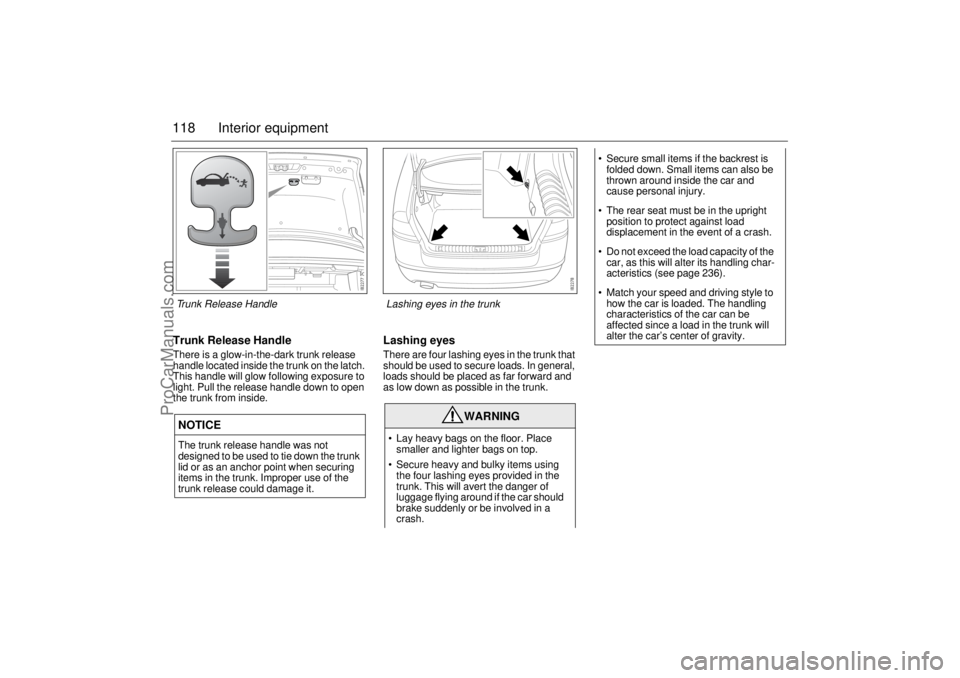
118 Interior equipmentTrunk Release HandleThere is a glow-in-the-dark trunk release
handle located inside the trunk on the latch.
This handle will glow following exposure to
light. Pull the release handle down to open
the trunk from inside.
Lashing eyesThere are four lashing eyes in the trunk that
should be used to secure loads. In general,
loads should be placed as far forward and
as low down as possible in the trunk.
NOTICEThe trunk release handle was not
designed to be used to tie down the trunk
lid or as an anchor point when securing
items in the trunk. Improper use of the
trunk release could damage it.
WARNING
Lay heavy bags on the floor. Place
smaller and lighter bags on top.
Secure heavy and bulky items using
the four lashing eyes provided in the
trunk. This will avert the danger of
luggage flying around if the car should
brake suddenly or be involved in a
crash.
Secure small items if the backrest is
folded down. Small items can also be
thrown around inside the car and
cause personal injury.
The rear seat must be in the upright
position to protect against load
displacement in the event of a crash.
Do not exceed the load capacity of the
car, as this will alter its handling char-
acteristics (see page 236).
Match your speed and driving style to
how the car is loaded. The handling
characteristics of the car can be
affected since a load in the trunk will
alter the car’s center of gravity.
Trunk Release Handle Lashing eyes in the trunk
ProCarManuals.com
Page 119 of 256
119 Interior equipment
Trunk lightingOn the underside of the parcel shelf is a light
that is switched on and off when the trunk is
opened and closed.
If the trunk lid is left open, the lighting will be
switched off automatically after 20 minutes
to prevent the battery from running flat.
Emergency opening of the narrow
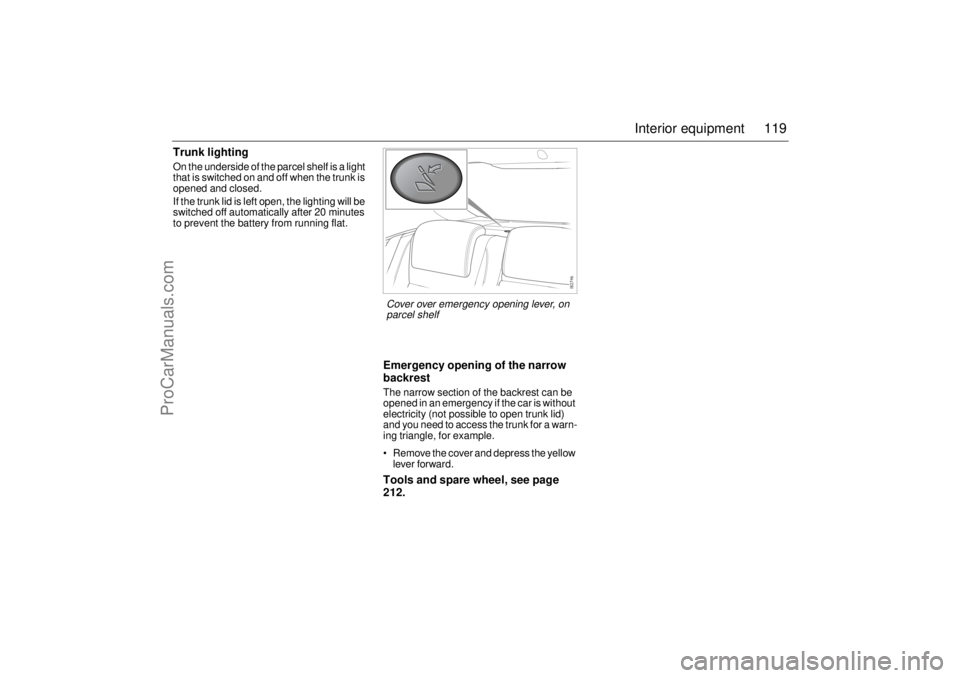
backrestThe narrow section of the backrest can be
opened in an emergency if the car is without
electricity (not possible to open trunk lid)
and you need to access the trunk for a warn-
ing triangle, for example.
Remove the cover and depress the yellow
lever forward.Tools and spare wheel, see page
212.Cover over emergency opening lever, on
parcel shelf
ProCarManuals.com
Page 120 of 256

120 Interior equipment(This page has been left blank.)
ProCarManuals.com