seat adjustment SAAB 9-3 2003 Owners Manual
[x] Cancel search | Manufacturer: SAAB, Model Year: 2003, Model line: 9-3, Model: SAAB 9-3 2003Pages: 256, PDF Size: 21.66 MB
Page 5 of 256
5
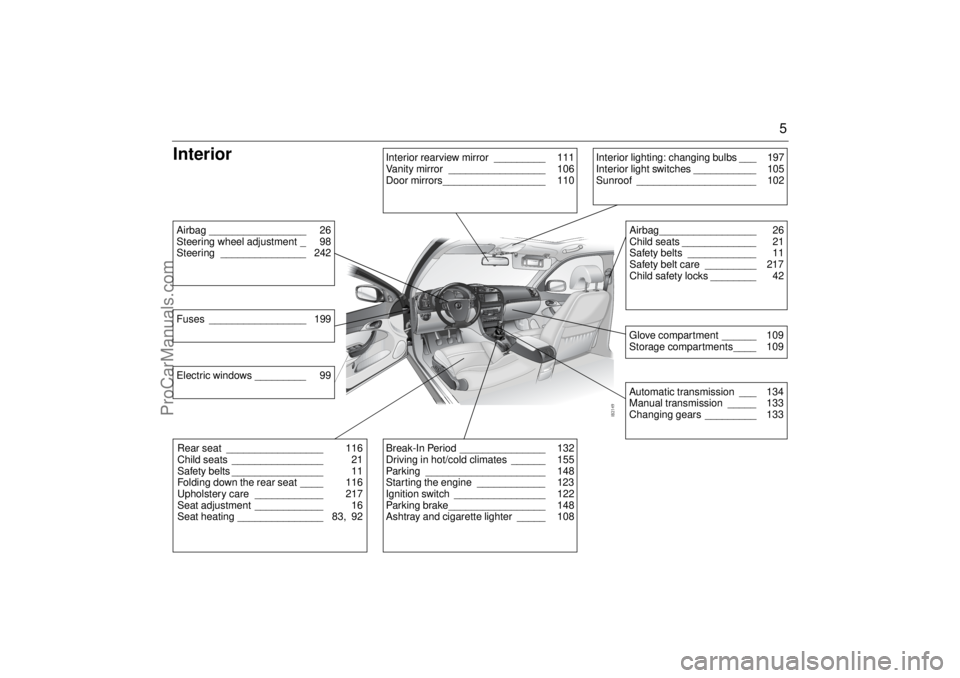
InteriorAirbag _________________ 26
Steering wheel adjustment _ 98
Steering _______________ 242
Interior rearview mirror _________ 111
Vanity mirror _________________ 106
Door mirrors__________________ 110
Airbag_________________ 26
Child seats _____________ 21
Safety belts ____________ 11
Safety belt care _________ 217
Child safety locks ________ 42Glove compartment ______ 109
Storage compartments____ 109Automatic transmission ___ 134
Manual transmission _____ 133
Changing gears _________ 133
Rear seat _________________ 116
Child seats ________________ 21
Safety belts ________________ 11
Folding down the rear seat ____ 116
Upholstery care ____________ 217
Seat adjustment ____________ 16
Seat heating _______________ 83, 92
Interior lighting: changing bulbs ___ 197
Interior light switches ___________ 105
Sunroof _____________________ 102
Break-In Period _______________ 132
Driving in hot/cold climates ______ 155
Parking _____________________ 148
Starting the engine ____________ 123
Ignition switch ________________ 122
Parking brake_________________ 148
Ashtray and cigarette lighter _____ 108
Fuses _________________ 199Electric windows _________ 99
ProCarManuals.com
Page 13 of 256
13 Safety
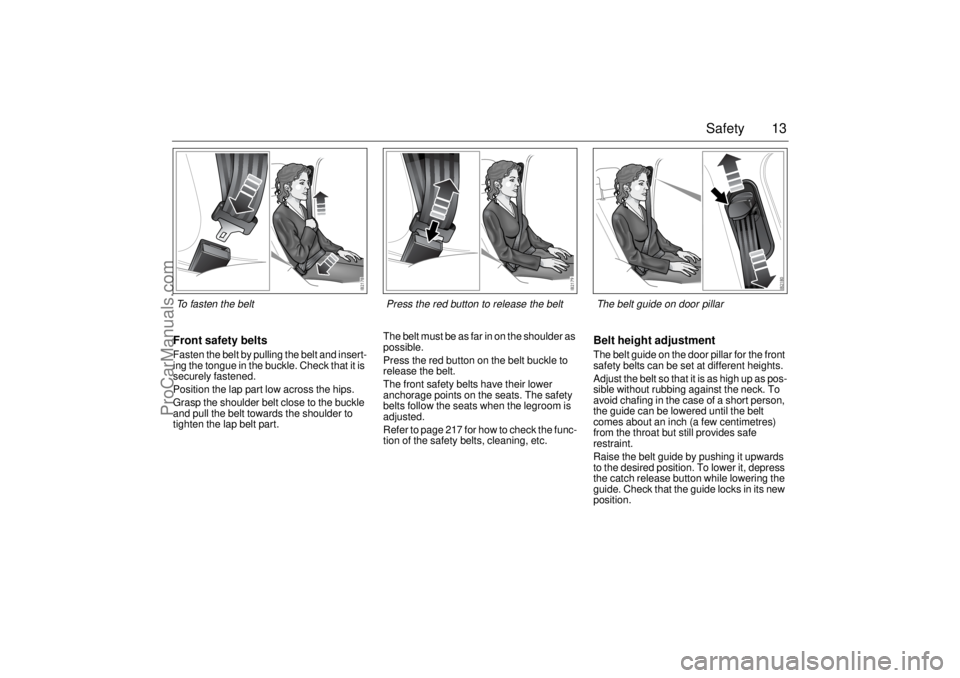
Front safety beltsFasten the belt by pulling the belt and insert-
ing the tongue in the buckle. Check that it is
securely fastened.
Position the lap part low across the hips.
Grasp the shoulder belt close to the buckle
and pull the belt towards the shoulder to
tighten the lap belt part.The belt must be as far in on the shoulder as
possible.
Press the red button on the belt buckle to
release the belt.
The front safety belts have their lower
anchorage points on the seats. The safety
belts follow the seats when the legroom is
adjusted.
Refer to page 217 for how to check the func-
tion of the safety belts, cleaning, etc.
Belt height adjustmentThe belt guide on the door pillar for the front
safety belts can be set at different heights.
Adjust the belt so that it is as high up as pos-
sible without rubbing against the neck. To
avoid chafing in the case of a short person,
the guide can be lowered until the belt
comes about an inch (a few centimetres)
from the throat but still provides safe
restraint.
Raise the belt guide by pushing it upwards
to the desired position. To lower it, depress
the catch release button while lowering the
guide. Check that the guide locks in its new
position.
To fasten the belt Press the red button to release the belt
The belt guide on door pillar
ProCarManuals.com
Page 16 of 256
16 SafetySeatsManually adjusted front seatsThe following seat adjustments can be
made to achieve a comfortable driving
position:
Height (driver’s seat)
Legroom
Backrest rake angle
Lumbar support (driver’s seat)
Head-restraint height
We recommend that adjustments to the
driver’s seat be performed in the following
order:
1 Height
2 Legroom
3 Backrest rake angle
4 Head restraint height
Lastly, adjust the position of the steering
wheel (see page 98).Electrically adjustable front seatsSee page 18.Electric heating, front seats (option)See pages 83 and 92.
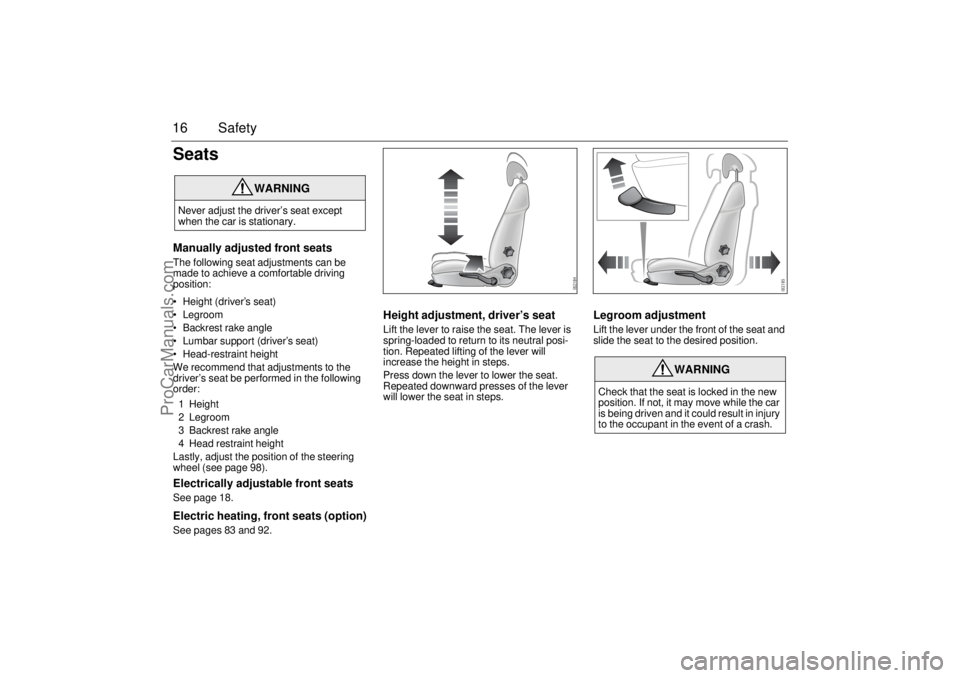
Height adjustment, driver’s seatLift the lever to raise the seat. The lever is
spring-loaded to return to its neutral posi-
tion. Repeated lifting of the lever will
increase the height in steps.
Press down the lever to lower the seat.
Repeated downward presses of the lever
will lower the seat in steps.
Legroom adjustmentLift the lever under the front of the seat and
slide the seat to the desired position.
WARNING
Never adjust the driver’s seat except
when the car is stationary.
WARNING
Check that the seat is locked in the new
position. If not, it may move while the car
is being driven and it could result in injury
to the occupant in the event of a crash.
ProCarManuals.com
Page 18 of 256

18 SafetyElectrically adjustable front seats
(option)With the doors closed the seats can only be
adjusted when the ignition is ON.
However, there are two exceptions:
To facilitate getting into the car, both seats
can be adjusted when either of the front
doors is open.
The seats can be adjusted up to
20 seconds after both doors have been
closed (applicable only to cars without
window and sunroof pinch protection).
Height adjustment and seat angleAdjust the height of the seat with the rear
section of the front lever.
Adjust the angle of the seat with the front
section of the front lever.
Legroom adjustmentAdjust the legroom with the front lever.
WARNING
The seats are actuated by powerful
motors. Bear this in mind when adjust-
ing the seat, and make sure that noth-
ing gets caught and damaged. Ensure
that nothing can be trapped behind the
seat when adjusting it.
Bear in mind that children can be
injured if they play with the electrically-
operated seats.
Always remove the remote control
when you leave the car to prevent
personal injury caused by the electri-
cally adjustable seats, for example,
due to children playing.
ProCarManuals.com
Page 19 of 256
19 Safety
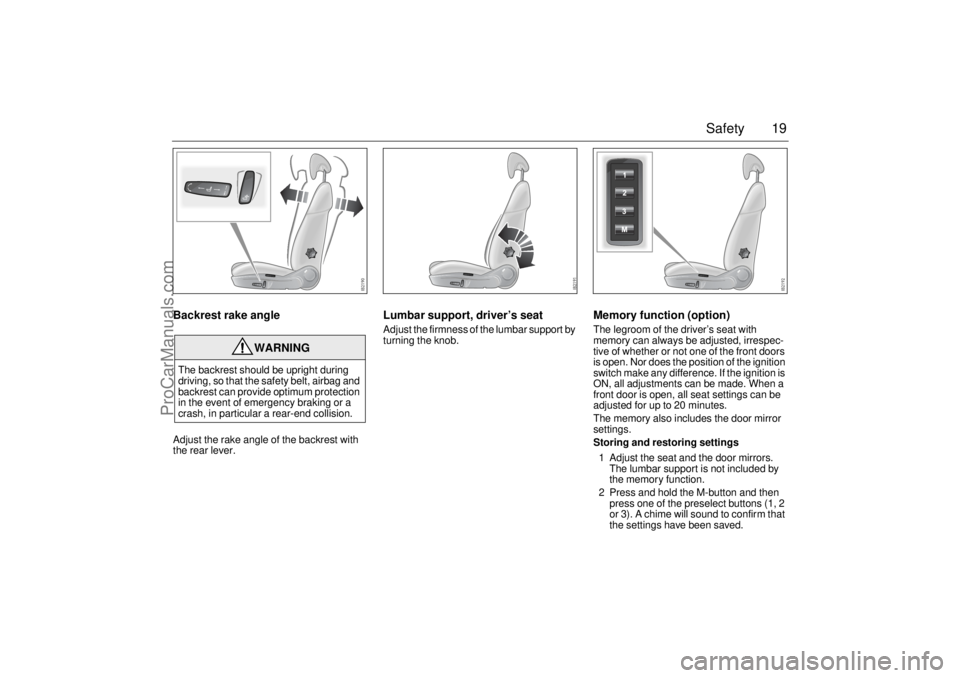
Backrest rake angleAdjust the rake angle of the backrest with
the rear lever.
Lumbar support, driver’s seatAdjust the firmness of the lumbar support by
turning the knob.
Memory function (option)The legroom of the driver’s seat with
memory can always be adjusted, irrespec-
tive of whether or not one of the front doors
is open. Nor does the position of the ignition
switch make any difference. If the ignition is
ON, all adjustments can be made. When a
front door is open, all seat settings can be
adjusted for up to 20 minutes.
The memory also includes the door mirror
settings.
Storing and restoring settings
1 Adjust the seat and the door mirrors.
The lumbar support is not included by
the memory function.
2 Press and hold the M-button and then
press one of the preselect buttons (1, 2
or 3). A chime will sound to confirm that
the settings have been saved.
WARNING
The backrest should be upright during
driving, so that the safety belt, airbag and
backrest can provide optimum protection
in the event of emergency braking or a
crash, in particular a rear-end collision.
ProCarManuals.com
Page 110 of 256
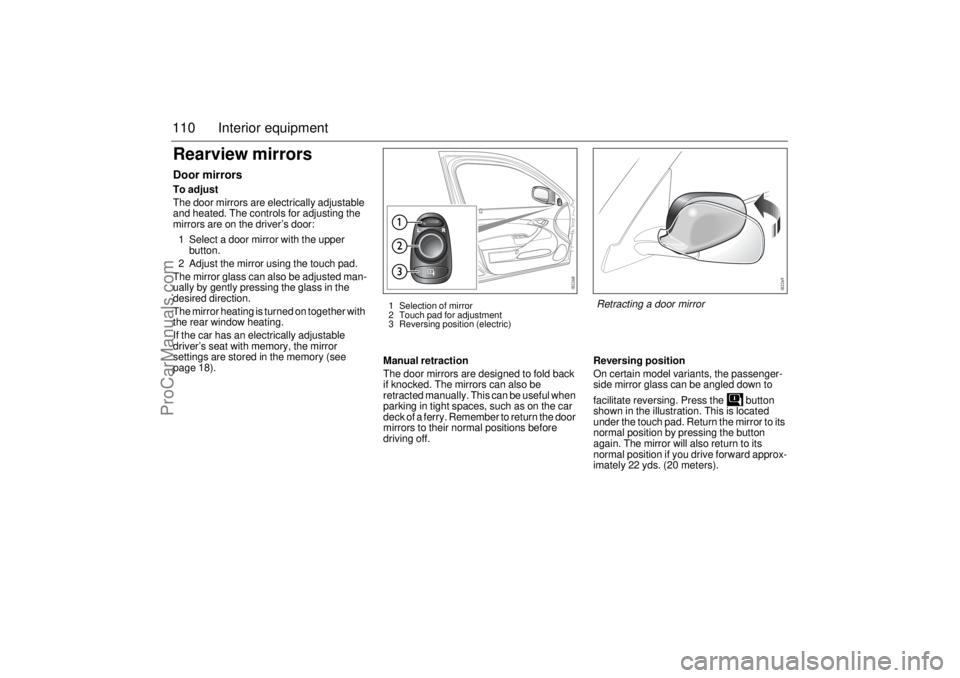
110 Interior equipmentRearview mirrorsDoor mirrorsTo adjust
The door mirrors are electrically adjustable
and heated. The controls for adjusting the
mirrors are on the driver’s door:
1 Select a door mirror with the upper
button.
2 Adjust the mirror using the touch pad.
The mirror glass can also be adjusted man-
ually by gently pressing the glass in the
desired direction.
The mirror heating is turned on together with
the rear window heating.
If the car has an electrically adjustable
driver’s seat with memory, the mirror
settings are stored in the memory (see
page 18).Manual retraction
The door mirrors are designed to fold back
if knocked. The mirrors can also be
retracted manually. This can be useful when
parking in tight spaces, such as on the car
deck of a ferry. Remember to return the door
mirrors to their normal positions before
driving off.Reversing position
On certain model variants, the passenger-
side mirror glass can be angled down to
facilitate reversing. Press the button
shown in the illustration. This is located
under the touch pad. Return the mirror to its
normal position by pressing the button
again. The mirror will also return to its
normal position if you drive forward approx-
imately 22 yds. (20 meters).
1 Selection of mirror
2 Touch pad for adjustment
3 Reversing position (electric)
Retracting a door mirror
ProCarManuals.com
Page 226 of 256
226 Car careHeadlight aimingThe vehicle has a visual optical headlight
aiming system equipped with vertical
aiming device. The aim has been preset at
the factory and should normally not need
further adjustments.
If your headlights are damaged in a crash,
the headlight aim may be affected. If you
believe your headlights need to be re-
aimed, we recommend that you take it to
your Saab dealer for service. However, it is
possible for you to re-aim your headlights as
described in the following procedure.To check the aim, the vehicle should be
properly prepared as follows:
The vehicle shall be placed so that the
headlights are 25 ft (7.6 m) from a light
colored wall or other flat surface. The
aiming area should be darkened, this will
improve your ability to see the beam of the
low beam headlight being aimed.
An optical headlamp aimer can also be
used and will than replace the wall.
The vehicle must have all four wheels on
a perfectly level surface which is level all
the way to the wall or other flat surface.
The vehicle should be placed so it is per-
pendicular to the wall or other flat surface.
The vehicle should be unloaded and fuel
tank full, and one person or 160 lbs.
(75 kg) on the drivers seat. The vehicle should be fully assembled
and all other work stopped while headlight
aiming is being done.
The vehicle should not have any snow, ice
or mud attached to it.
Tires should be inflated to the prescribed
pressure.
Close all doors.
Rock the vehicle to stabilize the suspen-
sion.
Headlight aiming is done with the vehicle
low beam lamps. The high beam lamps will
be correctly aimed if the low beam lamps
are aimed properly.
WARNING
Before checking/adjusting the headlight
aiming, switch off the engine to avoid
danger of fingers and hands being injured
by moving parts.
The radiator fan can start up even when
the engine is switched off.NOTICETo make sure that your headlights are
aimed properly read all instructions
before beginning. Failure to follow these
instructions could cause damage to
headlight parts or a not correctly aimed
headlight.
ProCarManuals.com
Page 251 of 256

251 Index
Index
AA/C
__________________________ 82
ABS brakes
___________________ 142
ACC
_________________________ 84
Adjustment, steering wheel
________ 98
Air conditioning
_________________ 82
Air filter
______________________ 178
Air pressure, tyres
______________ 207
Airbag
________________________ 26
Anchorage eyes
_______________ 118
Anti-corrosion treatment
_________ 220
Antilock braking system _________ 142
Anti-spin
_____________________ 144
Ashtrays _____________________ 108
Autochecking of lights, warning and
indicator lights
_________________ 58
Autodimming
______________ 111
, 112
Automatic climate control (ACC)
____ 84
Automatic transmission
__________ 134
Automatic tyre pressure monitoring
207
BBattery
______________________ 182
Bedding-in of new brake pads
____ 132
Before towing a trailer
___________ 160
Bonnet
______________________ 172Bootlid, driving when open
_______ 163
Bootlid, opening
________________ 41
Brake fluid, grade ______________ 242
Brakes
_______________________ 141
Braking ______________________ 141
Bulb changing
_________________ 188
Bulb table
____________________ 198
CCabin lighting
_________________ 105
Car alarm
_____________________ 46
Car transport __________________ 166
Care of air conditioning
__________ 225
Change of address notification
____ 232
Changing bulbs
________________ 188
Changing engine oil
____________ 177
Changing the battery, remote control
44
Changing wheels
______________ 214
Changing wiper blades
__________ 186
Checking the number of
remote controls
________________ 43
Checks before towing a trailer
____ 160
Child safety
____________________ 21
Child safety locks, rear doors
______ 42
Child seats
____________________ 21
Cigarette lighter
________________ 108
Cleaning the engine bay
_________ 218
Cleaning upholstery
____________ 217
Climate control system, manual
____ 79
Compact spare
________________ 212Compass
_____________________ 115
Condensation water, A/C
_________ 82
Coolant
______________________ 179
Cruise control
_________________ 140
Cup holder
____________________ 107
DDate codes, tyres
______________ 212
Deep water, driving through
______ 163
Direction indicator stalk switch _____ 75
Direction indicators
______________ 75
Donor battery, boost starting
______ 168
Door handles
___________________ 38
Door mirrors __________________ 110
Drive belt
_____________________ 185
Drive belt, length
_______________ 240
Driver’s seat with memory
_________ 19
Driving at night
________________ 163
Driving in cold climates
__________ 155
Driving in deep water
____________ 163
Driving in hot climates ___________ 156
Driving techniques
______________ 153
Driving with a heavy load on
hilly roads
___________________ 136
Driving with a load
______________ 162
Driving with a roof load
__________ 161
Driving with the bootlid open
______ 163
Driving with the compact
spare wheel
__________________ 167
ProCarManuals.com
Page 254 of 256

254 IndexRemote control
_________________ 38
Remote locking malfunction
_______ 40
Reporting safety defects
_________ 233
Rev counter
___________________ 59
Reversing lights ________________ 76
Roof lighting
__________________ 105
Roof lighting, changing
__________ 196
Running-in
___________________ 132
SSAHR, head restraint
____________ 20
SID
__________________________ 64
SPA _________________________ 151
Saab Information Display
_________ 64
Saab Parking Assistance ________ 151
Saab Trionic engine
management system
__________ 174
Safety belts
____________________ 11
Seatbelts
______________________ 11
Seatbelts, care
________________ 217
Seatbelts, checking
_____________ 217
Seats
_________________________ 16
Securing a load
________________ 118
Sentronic, manual gear selection
__ 139
Service costs
_________________ 232
Service information
_____________ 232
Service intervals
_______________ 230
Service record retention
_________ 231
Shifting the wheels
_____________ 209
Signalling, horn
_________________ 98Ski hatch
_____________________ 117
Spare wheel __________________ 212
Speed ratings, tyres
____________ 209
Speedometer
__________________ 60
Starting the engine
_____________ 123
Steering wheel adjustment
________ 98
Steering wheel lock
_____________ 123
Storage compartments __________ 109
Sun visor
_____________________ 106
Sunroof
______________________ 102
Switches ______________________ 72
TTCS
_________________________ 144
Technical data
_________________ 236
Textile carpeting, cleaning
_______ 218
Tightening torque, wheels ________ 216
Tools and spare wheel
__________ 212
Touching up paintwork __________ 219
Towbar
______________________ 157
Towbar load
__________________ 159
Towing
______________________ 164
Towing a trailer
________________ 157
Towing the car ________________ 165
Traction Control System (TCS)
____ 144
Transmission oil, checking
_______ 178
Transmission oil, grade
__________ 241
Transmission, automatic _________ 134
Transmission, manual
___________ 133
Transporting the car
____________ 166Trip computer
__________________ 65
Trip meter
_____________________ 59
Trolley jack ___________________ 215
Troubleshooting, A/C and ACC
____ 224
Turbo gauge
___________________ 61
Tyre date code ________________ 212
Tyre markings
_________________ 209
Tyre pressure _________________ 207
Tyre pressure monitoring, automatic
207
Tyre sizes
____________________ 243
Tyres
________________________ 206
UUpholstery care
________________ 217
Upholstery, cleaning
____________ 217
Useful tips on night driving
_______ 163
Useful tips on starting petrol engines
125
VVanity mirror
__________________ 106
Vehicle identification number
_____ 246
Vehicle recovery
_______________ 166
WWarning labels
___________________ 7
Warning lights __________________ 54
Warning triangle ________________ 76
ProCarManuals.com