SAAB 9-3 2008 Owners Manual
Manufacturer: SAAB, Model Year: 2008, Model line: 9-3, Model: SAAB 9-3 2008Pages: 320, PDF Size: 56.39 MB
Page 201 of 320
201 Starting and driving
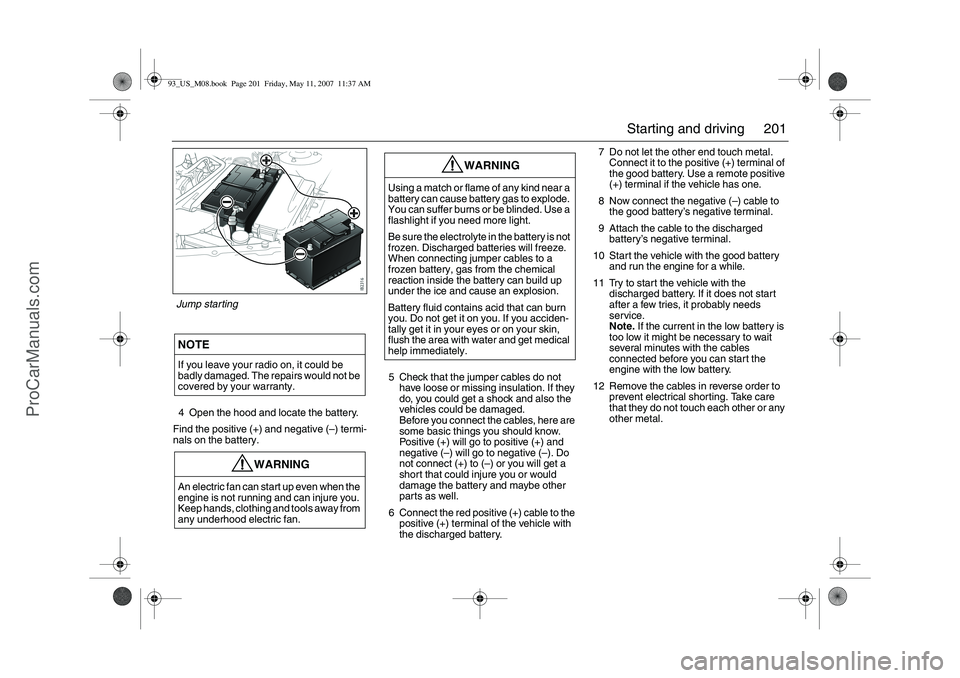
4 Open the hood and locate the battery.
Find the positive (+) and negative (–) termi-
nals on the battery.5 Check that the jumper cables do not
have loose or missing insulation. If they
do, you could get a shock and also the
vehicles could be damaged.
Before you connect the cables, here are
some basic things you should know.
Positive (+) will go to positive (+) and
negative (–) will go to negative (–). Do
not connect (+) to (–) or you will get a
short that could injure you or would
damage the battery and maybe other
parts as well.
6 Connect the red positive (+) cable to the
positive (+) terminal of the vehicle with
the discharged battery.7 Do not let the other end touch metal.
Connect it to the positive (+) terminal of
the good battery. Use a remote positive
(+) terminal if the vehicle has one.
8 Now connect the negative (–) cable to
the good battery’s negative terminal.
9 Attach the cable to the discharged
battery’s negative terminal.
10 Start the vehicle with the good battery
and run the engine for a while.
11 Try to start the vehicle with the
discharged battery. If it does not start
after a few tries, it probably needs
service.
Note. If the current in the low battery is
too low it might be necessary to wait
several minutes with the cables
connected before you can start the
engine with the low battery.
12 Remove the cables in reverse order to
prevent electrical shorting. Take care
that they do not touch each other or any
other metal.NOTEIf you leave your radio on, it could be
badly damaged. The repairs would not be
covered by your warranty.
WARNING
An electric fan can start up even when the
engine is not running and can injure you.
Keep hands, clothing and tools away from
any underhood electric fan.
WARNING
Using a match or flame of any kind near a
battery can cause battery gas to explode.
You can suffer burns or be blinded. Use a
flashlight if you need more light.
Be sure the electrolyte in the battery is not
frozen. Discharged batteries will freeze.
When connecting jumper cables to a
frozen battery, gas from the chemical
reaction inside the battery can build up
under the ice and cause an explosion.
Battery fluid contains acid that can burn
you. Do not get it on you. If you acciden-
tally get it in your eyes or on your skin,
flush the area with water and get medical
help immediately.
Jump starting93_US_M08.book Page 201 Friday, May 11, 2007 11:37 AM
ProCarManuals.com
Page 202 of 320
202 Starting and drivingUsing a battery charger3
33 3/starter
unitTo avoid damaging the car’s electrical
system and electronics, the following rules
must be followed when charging the battery
or jump starting the car.
If the charger or starter unit can be set to
different voltages (6 V/12 V/18 V/24 V),
12V must be selected.
Follow the manufacturer’s instructions
supplied with the charger or starter unit.
No other apparatus that are grounded or
connected to the mains must be
connected to the car during charging or
jump starting.
The charger or starter unit must under no
conditions produce a voltage greater
than:
16 V continuous
18 V for 60 minutes.
If you are unsure about the charge rating of
the unit, disconnect the battery clamp from
the positive terminal before connecting the
unit to the battery.
For long tripsBefore starting off on a long journey, it is
advisable to have your car inspected by
your Saab dealer.
Obtain a few important items to take along
on your journey, such as spare bulbs, wiper
blades, fuses, a drive belt (poly-V-belt) and
the like.
You can check some points yourself before-
hand:
Check that no oil or fuel leaks out of the
engine or gearbox/transmission.
Check the coolant and power steering
fluid levels. Check also for leaks.
Inspect the drive belt (poly-V-belt) and
replace if it shows any signs of wear.
Check the battery charge.
Check the tires for tread pattern and air
pressure, including the compact spare
tire.
Take an extra remote control and keep it
separate.
Check the brakes.
Check all bulbs.
Check for the presence of the tool kit and
jack in the car.
93_US_M08.book Page 202 Friday, May 11, 2007 11:37 AM
ProCarManuals.com
Page 203 of 320
203 Car care
Hood ________________ 204
Engine ______________ 205
Engine bay, 4-cyl engine 208
Engine bay, V6 engine _ 209
Engine oil ____________ 210
Air filter______________ 211
Transmission fluid ____ 212
Coolant ______________ 212
Brake/clutch fluid and
brake pads__________ 214
Power steering________ 215
Battery ______________ 216
Drive belt ____________ 219
Wipers and washers ___ 220
Wiper blades _________ 220
Changing bulbs _______ 222
Fuses _______________ 237 Tires _________________ 244
Automatic tire pressure
monitoring system ____ 257
Compact spare ________ 260
Changing a tire ________ 262
Safety belts ___________ 266
Upholstery and trim ____ 266
Textile carpeting _______ 267
Engine bay ____________ 267
Washing ______________ 267
Waxing and polishing ___ 270
Touching up the paint___ 270
Anti-corrosion treatment 271
Recovery and/or
recycling of automotive
materials ____________ 273
Air conditioning (A/C) ___ 274
Car care
3Asterisk means: equipment not fitted in all cars
(can depend on model variant, engine variant,
market specification, options or accessories).93_US_M08.book Page 203 Friday, May 11, 2007 11:37 AM
ProCarManuals.com
Page 204 of 320
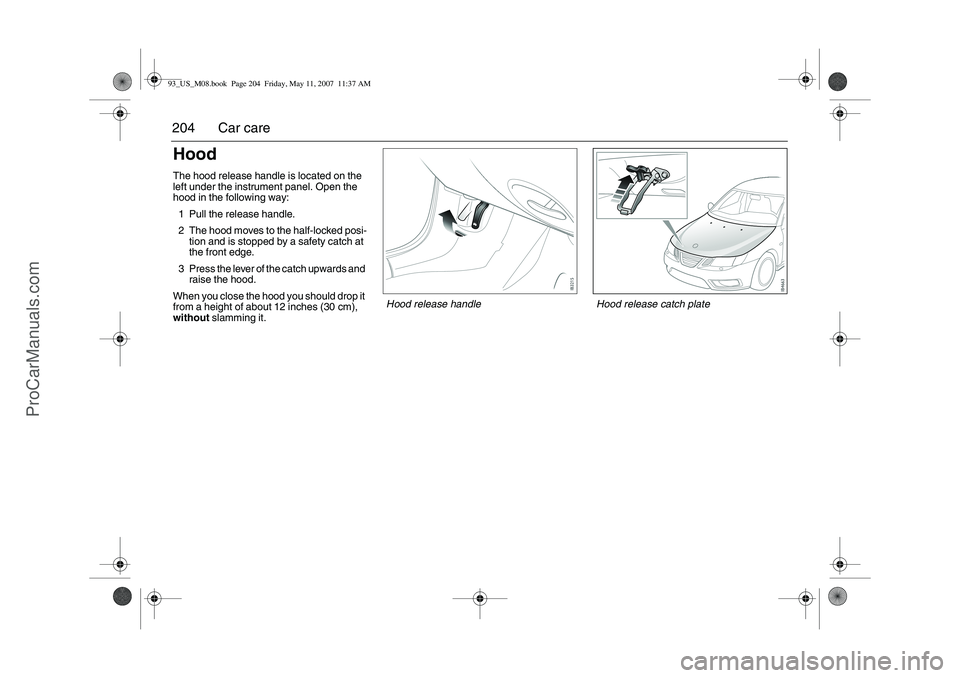
204 Car careHoodThe hood release handle is located on the
left under the instrument panel. Open the
hood in the following way:
1 Pull the release handle.
2 The hood moves to the half-locked posi-
tion and is stopped by a safety catch at
the front edge.
3 Press the lever of the catch upwards and
raise the hood.
When you close the hood you should drop it
from a height of about 12 inches (30 cm),
without slamming it.
Hood release catch plate
Hood release handle
93_US_M08.book Page 204 Friday, May 11, 2007 11:37 AM
ProCarManuals.com
Page 205 of 320
205 Car care
EngineTurbo 4-cylinder engineThe engine is a transverse four-cylinder
in-line engine with twin overhead camshafts
and 16 valves.
The engine is equipped with two balance-
shafts that reduce engine vibrations to a
minimum.
The balance shafts are chain-driven and
rotate at twice the speed of the crankshaft.
They produce forces and torques that are
opposed to those generated by the pistons
and connecting rods. The effect occurs
twice in each revolution of the engine, coun-
teracting the vibration from its moving parts,
and at the same time reducing unwanted
engine noise.
The gearbox, located on the right (viewed
from the front), is integrated with the engine.
Turbo V6 engineThe V6 engine is a turbocharged V6 engine
produced completely of aluminium with 60°
between the cylinder banks, 4 valves per
cylinder, 2 camshafts per bank.
The camshafts are driven via a chain trans-
mission. The engine is equipped with a
turbo whose turbine collects exhaust pres-
sure from both banks of cylinders.
To obtain optimum performance, fuel con-
sumption and low emission levels the
engine is equipped with CVCP (Continuous
Variable Cam Phasing). This means that
the engine’s intake camshafts can be
adjusted to achieve optimum functionality.
The switches are hydraulic.
Engine familiesSaab cars imported into the United States
and Canada meet all applicable emission
control standards. The engine family and
appropriate tune-up specifications are iden-
tified on a label in the engine bay.
These engine families meet applicable EPA
Federal Standards, California State Stan-
dards and Canadian Federal Standards and
are equipped with the following systems:
sequential multiport fuel injection system
three way catalytic converter
crankcase emissions control system
evaporative emission system.
93_US_M08.book Page 205 Friday, May 11, 2007 11:37 AM
ProCarManuals.com
Page 206 of 320
206 Car careEmission control
systemsThe systems for controlling emissions to the
atmosphere require regular checking and
adjustment at the intervals specified in the
service program.
In addition to meeting the exhaust emission
regulations and thereby helping to keep the
environment clean, a correctly tuned engine
will also give maximum fuel economy.
Saab Trionic engine
management system, 4-cyl
engineThe Saab Trionic engine management
system is a unique Saab development that
combines sequential multiport fuel injection,
electronic distributorless ignition and turbo-
charger boost pressure control into one sys-
tem.
The Trionic engine control module (ECM)
monitors many different engine parameters
such as:
Intake manifold pressure.
Intake air temperature.
Crankshaft position.
Engine coolant temperature.
Throttle position.
The oxygen content of the exhaust gases.
The ECM receives information regarding
engine knocking from a sophisticated feed-
back function in the ignition discharge unit.
By processing all of this information, the Tri-
onic system can control fuel injector open-
ing duration, ignition timing and turbo-
charger boost pressure to provide excellent
engine performance while maintaining low
emissions and fuel consumption.
WARNING
Engine exhaust, some of its constituents,
and certain vehicle components contain
or emit chemicals known to the State of
California to cause cancer and birth
defects and reproductive harm. In addi-
tion, certain fluids contained in vehicles
and certain products of component wear
contain or emit chemicals known to the
State of California to cause cancer and
birth defects or other reproductive harm.
NOTEThe Trionic engine management system
continuously monitors the operation of
these systems and has on-board diag-
nostic capabilities (OBD II). If the Engine
malfunction (CHECK ENGINE) light in
the main instrument illuminates, the Tri-
onic ECM has detected a problem. The
car will continue to operate, but perfor-
mance may be diminished. You should
have your car checked by a workshop as
soon as possible. We recommend that
you contact a Saab dealer.
93_US_M08.book Page 206 Friday, May 11, 2007 11:37 AM
ProCarManuals.com
Page 207 of 320
207 Car care
Bosch ME9 engine management
system, V6 engineThe Bosch ME9 engine management
system is a system that combines sequen-
tial multiport fuel injection, electronic distrib-
utorless ignition and turbocharger boost
pressure control into one system and intake
camshaft phasing control.
The ME9 engine control module (ECM)
monitors many different engine parameters
such as:
Charge air pressure.
Intake air temperature.
Crankshaft position.
Engine coolant temperature.
Throttle position.
The oxygen content of the exhaust gases.
By processing all of this information, the
ME9 system can control fuel injector open-
ing duration, ignition timing, intake camshaft
phasing and turbocharger boost pressure to
provide excellent engine performance while
maintaining low emissions and fuel con-
sumption.
ORVR (Onboard Refueling Vapor
Recovery)All hydrocarbons formed when refueling will
be recovered by the car and not released
into the atmosphere. The hydrocarbons are
absorbed in an evaporative emission canis-
ter. When the engine is subsequently
started, the evaporative emission canister is
gradually purged as air is sucked into it
through a shut-off valve. The hydrocar-
bon/air mixture passes through the evap
canister purge valve and into the engine
where it is burned. “Refueling”, see
page 159.
When refueling, make sure you screw the
filler cap on and keep turning until it has
clicked 3 times.
NOTEThe ME9 engine management system
continuously monitors the operation of
these systems and has on-board diag-
nostic capabilities (OBD II). If the Engine
malfunction (CHECK ENGINE) light in
the main instrument illuminates, the ME9
ECM has detected a problem. The car will
continue to operate, but performance
may be diminished. You should have your
car checked by a workshop as soon as
possible. We recommend that you con-
tact a Saab dealer.
93_US_M08.book Page 207 Friday, May 11, 2007 11:37 AM
ProCarManuals.com
Page 208 of 320
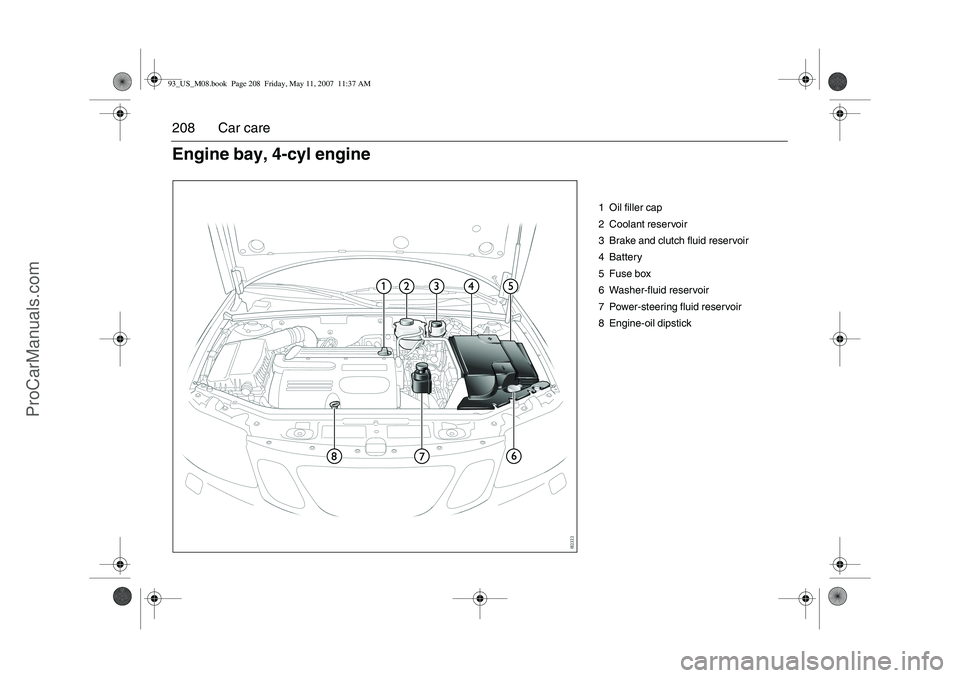
208 Car care
1 Oil filler cap
2 Coolant reservoir
3 Brake and clutch fluid reservoir
4Battery
5 Fuse box
6 Washer-fluid reservoir
7 Power-steering fluid reservoir
8 Engine-oil dipstick
Engine bay, 4-cyl engine93_US_M08.book Page 208 Friday, May 11, 2007 11:37 AM
ProCarManuals.com
Page 209 of 320
209 Car care
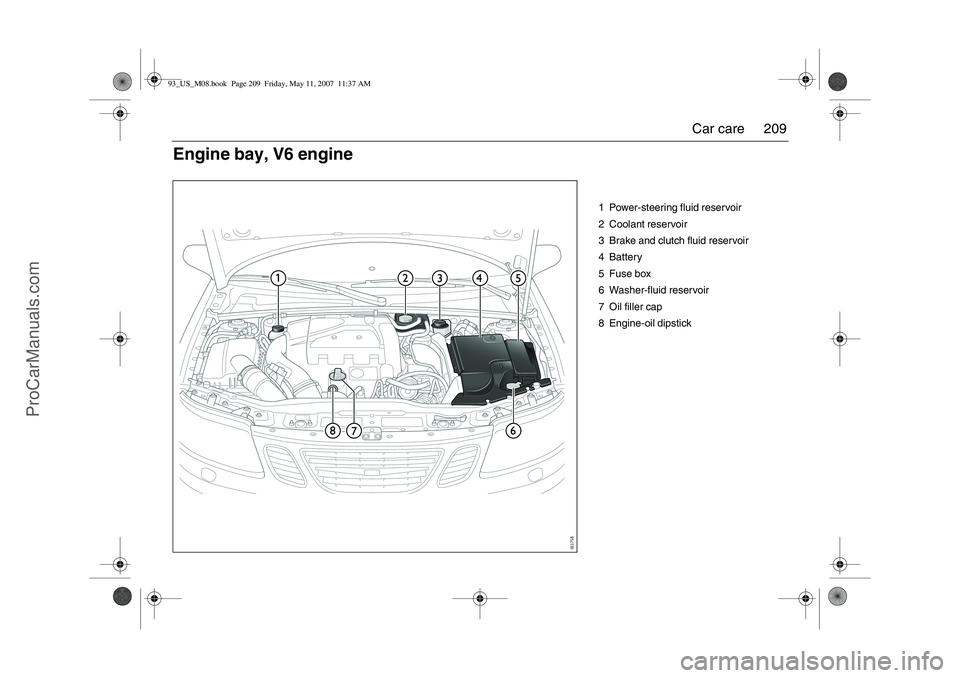
1 Power-steering fluid reservoir
2 Coolant reservoir
3 Brake and clutch fluid reservoir
4Battery
5 Fuse box
6 Washer-fluid reservoir
7 Oil filler cap
8 Engine-oil dipstick
Engine bay, V6 engine93_US_M08.book Page 209 Friday, May 11, 2007 11:37 AM
ProCarManuals.com
Page 210 of 320
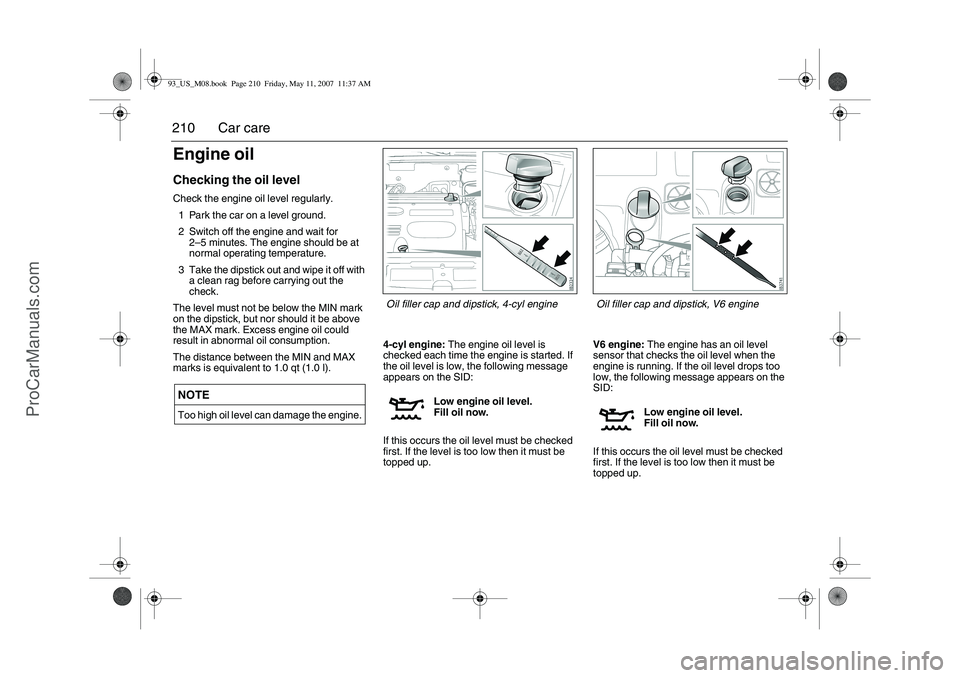
210 Car careEngine oilChecking the oil levelCheck the engine oil level regularly.
1 Park the car on a level ground.
2 Switch off the engine and wait for
2–5 minutes. The engine should be at
normal operating temperature.
3 Take the dipstick out and wipe it off with
a clean rag before carrying out the
check.
The level must not be below the MIN mark
on the dipstick, but nor should it be above
the MAX mark. Excess engine oil could
result in abnormal oil consumption.
The distance between the MIN and MAX
marks is equivalent to 1.0 qt (1.0 l).4-cyl engine: The engine oil level is
checked each time the engine is started. If
the oil level is low, the following message
appears on the SID:
If this occurs the oil level must be checked
first. If the level is too low then it must be
topped up.V6 engine: The engine has an oil level
sensor that checks the oil level when the
engine is running. If the oil level drops too
low, the following message appears on the
SID:
If this occurs the oil level must be checked
first. If the level is too low then it must be
topped up.NOTEToo high oil level can damage the engine.
Low engine oil level.
Fill oil now.
Low engine oil level.
Fill oil now.
Oil filler cap and dipstick, 4-cyl engine
Oil filler cap and dipstick, V6 engine
93_US_M08.book Page 210 Friday, May 11, 2007 11:37 AM
ProCarManuals.com