tow SAAB 9-3 2008 Owners Manual
[x] Cancel search | Manufacturer: SAAB, Model Year: 2008, Model line: 9-3, Model: SAAB 9-3 2008Pages: 320, PDF Size: 56.39 MB
Page 4 of 320
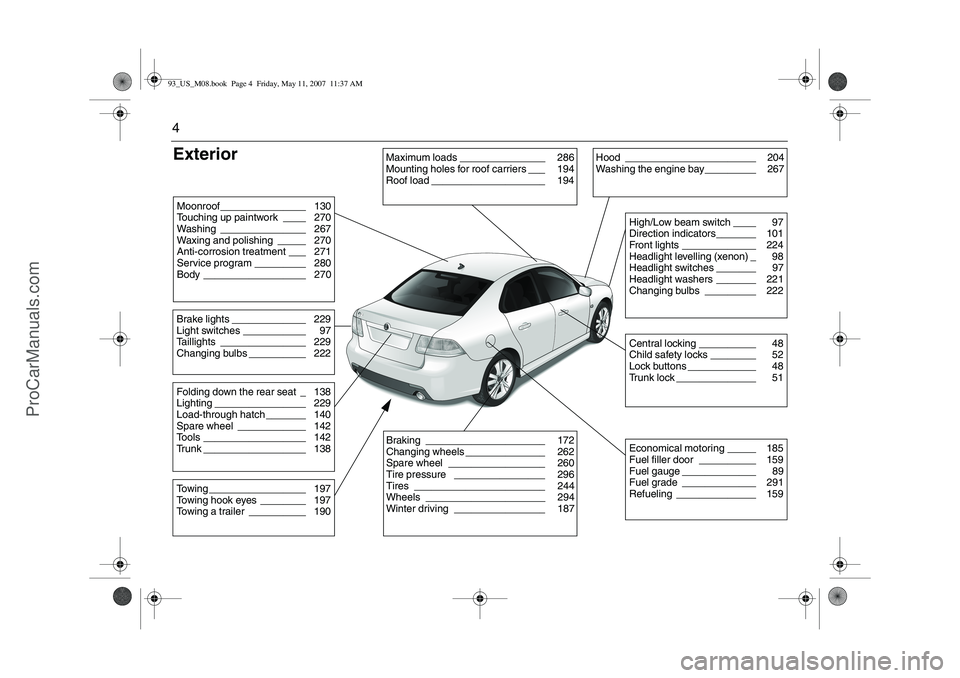
4ExteriorMoonroof_______________ 130
Touching up paintwork ____ 270
Washing _______________ 267
Waxing and polishing _____ 270
Anti-corrosion treatment ___ 271
Service program _________ 280
Body __________________ 270Brake lights _____________ 229
Light switches ___________ 97
Taillights _______________ 229
Changing bulbs __________ 222Towing _________________ 197
Towing hook eyes ________ 197
Towing a trailer __________ 190Folding down the rear seat _ 138
Lighting ________________ 229
Load-through hatch _______ 140
Spare wheel ____________ 142
Tools __________________ 142
Trunk __________________ 138
Maximum loads _______________ 286
Mounting holes for roof carriers ___ 194
Roof load ____________________ 194
Hood _______________________ 204
Washing the engine bay_________ 267
Central locking __________ 48
Child safety locks ________ 52
Lock buttons ____________ 48
Trunk lock ______________ 51High/Low beam switch ____ 97
Direction indicators_______ 101
Front lights _____________ 224
Headlight levelling (xenon) _ 98
Headlight switches _______ 97
Headlight washers _______ 221
Changing bulbs _________ 222Economical motoring _____ 185
Fuel filler door __________ 159
Fuel gauge _____________ 89
Fuel grade _____________ 291
Refueling ______________ 159
Braking _____________________ 172
Changing wheels ______________ 262
Spare wheel _________________ 260
Tire pressure ________________ 296
Tires _______________________ 244
Wheels _____________________ 294
Winter driving ________________ 187
93_US_M08.book Page 4 Friday, May 11, 2007 11:37 AM
ProCarManuals.com
Page 14 of 320
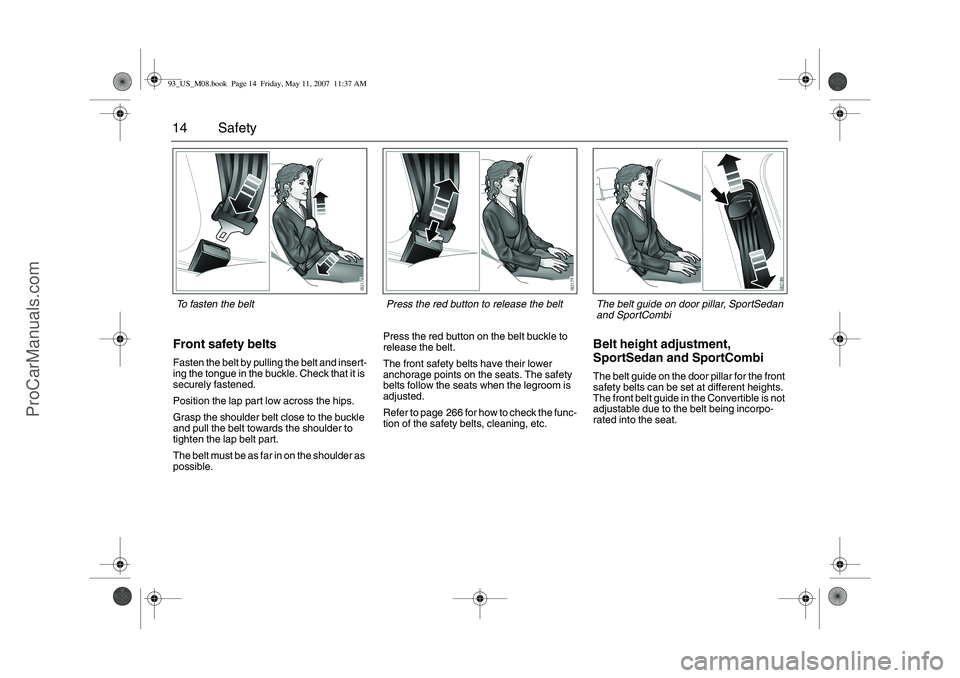
14 SafetyFront safety beltsFasten the belt by pulling the belt and insert-
ing the tongue in the buckle. Check that it is
securely fastened.
Position the lap part low across the hips.
Grasp the shoulder belt close to the buckle
and pull the belt towards the shoulder to
tighten the lap belt part.
The belt must be as far in on the shoulder as
possible.Press the red button on the belt buckle to
release the belt.
The front safety belts have their lower
anchorage points on the seats. The safety
belts follow the seats when the legroom is
adjusted.
Refer to page 266 for how to check the func-
tion of the safety belts, cleaning, etc.
Belt height adjustment,
SportSedan and SportCombiThe belt guide on the door pillar for the front
safety belts can be set at different heights.
The front belt guide in the Convertible is not
adjustable due to the belt being incorpo-
rated into the seat.
To fasten the belt Press the red button to release the belt
The belt guide on door pillar, SportSedan
and SportCombi
93_US_M08.book Page 14 Friday, May 11, 2007 11:37 AM
ProCarManuals.com
Page 17 of 320
17 Safety
Safety belts, rear seat,
SportSedan and SportCombiSafety belts rear seat, Convertible, see
page 75.
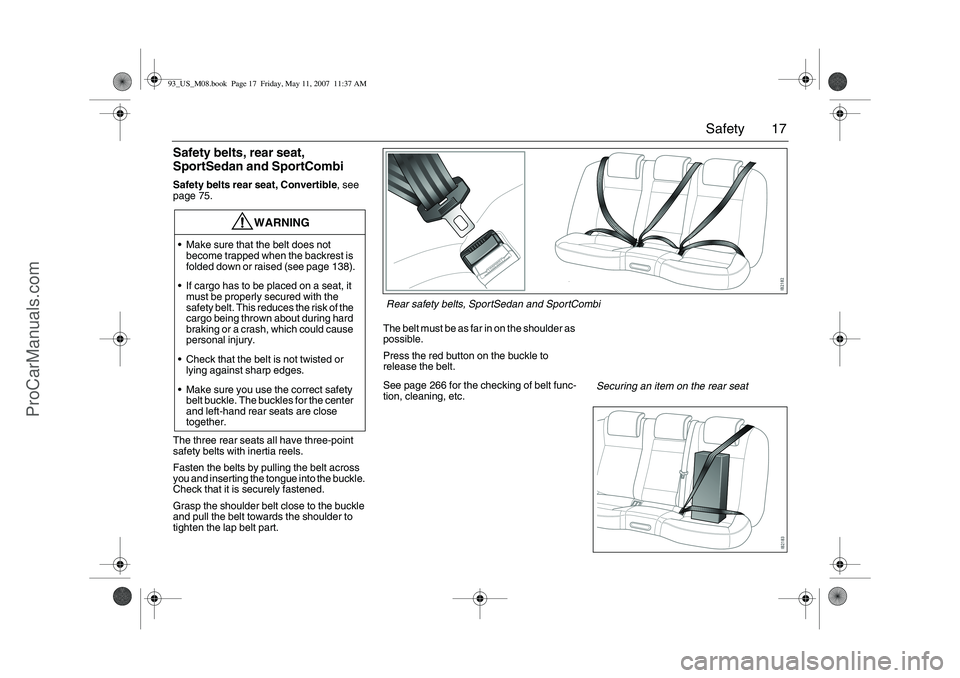
The three rear seats all have three-point
safety belts with inertia reels.
Fasten the belts by pulling the belt across
you and inserting the tongue into the buckle.
Check that it is securely fastened.
Grasp the shoulder belt close to the buckle
and pull the belt towards the shoulder to
tighten the lap belt part.The belt must be as far in on the shoulder as
possible.
Press the red button on the buckle to
release the belt.
See page 266 for the checking of belt func-
tion, cleaning, etc.
WARNING
Make sure that the belt does not
become trapped when the backrest is
folded down or raised (see page 138).
If cargo has to be placed on a seat, it
must be properly secured with the
safety belt. This reduces the risk of the
cargo being thrown about during hard
braking or a crash, which could cause
personal injury.
Check that the belt is not twisted or
lying against sharp edges.
Make sure you use the correct safety
belt buckle. The buckles for the center
and left-hand rear seats are close
together.
Rear safety belts, SportSedan and SportCombi
Securing an item on the rear seat
93_US_M08.book Page 17 Friday, May 11, 2007 11:37 AM
ProCarManuals.com
Page 39 of 320
39 Safety
The passenger sensing system is designed
to enable (may inflate) the right front
passenger’s frontal airbag anytime the
system senses that a person of adult size is
sitting properly in the right front passenger’s
seat. When the passenger sensing system
has allowed the airbag to be enabled, the on
indicator will light and stay lit to remind you
that the airbag is active.
For some children who have outgrown child
restraints and for very small adults, the pas-
senger sensing system may or may not turn
off the right front passenger’s frontal airbag,
depending upon the person’s seating pos-
ture and body build. Everyone in your vehi-
cle who has outgrown child restraints
should wear a safety belt properly —
whether or not there is an airbag for that per-
son.If a person of adult-size is sitting in the right
front passenger’s seat, but the off indicator
is lit, it could be because that person is not
sitting properly in the seat. If this happens,
turn the vehicle off and ask the person to
place the seatback in the fully upright posi-
tion, then sit upright in the seat, centered on
the seat cushion, with the person’s legs
comfortably extended. Restart the vehicle
and have the person remain in this position
for about two minutes. This will allow the
system to detect that person and then
enable the passenger’s airbag.Aftermarket equipment, such as seat
covers, can affect how well the passenger
sensing system operates. You may want to
consider not using seat covers or other
aftermarket equipment if your vehicle has
the passenger sensing system. See Adding
Equipment to Your Airbag-Equipped Vehi-
cle for more information about modifications
that can affect how the system operates.
WARNING
If the airbag readiness light in the instru-
ment panel cluster ever comes on and
stays on, it means that something may be
wrong with the airbag system. If this ever
happens, have the vehicle serviced
promptly, because an adult-size person
sitting in the right front passenger’s seat
may not have the protection of the frontal
airbag. See Airbag warning lamp on
page 43 for more on this, including impor-
tant safety information.
WARNING
Stowing of articles under the passenger’s
seat or between the passenger’s seat
cushion and seatback may interfere with
the proper operation of the passenger
sensing system.
93_US_M08.book Page 39 Friday, May 11, 2007 11:37 AM
ProCarManuals.com
Page 62 of 320
62 9-3 ConvertibleAdvice on soft top
operationOnce you have raised the soft top and
before driving off, always check that the
soft top is properly engaged with the wind-
shield rail, see page 66.
Once you have folded the soft top and
before driving off, check that the soft top
cover is locked, see page 64.
Do not operate the soft top in tempera-
tures below 23°F (–5°C).
Note that certain automatic car washes
can damage the soft top. This applies to
car washes that use mechanical feelers
bearing against the body. Saab advises
against washing the Convertible in an
automatic car wash.
After rain or washing the car, allow the soft
top to dr y completely before folding it.
Folding a wet or damp soft top can cause
water damage in the car and mildew to
form on the soft top.Roof racks and ski holders must not be
mounted on the soft top.
Under no circumstances should anything
be put into the stowage space of the soft
top (under the soft top cover) since this
could cause an obstruction when the soft
top is being folded away.
Do not place any objects on the covers
over the roll bars as this can hamper their
function.
When operating the soft top, raise or fold
it fully until notified that operation is
complete by the SID. Do not leave the soft
top partially open/closed. If the soft top is
left in an intermediate position it will
collapse progressively after 20 seconds
to prevent overloading the drive system.
Washing the soft top, see page 267.
WARNING
Never touch the hinges and struts of
the soft top nor the upper rail of the
windshield while operating the soft
top.
Do not operate the soft top while there
are bystanders close to the car.
93_US_M08.book Page 62 Friday, May 11, 2007 11:37 AM
ProCarManuals.com
Page 69 of 320
69 9-3 Convertible
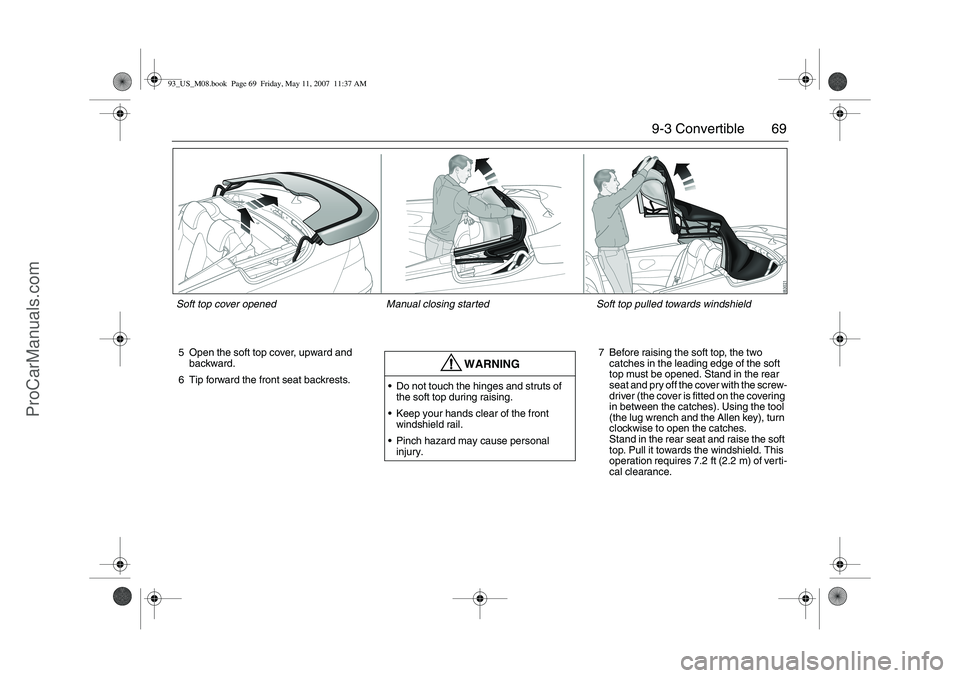
5 Open the soft top cover, upward and
backward.
6 Tip forward the front seat backrests.7 Before raising the soft top, the two
catches in the leading edge of the soft
top must be opened. Stand in the rear
seat and pry off the cover with the screw-
driver (the cover is fitted on the covering
in between the catches). Using the tool
(the lug wrench and the Allen key), turn
clockwise to open the catches.
Stand in the rear seat and raise the soft
top. Pull it towards the windshield. This
operation requires 7.2 ft (2.2 m) of verti-
cal clearance.
WARNING
Do not touch the hinges and struts of
the soft top during raising.
Keep your hands clear of the front
windshield rail.
Pinch hazard may cause personal
injury.
Soft top cover opened Manual closing started Soft top pulled towards windshield93_US_M08.book Page 69 Friday, May 11, 2007 11:37 AM
ProCarManuals.com
Page 70 of 320
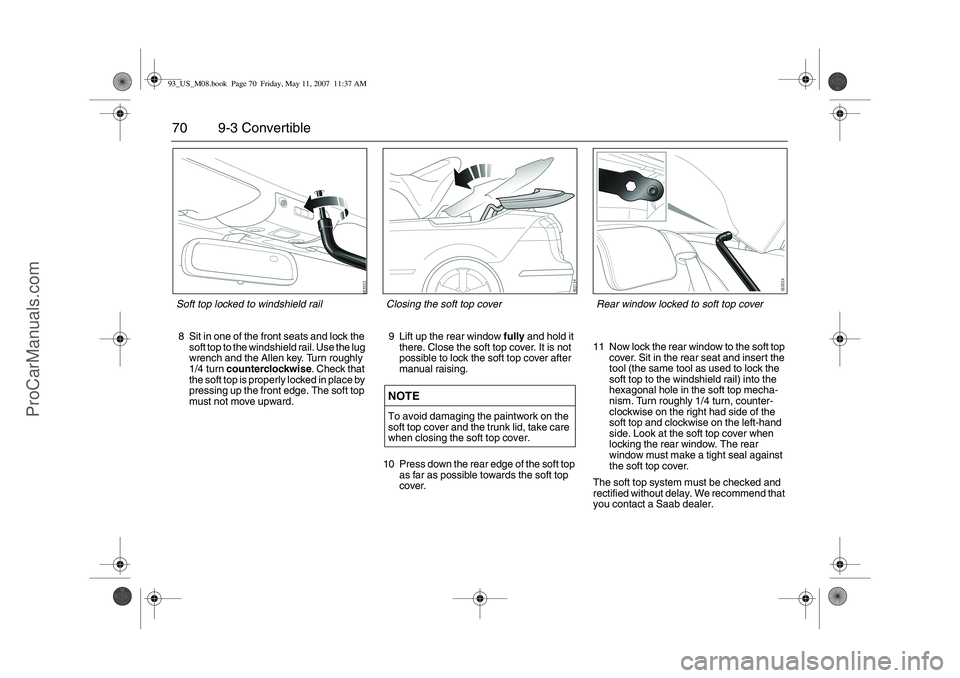
70 9-3 Convertible8 Sit in one of the front seats and lock the
soft top to the windshield rail. Use the lug
wrench and the Allen key. Turn roughly
1/4 turn counterclockwise. Check that
the soft top is properly locked in place by
pressing up the front edge. The soft top
must not move upward.9 Lift up the rear window fully and hold it
there. Close the soft top cover. It is not
possible to lock the soft top cover after
manual raising.
10 Press down the rear edge of the soft top
as far as possible towards the soft top
cover.11 Now lock the rear window to the soft top
cover. Sit in the rear seat and insert the
tool (the same tool as used to lock the
soft top to the windshield rail) into the
hexagonal hole in the soft top mecha-
nism. Turn roughly 1/4 turn, counter-
clockwise on the right had side of the
soft top and clockwise on the left-hand
side. Look at the soft top cover when
locking the rear window. The rear
window must make a tight seal against
the soft top cover.
The soft top system must be checked and
rectified without delay. We recommend that
you contact a Saab dealer.
NOTETo avoid damaging the paintwork on the
soft top cover and the trunk lid, take care
when closing the soft top cover.Closing the soft top cover
Rear window locked to soft top cover
Soft top locked to windshield rail93_US_M08.book Page 70 Friday, May 11, 2007 11:37 AM
ProCarManuals.com
Page 75 of 320
75 9-3 Convertible
Safety belts, rear seat,
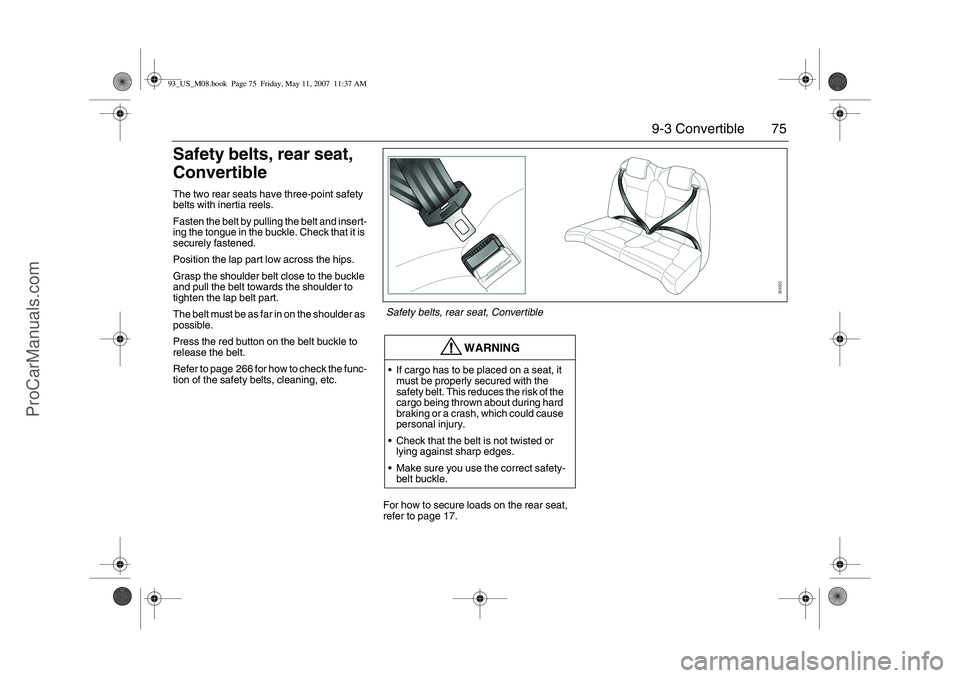
ConvertibleThe two rear seats have three-point safety
belts with inertia reels.
Fasten the belt by pulling the belt and insert-
ing the tongue in the buckle. Check that it is
securely fastened.
Position the lap part low across the hips.
Grasp the shoulder belt close to the buckle
and pull the belt towards the shoulder to
tighten the lap belt part.
The belt must be as far in on the shoulder as
possible.
Press the red button on the belt buckle to
release the belt.
Refer to page 266 for how to check the func-
tion of the safety belts, cleaning, etc.
For how to secure loads on the rear seat,
refer to page 17.
WARNING
If cargo has to be placed on a seat, it
must be properly secured with the
safety belt. This reduces the risk of the
cargo being thrown about during hard
braking or a crash, which could cause
personal injury.
Check that the belt is not twisted or
lying against sharp edges.
Make sure you use the correct safety-
belt buckle.Safety belts, rear seat, Convertible
93_US_M08.book Page 75 Friday, May 11, 2007 11:37 AM
ProCarManuals.com
Page 89 of 320
89 Instruments and controls
If the needle repeatedly enters the red zone
and the engine at the same time loses
power, because the monitoring system is
limiting the boost pressure, you should
contact a Saab dealer as soon as possible.
If the speed of the car exceeds 143 mph
(230 km/h), acceleration is limited by reduc-
ing the boost pressure. The pressure gauge
then moves towards the middle of the white
field, indicating a drop in engine power and
consequently the car’s speed.
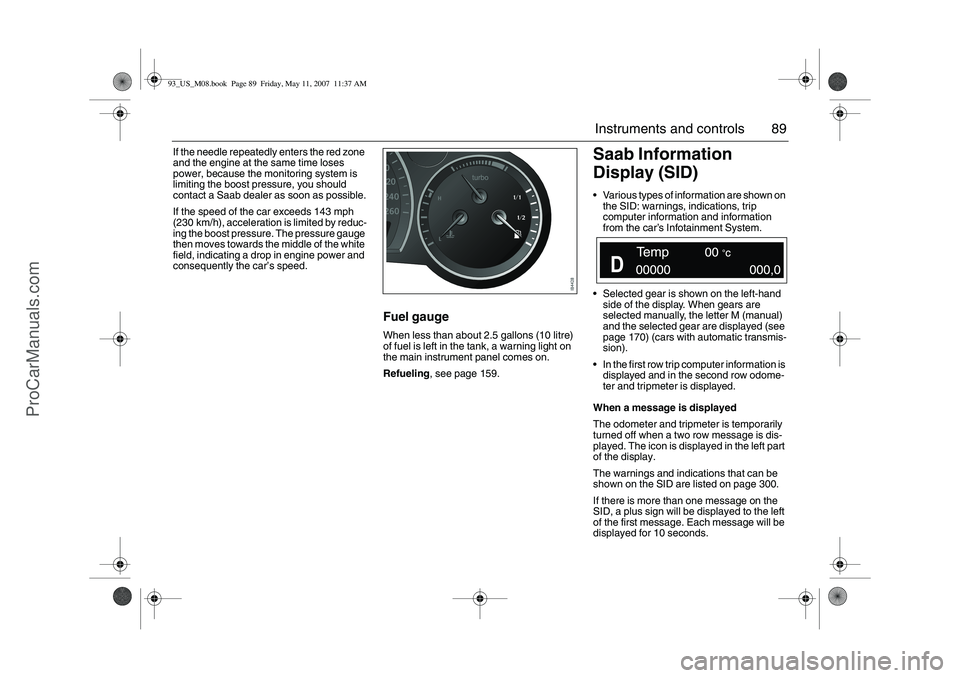
Fuel gaugeWhen less than about 2.5 gallons (10 litre)
of fuel is left in the tank, a warning light on
the main instrument panel comes on.
Refueling, see page 159.
Saab Information
Display (SID)Various types of information are shown on
the SID: warnings, indications, trip
computer information and information
from the car’s Infotainment System.
Selected gear is shown on the left-hand
side of the display. When gears are
selected manually, the letter M (manual)
and the selected gear are displayed (see
page 170) (cars with automatic transmis-
sion).
In the first row trip computer information is
displayed and in the second row odome-
ter and tripmeter is displayed.
When a message is displayed
The odometer and tripmeter is temporarily
turned off when a two row message is dis-
played. The icon is displayed in the left part
of the display.
The warnings and indications that can be
shown on the SID are listed on page 300.
If there is more than one message on the
SID, a plus sign will be displayed to the left
of the first message. Each message will be
displayed for 10 seconds.
93_US_M08.book Page 89 Friday, May 11, 2007 11:37 AM
ProCarManuals.com
Page 99 of 320
99 Instruments and controls
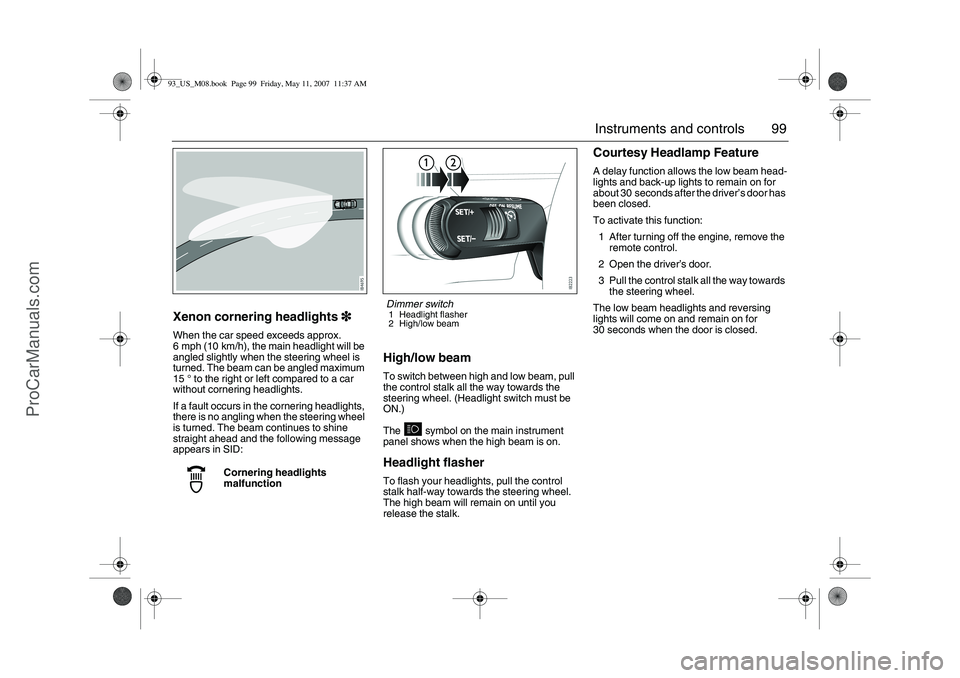
Xenon cornering headlights3
33 3When the car speed exceeds approx.
6 mph (10 km/h), the main headlight will be
angled slightly when the steering wheel is
turned. The beam can be angled maximum
15° to the right or left compared to a car
without cornering headlights.
If a fault occurs in the cornering headlights,
there is no angling when the steering wheel
is turned. The beam continues to shine
straight ahead and the following message
appears in SID:
High/low beamTo switch between high and low beam, pull
the control stalk all the way towards the
steering wheel. (Headlight switch must be
ON.)
The symbol on the main instrument
panel shows when the high beam is on.Headlight flasherTo flash your headlights, pull the control
stalk half-way towards the steering wheel.
The high beam will remain on until you
release the stalk.
Courtesy Headlamp FeatureA delay function allows the low beam head-
lights and back-up lights to remain on for
about 30 seconds after the driver’s door has
been closed.
To activate this function:
1 After turning off the engine, remove the
remote control.
2 Open the driver’s door.
3 Pull the control stalk all the way towards
the steering wheel.
The low beam headlights and reversing
lights will come on and remain on for
30 seconds when the door is closed.
Cornering headlights
malfunction
Dimmer switch1 Headlight flasher
2 High/low beam
93_US_M08.book Page 99 Friday, May 11, 2007 11:37 AM
ProCarManuals.com