flat tire SAAB 9-3 2009 User Guide
[x] Cancel search | Manufacturer: SAAB, Model Year: 2009, Model line: 9-3, Model: SAAB 9-3 2009Pages: 304, PDF Size: 44.31 MB
Page 252 of 304
252 Car careTread Width: The width of the tire´s tread.
UTQGS: Uniform Tire Quality Grade Stan-
dards, a tire information system that pro-
vides consumers with ratings for a tire´s
traction, temperature and treadwear. Rat-
ings are determined by tire manufacturers
using government testing procedures. The
rating are molded into the sidewall of the
tire. See “Uniform Tire Quality Grading” on
page 244.
Vehicle Capacity Weight: Is the number of
designated seating positions multiplied by
150 pounds (68 kg) plus the rated cargo
load. See “Loading Your Vehicle” on
page 250.
Vehicle Maximum Load on the Tire: Load
on an individual tire due to curb weight,
accessory weight, occupant weight and
cargo weight.
Vehicle Placard: A label permanently
attached to a vehicle showing original
equipment tire size and the recommended
cold inflation pressure. See “Loading Your
Vehicle” on page 250.
Steps for Determining Correct
Load Limit1 Locate the statement “The combined weight of occupants and
cargo should never exceed
XXX pounds” on your vehicle´s
placard.
2 Determine the combined weight of the driver and pa ssengers that will
be riding in your vehicle.
3 Subtract the combined weight of the driver and passengers from
XXX kilograms or XXX pounds.
4 The resulting figure equals the avail- able amount of cargo and luggage
load capacity. For example, if the
“XXX” amount equals 1400 lbs. and
there will be five 150 lb. passengers
in your vehicle, the amount of avail-
able cargo and luggage load capac-
ity is 650 lbs. (1400–750 (5x150) =
650 lbs.). 5 Determine the combined weight of
luggage and cargo being loaded on
the vehicle. That weight may not
safely exceed the available cargo
and luggage load capacity calcu-
lated in Step 4.
6 If your vehicle will be towing a trailer, load from your trailer will be trans-
ferred to your vehicle. Consult this
manual to determine how this
reduces the available cargo and
luggage load capacity of your vehi-
cle.
93_US_7carcare_MY09.fm Page 252 Tuesday, April 15, 2008 11:26 AM
ProCarManuals.com
Page 253 of 304
253
Car care
Winter tiresWinter (snow) tires are recommended for
winter climates where the majority of your
driving will be done on snow and ice. Winter
tires should be fitted to all four wheels to
maintain a proper balance. Your Saab
dealer can advise you of to the correct size
tire for your car (if different from the original
size) and also supply Saab approved winter
tires pre-mounted on steel or alloy rims.
Winter tires normally use a different speed
rating compared to summer/all season tires.
Make sure not to exce ed the stated speed
rating on the tires you use.
Make sure that wheels with sensors for tire
pressure monitoring are fitted during
replacement if the car has automatic tire
pressure monitoring.Tire date codeTires should be regarded as perishable
goods. As the tires age, the rubber becomes
progressively harder, and the road holding
ability of the tires diminishes. This is partic-
ularly true on winter tires.
Tires have a code that specifies their date of
manufacture. The first two digits denote the
week number and the last two digits the year
followed by a filled triangle.
Automatic tire pressure
monitoring systemThe system consists of a sensor in each
wheel and a common receiver. The sensors
are located inside the tire in direct connec-
tion with the air pressure valves.
Make sure that wheels with sensors for tire
pressure monitoring are fitted during
replacement if the car has automatic tire
pressure monitoring.
The system will trigger a warning/alarm if
the spare wheel is fitted because it has no
sensor. Tire pressure informa
tion is transmitted
wireless to the receiver.
The system checks the tire pressures when
speed exceeds 19 mph (30 km/h).
The system is self-programming which
means that the wheels can be shifted
around without any need for adjustment.
The sensor batteries last for 10 years or
around 160 000 km. The battery cannot be
replaced. The whole sensor must be
replaced.
WARNING
The system is an aid to the driver. The
driver always has the responsibility that
the tires have the correct air pressure.
For optimum safety, economy and com-
fort tire pressures should be checked reg-
ularly even if the automatic tire pressure
monitoring has not alarmed.
NOTICETire replacement must take place with
great care to avoid damaging the sensors
that are built together with the valves.
Remove the rear side first, see page 255.
Start to remove the tire opposite the valve.
During removal the tire machine must not come closer than ±10° from the
valve.
During fitting, start 20° after the valve and finish 20° before the valve.
Do not inflate the tire with pressure higher than 102 psi (700 kPa).
93_US_7carcare_MY09.fm Page 253 Tuesday, April 15, 2008 11:26 AM
ProCarManuals.com
Page 255 of 304
255
Car care
MalfunctionsThe above message is shown on the SID if:
Wheel without pressure sensor has been
fitted (e.g. spare wheel)
One or more pressure sensors are broken or missing
A fault has arisen in the receiver
A system error has arisen.
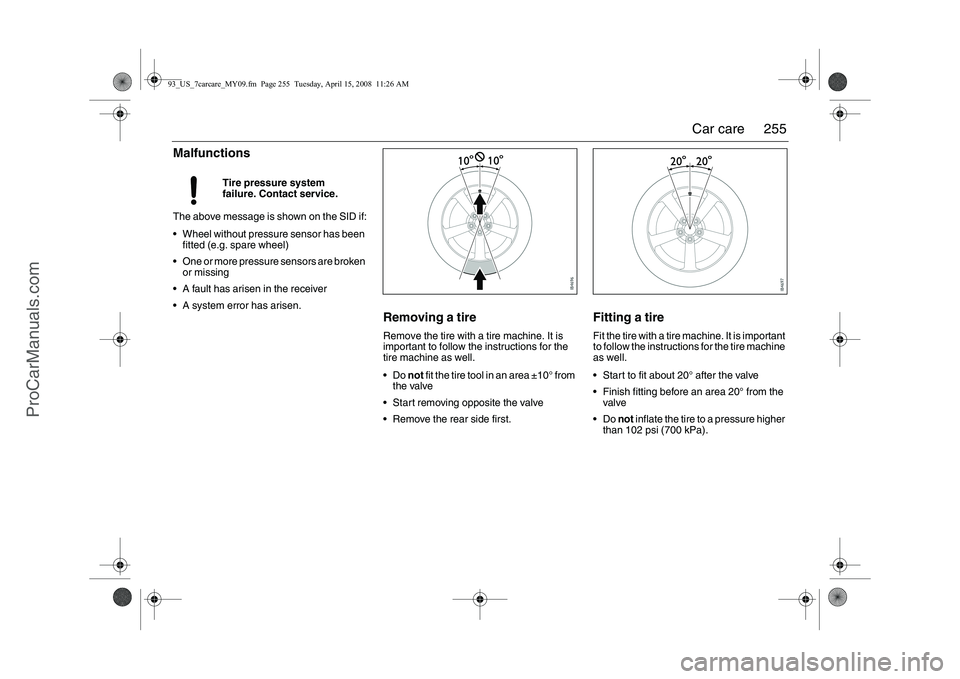
Removing a tireRemove the tire with a tire machine. It is
important to follow the instructions for the
tire machine as well.
Do not fit the tire tool in an area ±10° from
the valve
Start removing opposite the valve
Remove the rear side first.
Fitting a tireFit the tire with a tire machine. It is important
to follow the instructions for the tire machine
as well.
Start to fit about 20° after the valve
Finish fitting before an area 20° from the valve
Do not inflate the tire to a pressure higher
than 102 psi (700 kPa).
Tire pressure system
failure. Contact service.
93_US_7carcare_MY09.fm
Page 255 Tuesday, April 15, 2008 11:26 AM
ProCarManuals.com
Page 258 of 304
258 Car careDriving with a compact wheel
fittedObserve the following when the compact
spare tire is fitted:
The compact spare is light and easy to handle when changing a tire.
Do not drive further than necessary with the compact spare fitted - the maximum
life of the tire is only just over 2,000 miles
(approx. 3,500 km).
Refit the standard tire as soon as possi- ble.
Fitting a spare tire/wheel without pressure sensor will trigger a malfunction
message, see page 255.
Important considerations when driving with
a compact spare tire:
The car’s ground clearance is reduced. The car must not be driven with more than
one compact spare tire at a time.
Avoid driving against the curb.
Do not use snow chains.
Do not fit the wheel cover - this would conceal the warning text.
Changing a tire
WARNING
Do not exceed 50 mph (80 km/h). The
tire can overheat affecting the car’s
road holding.
Tire pressure: refer to page 291.
The spare tire or punctured tire must be stowed under the trunk floor, and
secured in place with the retaining nut.
WARNING
Lifting a vehicle and getting under it to do
maintenance or repairs is dangerous
without the appropriate safety equipment
and training. The jack provided with your
vehicle is designed only for changing a
flat tire. If it is used for anything else, you
or others could be badly injured or killed if
the vehicle slips off the jack. Use the jack
provided with your vehicle only for chang-
ing a flat tire.
Changing a tire can be dangerous. The
vehicle can slip off the jack and roll over
or fall on you or other people. You and
they could be badly injured or even killed.
Find a level place to change your tire. To
help prevent the vehicle from moving:
1 Set the parking brake firmly.
2 If you have an automatic transmis- sion, put the shift lever in PARK (P).
For a manual transmission, leave the
car in gear (1st or REVERSE (R)).
3 Turn off the engine and do not restart while the vehicle is raised.
4 Do not allow passengers to remain in the vehicle.
93_US_7carcare_MY09.fm Page 258 Tuesday, April 15, 2008 11:26 AM
ProCarManuals.com
Page 260 of 304
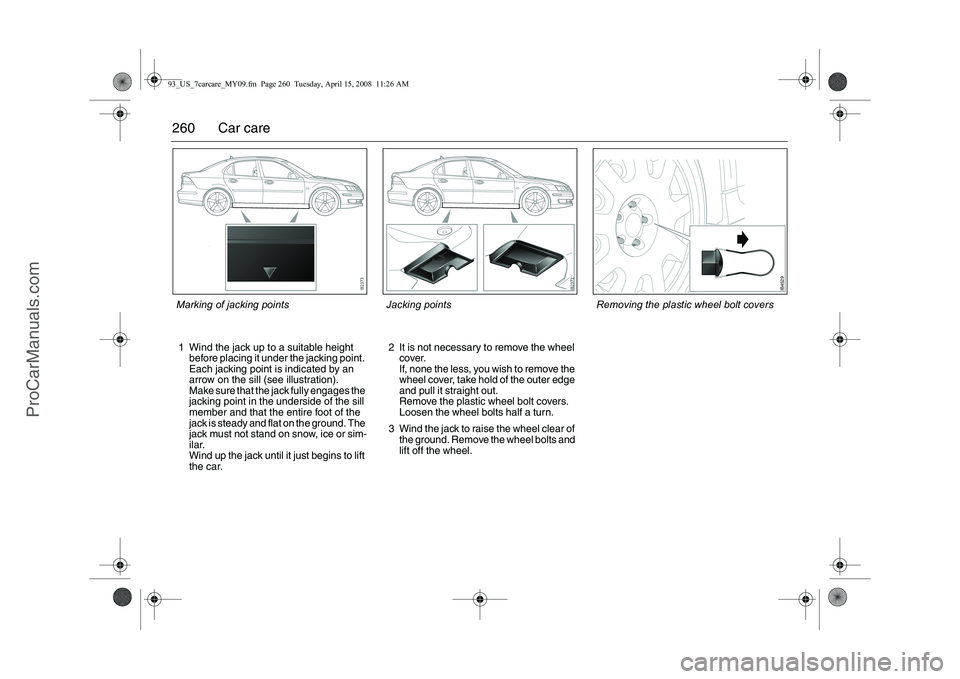
260 Car care1 Wind the jack up to a suitable height before placing it under the jacking point.
Each jacking point is indicated by an
arrow on the sill (see illustration).
Make sure that the jack fully engages the
jacking point in the underside of the sill
member and that the entire foot of the
jack is steady and flat on the ground. The
jack must not stand on snow, ice or sim-
ilar.
Wind up the jack until it just begins to lift
the car. 2 It is not necessary
to remove the wheel
cover.
If, none the less, you wish to remove the
wheel cover, take hold of the outer edge
and pull it straight out.
Remove the plastic wheel bolt covers.
Loosen the wheel bolts half a turn.
3 Wind the jack to raise the wheel clear of the ground. Remove the wheel bolts and
lift off the wheel.
Jacking points
Marking of jacking points
IB4529
Removing the plastic wheel bolt covers
93_US_7carcare_MY09.fm Page 260 Tuesday, April 15, 2008 11:26 AM
ProCarManuals.com
Page 262 of 304
262 Car care
Tire repair kit3
The tire repair kit re places the spare wheel.
The repair kit allows a punctured tire to be
temporarily repaired and reinflated without
needing to remove the wheel.
Minor damage to the tire, such as a foreign
object that has penetrated the tread, can be
temporarily repaired with the repair kit.
Do not remove the foreign object. Damage
larger than 0.16 in. (4 mm) and damage to
the sidewalls cannot be repaired with the
repair kit.
Follow the instructions supplied with the
repair kit carefully.
If the compressor sounds strange or
becomes abnormally hot, leave it switched
off for at least 30 minutes.
WARNING
Make sure no one can jog the gear lever,
for example, as the engine must be idling
when the tire is repaired. There is other-
wise a risk of personal injury.
Do not use the repair kit if:
the damage to the tire is larger than 0.16 in. (4 mm).
the wheel is damaged.
Do not exceed 50 mph (80 km/h) after
repairing one of the car tires with the
repair kit.
WARNING
Change the punctured tire as soon as
possible.
Replenish the repair kit at a workshop.
We recommend that you contact an
authorized Saab workshop. The canister
of sealant must be changed once every
four years. See the date on the canister.
The handling characteristics of the car
may be impaired.
Driving with a tire that is underinflated or
has a puncture can damage the tire in
such a way that it is not possible to repair
it with the sealant.
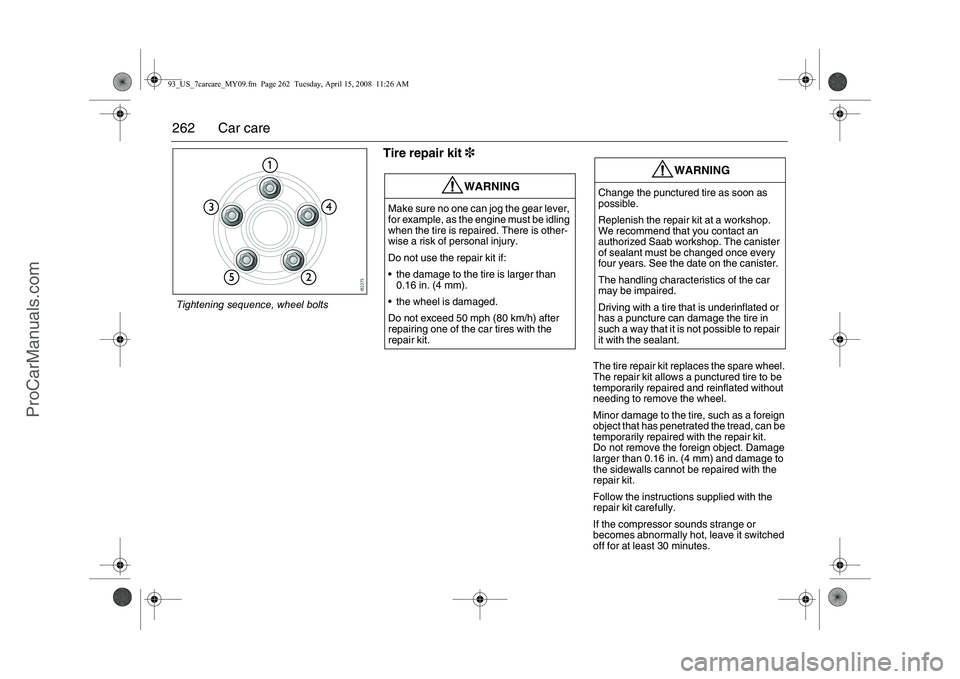
Tightening sequence, wheel bolts93_US_7carcare_MY09.fm Page 262 Tuesday, April 15, 2008 11:26 AM
ProCarManuals.com
Page 264 of 304
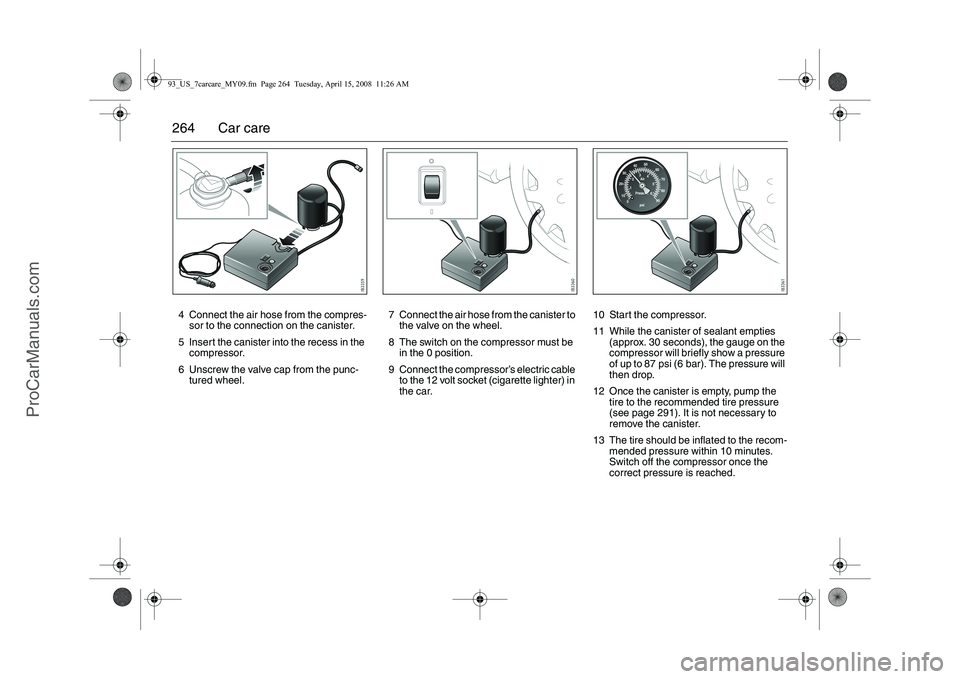
264 Car care4 Connect the air hose from the compres-sor to the connection on the canister.
5 Insert the canister into the recess in the compressor.
6 Unscrew the valve cap from the punc- tured wheel. 7 Connect the air hose from the canister to
the valve on the wheel.
8 The switch on the compressor must be in the 0 position.
9 Connect the compressor’s electric cable to the 12 volt socket (cigarette lighter) in
the car. 10 Start the compressor.
11 While the canister of sealant empties
(approx. 30 seconds), the gauge on the
compressor will briefly show a pressure
of up to 87 psi (6 bar). The pressure will
then drop.
12 Once the canister is empty, pump the tire to the recommended tire pressure
(see page 291). It is not necessary to
remove the canister.
13 The tire should be inflated to the recom- mended pressure within 10 minutes.
Switch off the compressor once the
correct pressure is reached.93_US_7carcare_MY09.fm Page 264 Tuesday, April 15, 2008 11:26 AM
ProCarManuals.com
Page 265 of 304
265
Car care
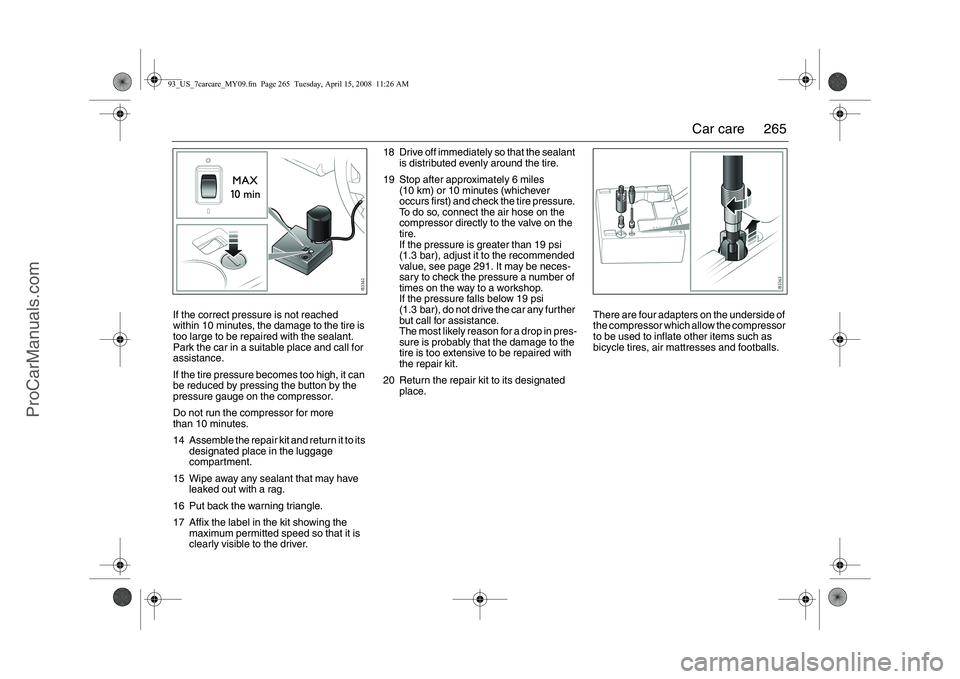
If the correct pressure is not reached
within 10 minutes, the damage to the tire is
too large to be repaired with the sealant.
Park the car in a suitable place and call for
assistance.
If the tire pressure becomes too high, it can
be reduced by pressing the button by the
pressure gauge on the compressor.
Do not run the co mpressor for more
than 10 minutes.
14 Assemble the repair kit and return it to its designated place in the luggage
compartment.
15 Wipe away any sealant that may have leaked out with a rag.
16 Put back the warning triangle.
17 Affix the label in the kit showing the maximum permitted speed so that it is
clearly visible to the driver. 18 Drive off immediately so that the sealant
is distributed evenly around the tire.
19 Stop after approximately 6 miles (10 km) or 10 minutes (whichever
occurs first) and check the tire pressure.
To do so, connect the air hose on the
compressor directly to the valve on the
tire.
If the pressure is greater than 19 psi
(1.3 bar), adjust it to the recommended
value, see page 291. It may be neces-
sary to check the pressure a number of
times on the way to a workshop.
If the pressure falls below 19 psi
(1.3 bar), do not drive the car any further
but call for assistance.
The most likely reason for a drop in pres-
sure is probably that the damage to the
tire is too extensive to be repaired with
the repair kit.
20 Return the repair kit to its designated place. There are four adapters on the underside of
the compressor which allow the compressor
to be used to inflate other items such as
bicycle tires, air mattresses and footballs.93_US_7carcare_MY09.fm
Page 265 Tuesday, April 15, 2008 11:26 AM
ProCarManuals.com
Page 274 of 304
274 Car carecompressor uses a lubricant that circu-
lates with the coolant.
Note
The A/C system cannot be switched on
when the outside temperature is below 32°F
(0°C). Turn on the A/ C system when the car
is standing in a warm place. Simplest is to
always have the A/C button pressed in. The
A/C system will then cu t in automatically
when the outside temperature is high
enough.
Headlight aimingThe vehicle has a visual optical headlight
aiming system equippe d with vertical
aiming device. The aim has been preset at
the factory and should normally not need
further adjustments.
If your headlights are damaged in a crash,
the headlight aim may be affected. If you
believe your headlights need to be
re-aimed, we recommend that you take it to
your Saab dealer for service. However, it is
possible for you to re-aim your headlights as
described in the following procedure. To check the aim, the vehicle should be
properly prepared as follows:
The vehicle shall be placed so that the
headlights are 25 ft (7.6 m) from a light
colored wall or other flat surface. The
aiming area should be darkened, this will
improve your ability to see the beam of the
low beam headlight being aimed.
An optical headlamp aimer can also be
used and will than replace the wall.
The vehicle must have all four wheels on a perfectly level surface which is level all
the way to the wall or other flat surface.
The vehicle should be placed so it is perpendicular to the wall or other flat
surface.
The vehicle should be unloaded and fuel tank full, and one person or 160 lbs.
(75 kg) on the drivers seat.
The vehicle should be fully assembled and all other work stopped while headlight
aiming is being done.
The vehicle should not have any snow, ice or mud attached to it.
Tires should be inflated to the prescribed pressure.
Close all doors.
Rock the vehicle to stabilize the suspen- sion.
Headlight aiming is done with the vehicle
low beam lamps. The high beam lamps will
WARNING
Before checking/adjusting the headlight
aiming, switch off the engine to avoid
danger of fingers and hands being injured
by moving parts.
The radiator fan can start up even when
the engine is switched off.NOTICETo make sure that your headlights are
aimed properly read all instructions
before beginning. Failure to follow these
instructions could cause damage to
headlight parts or a not correctly aimed
headlight.
93_US_7carcare_MY09.fm Page 274 Tuesday, April 15, 2008 11:26 AM
ProCarManuals.com
Page 298 of 304
298 IndexDeactivating the rear window
switches
_____________________ 121
Deep water, driving through
_______ 193
Definitions and terminology, tire ____ 250
Determining correct load, tires
_____ 252
Direction indicator stalk switch _____ 101
Direction indicators
______________ 101
Dome light, Convertible
__________ 228
Dome light, SportSedan __________ 228
Donor battery, boost starting
______ 197
Door handles
___________________ 48
Door mirrors
___________________ 122
Drive belt
______________________ 215
Driver’s seat with memory
_________ 21
Driving in cold climates
___________ 185
Driving in deep water
____________ 193
Driving in hot climates ____________ 187
Driving techniques
______________ 183
Driving with a compact wheel fitted
_258
Driving with a heavy load on hilly
roads
________________________ 164
Driving with a load
______________ 192
Driving with a roof load ___________ 192
Driving with the trunk lid open
______ 193
EEDR (Event Data Recorders)
______ 282
ESP®
________________________ 175
Easy entry, Convertible
____________ 73
Economical motoring
____________ 183
Electrical system, technical data
____ 287Electrically adjustable seats
________ 20
Electric engine heater
____________ 184
Electric heating, front seats
________ 114
Electric windows
________________ 119
Electric windows, Convertible
_______ 77
Electronic Stability Program
_______ 175
Electronic steering wheel lock ______ 151
Emergency opening of the narrow
backrest, SportSedan
___________ 140
Emergency operation of the moonroof
130
Engine bay, cleaning
_____________ 267
Engine heater
__________________ 184
Engine immobilizer
_______________ 55
Engine management system
______ 204
Engine number
_________________ 292
Engine oil, checking
_____________ 208
Engine oil, grade
________________ 286
Engine temperature gauge
_________ 88
Engine, description
______________ 203
Engine, technical data ____________ 286
Engines
_______________________ 287
Event Data Recorders (EDR)
______ 282
Extra electrical socket
____________ 134
FFacilitating entry to rear seat,
Convertible
____________________ 73
Factors affecting fuel consumption
__ 183
Filler cap
______________________ 157
Filling a portable fuel container
_____ 158
Filling up
______________________ 156Flat spots, tires
_________________ 242
Floor jack
______________________ 259
Folding down the rear seat backrest,
SportCombi
___________________ 141
Folding down the rear seat,
SportSedan ___________________ 136
Front fog lights __________________ 100
Front towing eye ________________ 194
Fuel cap
_______________________ 157
Fuel container
__________________ 158
Fuel gauge
_____________________ 89
Fuel grade _____________________ 287
Fuel information
_________________ 158
Functions, car alarm
______________ 58
Fuse panel in luggage compartment
_236
Fuse table
_____________________ 235
Fuses
_________________________ 233
GGDO, garage door opener
_________ 123
Gearbox number
________________ 292
General safety instructions,
Convertible
____________________ 62
Glove box
_____________________ 134
Glovebox lighting
________________ 229
HHandbrake
_____________________ 177
Hazard warning lights
____________ 102
Head restraint, Convertible
_________ 74
Head restraints
__________________ 23
93_US_MY09.book Page 298 Tuesday, April 15, 2008 10:30 AM
ProCarManuals.com