remote start SAAB 9-3 2009 User Guide
[x] Cancel search | Manufacturer: SAAB, Model Year: 2009, Model line: 9-3, Model: SAAB 9-3 2009Pages: 304, PDF Size: 44.31 MB
Page 162 of 304
162 Starting and drivingAutomatic
transmission3
The automatic transmission has an elec-
tronic control module. The control module
receives information including accelerator
position and road speed. Using this and
other information, it controls the hydraulic
pressure of the transmission to ensure that
gear changing is as smooth as possible.
The remote control can only be removed
when the selector lever is in the P position.The engine can only be started when the
selector lever is in the P or N position.
When the car is stationary, the engine must
be idling when you move the selector lever
from one position to another. If not, the
transmission could be damaged.
WARNING
Depress the brake pedal when shifting
the selector lever from P or N.
The car must be at a standstill before
P, R or N is selected. You have to have
your foot on the brake pedal to move
the lever out of P. If the car is still
moving when a drive position is subse-
quently selected, this could cause a
crash or damage the automatic trans-
mission.
Never park the car with the selector
lever in a drive position, even if the
parking brake is on.
If you want to leave the car with the
engine running, move the selector
lever to P or N and apply the parking
brake.
NOTICEAfter selecting a drive position, pause
briefly to allow the gear to engage (the car
starts to pull a little) before you acceler-
ate.
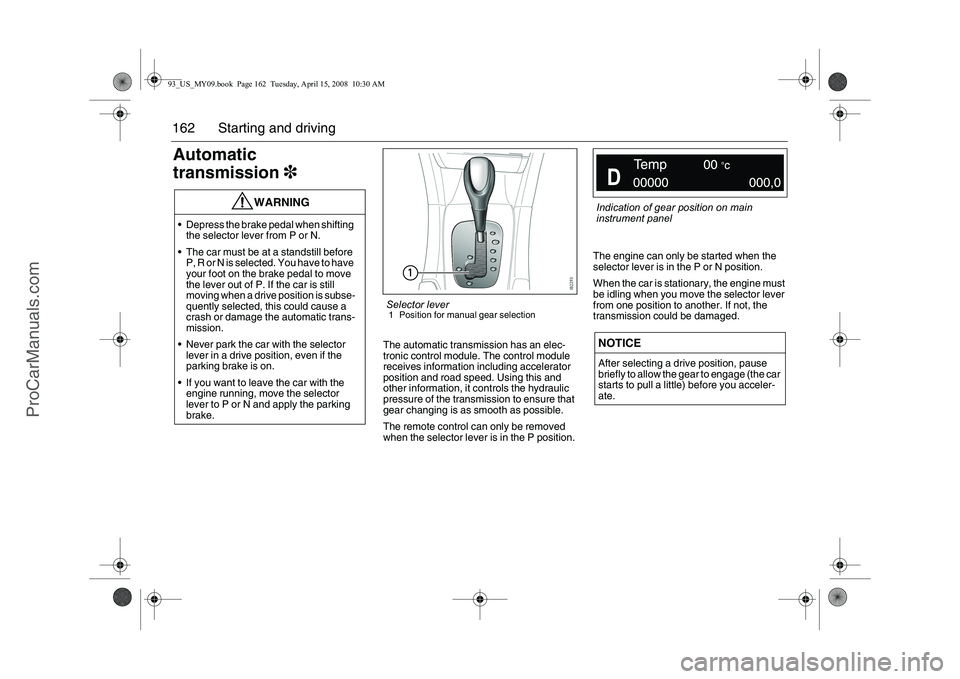
Selector lever1 Position for manual gear selection
Indication of gear position on main
instrument panel
93_US_MY09.book Page 162 Tuesday, April 15, 2008 10:30 AM
ProCarManuals.com
Page 177 of 304
177 Starting and driving
Parking brakeThe parking brake lever is situated between
the front seats. The brake acts on the rear
wheels. When the parking brake is applied,
the indicator light on the main instru-
ment panel will come on.
To release the parking brake, lift the lever
slightly, pull the release button on the under-
side of the lever and lower the lever.If conditions allow, it is best if the brake
pedal is not depressed, or only depressed
as little as necessary so as to stop the car
from rolling, when the parking brake is
applied.
To facilitate releasing the parking brake,
depress the brake pedal. This is especially
appropriate if the car is standing on a hill.
If the parking brake is applied when the car
starts off, the following message will appear
on the SID:
Parking
WARNING
Always apply the parking brake when
you park the car. If the car is to be
left parked for a long time, refer to
page 179.
Always apply the parking brake
before removing the remote control.
Do not use the parking brake while
driving.
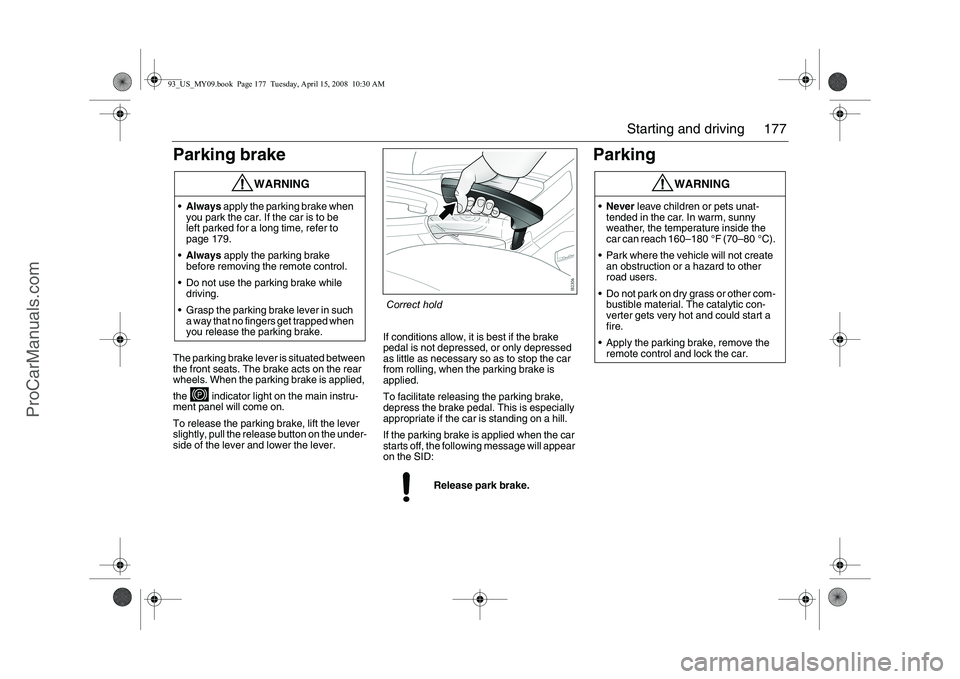
Grasp the parking brake lever in such
a way that no fingers get trapped when
you release the parking brake.
Release park brake.
WARNING
Never leave children or pets unat-
tended in the car. In warm, sunny
weather, the temperature inside the
car can reach 160–180 °F (70–80 °C).
Park where the vehicle will not create
an obstruction or a hazard to other
road users.
Do not park on dry grass or other com-
bustible material. The catalytic con-
verter gets very hot and could start a
fire.
Apply the parking brake, remove the
remote control and lock the car.
Correct hold
93_US_MY09.book Page 177 Tuesday, April 15, 2008 10:30 AM
ProCarManuals.com
Page 178 of 304
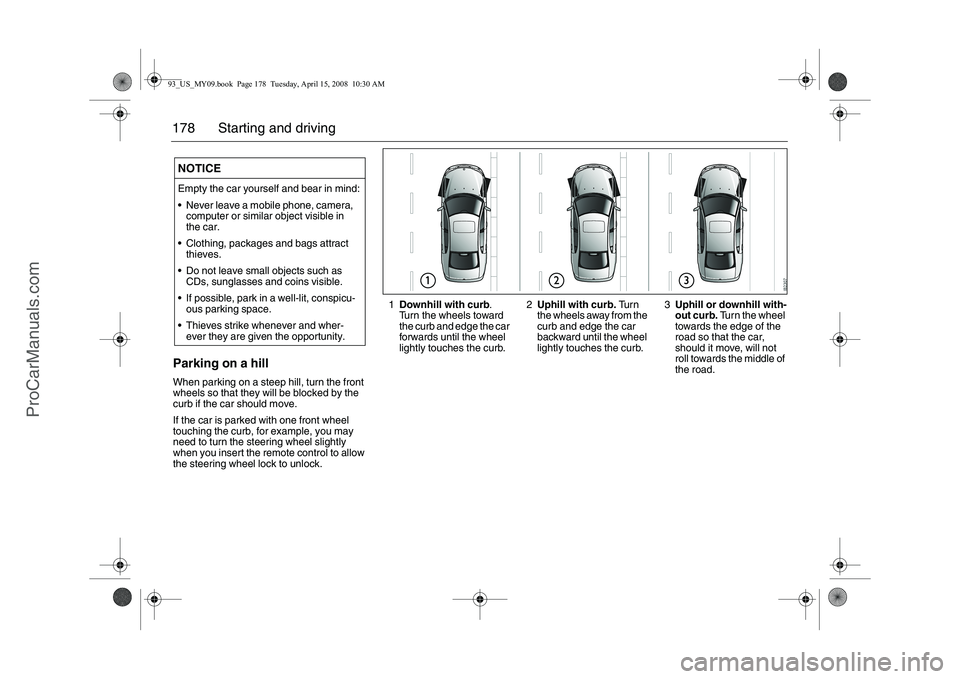
178 Starting and drivingParking on a hillWhen parking on a steep hill, turn the front
wheels so that they will be blocked by the
curb if the car should move.
If the car is parked with one front wheel
touching the curb, for example, you may
need to turn the steering wheel slightly
when you insert the remote control to allow
the steering wheel lock to unlock.NOTICEEmpty the car yourself and bear in mind:
Never leave a mobile phone, camera,
computer or similar object visible in
the car.
Clothing, packages and bags attract
thieves.
Do not leave small objects such as
CDs, sunglasses and coins visible.
If possible, park in a well-lit, conspicu-
ous parking space.
Thieves strike whenever and wher-
ever they are given the opportunity.
1Downhill with curb
.
Turn the wheels toward
the curb and edge the car
forwards until the wheel
lightly touches the curb.2Uphill with curb. Tu r n
the wheels away from the
curb and edge the car
backward until the wheel
lightly touches the curb.3Uphill or downhill with-
out curb. Turn the wheel
towards the edge of the
road so that the car,
should it move, will not
roll towards the middle of
the road.
93_US_MY09.book Page 178 Tuesday, April 15, 2008 10:30 AM
ProCarManuals.com
Page 193 of 304
193 Starting and driving
Driving with the trunk lid
openIf you must drive with the trunk lid open,
close all windows and the moonroof (if
equipped) and set the cabin fan to its high-
est speed setting.Driving in deep waterTowing the car
WARNING
Avoid driving with the trunk lid partly or
fully open, since exhaust fumes can be
drawn into the cabin.NOTICEDo not drive in puddles or water deeper
than 7 in. (20 cm) and do not drive faster
than 3–4 mph. Water can otherwise be
sucked into the engine. The engine will be
seriously damaged if water enters the
intake system.
WARNING
Remember that the brake servo does
not operate when the engine is off.
Much greater pressure than normal
will therefore be required to operate
the brake pedal.
Nor does the steering servo operate
when the engine is off. The steering
will therefore be much heavier than
usual.
The towing vehicle should always be
heavier than the vehicle on tow.
Never allow passengers to ride in the
car when it is on tow.
Always seek professional help if the
car needs to be recovered.
The ignition switch must be in the ON
position if the car is moved with the
engine not running.
The steering wheel lock must be dis-
engaged before towing the car.
The steering wheel lock disengages
when the remote control is inserted
into the ignition switch, if the battery
has sufficient charge.
93_US_MY09.book Page 193 Tuesday, April 15, 2008 10:30 AM
ProCarManuals.com
Page 198 of 304
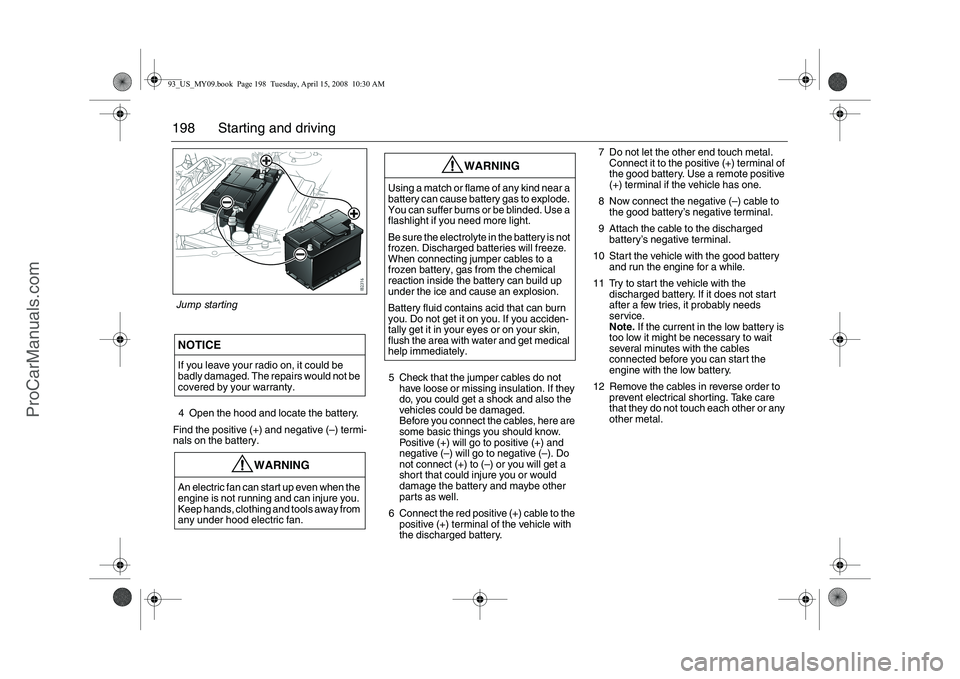
198 Starting and driving4 Open the hood and locate the battery.
Find the positive (+) and negative (–) termi-
nals on the battery.5 Check that the jumper cables do not
have loose or missing insulation. If they
do, you could get a shock and also the
vehicles could be damaged.
Before you connect the cables, here are
some basic things you should know.
Positive (+) will go to positive (+) and
negative (–) will go to negative (–). Do
not connect (+) to (–) or you will get a
short that could injure you or would
damage the battery and maybe other
parts as well.
6 Connect the red positive (+) cable to the
positive (+) terminal of the vehicle with
the discharged battery.7 Do not let the other end touch metal.
Connect it to the positive (+) terminal of
the good battery. Use a remote positive
(+) terminal if the vehicle has one.
8 Now connect the negative (–) cable to
the good battery’s negative terminal.
9 Attach the cable to the discharged
battery’s negative terminal.
10 Start the vehicle with the good battery
and run the engine for a while.
11 Try to start the vehicle with the
discharged battery. If it does not start
after a few tries, it probably needs
service.
Note. If the current in the low battery is
too low it might be necessary to wait
several minutes with the cables
connected before you can start the
engine with the low battery.
12 Remove the cables in reverse order to
prevent electrical shorting. Take care
that they do not touch each other or any
other metal.NOTICEIf you leave your radio on, it could be
badly damaged. The repairs would not be
covered by your warranty.
WARNING
An electric fan can start up even when the
engine is not running and can injure you.
Keep hands, clothing and tools away from
any under hood electric fan.
WARNING
Using a match or flame of any kind near a
battery can cause battery gas to explode.
You can suffer burns or be blinded. Use a
flashlight if you need more light.
Be sure the electrolyte in the battery is not
frozen. Discharged batteries will freeze.
When connecting jumper cables to a
frozen battery, gas from the chemical
reaction inside the battery can build up
under the ice and cause an explosion.
Battery fluid contains acid that can burn
you. Do not get it on you. If you acciden-
tally get it in your eyes or on your skin,
flush the area with water and get medical
help immediately.
Jump starting93_US_MY09.book Page 198 Tuesday, April 15, 2008 10:30 AM
ProCarManuals.com
Page 199 of 304
199 Starting and driving
Using a battery charger3/starter
unitTo avoid damaging the car’s electrical
system and electronics, the following rules
must be followed when charging the battery
or jump starting the car.
If the charger or starter unit can be set to
different voltages (6 V/12 V/18 V/24 V),
12V must be selected.
Follow the manufacturer’s instructions
supplied with the charger or starter unit.
No other apparatus that are grounded or
connected to the mains must be
connected to the car during charging or
jump starting.
The charger or starter unit must under no
conditions produce a voltage greater
than:
16 V continuous
18 V for 60 minutes.
If you are unsure about the charge rating of
the unit, disconnect the battery clamp from
the positive terminal before connecting the
unit to the battery.
For long tripsBefore starting off on a long journey, it is
advisable to have your car inspected by
your Saab dealer.
Obtain a few important items to take along
on your journey, such as spare bulbs, wiper
blades, fuses, a drive belt (poly-V-belt) and
the like.
You can check some points yourself before-
hand:
Check that no oil or fuel leaks out of the
engine or gearbox/transmission.
Check the coolant and power steering
fluid levels. Check also for leaks.
Inspect the drive belt (poly-V-belt) and
replace if it shows any signs of wear.
Check the battery charge.
Check the tires for tread pattern and air
pressure, including the compact spare
tire.
Take an extra remote control and keep it
separate.
Check the brakes.
Check all bulbs.
Check for the presence of the tool kit and
jack in the car.
93_US_MY09.book Page 199 Tuesday, April 15, 2008 10:30 AM
ProCarManuals.com
Page 294 of 304
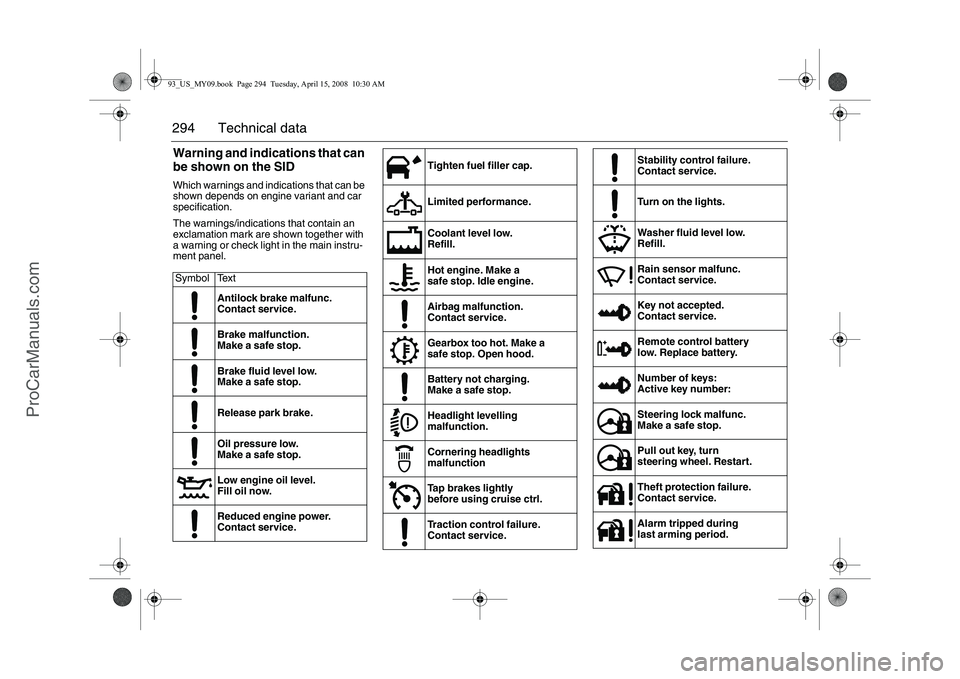
294 Technical dataWarning and indications that can
be shown on the SIDWhich warnings and indications that can be
shown depends on engine variant and car
specification.
The warnings/indications that contain an
exclamation mark are shown together with
a warning or check light in the main instru-
ment panel.
Symbol Text
Antilock brake malfunc.
Contact service.
Brake malfunction.
Make a safe stop.
Brake fluid level low.
Make a safe stop.
Release park brake.
Oil pressure low.
Make a safe stop.
Low engine oil level.
Fill oil now.
Reduced engine power.
Contact service.
Tighten fuel filler cap.
Limited performance.
Coolant level low.
Refill.
Hot engine. Make a
safe stop. Idle engine.
Airbag malfunction.
Contact service.
Gearbox too hot. Make a
safe stop. Open hood.
Battery not charging.
Make a safe stop.
Headlight levelling
malfunction.
Cornering headlights
malfunction
Tap brakes lightly
before using cruise ctrl.
Traction control failure.
Contact service.
Stability control failure.
Contact service.
Turn on the lights.
Washer fluid level low.
Refill.
Rain sensor malfunc.
Contact service.
Key not accepted.
Contact service.
Remote control battery
low. Replace battery.
Number of keys:
Active key number:
Steering lock malfunc.
Make a safe stop.
Pull out key, turn
steering wheel. Restart.
Theft protection failure.
Contact service.
Alarm tripped during
last arming period.
93_US_MY09.book Page 294 Tuesday, April 15, 2008 10:30 AM
ProCarManuals.com
Page 300 of 304
300 IndexPPanic function, car alarm
__________ 58
Park Brake Shift Lock
____________ 163
Park Brake Shift Lock, temporary
override
______________________ 166
Parking
_______________________ 177
Parking aid ____________________ 180
Parking brake __________________ 177
Parking on a hill ________________ 178
Pinch protection, electric windows,
SportSedan and SportCombi
_____ 120
Pinch protection, moonroof
________ 130
Plates and labels, location ________ 292
Polishing and waxing
____________ 270
Poly-V-belt
____________________ 215
Portable fuel container
___________ 158
Position lights
___________________ 98
Power steering fluid, checking
_____ 213
Pressure gauge
_________________ 88
Pressure, tires
__________________ 240
Profiles, customized settings
_______ 94
QQuality grading, tires
_____________ 244
Quick guide, remote control
________ 49
RRain sensor
____________________ 103
Raising the soft top manually,
Convertible ____________________ 68Reading lights, Convertible
_________ 79
Rear fog light
___________________ 101
Rear seat, folding down, SportCombi
141
Rear seat, safety belts
____________ 17
Rear seats, folding down, SportSedan
136
Rear towing eye
________________ 194
Rear windows, deactivating,
SportSedan and SportCombi
_____ 121
Rearview mirrors
________________ 122
Recommendations for automatic
transmission, towing a trailer
_____ 189
Recommendations for manual gearbox,
towing a trailer
________________ 190
Recommended snow chains
_______ 288
Refueling
______________________ 156
Reinstalling the fuel cap
__________ 157
Remote control
__________________ 48
Remote locking malfunction
________ 50
Replacement, wheel
_____________ 246
Reporting safety defects __________ 281
Rev counter
_____________________ 87
Reversing lights
________________ 102
Rollover Pop-up Bars, Convertible
___ 76
Roof lighting, SportSedan and
SportCombi
___________________ 131
Roof lighting, changing
___________ 228
Running-in
_____________________ 160
SSaab Information Display
__________ 89
Saab Parking Assistance _________ 180Safety belts
_____________________ 12
Safety belts, rear seat, SportSedan
and SportCombi
________________ 17
SAHR, head restraint _____________ 23
SDM
_________________________ 282
SID
___________________________ 89
SPA __________________________ 180
Seat belts
______________________ 12
Seat belts in rear seat, Convertible
___ 75
Seat belts, care
_________________ 266
Seat belts, checking
_____________ 266
Seats
__________________________ 18
Securing a load
_________________ 139
Sentronic, manual gear selection
___ 168
Service Engine Lamp
_____________ 83
Service costs
___________________ 279
Service information
______________ 280
Service intervals
________________ 278
Service record retention
__________ 279
Signalling, horn
_________________ 118
Ski hatch, SportCombi
____________ 143
Ski hatch, SportSedan ____________ 138
Spare wheel
___________________ 256
Speed ratings, tires
______________ 249
Speedometer
____________________ 87
Sport mode, automatic transmission
_163
Starting the engine
______________ 152
Steering wheel adjustment
________ 118
Steering wheel lock
______________ 151
Steps for determining correct load
limit
_________________________ 252
Storage compartments
___________ 134
93_US_MY09.book Page 300 Tuesday, April 15, 2008 10:30 AM
ProCarManuals.com