93 160 SAAB 9-3 2009 Owners Manual
[x] Cancel search | Manufacturer: SAAB, Model Year: 2009, Model line: 9-3, Model: SAAB 9-3 2009Pages: 304, PDF Size: 44.31 MB
Page 5 of 304

5
InteriorAirbag _________________ 32
Steering wheel adjustment _ 118
Interior rear view mirror _________ 123
Vanity mirror _________________ 132
Door mirrors__________________ 122
Safety belts ____________ 12
Airbag_________________ 32
Child safety locks ________ 52
Child seats _____________ 24
Safety belt care _________ 266Glove box ______________ 134
Storage compartments ____ 134Automatic transmission ___ 162
Changing gears _________ 161
Manual transmission _____ 161
Safety belts __________________ 12
Child seats __________________ 24
Folding down the rear seat ______ 136
Rear seat ____________________ 136
Seat adjustment ______________ 18
Seat heating _________________ 114
Upholstery care _______________ 266
Interior light switches ___________ 131
Moonroof ____________________ 128
Interior lighting: changing bulbs ___ 231
Ignition switch ________________ 150
Starting the engine ____________ 152
Power Outlet _________________ 134
Break-In Period _______________ 160
Driving in hot/cold climates ______ 185
Parking brake_________________ 177
Parking _____________________ 177
Fuses _________________ 233Electric windows _________ 11993_US_MY09.book Page 5 Tuesday, April 15, 2008 10:30 AM
ProCarManuals.com
Page 94 of 304
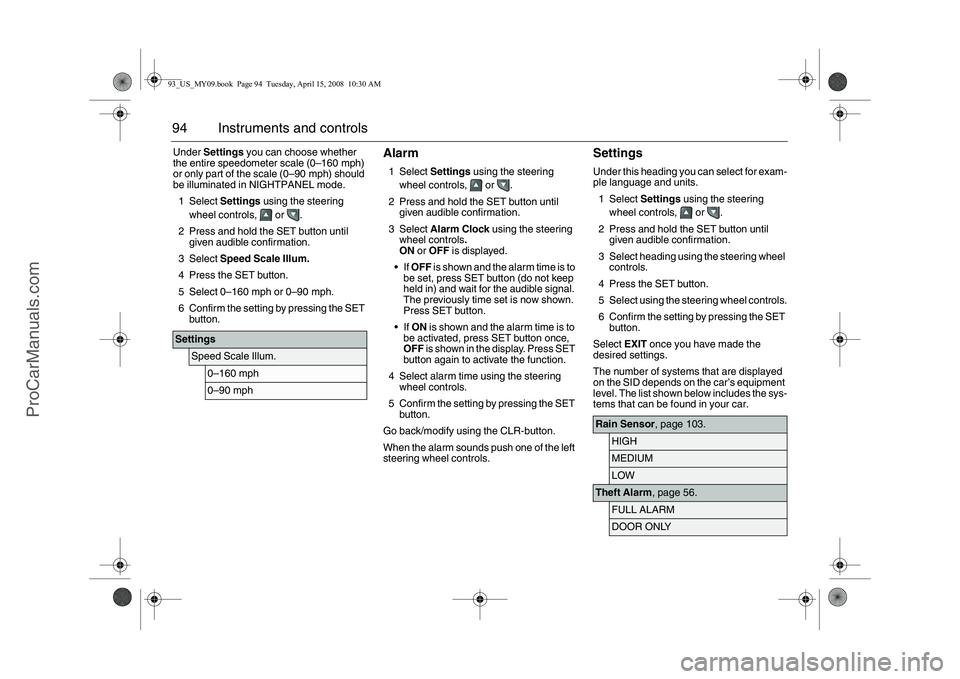
94 Instruments and controlsUnder Settings you can choose whether
the entire speedometer scale (0–160 mph)
or only part of the scale (0–90 mph) should
be illuminated in NIGHTPANEL mode.
1Select Settings using the steering
wheel controls, or .
2 Press and hold the SET button until
given audible confirmation.
3Select Speed Scale Illum.
4 Press the SET button.
5 Select 0–160 mph or 0–90 mph.
6 Confirm the setting by pressing the SET
button.
Alarm1Select Settings using the steering
wheel controls, or .
2 Press and hold the SET button until
given audible confirmation.
3Select Alarm Clock using the steering
wheel controls.
ON or OFF is displayed.
If OFF is shown and the alarm time is to
be set, press SET button (do not keep
held in) and wait for the audible signal.
The previously time set is now shown.
Press SET button.
If ON is shown and the alarm time is to
be activated, press SET button once,
OFF is shown in the display. Press SET
button again to activate the function.
4 Select alarm time using the steering
wheel controls.
5 Confirm the setting by pressing the SET
button.
Go back/modify using the CLR-button.
When the alarm sounds push one of the left
steering wheel controls.
SettingsUnder this heading you can select for exam-
ple language and units.
1Select Settings using the steering
wheel controls, or .
2 Press and hold the SET button until
given audible confirmation.
3 Select heading using the steering wheel
controls.
4 Press the SET button.
5 Select using the steering wheel controls.
6 Confirm the setting by pressing the SET
button.
Select EXIT once you have made the
desired settings.
The number of systems that are displayed
on the SID depends on the car’s equipment
level. The list shown below includes the sys-
tems that can be found in your car.
Settings
Speed Scale Illum.
0–160 mph0–90 mph
Rain Sensor, page 103.
HIGHMEDIUMLOW
Theft Alarm, page 56.
FULL ALARMDOOR ONLY
93_US_MY09.book Page 94 Tuesday, April 15, 2008 10:30 AM
ProCarManuals.com
Page 95 of 304
95 Instruments and controls
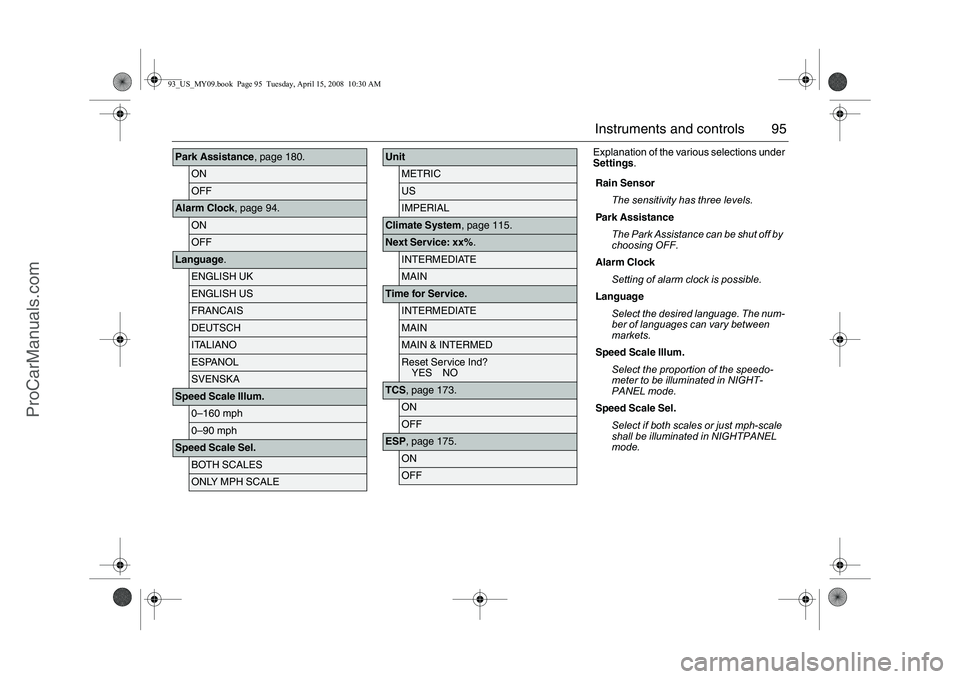
Explanation of the various selections under
Settings.
Park Assistance, page 180.
ONOFF
Alarm Clock, page 94.
ONOFF
Language.
ENGLISH UKENGLISH USFRANCAISDEUTSCHITALIANOESPANOLSVENSKA
Speed Scale Illum.
0–160 mph0–90 mph
Speed Scale Sel.
BOTH SCALESONLY MPH SCALE
Unit
METRICUSIMPERIAL
Climate System, page 115.Next Service: xx%.
INTERMEDIATEMAIN
Time for Service.
INTERMEDIATEMAINMAIN & INTERMEDReset Service Ind?
YES NO
TCS, page 173.
ONOFF
ESP, page 175.
ONOFF
Rain Sensor
The sensitivity has three levels.
Park Assistance
The Park Assistance can be shut off by
choosing OFF.
Alarm Clock
Setting of alarm clock is possible.
Language
Select the desired language. The num-
ber of languages can vary between
markets.
Speed Scale Illum.
Select the proportion of the speedo-
meter to be illuminated in NIGHT-
PANEL mode.
Speed Scale Sel.
Select if both scales or just mph-scale
shall be illuminated in NIGHTPANEL
mode.
93_US_MY09.book Page 95 Tuesday, April 15, 2008 10:30 AM
ProCarManuals.com
Page 136 of 304

136 Interior equipmentTrunkFolding down the rear seat, SportSedanConvertible: The rear seat cannot be folded.
WARNING
Never drive the car if the backrest is not correctly locked into
position as this increases the risk of personal injury in the
event of heavy braking or a crash.
Never leave a child or animal unattended in the car. During
sunny weather the temperature in the passenger and trunk
can climb to 160–180 °F (70–80 °C). Small children are very
susceptible to heat stroke.
Keep hands well clear of all moving parts.
Never place heavy objects on the parcel shelf. There is always
a danger of loose objects being thrown forward and causing
injury if the car should brake suddenly or be involved in a
crash. See also page 192.
When folding the backrest back upright, make sure that it is
locked correctly on both sides. This is imperative since the
center safety belt is mounted in the backrest.
When folding the backrest back upright, make sure that it is
locked correctly on both sides. This is imperative since other-
wise objects in the trunk could force their way into the cabin
during heavy breaking or a crash.
Adjust the head restraints for the rear seats to be occupied to
a suitable height before riding in the car.
The tail pipe of the exhaust system can become very hot during
driving. Bear in mind when loading and unloading the cat so that
children, for example, do not burn themselves.
93_US_MY09.book Page 136 Tuesday, April 15, 2008 10:30 AM
ProCarManuals.com
Page 141 of 304

141 Interior equipment
Folding down the rear seat backrest, SportCombiFor greater flexibility, the rear seat is split so that the narrow and the
wide part can be folded down separately.
It is easiest to fold down the rear seat backrests if the front seats are
slid forward.
1 Unlock the backrest by pulling the appropriate handle forward.
An unlocked backrest has a red indicator by the handle.
2 Fold the backrest forward.When returning the backrest to its upright position, make sure that
it locks properly in place. The red indicator by the handle must not
be visible. Also make sure that the safety belt does not get caught.
If the left-hand backrest is not properly locked in position, the follow-
ing message is displayed on the SID (equivalent message displayed
for right-hand backrest):
WARNING
Never drive the car if the backrest is not correctly locked into
position as this increases the risk of personal injury in the
event of heavy braking or a crash.
Never leave a child or animal unattended in the car. During
sunny weather the temperature in the passenger and trunk
can climb to 160–180 °F (70–80 °C). Small children are very
susceptible to heat stroke.
Keep hands well clear of all moving parts.
When folding the backrest back upright, make sure that it is
locked correctly on both sides. This is imperative since the
center safety belt is mounted in the backrest.
Adjust the head restraints for the rear seats to be occupied to
a suitable height before riding in the car.
The tail pipe of the exhaust system can become very hot during
driving. Bear in mind when loading and unloading the cat so that
children, for example, do not burn themselves.
Rear left seat
backrest unlocked.
93_US_MY09.book Page 141 Tuesday, April 15, 2008 10:30 AM
ProCarManuals.com
Page 149 of 304

149 Starting and driving
Ignition switch ________ 150
Steering wheel lock ____ 151
Starting the engine ____ 152
Important considerations
for driving __________ 153
Refueling ____________ 156
Engine Break-in Period _ 160
Manual transmission___ 161
Automatic
transmission3______ 162
Cruise Control ________ 169
Braking ______________ 170
All-wheel drive (XWD)3173
Traction Control System
(TCS) ______________ 173
Electronic Stability
Program ESP
®
______ 175
Parking brake_________ 177 Parking _______________ 177
Saab Parking
Assistance3________ 180
Economical driving _____ 183
Driving in cold weather__ 185
Driving in hot climates __ 187
Towing a trailer3______ 188
Driving with a roof rack
load ________________ 192
Driving with a load _____ 192
Driving with the trunk lid
open________________ 193
Driving in deep water ___ 193
Towing the car _________ 193
Jump starting _________ 197
For long trips __________ 199
Starting and driving
3Asterisk means: equipment not fitted in all cars
(can depend on model variant, engine variant,
market specification, options or accessories).93_US_MY09.book Page 149 Tuesday, April 15, 2008 10:30 AM
ProCarManuals.com
Page 160 of 304

160 Starting and drivinggasoline whether the fuel contains MMT.
Saab does not recommend the use of such
gasolines.
Fuels containing MMT can reduce the life of
spark plugs and the performance of the
emission control system may be affected.
The malfunction indicator lamp may turn on.
If this occurs, return to your authorized Saab
dealer for service.
Fuels in Foreign Countries
If you plan on driving in another country out-
side the United States or Canada, the
proper fuel may be hard to find. Never use
leaded gasoline or any other fuel not recom-
mended in the previous text on fuel. Costly
repairs caused by use of improper fuel
would not be covered by your warranty.
To check the fuel availability, ask an auto
club, or contact a major oil company that
does business in the country where you will
be driving.
Engine Break-in PeriodPistons, cylinder bores and bearings need
time to obtain uniform, wear-resistant
surfaces.
If a new engine is driven too hard, this grad-
ual process of bedding-in will not be possi-
ble and the life of the engine will be short-
ened.
During the first 1,200 miles (2,000 km),
do not exceed 5,000 rpm.
In addition, refrain from driving the car at full
throttle, other than for brief instances,
during the first 1,800 miles (3,000 km).
Wearing in new brake padsNew brake pads take time to bed in, about
90 miles (150 km) if the car is driven largely
under stop-and-go conditions or about
300 miles (500 km) of highway driving.
To extend the useful life of the pads, avoid
hard braking as much as possible.
93_US_MY09.book Page 160 Tuesday, April 15, 2008 10:30 AM
ProCarManuals.com
Page 177 of 304
177 Starting and driving
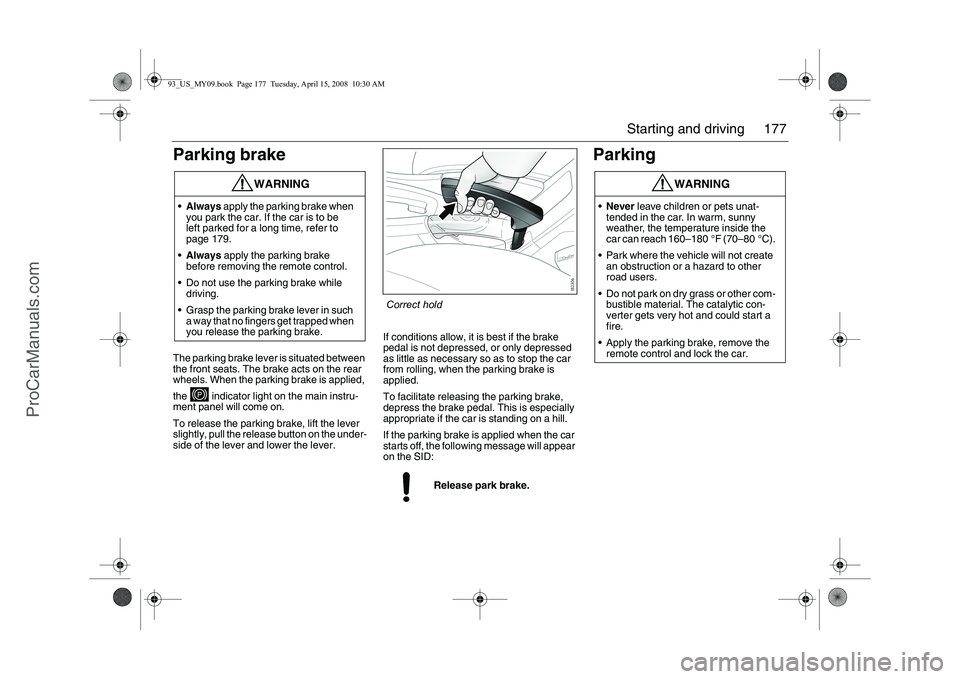
Parking brakeThe parking brake lever is situated between
the front seats. The brake acts on the rear
wheels. When the parking brake is applied,
the indicator light on the main instru-
ment panel will come on.
To release the parking brake, lift the lever
slightly, pull the release button on the under-
side of the lever and lower the lever.If conditions allow, it is best if the brake
pedal is not depressed, or only depressed
as little as necessary so as to stop the car
from rolling, when the parking brake is
applied.
To facilitate releasing the parking brake,
depress the brake pedal. This is especially
appropriate if the car is standing on a hill.
If the parking brake is applied when the car
starts off, the following message will appear
on the SID:
Parking
WARNING
Always apply the parking brake when
you park the car. If the car is to be
left parked for a long time, refer to
page 179.
Always apply the parking brake
before removing the remote control.
Do not use the parking brake while
driving.
Grasp the parking brake lever in such
a way that no fingers get trapped when
you release the parking brake.
Release park brake.
WARNING
Never leave children or pets unat-
tended in the car. In warm, sunny
weather, the temperature inside the
car can reach 160–180 °F (70–80 °C).
Park where the vehicle will not create
an obstruction or a hazard to other
road users.
Do not park on dry grass or other com-
bustible material. The catalytic con-
verter gets very hot and could start a
fire.
Apply the parking brake, remove the
remote control and lock the car.
Correct hold
93_US_MY09.book Page 177 Tuesday, April 15, 2008 10:30 AM
ProCarManuals.com
Page 241 of 304
241
Car care
High speed operation
If you’ll be driving at high speeds, speeds of
100 mph (160 km/h) or higher, where it is
legal, set the cold inflation pressure to the
maximum inflation pressure shown on the
tire sidewall, or to 35 psi (244 kPa), which-
ever is lower. See the example below.
When you end this high-speed driving,
return to the cold inflation pressure shown
on the Tire and Loading Information label.
See on page 250.
Example
You’ll find maximum load and inflation pres-
sure molded on the tire’s sidewall, in small
letters near the rim flange. It will read some-
thing like this: Maximum load 690 kg
(1521 lbs) 300 kPa (44 psi) Max. Press
For this example, you would set the inflation
pressure for high-speed driving at 35 psi
(244 kPa).When to checkCheck your tires once a month or more.
Don’t forget your compact spare tire. It
should be at 60 psi (420 kPa).
How to CheckUse a good quality pocket-type gage to
check tire pressure. Yo u can’t tell if your
tires are properly inflated simply by looking
at them. Radial tires may look properly
inflated even when they’re underinflated.
Be sure to put the valve caps back on the
valve stems. They help prevent leaks by
keeping out dirt and moisture.Tire Inspection and RotationTires should be rotated every 10,000 miles
(16 000 km).
Any time you notice unusual wear, rotate
your tires as soon as possible and check
wheel alignment. Also check for damaged
tires or wheels. See “When It Is Time for
New Tires” on page 242 and “Wheel
Replacement” on page 246 for more infor-
mation.
The purpose of regular rotation is to achieve
more uniform wear for all tires on the vehi-
cle. The first rotation is the most important.
When rotating your tires, always use the
correct rotation pattern. Le ft front tire to left
rear. Left rear tire to right front. Right front to
right rear. Right rear to left front.
Don’t include the compact spare tire in your
tire rotation.
After the tires have b een rotated, adjust the
front and rear inflation pressures as shown
on the Tire-Loading Information label. Make
WARNING
Driving at high speeds, 100 mph
(160 km/h) or higher, puts an additional
strain on tires.
Sustained high-speed driving causes
excessive heat build up and can cause
sudden tire failure. You could have a
crash and you or others could be killed.
Some high-speed rated tires require infla-
tion pressure adjustment for high speed
operation. When speed limits and road
conditions are such that a vehicle can be
driven at high speeds, make sure the tires
are rated for high speed operation, in
excellent condition, and set to the correct
cold tire inflation pressure for the vehicle
load.93_US_7carcare_MY09.fm Page 241 Tuesday, April 15, 2008 11:26 AM
ProCarManuals.com
Page 249 of 304

249
Car care
Aspect ratio: A two-digit number that indi-
cates the tire height-to-width measure-
ments. For example, if the tire size aspect
ratio is “55”, as shown in item “C” of the illus-
tration, it would mean that the tire´s sidewall
is 55% as high as it is wide.
Belt Rating: A letter code is used to indicate
the type of ply construction in the tire. The
letter “R” means radial ply construction; the
letter “D” means diagonal or bias ply con-
struction; and the letter “B” means
belted-bias ply construction.
Rim Diameter: Diameter of the wheel in
inches.
Load range: The load range represents the
load carry capacity a tire is certified to carry.
Speed Rating: The maximum speed that a
tire is certified to carry a load. Speed ratings
range from “A” to “Z”.
Tire markingsAn example of the meaning of the different
markings in a tire size is given below for a
tire size of 225/45 R17 94H:
225 Tire section width, mm
45 Aspect ratio, i.e. the section height
as a percentage of the section
width
R Radial ply
17 Wheel rim diameter 17 in at bead
seats
94 Tire load index
H Speed rating
Tire load indices
91 Tire approved for max. 1355 lbs.
(615 kg)
93 Max. 1433 lbs. (650 kg)
94 Max. 1477 lbs. (670 kg)
95 Max. 1521 lbs. (690 kg)
97 Max. 1609 lbs. (730 kg)
98 Max. 1653 lbs. (750 kg) Speed ratings
Q Tire approved for speeds up to
100 mph (160 km/h)
S Max. 112 mph (180 km/h)
T Max. 118 mph (190 km/h)
H Max. 130 mph (210 km/h) V Max. 149 mph (240 km/h)
W Max. 168 mph (270 km/h) Y Max. 186 mph (300 km/h)
93_US_7carcare_MY09.fm Page 249 Tuesday, April 15, 2008 11:26 AM
ProCarManuals.com