SAAB 9-5 2000 Owners Manual
Manufacturer: SAAB, Model Year: 2000, Model line: 9-5, Model: SAAB 9-5 2000Pages: 256, PDF Size: 14.24 MB
Page 201 of 256
201 Car care and technical information
TemperatureThe temperature grades are A (the highest),
B, and C, representing the tire’s resistance
to the generation of heat and its ability to dis-
sipate heat when tested under controlled
conditions on a specified indoor laboratory
test wheel. Sustained high temperature can
cause the material of the tire to degenerate
and reduce tire life, and excessive temper-
ature can lead to sudden tire failure. The
grade C corresponds to a level of perfor-
mance which all passenger car tires must
meet under the Federal Motor Vehicle
Safety Standard No. 109.
Grades B and A represent higher levels of
performance on the laboratory test wheel
than the minimum required by law.
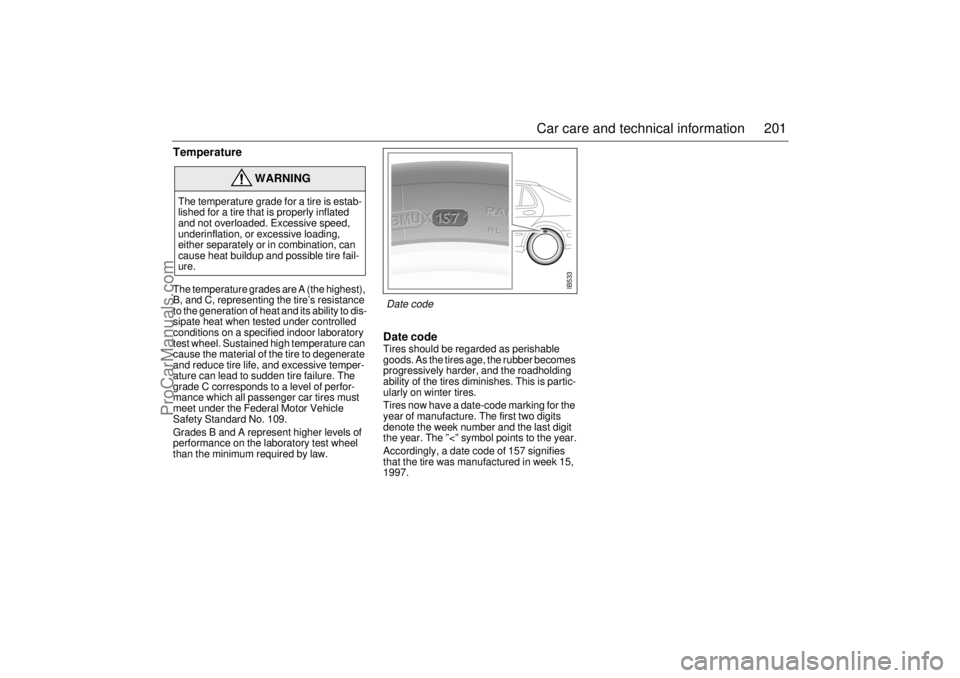
Date codeTires should be regarded as perishable
goods. As the tires age, the rubber becomes
progressively harder, and the roadholding
ability of the tires diminishes. This is partic-
ularly on winter tires.
Tires now have a date-code marking for the
year of manufacture. The first two digits
denote the week number and the last digit
the year. The ”<” symbol points to the year.
Accordingly, a date code of 157 signifies
that the tire was manufactured in week 15,
1997.
WARNING
The temperature grade for a tire is estab-
lished for a tire that is properly inflated
and not overloaded. Excessive speed,
underinflation, or excessive loading,
either separately or in combination, can
cause heat buildup and possible tire fail-
ure.
IB533
Date code
ProCarManuals.com
Page 202 of 256
202 Car care and technical informationCompact spare wheelThe compact spare is light and easy to
handle when changing the tire. Its use is
only permitted when a standard tire has sus-
tained a puncture. The maximum life of the
tire is only 2000 miles (3,500 km).
Do not exceed 50 mph (80 km/h) with the
compact spare fitted.
The compact spare should be inflated to
60 psi (420 kPa). Carry the punctured tire in
the spare-wheel well under the luggage-
compartment floor.
Have the standard tire repaired and refitted
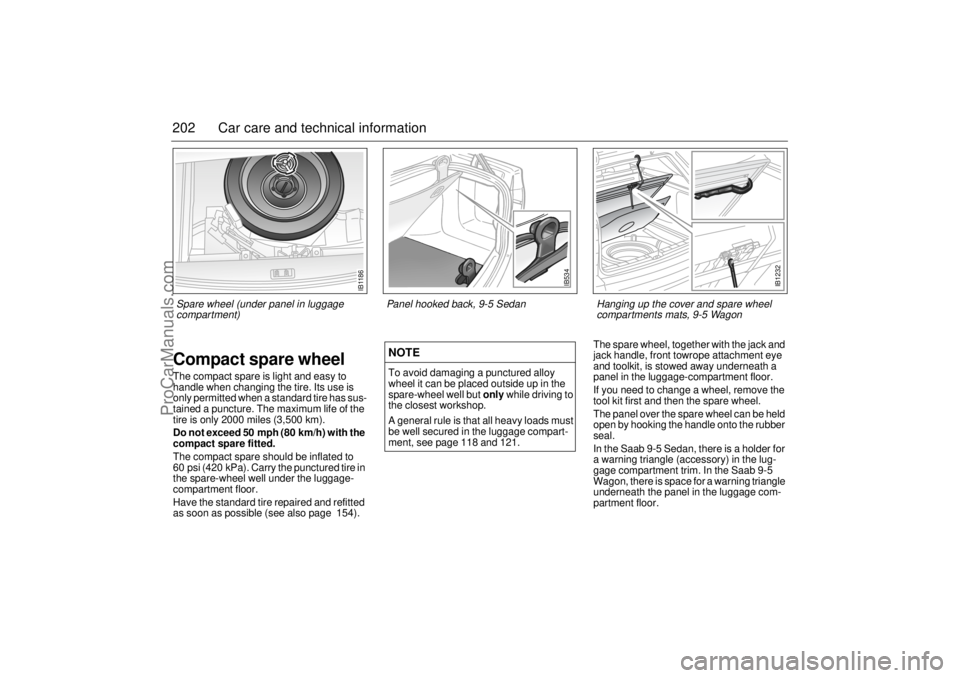
as soon as possible (see also page 154).The spare wheel, together with the jack and
jack handle, front towrope attachment eye
and toolkit, is stowed away underneath a
panel in the luggage-compartment floor.
If you need to change a wheel, remove the
tool kit first and then the spare wheel.
The panel over the spare wheel can be held
open by hooking the handle onto the rubber
seal.
In the Saab 9-5 Sedan, there is a holder for
a warning triangle (accessory) in the lug-
gage compartment trim. In the Saab 9-5
Wagon, there is space for a warning triangle
underneath the panel in the luggage com-
partment floor.
NOTETo avoid damaging a punctured alloy
wheel it can be placed outside up in the
spare-wheel well but only while driving to
the closest workshop.
A general rule is that all heavy loads must
be well secured in the luggage compart-
ment, see page 118 and 121.
IB534
Panel hooked back, 9-5 Sedan
IB1232
Hanging up the cover and spare wheel
compartments mats, 9-5 Wagon
IB1186
Spare wheel (under panel in luggage
compartment)
ProCarManuals.com
Page 203 of 256

203 Car care and technical information
Changing a wheel
WARNING
The car jack is designed solely for use
in changing a wheel or fitting snow
chains. It must not be used to support
the car during repair work or servicing.
Never crawl under a car that is
supported only by a jack.
Special care must be taken if the car is
on a slope – use wheel chocks!
Position chocks, one ahead and one
behind, the wheel that is diagonally
opposite to the one to be changed.
Switch on the hazard warning lights if
the car is on a road.
Apply the handbrake and leave the car
in gear (1st or reverse). Automatic
transmission: move selector to the
P position.
Ensure that everybody is out of the car
before jacking it up.
Never start the engine while the car is
jacked up.
The jack must stand on a firm, level
surface.
Stow the jack in the place provided for
it under the panel in the floor of the lug-
gage compartment. Secure it properly
to avert injury to passengers in the
event of an accident.
Do not use the jack for any purpose
other than for jacking up the car.
ProCarManuals.com
Page 204 of 256
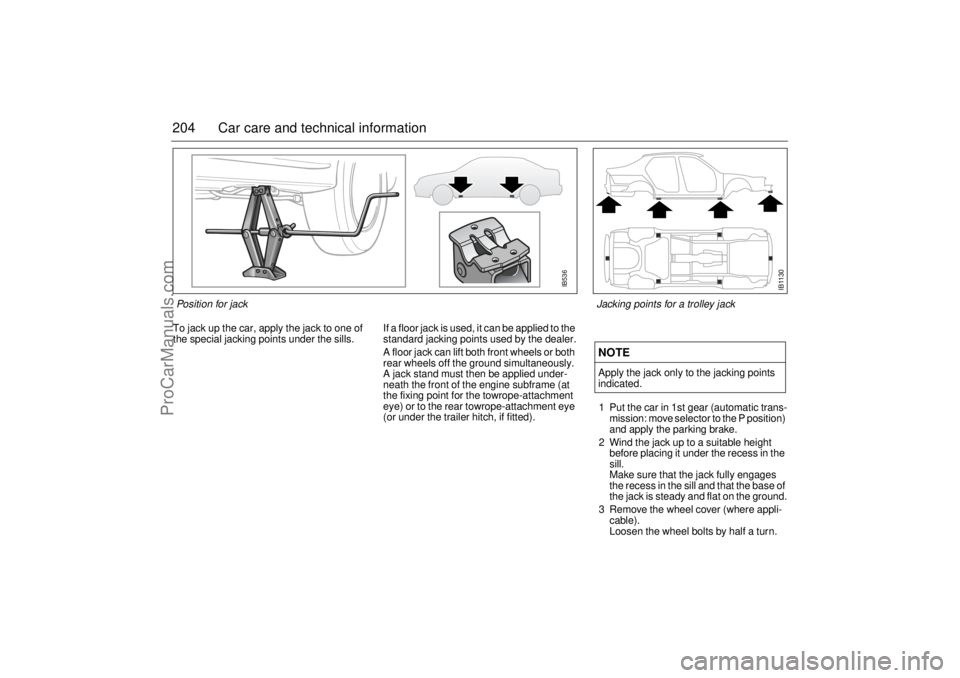
204 Car care and technical informationTo jack up the car, apply the jack to one of
the special jacking points under the sills.If a floor jack is used, it can be applied to the
standard jacking points used by the dealer.
A floor jack can lift both front wheels or both
rear wheels off the ground simultaneously.
A jack stand must then be applied under-
neath the front of the engine subframe (at
the fixing point for the towrope-attachment
eye) or to the rear towrope-attachment eye
(or under the trailer hitch, if fitted).1 Put the car in 1st gear (automatic trans-
mission: move selector to the P position)
and apply the parking brake.
2 Wind the jack up to a suitable height
before placing it under the recess in the
sill.
Make sure that the jack fully engages
the recess in the sill and that the base of
the jack is steady and flat on the ground.
3 Remove the wheel cover (where appli-
cable).
Loosen the wheel bolts by half a turn.
NOTEApply the jack only to the jacking points
indicated.
Pos i ti o n for j ack
IB1130
Jacking points for a trolley jack
IB536
ProCarManuals.com
Page 205 of 256
205 Car care and technical information
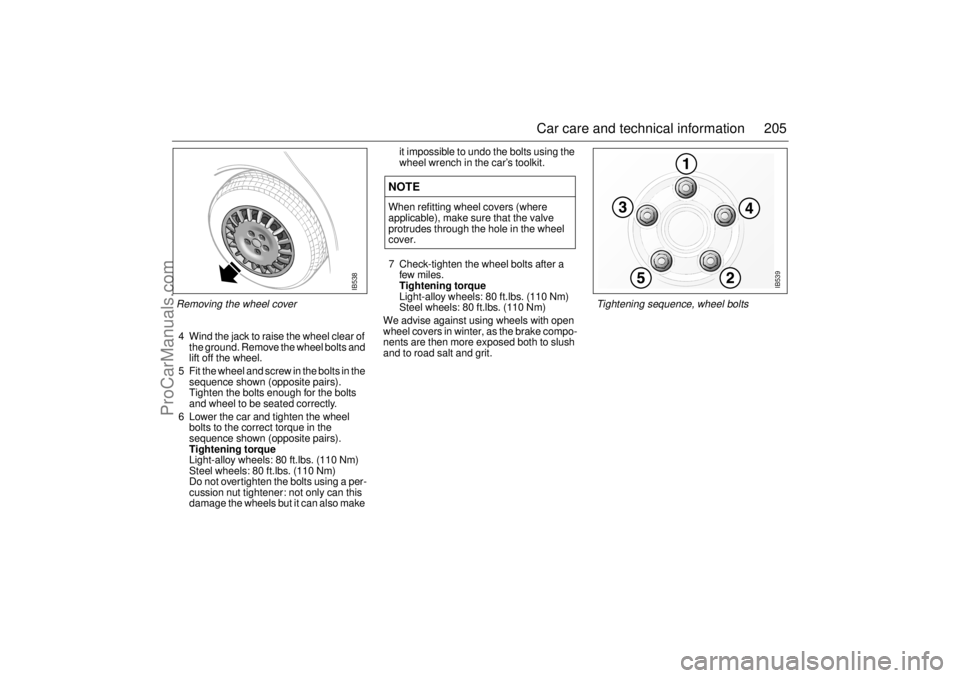
4 Wind the jack to raise the wheel clear of
the ground. Remove the wheel bolts and
lift off the wheel.
5 Fit the wheel and screw in the bolts in the
sequence shown (opposite pairs).
Tighten the bolts enough for the bolts
and wheel to be seated correctly.
6 Lower the car and tighten the wheel
bolts to the correct torque in the
sequence shown (opposite pairs).
Tightening torque
Light-alloy wheels: 80 ft.lbs. (110 Nm)
Steel wheels: 80 ft.lbs. (110 Nm)
Do not overtighten the bolts using a per-
cussion nut tightener: not only can this
damage the wheels but it can also make it impossible to undo the bolts using the
wheel wrench in the car’s toolkit.
7 Check-tighten the wheel bolts after a
few miles.
Tightening torque
Light-alloy wheels: 80 ft.lbs. (110 Nm)
Steel wheels: 80 ft.lbs. (110 Nm)
We advise against using wheels with open
wheel covers in winter, as the brake compo-
nents are then more exposed both to slush
and to road salt and grit.
NOTEWhen refitting wheel covers (where
applicable), make sure that the valve
protrudes through the hole in the wheel
cover.
IB538
Removing the wheel cover
IB539
Tightening sequence, wheel bolts
ProCarManuals.com
Page 206 of 256

206 Car care and technical informationFlat spottingAll tires get hot, especially on long journeys
or when the car is driven hard. After the car
has been parked with hot tires and the tires
have cooled down, a flat spot can appear in
the tire, where it is in contact with the
ground. The same can occur if the car has
not been moved for a long time.
Flat spots can give rise to vibration that can
be felt through the steering wheel, similar to
that experienced when the wheels need bal-
ancing. Flat spots of this type disappear
once the tires get hot again, usually after
10–15 miles (20–25 km) of driving at cruis-
ing speed.
Air conditioning
(A/C system)
Fault diagnosis If a fault occurs in the A/C system, there are
a number of checks you can perform your-
self. If the fault persists, however, have the
system checked by an authorized Saab
dealer.
Important!
When the A/C system is running, the intake
air is dehumidified, and the resultant con-
densation is drained off through two outlets
underneath the floor of the car in the vicinity
of the front doors. It is therefore perfectly
normal for water to be seen dripping from
these outlets when the car is parked. The
warmer the ambient air and the higher the
humidity, the greater will be the amount of
condensation formed.
Inadequate cooling:
a Make sure that the temperature and
air-distribution controls are in the
appropriate settings.
b Check that the condenser (forward of
the radiator) has not become clogged
with dirt and insects.
c Make sure that the drive belt for the com-
pressor is not slipping.
d Check the fuses for the ventilation fans
and compressor.
NOTE The A/C system is designed for use
with R134a refrigerant.
Refrigerant handling requires special
equipment and special procedures for
charging and draining the system.
All repairs and adjustments on the A/C
system must be carried out by a Saab
dealer authorized for this kind of work.
Never mix R134a and R12 refriger-
ants.
WARNING
The A/C system is pressurized. Do not
break any connections or undo A/C
system components.
Escaping gas can cause blindness or
other injury.
ProCarManuals.com
Page 207 of 256

207 Car care and technical information
Maintenance The drive belt for the compressor should
be inspected under the regular service
program.
Clean dirt and insects away from the con-
denser and radiator to prevent clogging.
When washing the car, use the hose to
spray the radiator and condenser (located
forward of the radiator) from both sides
(both from the front of the car and from
inside the engine bay). Do not use a pres-
sure washer.
Caution: Do not use the hose when the
engine is hot.Other than in extremely cold weather, do not
screen the radiator, e.g. with netting, as this
will greatly diminish its cooling capacity.
Note: The A/C system will only operate
when the outdoor temperature is above the
freezing point (0°C, 32°F).
Safety beltsRegularly check the function of the safety
belts as follows:
Hold the diagonal strap and pull it sharply.
The safety belt should lock and it should
not be possible to withdraw it further.
Check the anchorage points in the floor.
They must not have suffered rust damage.
There must be no frayed threads in the web-
bing.
Safety belts must not come into contact with
substances such as polishes, oils or other
chemicals. If the straps are dirty, wash them
with warm water and a detergent or have
them replaced.
WARNING
If the car is involved in a collision, the
safety belts, belt pretensioners and other
components must be inspected by an
authorized Saab dealer.
Never make any alterations or repairs to
the safety belt yourself but visit an autho-
rized Saab dealer.
ProCarManuals.com
Page 208 of 256

208 Car care and technical informationUpholstery and trimTo remove fluff or hairs from the seat uphol-
stery or headlining, use a moist, lint-free
cloth or a special lint remover (brush or
roller). Remove any dirty marks using a
cloth moistened with lukewarm soapy
water.
When using a stain remover, always work
from the outside towards the center to avoid
leaving a ring. If a soiled ring or spot should
remain, it can usually be removed using
lukewarm soapy water or water alone.
Wet patches left by spilt soft drinks or thin oil
must be wiped off immediately using an
absorbent material, such as kitchen paper,
and treated with stain remover.
Alcohol is recommended for removing
grease or oil stains, and a semi-stiff brush
may also be used.
Cleaning and caring for leather
upholsteryThe principal reason for treating leather
upholstery is to maintain its elegant appear-
ance and to provide it with a protective film.
Discoloration caused by dust and wear
mainly affects the lighter shades, although
this is not detrimental to the leather –
indeed, the patina resulting from use is often
considered desirable in leather. But if the
leather is allowed to become too grubby, it
can start to look shabby.
It is a good idea to clean and recondition the
leather twice a year – in conjunction with a
general spring-cleaning of the car – after the
winter and in the autumn, for instance. In
hot, dry climates, the leather will need to be
treated more frequently.
Moisten a soft cloth in a mild soap solution.
Carefully apply this damp (not wet) cloth to
the leather, working in light, circular move-
ments until the leather is clean. Repeat the
procedure using clean water and then leave
the leather to dry thoroughly. Finally, treat
the leather with a leather conditioner.Apply the leather conditioner using a soft
cloth and the same circular movements as
described above. After it has dried, polish
the leather with a soft, dry cloth. Follow the
directions given above. Do not use hot
water, unknown abrasive polishes, sol-
vents, sprays or soaps that might scratch
the leather.
Textile carpetingVacuum clean the carpeting regularly. Car-
pets can also be cleaned using a brush, or
carpet shampoo applied with a sponge. Do
not use vacuum cleaners outdoors unless
they are properly grounded.
ProCarManuals.com
Page 209 of 256

209 Car care and technical information
Washing the carWash the car frequently. When the car is
new, wash the bodywork by hand, using just
cold water – a brush attachment on the end
of a hose is ideal. Do not use automatic car
washes for the first five or six months,
before the paintwork has hardened prop-
erly. Thereafter, use a high quality car wash
soap added to lukewarm water.
Remove any bird droppings without delay,
as these can discolor the paintwork and
prove difficult to polish out.
Use a soft cloth moistened with methyl alco-
hol to remove splashes of tar or asphalt. Do
not use strong cleaners, as these can dry
out the paintwork. The underside of the car also needs wash-
ing regularly, and this should be done extra
thoroughly at the end of winter. Clean the
underside of the car by hand if the car is usu-
ally washed in an automatic car wash with-
out special facilities for underbody cleaning.
Never wash or leave the car to dry in the
sun, but wipe it dry with a chamois leather
immediately after washing to avoid smears
and streaks.
Clean the window glass inside and out using
a high quality window cleaner. This is partic-
ularly important when the car is new, as
upholstery and trim have a tendency to
sweat a little at first.
Keep the glass well cleaned, as this helps to
prevent misting.
Waxing and polishingDo not wax a new car during the first three
or four months. In fact, there is no need to
polish the car before the paintwork has
started to go dull through oxidation. Other
than in exceptional cases, do not use abra-
sive polishes containing a cutting agent on
a new car. Always wash the car thoroughly
before waxing or polishing.
NOTEAvoid using any alcohol-based cleaners
on the front and rear light clusters, as
these can cause cracking of the lenses.
NOTE The door mirrors must be fully
retracted before the car enters an
automatic car wash.
Remove fixed antennas, e.g. for
mobile phone, before putting car
through an automatic car wash.
Try your brakes on leaving a car wash.
Wet brake discs reduce the braking
effect.
ProCarManuals.com
Page 210 of 256
210 Car care and technical informationEngine compartmentClean the engine compartment using an
engine detergent and rinse with hot water.
Cover the headlights and do not aim the
spray nozzle on the
Radiator.
Throttle cable.
Throttle housing.
Other engine controls.
The alternator.
Ignition system and other electrical com-
ponents.
Additional care should be taken if using a
high-pressure washer. Hold the nozzle at
right angles to the area to be cleaned, which
is particularly important when spraying
labels.
Do not use gasoline as a cleaning agent or
solvent when carrying out repairs or mainte-
nance. Saab recommends the use of envi-
ronmentally safe degreasing agents.
Touching up the paintDamaged paintwork should be treated as
soon as it is discovered: the longer it is left,
the greater the risk of corrosion. The
anti-perforation warranty does not cover
corrosion resulting from untreated defects.
Paintwork damage sustained in a collision is
usually extensive and can only be properly
restored by professionals.
However, you can repair small scratches
and stone-chip damage yourself. The nec-
essary tools and materials, such as primer,
touch-up paint and brushes, are available
from your Saab dealer.
In the case of minor flaws in the paintwork,
where the metal has not been exposed and
an undamaged layer of paint remains,
touch-up paint can usually be applied
directly, after any dirt has been scraped
away using a pointed knife.
If corrosion has already set in, e.g. as a
result of stone-chip damage, use a pointed
knife to scrape off all surface rust. If possi-
ble, the damaged area should be taken
back to the bare metal. The metal should
then be primed with two thin coats of primer
applied by brush.
After the primer has dried, apply several thin
layers of topcoat enamel until the surface of
the repaired area is flush with the surround-
ing paintwork.
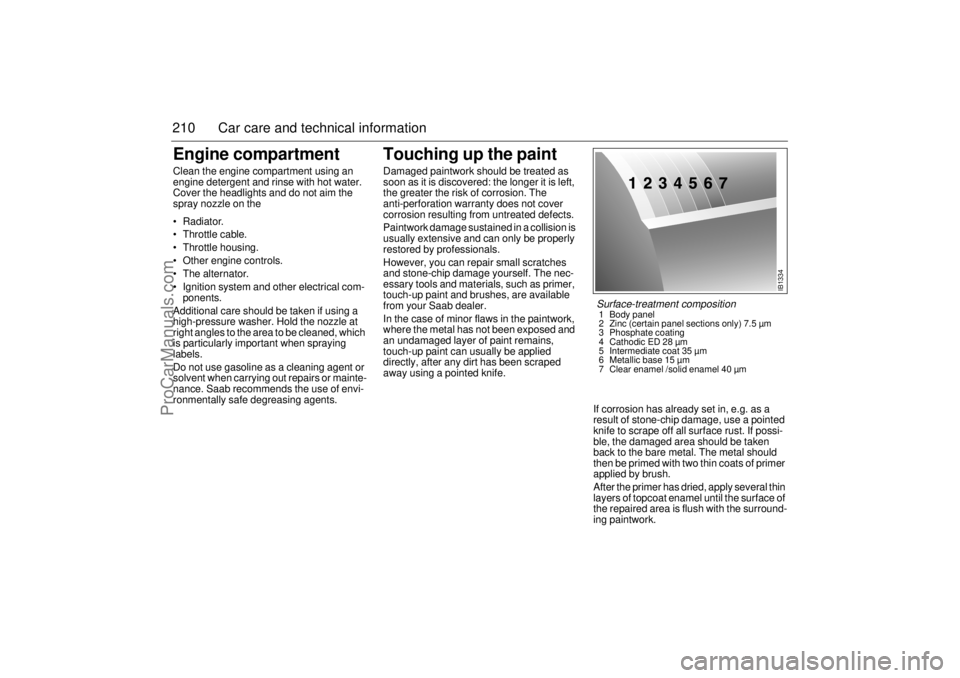
IB1334
Surface-treatment composition 1 Body panel
2 Zinc (certain panel sections only) 7.5 µm
3 Phosphate coating
4 Cathodic ED 28 µm
5 Intermediate coat 35 µm
6 Metallic base 15 µm
7 Clear enamel /solid enamel 40 µm
ProCarManuals.com