ECU SAAB 9-5 2003 Service Manual
[x] Cancel search | Manufacturer: SAAB, Model Year: 2003, Model line: 9-5, Model: SAAB 9-5 2003Pages: 288, PDF Size: 16.78 MB
Page 147 of 288
147 Interior equipment and trunk
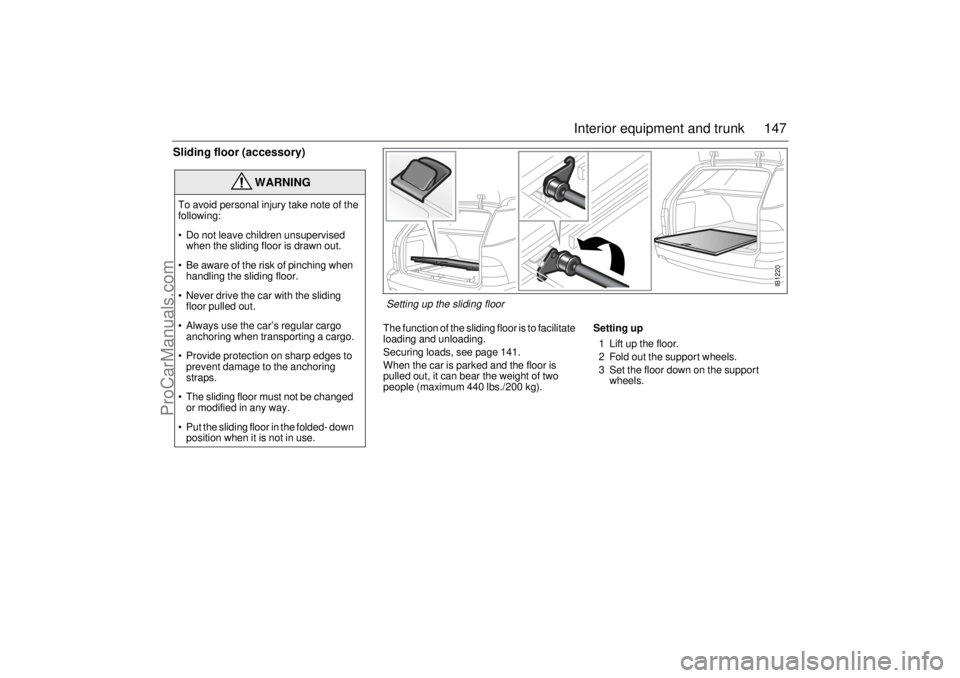
Sliding floor (accessory)
The function of the sliding floor is to facilitate
loading and unloading.
Securing loads, see page 141.
When the car is parked and the floor is
pulled out, it can bear the weight of two
people (maximum 440 lbs./200 kg).Setting up
1 Lift up the floor.
2 Fold out the support wheels.
3 Set the floor down on the support
wheels.
WARNING
To avoid personal injury take note of the
following:
Do not leave children unsupervised
when the sliding floor is drawn out.
Be aware of the risk of pinching when
handling the sliding floor.
Never drive the car with the sliding
floor pulled out.
Always use the car’s regular cargo
anchoring when transporting a cargo.
Provide protection on sharp edges to
prevent damage to the anchoring
straps.
The sliding floor must not be changed
or modified in any way.
Put the sliding floor in the folded- down
position when it is not in use.
IB1220
Setting up the sliding floor
ProCarManuals.com
Page 148 of 288
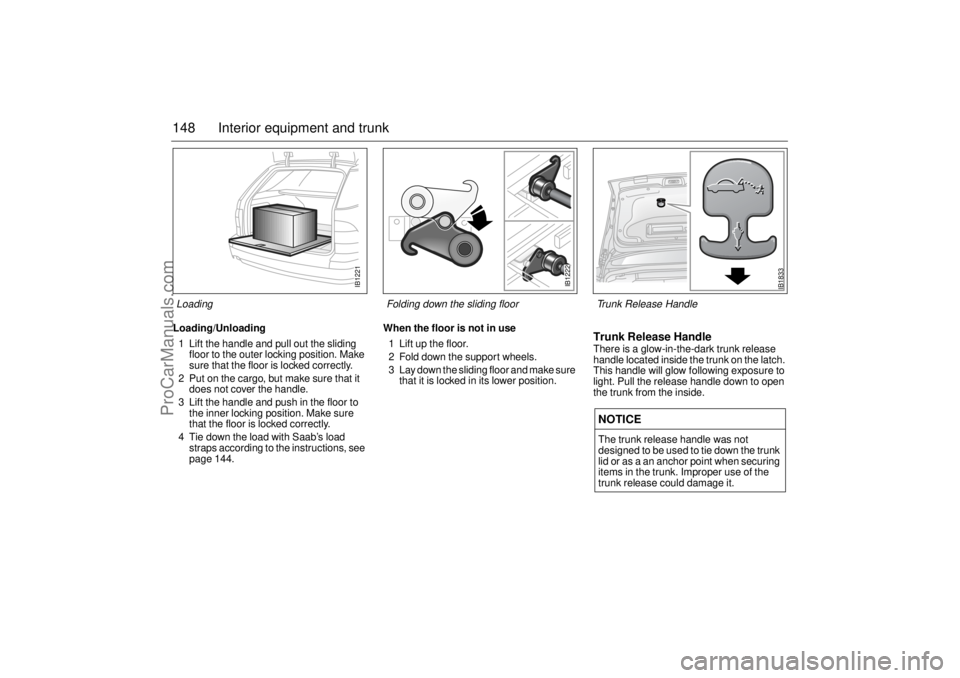
148 Interior equipment and trunkLoading/Unloading
1 Lift the handle and pull out the sliding
floor to the outer locking position. Make
sure that the floor is locked correctly.
2 Put on the cargo, but make sure that it
does not cover the handle.
3 Lift the handle and push in the floor to
the inner locking position. Make sure
that the floor is locked correctly.
4 Tie down the load with Saab’s load
straps according to the instructions, see
page 144.When the floor is not in use
1 Lift up the floor.
2 Fold down the support wheels.
3 Lay down the sliding floor and make sure
that it is locked in its lower position.
Trunk Release HandleThere is a glow-in-the-dark trunk release
handle located inside the trunk on the latch.
This handle will glow following exposure to
light. Pull the release handle down to open
the trunk from the inside.NOTICEThe trunk release handle was not
designed to be used to tie down the trunk
lid or as a an anchor point when securing
items in the trunk. Improper use of the
trunk release could damage it.
IB1221
Loading
IB1222
Folding down the sliding floor
IB1833
Trunk Release Handle
ProCarManuals.com
Page 165 of 288

165 Starting and driving
Park Brake Shift lockThe transmission has a security function
known as Park Brake Shift Lock. To move
the gear selector out of the P position, the
brake pedal must be depressed at the same
time as the gear selector catch (detente) is
pressed in.
Shift Lock overrideCheck fuse No. 1 (see page 228). If the
problem was cured by changing the fuse or
battery, you do not have to contact a Saab
dealer.
If the fuse blows again as soon as the Shift
Lock feature is activated you should contact
your Saab dealer.
If the fuse is OK, check the battery regarding
the voltage.
1 Apply the parking brake
2 Make sure the key is in position ON
3 Use a small tool such as a screwdriver
and push the lever (see picture) down-
wards so that the detent button can be
pressed approx. 10 mm
4 Move the selector out of position P to N
5 Remove the tool
6 Release the parking brake if the car is to
be moved immediately; otherwise keep
it applied
Automatic transmission,
fault indicator
If ”Automatic transmission, fault indicator”
light appears on the main instrument panel,
the system has detected a fault in the auto-
matic transmission or its control module
(see page 61).
This also means that the Limp-home mode
has been selected, to guard against further
damage being done to the transmission. In
this mode, the automatic transmission
starts in 5th gear, and gear changes (if nec-
essary) will have to be made manually.
Stop the car in a safe place. Switch off then
restart the engine. If the fault is intermittent,
the transmission will operate as normal
despite the fault indicator being on. Have
the car checked at an authorized Saab
dealer.
It is not possible to select the SPORT,
WINTER or Sentronic mode when the
Limp-home mode is active.
Gear changes must be made manually.
The following gears will be engaged in the
respective selector positions when the auto-
matic transmission is in Limp-home mode:
NOTICEDue to electrical problems it may not be
possible to move the selector out of the
park position, even if the ignition is ON. If
for some reason the selector has to be
moved out of the park position (i.e. to tow
the car a short distance) do as described
below.
Position R D M L
Gear Reverse 5th 5th 2nd
ProCarManuals.com
Page 182 of 288
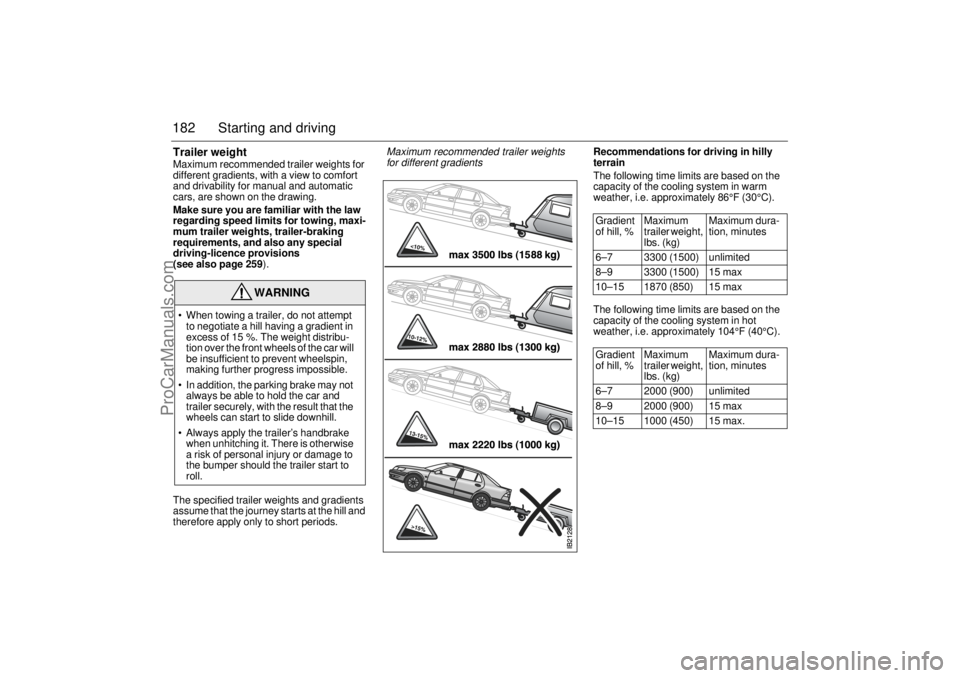
182 Starting and drivingTrailer weightMaximum recommended trailer weights for
different gradients, with a view to comfort
and drivability for manual and automatic
cars, are shown on the drawing.
Make sure you are familiar with the law
regarding speed limits for towing, maxi-
mum trailer weights, trailer-braking
requirements, and also any special
driving-licence provisions
(see also page 259). The specified trailer weights and gradients
assume that the journey starts at the hill and
therefore apply only to short periods. Recommendations for driving in hilly
terrain
The following time limits are based on the
capacity of the cooling system in warm
weather, i.e. approximately 86°F (30°C).
The following time limits are based on the
capacity of the cooling system in hot
weather, i.e. approximately 104°F (40°C).
WARNING
When towing a trailer, do not attempt
to negotiate a hill having a gradient in
excess of 15 %. The weight distribu-
tion over the front wheels of the car will
be insufficient to prevent wheelspin,
making further progress impossible.
In addition, the parking brake may not
always be able to hold the car and
trailer securely, with the result that the
wheels can start to slide downhill.
Always apply the trailer’s handbrake
when unhitching it. There is otherwise
a risk of personal injury or damage to
the bumper should the trailer start to
roll.
Gradient
of hill, % Maximum
trailer weight,
lbs. (kg)Maximum dura-
tion, minutes
6–7 3300 (1500) unlimited
8–9 3300 (1500) 15 max
10–15 1870 (850) 15 max
Gradient
of hill, % Maximum
trailer weight,
lbs. (kg)Maximum dura-
tion, minutes
6–7 2000 (900) unlimited
8–9 2000 (900) 15 max
10–15 1000 (450) 15 max.
Maximum recommended trailer weights
for different gradients
ProCarManuals.com
Page 185 of 288
185 Starting and driving
Driving with a roof rack
loadThe maximum permissible roof load is
220 lbs. (100 kg).
Note that the roof load is included in the
car’s maximum permissible load (see page
258).
Strong, sturdy roof carriers designed spe-
cially for the car are available from your
Saab dealer. Always secure the roof load
safely.
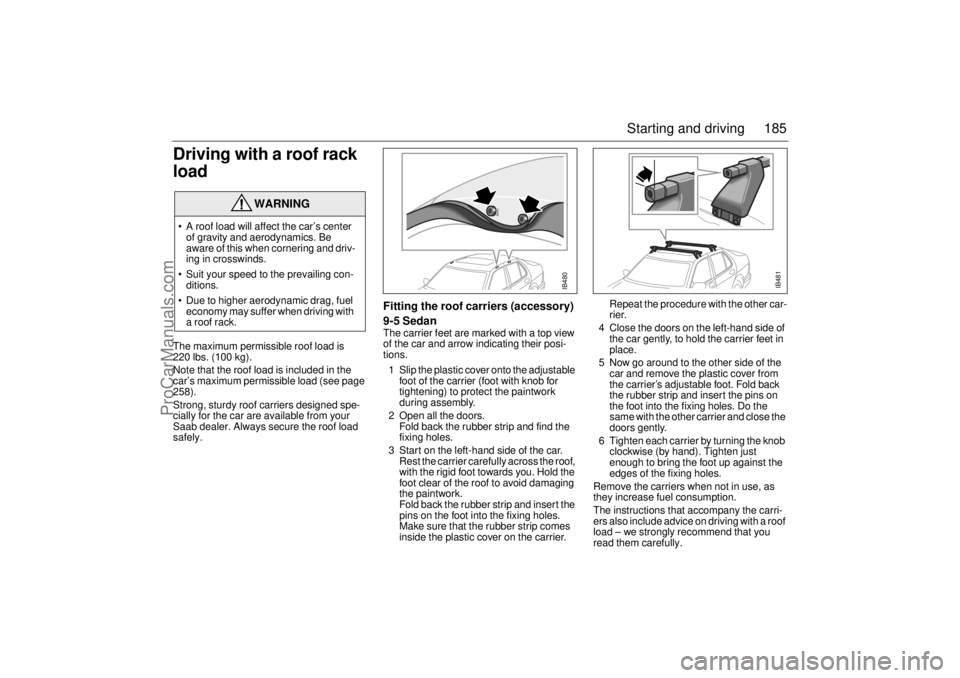
Fitting the roof carriers (accessory)
9-5 SedanThe carrier feet are marked with a top view
of the car and arrow indicating their posi-
tions.
1 Slip the plastic cover onto the adjustable
foot of the carrier (foot with knob for
tightening) to protect the paintwork
during assembly.
2 Open all the doors.
Fold back the rubber strip and find the
fixing holes.
3 Start on the left-hand side of the car.
Rest the carrier carefully across the roof,
with the rigid foot towards you. Hold the
foot clear of the roof to avoid damaging
the paintwork.
Fold back the rubber strip and insert the
pins on the foot into the fixing holes.
Make sure that the rubber strip comes
inside the plastic cover on the carrier. Repeat the procedure with the other car-
rier.
4 Close the doors on the left-hand side of
the car gently, to hold the carrier feet in
place.
5 Now go around to the other side of the
car and remove the plastic cover from
the carrier’s adjustable foot. Fold back
the rubber strip and insert the pins on
the foot into the fixing holes. Do the
same with the other carrier and close the
doors gently.
6 Tighten each carrier by turning the knob
clockwise (by hand). Tighten just
enough to bring the foot up against the
edges of the fixing holes.
Remove the carriers when not in use, as
they increase fuel consumption.
The instructions that accompany the carri-
ers also include advice on driving with a roof
load – we strongly recommend that you
read them carefully.
WARNING
A roof load will affect the car’s center
of gravity and aerodynamics. Be
aware of this when cornering and driv-
ing in crosswinds.
Suit your speed to the prevailing con-
ditions.
Due to higher aerodynamic drag, fuel
economy may suffer when driving with
a roof rack.
IB480
IB481
ProCarManuals.com
Page 186 of 288
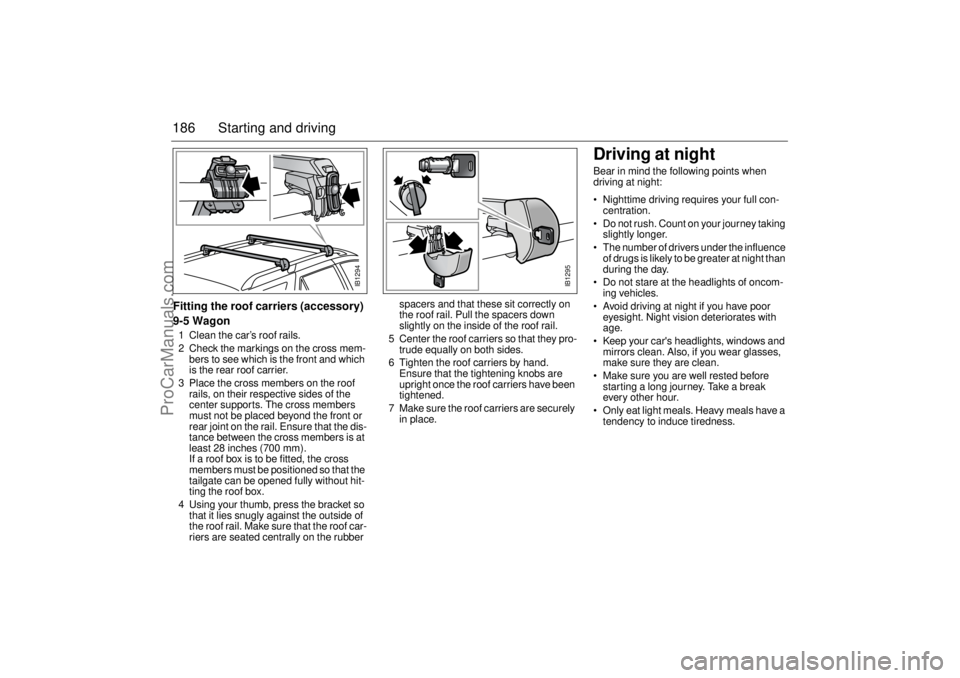
186 Starting and drivingFitting the roof carriers (accessory)
9-5 Wagon1 Clean the car’s roof rails.
2 Check the markings on the cross mem-
bers to see which is the front and which
is the rear roof carrier.
3 Place the cross members on the roof
rails, on their respective sides of the
center supports. The cross members
must not be placed beyond the front or
rear joint on the rail. Ensure that the dis-
tance between the cross members is at
least 28 inches (700 mm).
If a roof box is to be fitted, the cross
members must be positioned so that the
tailgate can be opened fully without hit-
ting the roof box.
4 Using your thumb, press the bracket so
that it lies snugly against the outside of
the roof rail. Make sure that the roof car-
riers are seated centrally on the rubber spacers and that these sit correctly on
the roof rail. Pull the spacers down
slightly on the inside of the roof rail.
5 Center the roof carriers so that they pro-
trude equally on both sides.
6 Tighten the roof carriers by hand.
Ensure that the tightening knobs are
upright once the roof carriers have been
tightened.
7 Make sure the roof carriers are securely
in place.
Driving at nightBear in mind the following points when
driving at night:
Nighttime driving requires your full con-
centration.
Do not rush. Count on your journey taking
slightly longer.
The number of drivers under the influence
of drugs is likely to be greater at night than
during the day.
Do not stare at the headlights of oncom-
ing vehicles.
Avoid driving at night if you have poor
eyesight. Night vision deteriorates with
age.
Keep your car's headlights, windows and
mirrors clean. Also, if you wear glasses,
make sure they are clean.
Make sure you are well rested before
starting a long journey. Take a break
every other hour.
Only eat light meals. Heavy meals have a
tendency to induce tiredness.
IB1294
IB1295
ProCarManuals.com
Page 187 of 288

187 Starting and driving
Driving with a loadThe driving characteristics of the car are
affected by the way it is loaded.
Place heavy loads as far forward and as
low as possible in the trunk.
Secure the load to the tie downs, see
page 141.
The load should be such that the car´s
total weight or axle weight are not
exceeded, see page 258.
Heavy loads mean that the car’s center of
gravity is further back. As a result, the car
will sway more during evasive steering.
Never exceed the permissible load in the
roof box, even if there is room for more.
Ensure that the tire pressure is correct –
slight overinflation is preferable to under-
inflation.
The braking distance of a loaded car is
always greater. Keep your distance from
the vehicle in front.
Roof loads can negatively affect tele-
communication.
Tire pressure, see page 269 and back
cover.
Tires The tire pressure should match the current
load and speed of the car; see page 268 or
the tire pressure label on
page 269.
The tire pressures given apply to cold tires,
that is tires that are the same temperature
as the outside air temperature.
The tire pressure increases as the tires
become warm (e.g. during highway driving)
with approximately 0.3 bar (4 psi). When
the temperature of the tires changes by 50°
(10°C), the tire pressure will change 0.1 bar
(2 psi).Never reduce the pressure of a hot tire. If the
tires are hot when you check them, only
increase the pressure, if necessary.
Underinflated tires wear more quickly than
slightly overinflated tires.
If a valve is leaking, simply unscrew it and fit
a new one.
Important! Remember to adjust the tire
pressures if you change the load in the car
or intend to drive at substantially lower or
higher speeds than normal.
WARNING
Check the tire pressure at least once a
month and before long journeys. Under-
inflation can result in:
Punctures
Separation of the tire and tread
Damage to the sidewalls
Damage to the rims on poor roads
Poor handling characteristics
Premature tire wear
Increased fuel consumption.
ProCarManuals.com
Page 188 of 288
188 Starting and drivingDriving considerations
with compact spare
wheel/tire fittedThe following should be observed when the
compact spare wheel (T115/70 R16) is
fitted:
The compact spare is light and easy to
handle when changing the wheel. Do not
drive further than necessary with the com-
pact spare fitted – the maximum life of the
wheel is only just over 2000 miles
(3,500 km). Have the standard wheel
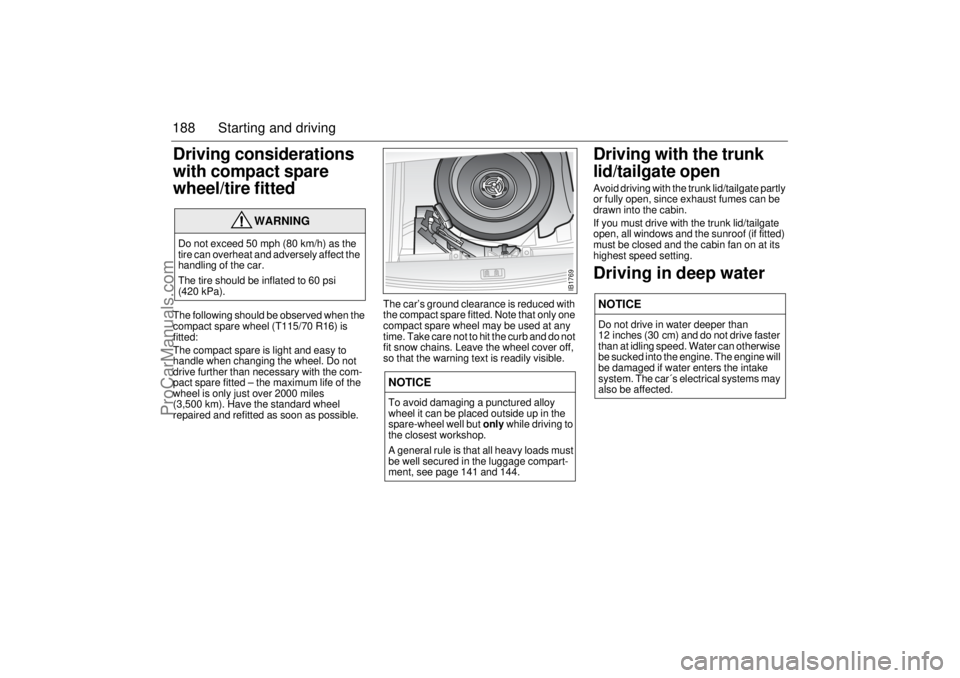
repaired and refitted as soon as possible. The car’s ground clearance is reduced with
the compact spare fitted. Note that only one
compact spare wheel may be used at any
time. Take care not to hit the curb and do not
fit snow chains. Leave the wheel cover off,
so that the warning text is readily visible.
Driving with the trunk
lid/tailgate openAvoid driving with the trunk lid/tailgate partly
or fully open, since exhaust fumes can be
drawn into the cabin.
If you must drive with the trunk lid/tailgate
open, all windows and the sunroof (if fitted)
must be closed and the cabin fan on at its
highest speed setting.Driving in deep water
WARNING
Do not exceed 50 mph (80 km/h) as the
tire can overheat and adversely affect the
handling of the car.
The tire should be inflated to 60 psi
(420 kPa).
NOTICETo avoid damaging a punctured alloy
wheel it can be placed outside up in the
spare-wheel well but only while driving to
the closest workshop.
A general rule is that all heavy loads must
be well secured in the luggage compart-
ment, see page 141 and 144.
NOTICEDo not drive in water deeper than
12 inches (30 cm) and do not drive faster
than at idling speed. Water can otherwise
be sucked into the engine. The engine will
be damaged if water enters the intake
system. The car´s electrical systems may
also be affected.
IB1769
ProCarManuals.com
Page 189 of 288
189 Starting and driving
Towing the carTransporting the car Front towing eye
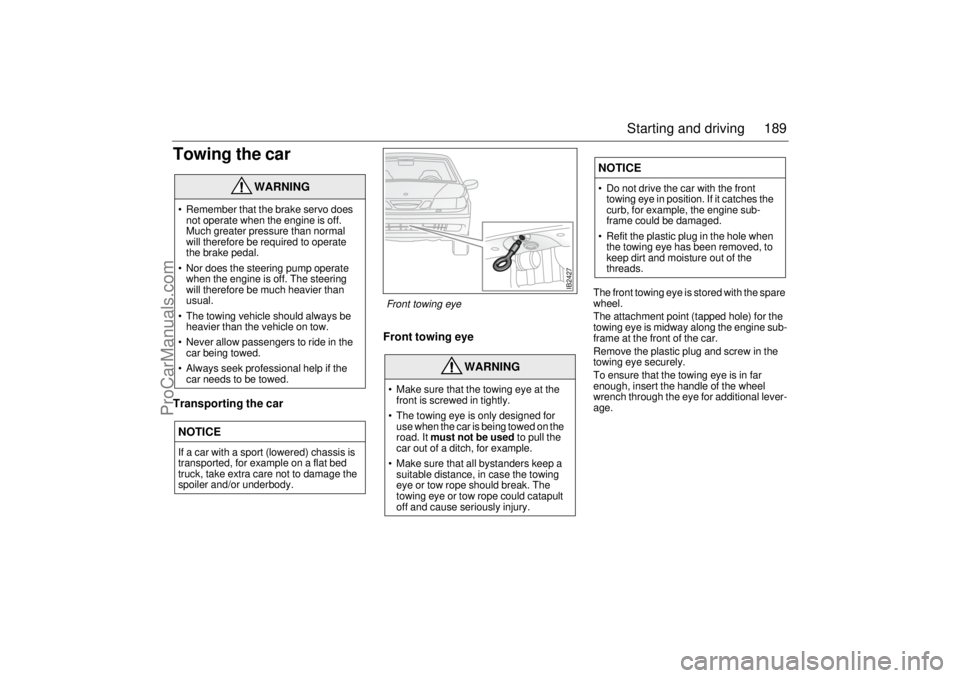
The front towing eye is stored with the spare
wheel.
The attachment point (tapped hole) for the
towing eye is midway along the engine sub-
frame at the front of the car.
Remove the plastic plug and screw in the
towing eye securely.
To ensure that the towing eye is in far
enough, insert the handle of the wheel
wrench through the eye for additional lever-
age.
WARNING
Remember that the brake servo does
not operate when the engine is off.
Much greater pressure than normal
will therefore be required to operate
the brake pedal.
Nor does the steering pump operate
when the engine is off. The steering
will therefore be much heavier than
usual.
The towing vehicle should always be
heavier than the vehicle on tow.
Never allow passengers to ride in the
car being towed.
Always seek professional help if the
car needs to be towed.NOTICEIf a car with a sport (lowered) chassis is
transported, for example on a flat bed
truck, take extra care not to damage the
spoiler and/or underbody.
WARNING
Make sure that the towing eye at the
front is screwed in tightly.
The towing eye is only designed for
use when the car is being towed on the
road. It must not be used to pull the
car out of a ditch, for example.
Make sure that all bystanders keep a
suitable distance, in case the towing
eye or tow rope should break. The
towing eye or tow rope could catapult
off and cause seriously injury.
NOTICE Do not drive the car with the front
towing eye in position. If it catches the
curb, for example, the engine sub-
frame could be damaged.
Refit the plastic plug in the hole when
the towing eye has been removed, to
keep dirt and moisture out of the
threads.
IB2427
Front towing eye
ProCarManuals.com
Page 198 of 288
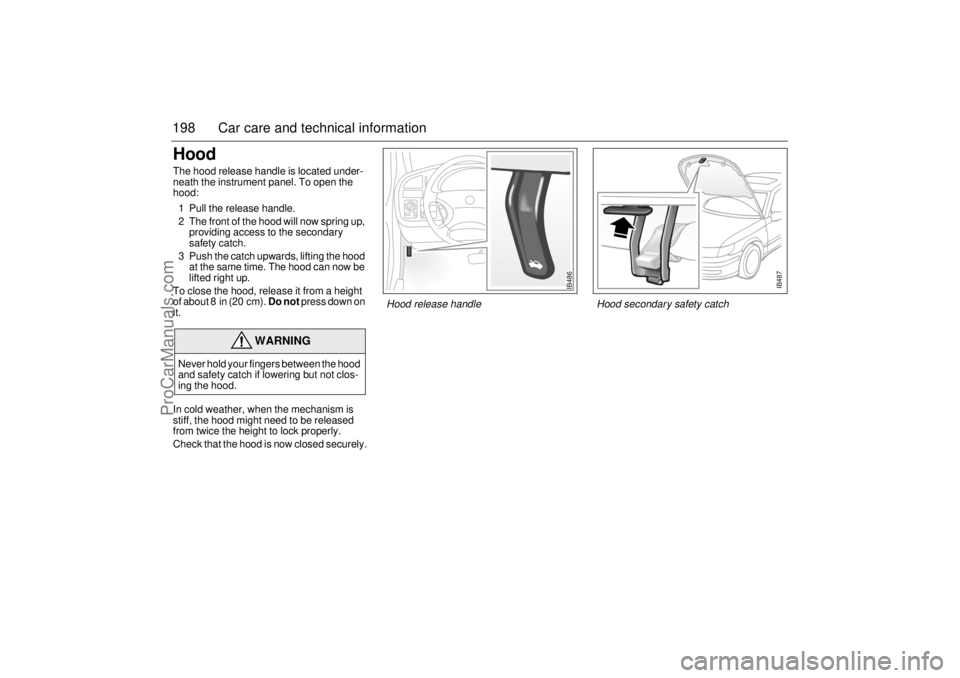
198 Car care and technical informationHood The hood release handle is located under-
neath the instrument panel. To open the
hood:
1 Pull the release handle.
2 The front of the hood will now spring up,
providing access to the secondary
safety catch.
3 Push the catch upwards, lifting the hood
at the same time. The hood can now be
lifted right up.
To close the hood, release it from a height
of about 8 in (20 cm). Do not press down on
it.
In cold weather, when the mechanism is
stiff, the hood might need to be released
from twice the height to lock properly.
Check that the hood is now closed securely.
WARNING
Never hold your fingers between the hood
and safety catch if lowering but not clos-
ing the hood.
IB487
IB486
Hood release handle Hood secondary safety catch
ProCarManuals.com