speed warning SAAB 9-5 2004 User Guide
[x] Cancel search | Manufacturer: SAAB, Model Year: 2004, Model line: 9-5, Model: SAAB 9-5 2004Pages: 288, PDF Size: 16.91 MB
Page 64 of 288
64 Instruments and controlsOutdoor temperature
(Frost warning)Regardless of which function has been
selected, except Night Panel Mode, SID will
automatically display the outdoor tempera-
ture when it is between 26° and 38°F (–3°
and +3°C). This also applies if the
temperature has moved outside the range
of 21° to 43°F (–6° to +6°C) but is again
between 26° and 38°F (–3° and +3°C).
Entering values for the functions Values can be entered for the following
functions: Speed∅, Dist, Arriv, Alarm and
Speed W.
1 Select the desired function using
or .
2 Press the SET button for at least one
second (figures start to flash and a
chime sounds).
3 Use or to increase or
decrease the value (press CLEAR to
reset).
4 Press SET to record the value.Average fuel consumptionThe average fuel consumption is calculated
using the values for fuel consumed and dis-
tance driven since last reset. This value is
stored in the car’s trip computer even when
the engine is switched off.
Select Fuel Ø with .
To reset the value, press the CLEAR button
for 4 seconds. A chime will be heard and
CLEARED will be displayed.
Setting the date1 Use to select Date.
2 Press the SET button for at least one
second (year starts to flash and a chime
sounds).
3 Set the year using or .
4 Touch SET.
5 Set the month in the same way.
6 Touch SET.
7 Set the day in the same way.
8 Press SET to save the date setting.
WARNING
Remember that roads can be icy even at
temperatures of above 38°F (+3°C),
especially on bridges and stretches of
road that are sheltered from the sun.
ProCarManuals.com
Page 65 of 288

65 Instruments and controls
Turning the Alarm and Speed
warning on or off 1 Select the Alarm or Speed-warning
function.
2 Press SET to turn on the function.
Press CLEAR to turn off the function.
When either function is on, Alarm/Speed W
respectively will be visible on the display. An
asterisk
* will be visible on the right of the
display when either function is selected.
The Alarm and Speed-warning settings will
not be cancelled when the engine is
switched off.
When the Alarm has been set to come on at
a specified time, it will only be activated
once – it will not come on at the same time
every day. Press SET to turn it on again.
The Alarm will continue to beep for one
minute if not switched off.
Calculation of arrival time and
average speed The settings must be made before the jour-
ney is started.
Calculation of arrival time:
1 Select Dist using the button.
2 Set the destination distance.
3 Press SET.
When Arriv. is selected during the journey,
the arrival time based on the average speed
over the past 20 minutes will be displayed.
The trip computer will include any stops in
the calculation of the estimated time of
arrival.
Press Dist and the distance remaining to the
destination will be displayed in the same
way.
After the distance to destination has
decreased to zero, the Dist will function as
a trip meter (see ”Using Dist as a trip
meter”). The starting value for the trip meter
will be the last distance set in the Dist
function.
Example: The Dist setting was 100 miles.
Once 100 miles (160 km) has been cov-
ered, the Dist will start to function as a trip
meter, the initial reading of which will be
100 miles (160 km).
Using Dist as a trip meter If no value has been set for the Dist function,
Dist will now function as a trip meter (indi-
cated by an arrow on the far right of the dis-
play).
Press CLEAR to reset the trip meter.
Under 1000 miles the distance will be
shown in increments of 0.1 miles,
there-after, the reading will change in incre-
ments of 1.0 mile.
Metric units: for just under a kilometer, the
distance will be shown in increments of
10 meters, there-after, the reading will
change in increments of 100 meters.
When Dist is functioning as a trip meter, the
Arriv function will display the current time.
ProCarManuals.com
Page 67 of 288

67 Instruments and controls
CHECK messages When the engine is started, CHECKING will
appear on the display for about four sec-
onds, while the SID checks are being per-
formed.
When a CHECK message is generated
while the car is being driven, a chime will
sound, INFO DISPL will illuminate on the
main instrument panel, and the message
will appear on the SID. The number of mes-
sages that can be displayed by the SID
varies with the specification of the car.
If more than one CHECK message has
been generated, the
+ symbol will appear to
the left of the text on the display. The mes-
sages appear in order of priority.
If a new fault occurs while another message
is being displayed, the message relating to
the new one will appear for 10 seconds,
after which the display will return to the ear-
lier one.
Press CLEAR once to acknowledge a mes-
sage, whereupon it will be cleared from the
display. It will not be displayed again before
the ignition has been switched off and then
on again. The following messages may be displayed:
1 This message will be displayed approximately
600 miles (1,000 km) before the next sched-
uled service is due, or when 365 days have
elapsed since the last service. The message
should be cleared at the time of that service
(see the Saab Warranties & Service Record
Booklet).
This message can also be deleted by first
briefly pressing the CLEAR button, then
depressing it a second time for at least eight
seconds until ”SERVICE” appears on the dis-
play and a chime sounds. The message can
only be deleted when it is shown on the SID.
Night panelTo improve night-driving conditions inside
the car, the Night Panel mode can be
selected. In this mode, the amount of infor-
mation displayed is reduced, and only the
most important instruments and displays
will be illuminated.
When the Night Panel button is pressed,
only the speedometer will be illuminated (up
to the 87-mph or 140-km/h graduation), all
the other instruments illumination being
extinguished and their needles moved to
zero. Both the SID and the ACC displays will
be extinguished and the backlighting for
switches and other controls will be dimmed.
Note: All indicator and warning lights,
together with the display of CHECK mes-
sages, will operate as normal, except ”Out-
door temperature (Frost warning)”, see
page 64. Message See
page
Fog light failure. 216
Rear light failure. 220
Brake light failure. 220
Washer fluid level low. Refill. 214
Coolant level low. Refill. 207
Remote control battery low.
Replace battery. 43
Key not accepted. Contact service. 50
Theft protection failure. Contact
service. 50
Gearbox too hot. Make a safe stop. 162
Tighten fuel filler cap. 154
Time for service.
1)
264
ProCarManuals.com
Page 73 of 288
73 Instruments and controls
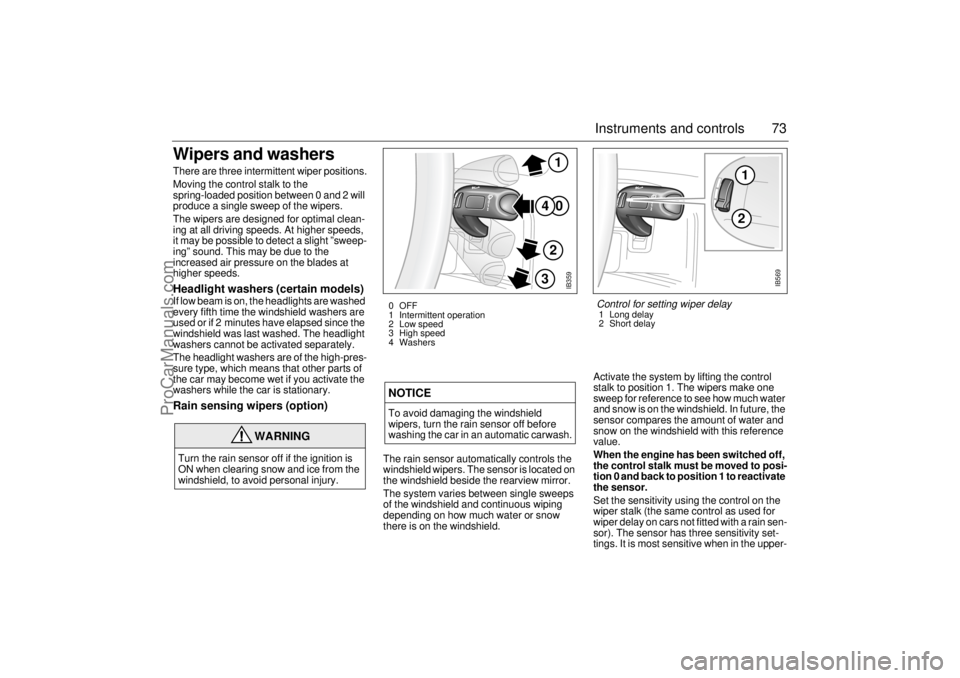
Wipers and washers There are three intermittent wiper positions.
Moving the control stalk to the
spring-loaded position between 0 and 2 will
produce a single sweep of the wipers.
The wipers are designed for optimal clean-
ing at all driving speeds. At higher speeds,
it may be possible to detect a slight ”sweep-
ing” sound. This may be due to the
increased air pressure on the blades at
higher speeds.Headlight washers (certain models)If low beam is on, the headlights are washed
every fifth time the windshield washers are
used or if 2 minutes have elapsed since the
windshield was last washed. The headlight
washers cannot be activated separately.
The headlight washers are of the high-pres-
sure type, which means that other parts of
the car may become wet if you activate the
washers while the car is stationary.Rain sensing wipers (option)
The rain sensor automatically controls the
windshield wipers. The sensor is located on
the windshield beside the rearview mirror.
The system varies between single sweeps
of the windshield and continuous wiping
depending on how much water or snow
there is on the windshield.Activate the system by lifting the control
stalk to position 1. The wipers make one
sweep for reference to see how much water
and snow is on the windshield. In future, the
sensor compares the amount of water and
snow on the windshield with this reference
value.
When the engine has been switched off,
the control stalk must be moved to posi-
tion 0 and back to position 1 to reactivate
the sensor.
Set the sensitivity using the control on the
wiper stalk (the same control as used for
wiper delay on cars not fitted with a rain sen-
sor). The sensor has three sensitivity set-
tings. It is most sensitive when in the upper-
WARNING
Turn the rain sensor off if the ignition is
ON when clearing snow and ice from the
windshield, to avoid personal injury.
NOTICETo avoid damaging the windshield
wipers, turn the rain sensor off before
washing the car in an automatic carwash.
IB359
0
41
2
3
0 OFF
1 Intermittent operation
2 Low speed
3 High speed
4 Washers
12
IB569
Control for setting wiper delay1 Long delay
2 Short delay
ProCarManuals.com
Page 101 of 288
101 Saab 9-5 Audio System
Programmable
functionsVolume-preset modeTo select the volume-preset mode, press
and hold the WB button at the same time as
you switch the Audio System on.
Use the button to select the
desired function.
The following volume settings can be
preselected:
STARTVOL – maximum volume level
when the Audio System is switched on
TEL VOL – preset volume level when an
in-car phone is activated
SP D VOL – speed-dependent volume.
The Audio System will automatically
adjust the volume level to compensate for
background noise, such as road noise,
which increases with vehicle speed.
LOUDNESS ON/OFF – boosting of the
highest and lowest frequency ranges to
enhance the sound image when the
volume is set to a low level.
Adjusting the volume The default setting for START VOL is
volume setting 9, and that for TEL VOL is
volume setting 14 (the highest volume set-
ting is 30).
Maximum START VOL
TELVOL
To change the volume setting:
– Press and hold the WB button at the
same time as you switch on the Audio
System.
– Adjust the volume
– Wait 10 seconds or press one of the but-
tons on the bottom row of the Audio Sys-
tem, e.g. RADIO/BAND, to save the new
volume setting.
Speed-dependent volume
(SP D VOL) ON/OFF To change the default setting:
The default setting for this function is ON.
– Press and hold the WB button at the
same time as you switch on the Audio
System.
– Select SP D VOL using
– Select ON/OFF using the VOL control.
– Wait 10 seconds or press one of the but-
tons on the bottom row of the Audio Sys-
tem, e.g. RADIO/BAND, to save the new
default setting.
WARNING
These functions should only be carried
out when the car is stationary.
ProCarManuals.com
Page 140 of 288
140 Interior equipment and trunkLoad anchoring
Driving with the trunk lid/tailgate open, see
page 188.
WARNING
Put heavy loads as low down and as
far forward as possible in the luggage
compartment, i.e. against the back of
the rear seat.
Never overload the cargo net. If the
elastic breaks this may cause personal
injury. Do not use a cargo net that
shows signs of wear.
Never stack cargo so high that any part
of the cargo lies above the edge of the
backrest, if a cargo guard (accessory)
is not being used.
Always tie down the cargo so that it
cannot be thrown forward during
heavy braking or in the event of a
crash.
Unsecured and heavy cargo can
increase the risk of injury during hard
braking, sudden avoidance maneu-
vers and in the event of a crash.
For the best load anchoring, use the
special cargo bolts and load straps
(accessory).
Load the cargo bolts evenly. Never
attach more than one strap to each tie
down eye.
Provide protection on sharp edges to
prevent damage to the load straps.
Never use the elastic floor net and
elastic side net when the rear seat is
folded down. These nets are only
intended to keep light objects tidy, not
for the anchoring of loads.
If possible, avoid having the rear seat
folded down when driving with a heavy
load because the anchoring possibili-
ties are restricted when the rear seat is
in this position. That the rear seat is
in the upright position is a basic
requirement for protection against
cargo displacement in the event of
a crash.
Cargo can intrude into the passenger
compartment during a sudden stop or
front crash if the outer safety belts are
not fastened. Check that the two red
warning-indication flags are fully
down. This shows that the backrests
are locked.
WARNING
Match the speed and driving style
according to how the car is loaded.
The driving characteristics of the car
can be affected because the center of
gravity is altered when there is a cargo
in the luggage compartment.
An object weighing 55 lbs. (25 kg) cor-
responds to a weight of 2200 lbs.
(1000 kg) in a head on crash at
32 mph (50 km/h).
Adjust the car’s load (passengers and
luggage) so that the gross vehicle
weight or the axle weight is not
exceeded, see page 270.
ProCarManuals.com
Page 152 of 288

152 Starting and driving
One of the advantages of the system is
that it enables the engine to be run
safely on lower-grade fuel, although not
lower than AON 87.
The maximum boost pressure is
adjusted automatically to the knocking
or pinging tendency of the engine.
Occasional, short-lived knocking when
the engine is under a heavy load is per-
fectly normal; the extent will depend on
the grade of fuel in the tank.
Isolated instances of knocking are
more likely to occur with low-octane
fuel. This controlled form of knocking,
followed by a reduction in the boost
pressure, is a sign that the wastegate is
functioning and is perfectly safe for the
engine.
Important considerations with cata-
lytic convertersThe catalytic converter is an emission-con-
trol device incorporated in the car’s exhaust
system. It consists of a metal canister with a
honeycomb insert, the cells of which have
walls coated in a catalytic layer (mixture of
precious metals).
To ensure that the catalytic converter con-
tinues to function properly, and also to avoid
damage to the converter and its associated
components, the following points must be
observed:
Have the car serviced regularly in accor-
dance with the service program. The fuel
and ignition systems are particularly
important in this context.
Always be alert to any misfiring of the
engine (not running on all cylinders) and
any loss of power or performance. At the
first sign of a malfunction, reduce speed
and take the car to an authorized Saab
dealer as soon as possible.
If the engine fails to start (in very cold
weather or if the battery is flat), the car can
be push started (manual gearbox only) or
started using jumper cables to a donor
NOTICE If the engine sounds strange there is a
fault in the system. Have the car
checked without delay by an autho-
rized Saab dealer.
The use of fuel with too low an octane
rating can cause serious engine dam-
age.
WARNING
If the engine is being run with the car on a
rolling road or dynamometer, longer than
for a standard state emission inspection,
to ensure adequate cooling, air must be
blown into the engine compartment and
under the car at a rate equivalent to the
ram-air effect that would be obtained at
the corresponding road speed.
NOTICEUse only unleaded gasoline. Leaded gas-
oline is detrimental to the catalyst and
oxygen sensor and will seriously impair
the function of the catalytic converter.
ProCarManuals.com
Page 159 of 288
159 Starting and driving
Automatic transmission
The electronic control module for the auto-
matic transmission receives information on
engine torque and road speed, and also
controls the hydraulic pressure in the trans-
mission to ensure that gear changing is as
smooth as possible.
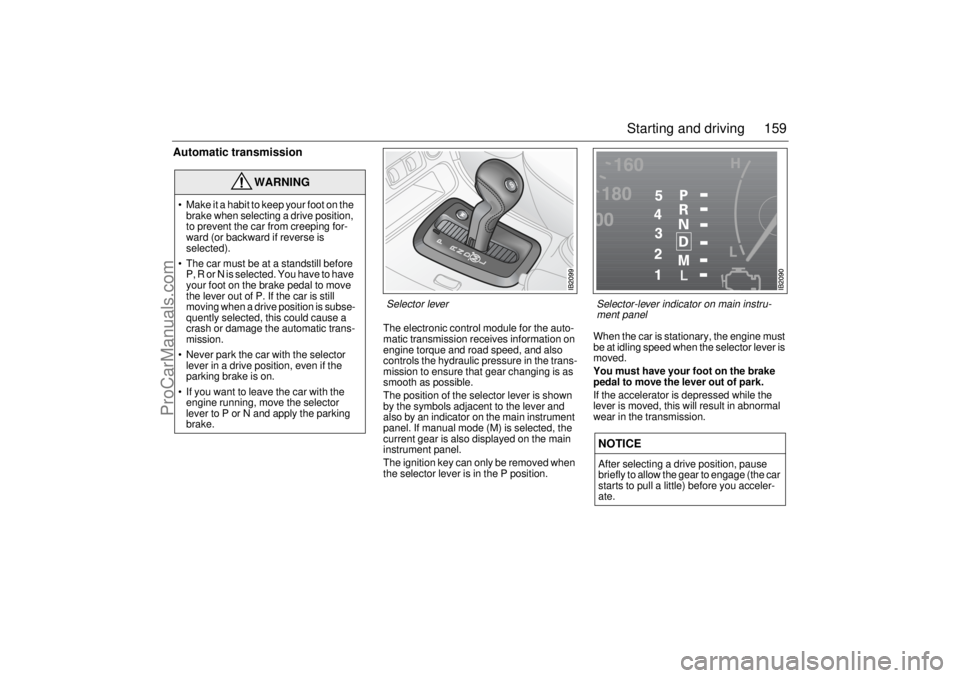
The position of the selector lever is shown
by the symbols adjacent to the lever and
also by an indicator on the main instrument
panel. If manual mode (M) is selected, the
current gear is also displayed on the main
instrument panel.
The ignition key can only be removed when
the selector lever is in the P position. When the car is stationary, the engine must
be at idling speed when the selector lever is
moved.
You must have your foot on the brake
pedal to move the lever out of park.
If the accelerator is depressed while the
lever is moved, this will result in abnormal
wear in the transmission.
WARNING
Make it a habit to keep your foot on the
brake when selecting a drive position,
to prevent the car from creeping for-
ward (or backward if reverse is
selected).
The car must be at a standstill before
P, R or N is selected. You have to have
your foot on the brake pedal to move
the lever out of P. If the car is still
moving when a drive position is subse-
quently selected, this could cause a
crash or damage the automatic trans-
mission.
Never park the car with the selector
lever in a drive position, even if the
parking brake is on.
If you want to leave the car with the
engine running, move the selector
lever to P or N and apply the parking
brake.
NOTICEAfter selecting a drive position, pause
briefly to allow the gear to engage (the car
starts to pull a little) before you acceler-
ate.
Selector lever
Selector-lever indicator on main instru-
ment panel
ProCarManuals.com
Page 162 of 288
162 Starting and driving
Overheated transmission fluid If the automatic-transmission fluid should
overheat, the following message will appear
on the SID:
”Gearbox too hot. Make a safe stop.”. In this
event, stop the car in a suitable place,
switch off the engine and open the hood.
Wait for several minutes then turn on the
ignition to check that the message has gone
out. When driving subsequent to the trans-
mission fluid overheating, select a gear in
which the engine speed is about 3,000 rpm.
Overheating of the automatic-transmission
fluid can occur when the car is towing a
heavy load, such as a camping trailer in hilly
country. High ambient temperatures can
also increase the temperature of the trans-
mission fluid or the oil cooler may be faulty.
Contact an authorized Saab dealer (see
also page 178).
Driving on hilly roads with a heavy
loadThe transmission fluid can overheat when
the gearbox is strained, for example, when
driving with a trailer on hilly roads. To avoid
the transmission fluid overheating, always
drive in Normal mode. The adaptive gear
change patterns are then active.
High air temperatures or a faulty oil cooler
can also cause the transmission fluid to
overheat. Overheating reduces the service
life of the fluid. Contact an authorized Saab
dealer (see also page 178). Towing Towing of cars with automatic transmission,
see page 188.
NOTICEIf the control module has actuated the
Limp-home function for the automatic
transmission, the car will remain in 5th
gear when D is selected, making it very
sluggish.
Select position L to prevent unnecessary
wear on the transmission. The transmis-
sion then starts in 2nd gear. Once the car
is moving you can select position D.
When the indicator light is on, the car
must not be driven with a caravan or
trailer attached.
WARNING
Remember to use engine-braking (selec-
tor position D or L) to spare the brakes
when you are driving on a long or steep
downhill slope.
Brake failure can result from overheated
brakes!
ProCarManuals.com
Page 167 of 288
167 Starting and driving
Cruise controlFor safety reasons (brake system func-
tion) the brakes must be applied once,
when the engine has started, before the
cruise control system can be activated.
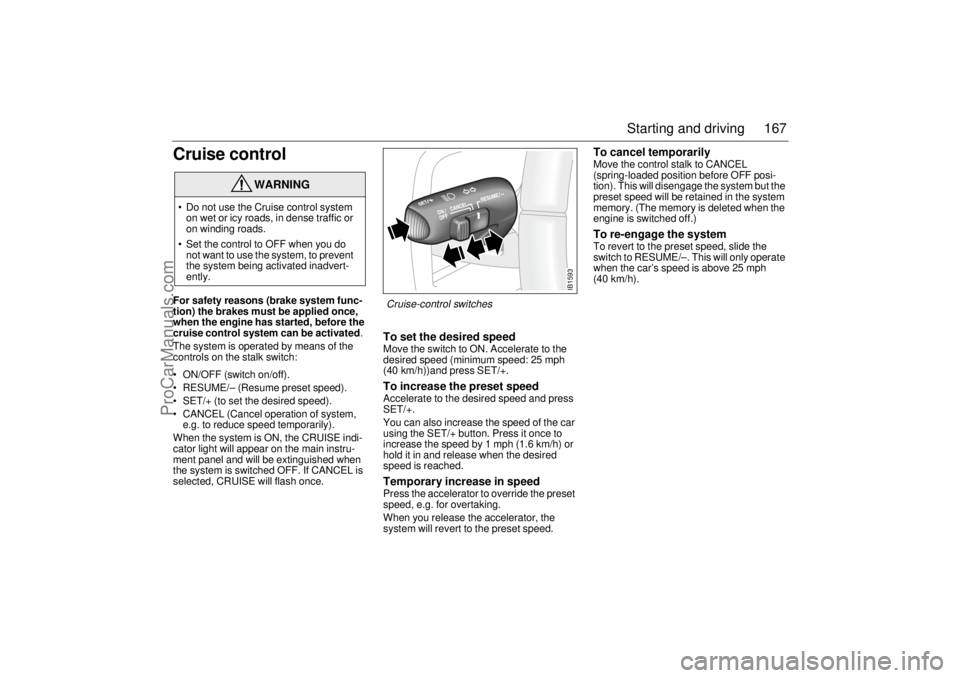
The system is operated by means of the
controls on the stalk switch:
ON/OFF (switch on/off).
RESUME/– (Resume preset speed).
SET/+ (to set the desired speed).
CANCEL (Cancel operation of system,
e.g. to reduce speed temporarily).
When the system is ON, the CRUISE indi-
cator light will appear on the main instru-
ment panel and will be extinguished when
the system is switched OFF. If CANCEL is
selected, CRUISE will flash once.
To set the desired speed Move the switch to ON. Accelerate to the
desired speed (minimum speed: 25 mph
(40 km/h))and press SET/+. To increase the preset speed Accelerate to the desired speed and press
SET/+.
You can also increase the speed of the car
using the SET/+ button. Press it once to
increase the speed by 1 mph (1.6 km/h) or
hold it in and release when the desired
speed is reached. Temporary increase in speed Press the accelerator to override the preset
speed, e.g. for overtaking.
When you release the accelerator, the
system will revert to the preset speed.
To cancel temporarily Move the control stalk to CANCEL
(spring-loaded position before OFF posi-
tion). This will disengage the system but the
preset speed will be retained in the system
memory. (The memory is deleted when the
engine is switched off.) To re-engage the system To revert to the preset speed, slide the
switch to RESUME/–. This will only operate
when the car’s speed is above 25 mph
(40 km/h).
WARNING
Do not use the Cruise control system
on wet or icy roads, in dense traffic or
on winding roads.
Set the control to OFF when you do
not want to use the system, to prevent
the system being activated inadvert-
ently.
IB1593
Cruise-control switches
ProCarManuals.com