transmission oil SAAB 9-5 2004 Owners Manual
[x] Cancel search | Manufacturer: SAAB, Model Year: 2004, Model line: 9-5, Model: SAAB 9-5 2004Pages: 288, PDF Size: 16.91 MB
Page 6 of 288
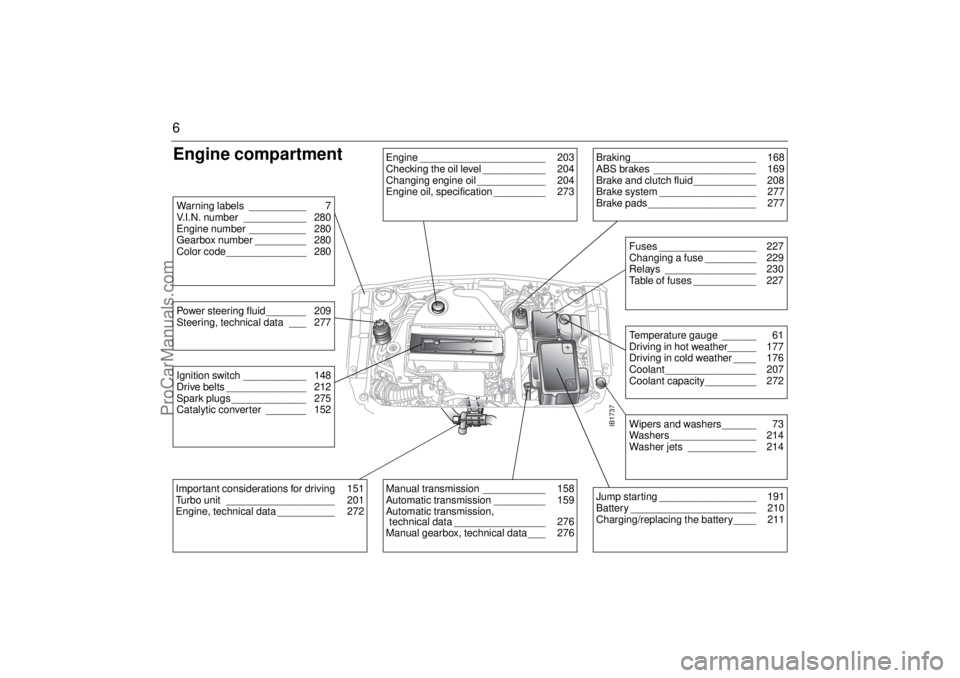
6Engine compartment
IB1737
Engine ______________________ 203
Checking the oil level ___________ 204
Changing engine oil ____________ 204
Engine oil, specification _________ 273
Braking______________________ 168
ABS brakes __________________ 169
Brake and clutch fluid ___________ 208
Brake system _________________ 277
Brake pads ___________________ 277
Fuses _________________ 227
Changing a fuse _________ 229
Relays ________________ 230
Table of fuses ___________ 227Temperature gauge ______ 61
Driving in hot weather_____ 177
Driving in cold weather ____ 176
Coolant________________ 207
Coolant capacity_________ 272
Power steering fluid _______ 209
Steering, technical data ___ 277
Wipers and washers ______ 73
Washers _______________ 214
Washer jets ____________ 214
Jump starting _________________ 191
Battery ______________________ 210
Charging/replacing the battery____ 211
Manual transmission ___________ 158
Automatic transmission _________ 159
Automatic transmission,
technical data ________________ 276
Manual gearbox, technical data ___ 276
Important considerations for driving 151
Turbo unit ___________________ 201
Engine, technical data __________ 272Ignition switch ___________ 148
Drive belts ______________ 212
Spark plugs _____________ 275
Catalytic converter _______ 152Warning labels __________ 7
V.I.N. number ___________ 280
Engine number __________ 280
Gearbox number _________ 280
Color code______________ 280
ProCarManuals.com
Page 60 of 288
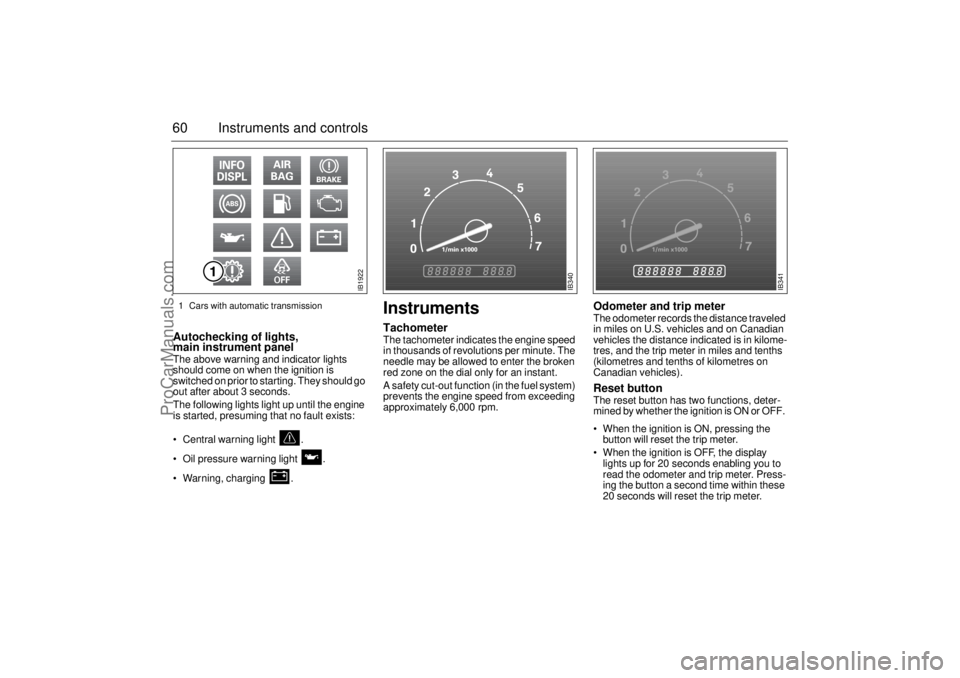
60 Instruments and controlsAutochecking of lights,
main instrument panel The above warning and indicator lights
should come on when the ignition is
switched on prior to starting. They should go
out after about 3 seconds.
The following lights light up until the engine
is started, presuming that no fault exists:
Central warning light .
Oil pressure warning light .
Warning, charging .
InstrumentsTachometerThe tachometer indicates the engine speed
in thousands of revolutions per minute. The
needle may be allowed to enter the broken
red zone on the dial only for an instant.
A safety cut-out function (in the fuel system)
prevents the engine speed from exceeding
approximately 6,000 rpm.
Odometer and trip meter The odometer records the distance traveled
in miles on U.S. vehicles and on Canadian
vehicles the distance indicated is in kilome-
tres, and the trip meter in miles and tenths
(kilometres and tenths of kilometres on
Canadian vehicles). Reset button The reset button has two functions, deter-
mined by whether the ignition is ON or OFF.
When the ignition is ON, pressing the
button will reset the trip meter.
When the ignition is OFF, the display
lights up for 20 seconds enabling you to
read the odometer and trip meter. Press-
ing the button a second time within these
20 seconds will reset the trip meter.
IB1922
IB340
IB341
1 Cars with automatic transmission
ProCarManuals.com
Page 150 of 288

150 Starting and drivingIt is possible for air to enter the lubricating
system in conjunction with an oil or oil-filter
change, or if the car has been stored for
some time. This air can cause the hydraulic
cam followers to emit a ticking noise, which
can persist for up to 15 minutes after start-
ing. Although this is quite normal and does
not indicate any malfunction, it is advisable
not to exceed 3,000 rpm before the noise
has disappeared.
The hydraulic cam lifters are completely
service free; the valve clearance is set up at
the factory and will not need any subse-
quent adjustment.
Starting the engineAvoid racing the engine or putting a heavy
load on it before it has warmed up. Drive
away as soon as the oil warning light has
been extinguished to enable the engine to
attain its normal temperature as quickly as
possible.
The engine has an automatic choke and
should be started as follows:
Cars with manual transmission
To start the engine the clutch pedal must
be fully depressed.
1 Depress the clutch pedal fully but do not
touch the accelerator.
2 Start the engine. Let the ignition key
spring back as soon as the engine has
started and is running smoothly – at very
low temperatures, you may need to run
the starter for up to 25 seconds. Wait
20–30 seconds before running the
starter again, to give the battery time to
recover.
Note:
On cars with manual transmission, if the
starter fails to engage when the ignition key
is turned to the start position, make sure the
clutch pedal is full depressed. Misposi-
tioned floor mats or other obstructions
under the clutch pedal may affect starting.
Let the engine idle for about 10 seconds. Do
not open the throttle wide for at least 2–
3 minutes after starting. Cars with automatic transmission
1 The selector lever must be in the P or N
position.
2 Keep your foot on the brake pedal.
3 Start the engine. Let the ignition key
spring back as soon as the engine has
started and is running smoothly – at very
low temperatures, you may need to run
the starter for up to 25 seconds. Wait
20–30 seconds before running the
starter again, to give the battery time to
recover.
Let the engine idle for about 10 seconds. Do
not open the throttle wide for at least
2–3 minutes after starting.
Useful tips on cold climate starting If the engine has failed to start after several
attempts in very cold weather, press and
hold the accelerator down to the floor and
run the starter for 5–10 seconds. This will
prevent the engine being flooded (exces-
sively rich fuel-air mixture).
Now start the engine in the normal way – do
not touch the accelerator.
If the engine stalls immediately after starting
(e.g. if the clutch was released too quickly),
do not touch the accelerator when restarting
the engine. The tail pipe of the exhaust system
can become very hot during driving.
Bear this in mind when loading and
unloading the car.
Do not rest or sleep in the car when
parked with the engine running. There
is a risk of depressing the accelerator
which could lead to engine damage.
ProCarManuals.com
Page 162 of 288

162 Starting and driving
Overheated transmission fluid If the automatic-transmission fluid should
overheat, the following message will appear
on the SID:
”Gearbox too hot. Make a safe stop.”. In this
event, stop the car in a suitable place,
switch off the engine and open the hood.
Wait for several minutes then turn on the
ignition to check that the message has gone
out. When driving subsequent to the trans-
mission fluid overheating, select a gear in
which the engine speed is about 3,000 rpm.
Overheating of the automatic-transmission
fluid can occur when the car is towing a
heavy load, such as a camping trailer in hilly
country. High ambient temperatures can
also increase the temperature of the trans-
mission fluid or the oil cooler may be faulty.
Contact an authorized Saab dealer (see
also page 178).
Driving on hilly roads with a heavy
loadThe transmission fluid can overheat when
the gearbox is strained, for example, when
driving with a trailer on hilly roads. To avoid
the transmission fluid overheating, always
drive in Normal mode. The adaptive gear
change patterns are then active.
High air temperatures or a faulty oil cooler
can also cause the transmission fluid to
overheat. Overheating reduces the service
life of the fluid. Contact an authorized Saab
dealer (see also page 178). Towing Towing of cars with automatic transmission,
see page 188.
NOTICEIf the control module has actuated the
Limp-home function for the automatic
transmission, the car will remain in 5th
gear when D is selected, making it very
sluggish.
Select position L to prevent unnecessary
wear on the transmission. The transmis-
sion then starts in 2nd gear. Once the car
is moving you can select position D.
When the indicator light is on, the car
must not be driven with a caravan or
trailer attached.
WARNING
Remember to use engine-braking (selec-
tor position D or L) to spare the brakes
when you are driving on a long or steep
downhill slope.
Brake failure can result from overheated
brakes!
ProCarManuals.com
Page 165 of 288

165 Starting and driving
If you move the selector lever from D to L, downchanges will follow
a set pattern to avoid damaging the engine or transmission.
Manual gear-changing is not recommended on slippery roads.
If one of the drive wheels spins excessively, the engine torque will
be reduced to avoid damaging the transmission.
Adaptive gear-change patternsAdaptive gear-change patterns are selected automatically depend-
ing on the engine load and the present temperature of the transmis-
sion. The function is available in Normal and Sport modes.
The changes occur at a higher engine speed and the car remains in
the same gear for longer, if the transmission control module senses
that the load has not decreased. These gear-change patterns pre-
vent unnecessary changing up and down, when for example driving
up or down long slopes with a trailer or caravan, and to prevent over-
heating the transmission oil. The adaptive gear-change function is
also selected automatically when the transmission oil becomes too
hot, to protect the transmission itself from damage and to lower the
oil temperature.
The adaptive gear-change pattern function is deselected when:
Winter mode is selected.
The engine is switched off.
The load is reduced so much that the function is no longer
required.
”Automatic transmission, fault indicator” appears on main
instrument panel, see page 161.
ProCarManuals.com
Page 190 of 288
190 Starting and drivingTowing the car Gear lever in neutral (in cars with automatic
transmission: selector lever at N (neutral))
Turn on the parking lights.
Drive carefully and do not exceed the
speed limit for vehicles being towed.
Always try to keep the towrope taut by
gently applying the brake, as necessary.
This will avoid the towrope being jerked
violently.
The local regulations on towing speeds
must be followed.
The highest permissible towing speed is
30 mph (50 km/h), unless the legal limit is
lower. The longest permissible towing dis-
tance is 30 miles (50 km). If the car has to
be transported farther than that, summon a
tow truck. A flat bed tow truck is the pre-
ferred method to tow.
Failure to follow these guidelines can result
in damage.Cars with automatic transmission
The car cannot be bump started. In an
emergency, it is possible to start the engine
using jump leads (see the section, ”Jump
starting” on page 191).
Transporting the car
NOTICE
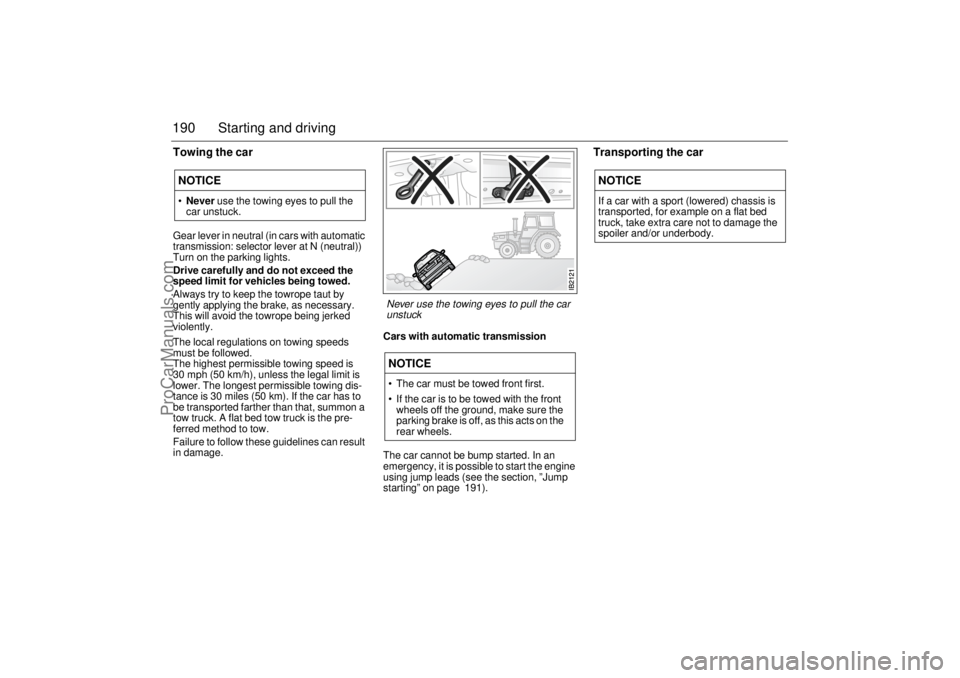
Never use the towing eyes to pull the
car unstuck.
NOTICE The car must be towed front first.
If the car is to be towed with the front
wheels off the ground, make sure the
parking brake is off, as this acts on the
rear wheels.
NOTICEIf a car with a sport (lowered) chassis is
transported, for example on a flat bed
truck, take extra care not to damage the
spoiler and/or underbody.
Never use the towing eyes to pull the car
unstuck
ProCarManuals.com
Page 199 of 288
199 Car care and technical information
Car care and
technical
information
IB1772
Hood ________________ 200
Engine compartment ___ 201
Emission control systems 202
Engine_______________ 203
Engine oil ____________ 204
Transmission fluid_____ 206
Coolant ______________ 207
Brake and clutch fluid __ 208
Power steering fluid ___ 209
Air filter ______________ 209
Battery ______________ 210
Drive belts ___________ 212
Wipers and washers ___ 213 Changing bulbs _______ 215
Fuses _______________ 227
Tires ________________ 233
Compact spare tire ____ 246
Air conditioning (ACC) _ 252
Safety belts __________ 253
Upholstery and trim ___ 253
Textile carpeting ______ 253
Washing the car ______ 254
Waxing and polishing __ 255
Engine compartment __ 255
Touching up the paint__ 255
Anti-corrosion treatment 256 For long trips _________ 258
Recovery and/or recycling
of automotive materials 258
Headlight aiming ______ 259
ProCarManuals.com
Page 201 of 288
201 Car care and technical information
Engine compartment
10
9
6
7
8
1
2
4
3
5
IB1773
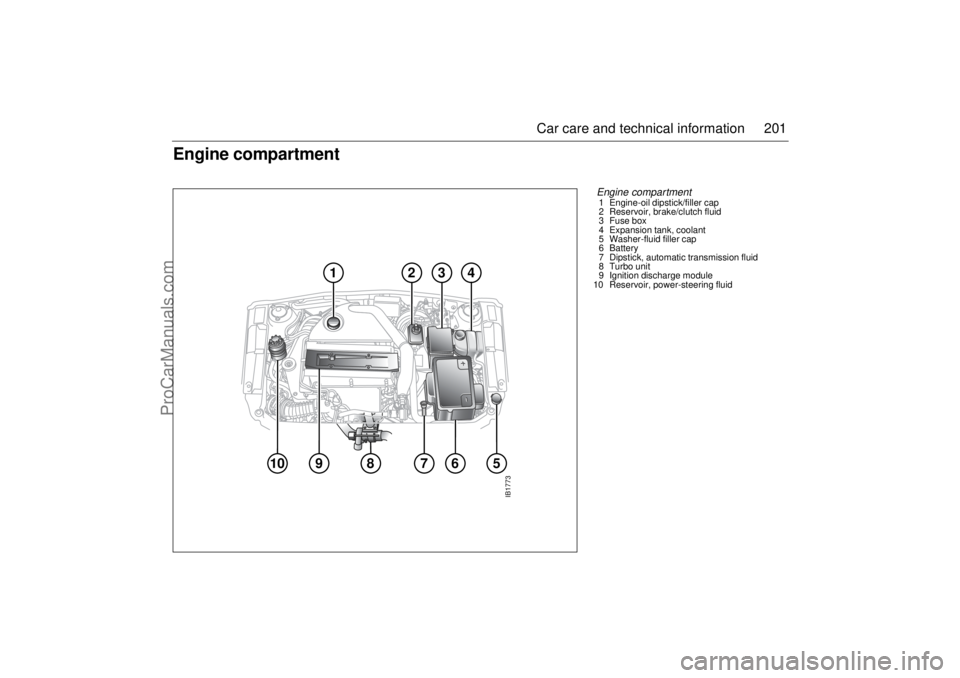
Engine compartment1 Engine-oil dipstick/filler cap
2 Reservoir, brake/clutch fluid
3 Fuse box
4 Expansion tank, coolant
5 Washer-fluid filler cap
6Battery
7 Dipstick, automatic transmission fluid
8 Turbo unit
9 Ignition discharge module
10 Reservoir, power-steering fluid
ProCarManuals.com
Page 206 of 288
206 Car care and technical informationTransmission fluidManual transmission Check and top up the fluid in accordance
with the service program.
If original fluid cannot be obtained for top-
ping up (see page 276), automatic trans-
mission fluid Dexron III (synthetic oil) can be
used. If so, the car should be taken to an
authorized Saab dealer immediately to
have the reason for low fluid level corrected
and original fluid installed.Automatic transmission Check the fluid level as follows:
1 Stand the car on level ground and apply
the parking brake. The automatic trans-
mission fluid must be at normal running
temperature, approximately 175°F
(80°C). This can be achieved by driving
the car for about 30 min on the open
road.
2 With the engine idling, move the selector
lever to D and wait for at least
15 seconds. Next, move the selector
lever to R and wait for 15 seconds again.
Finally, move the selector lever to P. Let
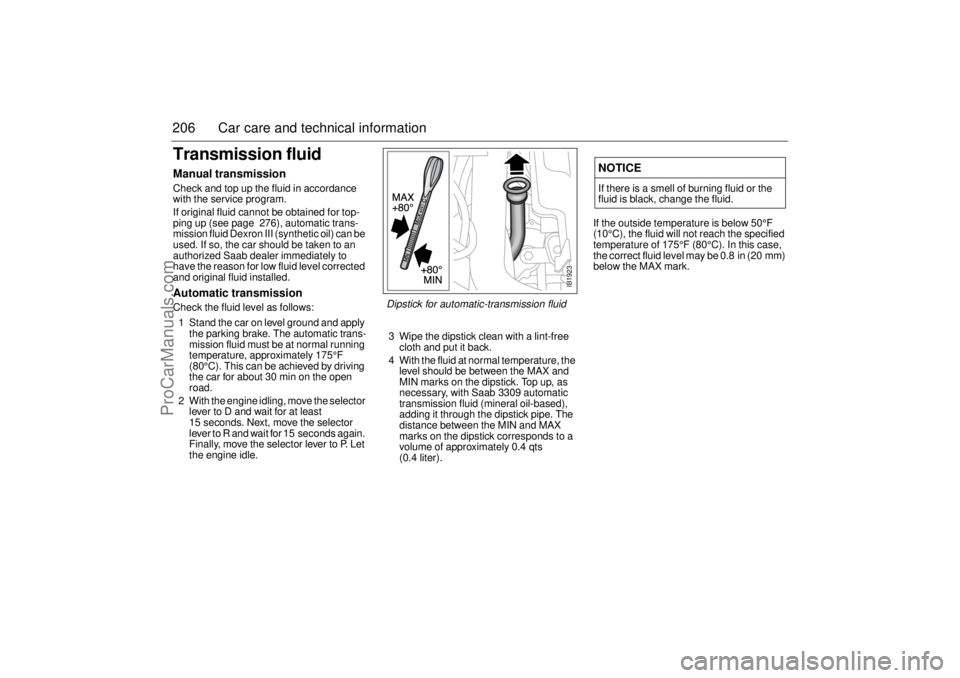
the engine idle.3 Wipe the dipstick clean with a lint-free
cloth and put it back.
4 With the fluid at normal temperature, the
level should be between the MAX and
MIN marks on the dipstick. Top up, as
necessary, with Saab 3309 automatic
transmission fluid (mineral oil-based),
adding it through the dipstick pipe. The
distance between the MIN and MAX
marks on the dipstick corresponds to a
volume of approximately 0.4 qts
(0.4 liter).
If the outside temperature is below 50°F
(10°C), the fluid will not reach the specified
temperature of 175°F (80°C). In this case,
the correct fluid level may be 0.8 in (20 mm)
below the MAX mark.NOTICEIf there is a smell of burning fluid or the
fluid is black, change the fluid.
IB1923
Dipstick for automatic-transmission fluid
ProCarManuals.com
Page 242 of 288
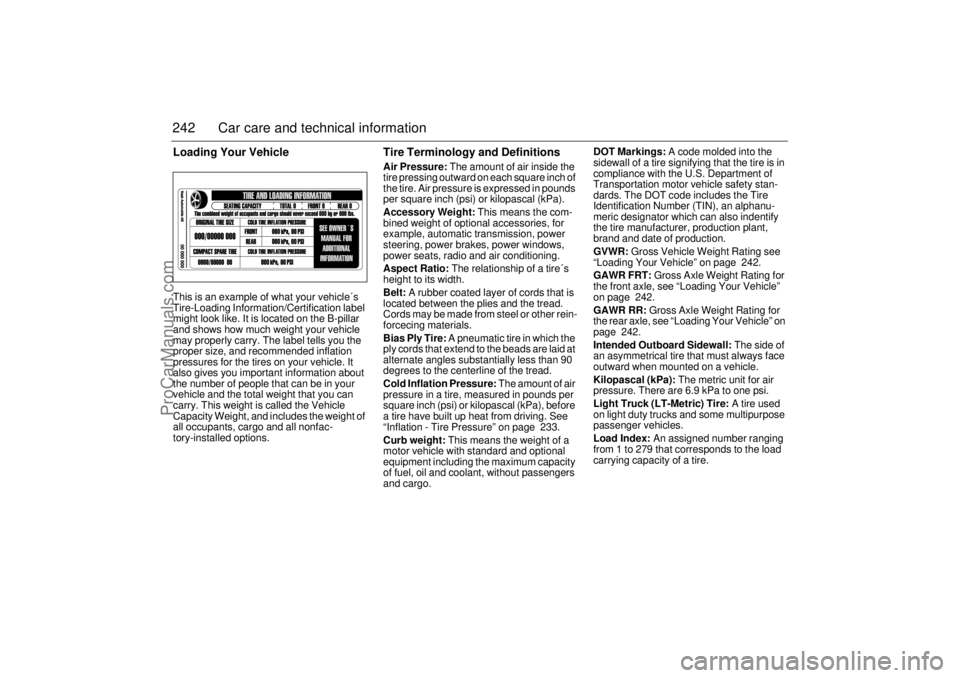
242 Car care and technical informationLoading Your VehicleThis is an example of what your vehicle´s
Tire-Loading Information/Certification label
might look like. It is located on the B-pillar
and shows how much weight your vehicle
may properly carry. The label tells you the
proper size, and recommended inflation
pressures for the tires on your vehicle. It
also gives you important information about
the number of people that can be in your
vehicle and the total weight that you can
carry. This weight is called the Vehicle
Capacity Weight, and includes the weight of
all occupants, cargo and all nonfac-
tory-installed options.
Tire Terminology and DefinitionsAir Pressure: The amount of air inside the
tire pressing outward on each square inch of
the tire. Air pressure is expressed in pounds
per square inch (psi) or kilopascal (kPa).
Accessory Weight: This means the com-
bined weight of optional accessories, for
example, automatic transmission, power
steering, power brakes, power windows,
power seats, radio and air conditioning.
Aspect Ratio: The relationship of a tire´s
height to its width.
Belt: A rubber coated layer of cords that is
located between the plies and the tread.
Cords may be made from steel or other rein-
forcecing materials.
Bias Ply Tire: A pneumatic tire in which the
ply cords that extend to the beads are laid at
alternate angles substantially less than 90
degrees to the centerline of the tread.
Cold Inflation Pressure: The amount of air
pressure in a tire, measured in pounds per
square inch (psi) or kilopascal (kPa), before
a tire have built up heat from driving. See
“Inflation - Tire Pressure” on page 233.
Curb weight: This means the weight of a
motor vehicle with standard and optional
equipment including the maximum capacity
of fuel, oil and coolant, without passengers
and cargo.DOT Markings: A code molded into the
sidewall of a tire signifying that the tire is in
compliance with the U.S. Department of
Transportation motor vehicle safety stan-
dards. The DOT code includes the Tire
Identification Number (TIN), an alphanu-
meric designator which can also indentify
the tire manufacturer, production plant,
brand and date of production.
GVWR: Gross Vehicle Weight Rating see
“Loading Your Vehicle” on page 242.
GAWR FRT: Gross Axle Weight Rating for
the front axle, see “Loading Your Vehicle”
on page 242.
GAWR RR: Gross Axle Weight Rating for
the rear axle, see “Loading Your Vehicle” on
page 242.
Intended Outboard Sidewall: The side of
an asymmetrical tire that must always face
outward when mounted on a vehicle.
Kilopascal (kPa): The metric unit for air
pressure. There are 6.9 kPa to one psi.
Light Truck (LT-Metric) Tire: A tire used
on light duty trucks and some multipurpose
passenger vehicles.
Load Index: An assigned number ranging
from 1 to 279 that corresponds to the load
carrying capacity of a tire.
ProCarManuals.com