ESP SAAB 9-5 2005 User Guide
[x] Cancel search | Manufacturer: SAAB, Model Year: 2005, Model line: 9-5, Model: SAAB 9-5 2005Pages: 276, PDF Size: 16.72 MB
Page 83 of 276

81 Instruments and controls
To program a function or to cancel
a programmed function, press
and hold in the relevant button until the corresponding symbol has
flashed four times on the display and a chime has sounded.
Make sure the ignition is ON.
Example: To have the ACC system switch the heating for the rear
window and door mirrors ON/OFF automatically, press and hold in
until the symbol has flashed four times on the display and a
chime has sounded.
The display shows:
ACC:AUTO
RDEFR CTRL
Once a function has been recorded under ”Programming II”, it will
remain in the system until you cancel the program.
AUTO will still show on the display after a function has been saved
in ”Programming II”.
Calibration If the battery has been disconnected or has died, the system will
need to be recalibrated.
To start the calibration procedure:
1 Start the engine.
2 Press and simultaneously.
Calibration takes about 30 seconds. During this time and for about
3 seconds after the operation has been completed, the number of
fault codes (if any) stored in the system will appear in the tempera-
ture display on the left. The fault codes themselves will be shown in
the temperature display on the right. Useful tips (Before driving the car to an authorized Saab dealer)
If AUTO is not shown on the display, see ”Cancelling the program-
med settings (I)” on page 79.
If you suspect that the ACC system is not functioning properly,
cancel (delete) all programmed settings and then recalibrate the
system.
See ”Cancelling the programmed settings (I) and (II)”, pages 79
and 80, and ”Calibration” above.
Note that AUTO will show on the display even if you have comple-
ted Programming II, but that this does not apply to Programming I.
If the battery has been disconnected or has died, the ACC system
will need to be recalibrated. See ”Calibration” above.
If the system starts in OFF mode, cancel the programme. Refer to
Cancelling the programmed settings (I) on page 79.
Function Text displayed on SID
during programming Text displayed on SID
when cancelling
program
ACC:LO TEMP
A/C CTRLACC:NORMAL
A/C CTRL
ACC:RECIRC
SPEED CTRLACC:RECIRC
NORMAL CTRL
ACC:AUTO
RDEFR CTRLACC :MANUAL
RDEFR CTRL
ProCarManuals.com
Page 98 of 276
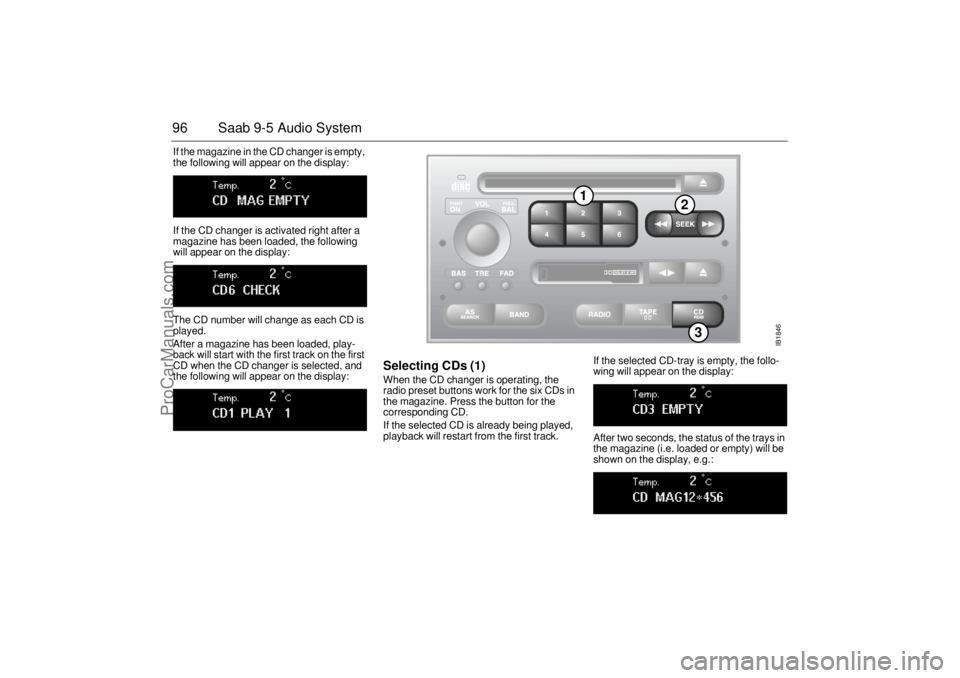
96 Saab 9-5 Audio SystemIf the magazine in the CD changer is empty,
the following will appear on the display:
If the CD changer is activated right after a
magazine has been loaded, the following
will appear on the display:
The CD number will change as each CD is
played.
After a magazine has been loaded, play-
back will start with the first track on the first
CD when the CD changer is selected, and
the following will appear on the display:
Selecting CDs (1) When the CD changer is operating, the
radio preset buttons work for the six CDs in
the magazine. Press the button for the
corresponding CD.
If the selected CD is already being played,
playback will restart from the first track. If the selected CD-tray is empty, the follo-
wing will appear on the display:
After two seconds, the status of the trays in
the magazine (i.e. loaded or empty) will be
shown on the display, e.g.:
IB1846
3
1
2
ProCarManuals.com
Page 115 of 276
113 Interior equipment and trunk
Electric windowsThe electric motors of the front windows are
equipped with overload protection (integra-
ted thermal protection). This protection ope-
rates when the windows are wound down
automatically (switch pressed fully down).
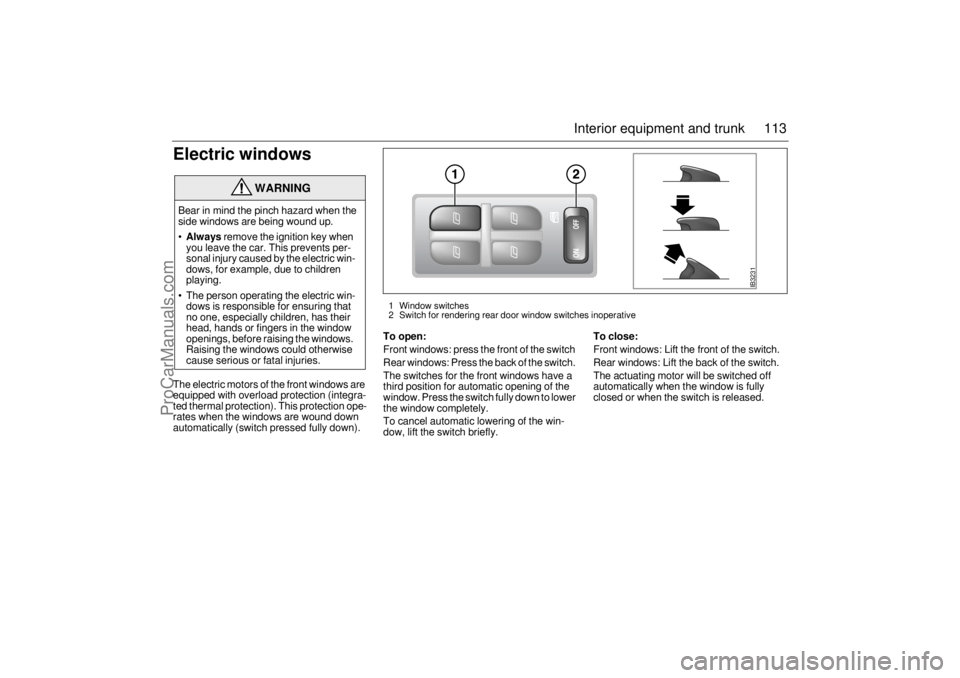
To open:Front windows: press the front of the switch
Rear windows: Press the back of the switch.
The switches for the front windows have a
third position for automatic opening of the
window. Press the switch fully down to lower
the window completely.
To cancel automatic lowering of the win-
dow, lift the switch briefly.
To close:Front windows: Lift the front of the switch.
Rear windows: Lift the back of the switch.
The actuating motor will be switched off
automatically when the window is fully
closed or when the switch is released.
WARNING
Bear in mind the pinch hazard when the
side windows are being wound up.
Always
remove the ignition key when
you leave the car. This prevents per-
sonal injury caused by the electric win-
dows, for example, due to children
playing.
The person operating the electric win-
dows is responsible for ensuring that
no one, especially children, has their
head, hands or fingers in the window
openings, before raising the windows.
Raising the windows could otherwise
cause serious or fatal injuries.
IB3231
1 Window switches
2 Switch for rendering rear door window switches inoperative
ProCarManuals.com
Page 116 of 276
114 Interior equipment and trunk
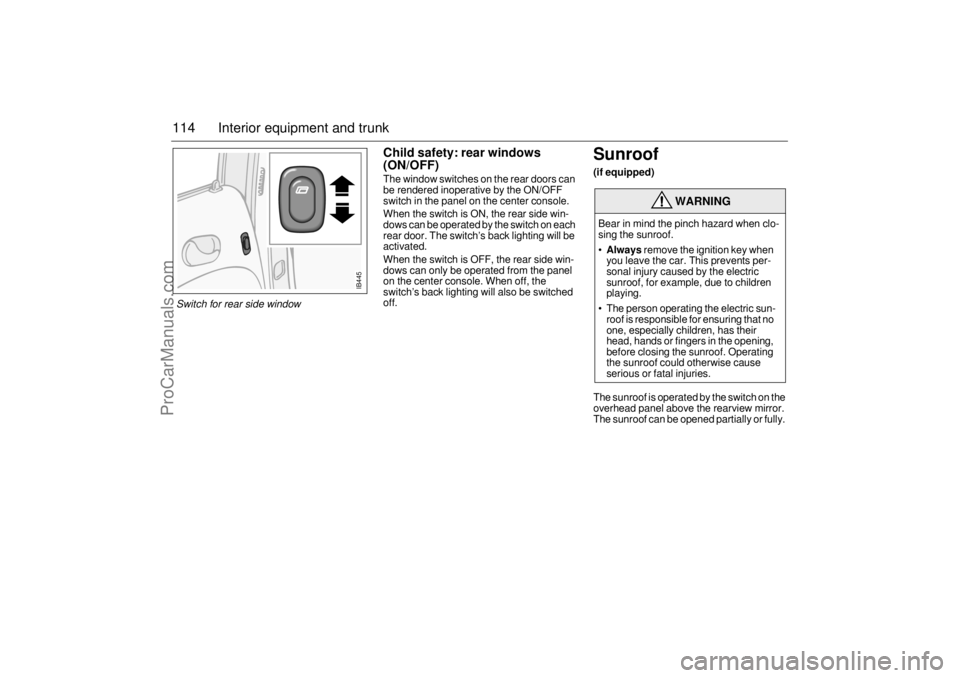
Child safety: rear windows
(ON/OFF)The window switches on the rear doors can
be rendered inoperative by the ON/OFF
switch in the panel on the center console.
When the switch is ON, the rear side win-
dows can be operated by the switch on each
rear door. The switch’s back lighting will be
activated.
When the switch is OFF, the rear side win-
dows can only be operated from the panel
on the center console. When off, the
switch’s back lighting will also be switched
off.
Sunroof (if equipped)The sunroof is operated by the switch on the
overhead panel above the rearview mirror.
The sunroof can be opened partially or fully.
WARNING
Bear in mind the pinch hazard when clo-
sing the sunroof.
Always
remove the ignition key when
you leave the car. This prevents per-
sonal injury caused by the electric
sunroof, for example, due to children
playing.
The person operating the electric sun-
roof is responsible for ensuring that no
one, especially children, has their
head, hands or fingers in the opening,
before closing the sunroof. Operating
the sunroof could otherwise cause
serious or fatal injuries.
IB445
Switch for rear side window
ProCarManuals.com
Page 118 of 276
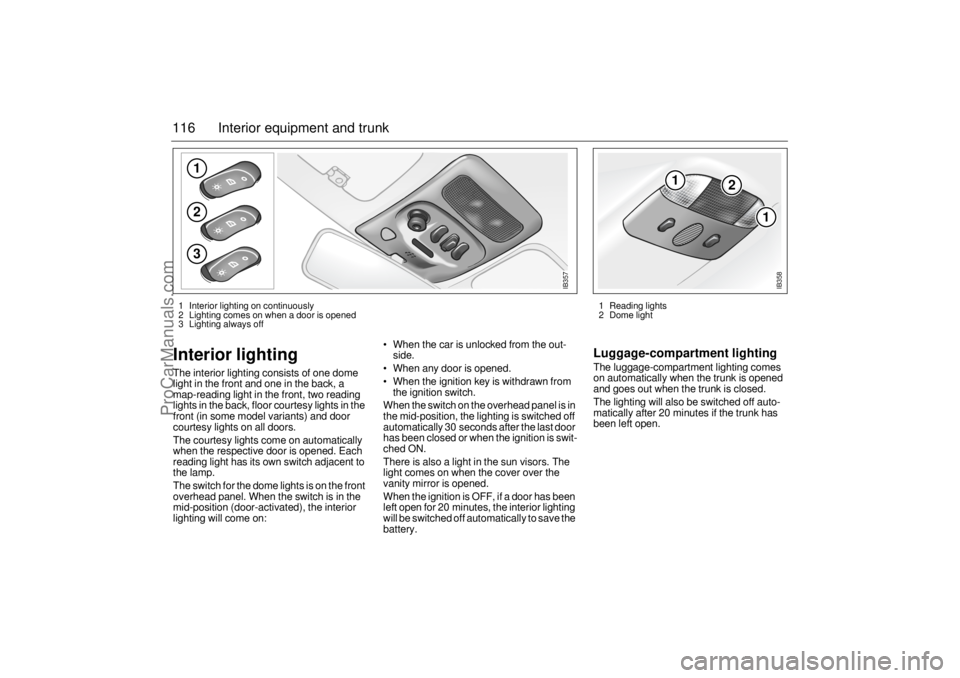
116 Interior equipment and trunkInterior lighting The interior lighting consists of one dome
light in the front and one in the back, a
map-reading light in the front, two reading
lights in the back, floor courtesy lights in the
front (in some model variants) and door
courtesy lights on all doors.
The courtesy lights come on automatically
when the respective door is opened. Each
reading light has its own switch adjacent to
the lamp.
The switch for the dome lights is on the front
overhead panel. When the switch is in the
mid-position (door-activated), the interior
lighting will come on: When the car is unlocked from the out-
side.
When any door is opened.
When the ignition key is withdrawn from
the ignition switch.
When the switch on the overhead panel is in
the mid-position, the lighting is switched off
automatically 30 seconds after the last door
has been closed or when the ignition is swit-
ched ON.
There is also a light in the sun visors. The
light comes on when the cover over the
vanity mirror is opened.
When the ignition is OFF, if a door has been
left open for 20 minutes, the interior lighting
will be switched off automatically to save the
battery.
Luggage-compartment lightingThe luggage-compartment lighting comes
on automatically when the trunk is opened
and goes out when the trunk is closed.
The lighting will also be switched off auto-
matically after 20 minutes if the trunk has
been left open.
123
IB357
1
2
1
IB358
1 Reading lights
2 Dome light 1 Interior lighting on continuously
2 Lighting comes on when a door is opened
3 Lighting always off
ProCarManuals.com
Page 123 of 276
121 Interior equipment and trunk
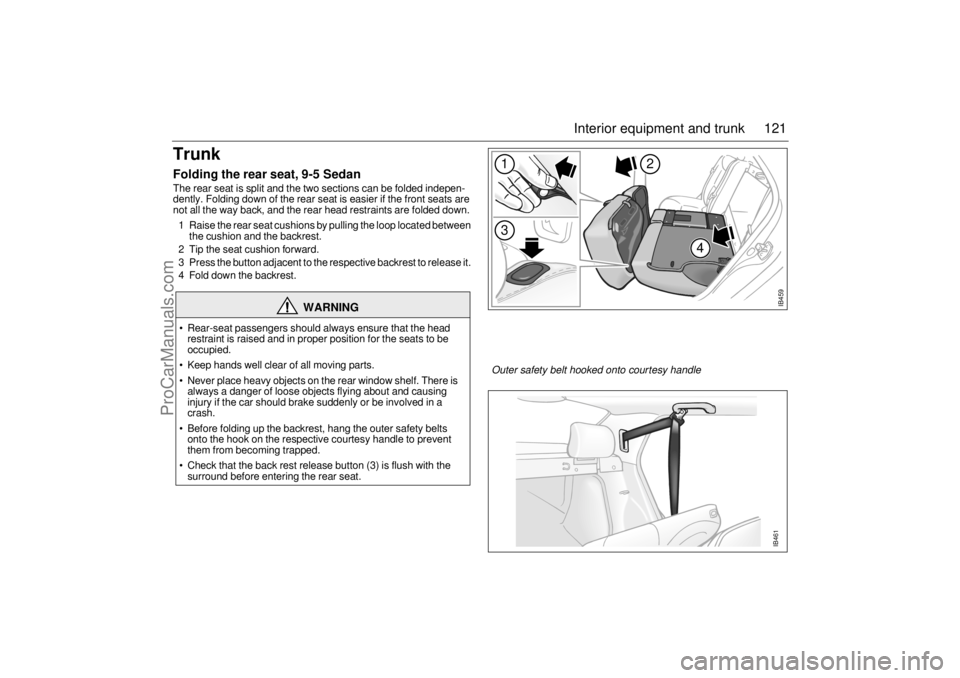
TrunkFolding the rear seat, 9-5 SedanThe rear seat is split and the two sections can be folded indepen-
dently. Folding down of the rear seat is easier if the front seats are
not all the way back, and the rear head restraints are folded down.
1 Raise the rear seat cushions by pulling the loop located between
the cushion and the backrest.
2 Tip the seat cushion forward.
3 Press the button adjacent to the respective backrest to release it.
4 Fold down the backrest.
WARNING
Rear-seat passengers should always ensure that the head
restraint is raised and in proper position for the seats to be
occupied.
Keep hands well clear of all moving parts.
Never place heavy objects on the rear window shelf. There is
always a danger of loose objects flying about and causing
injury if the car should brake suddenly or be involved in a
crash.
Before folding up the backrest, hang the outer safety belts
onto the hook on the respective courtesy handle to prevent
them from becoming trapped.
Check that the back rest release button (3) is flush with the
surround before entering the rear seat.
IB459
1
2
4
3
IB461
Outer safety belt hooked onto courtesy handle
ProCarManuals.com
Page 126 of 276
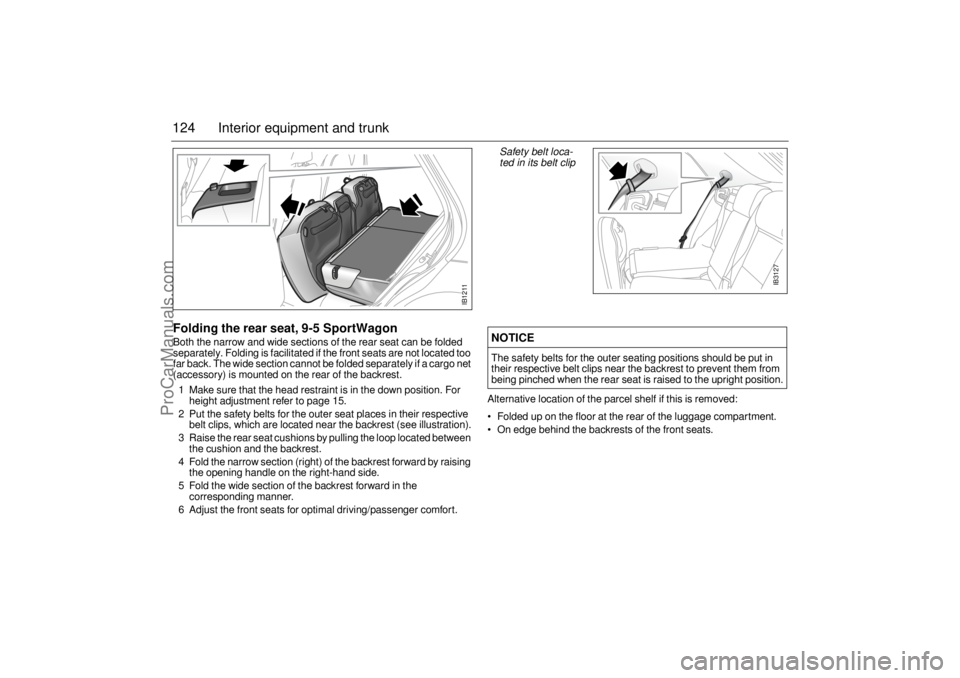
124 Interior equipment and trunkFolding the rear seat, 9-5 SportWagonBoth the narrow and wide sections of the rear seat can be folded
separately. Folding is facilitated if the front seats are not located too
far back. The wide section cannot be folded separately if a cargo net
(accessory) is mounted on the rear of the backrest.
1 Make sure that the head restraint is in the down position. For
height adjustment refer to page 15.
2 Put the safety belts for the outer seat places in their respective
belt clips, which are located near the backrest (see illustration).
3 Raise the rear seat cushions by pulling the loop located between
the cushion and the backrest.
4 Fold the narrow section (right) of the backrest forward by raising
the opening handle on the right-hand side.
5 Fold the wide section of the backrest forward in the
corresponding manner.
6 Adjust the front seats for optimal driving/passenger comfort.
Alternative location of the parcel shelf if this is removed:
Folded up on the floor at the rear of the luggage compartment.
On edge behind the backrests of the front seats.NOTICEThe safety belts for the outer seating positions should be put in
their respective belt clips near the backrest to prevent them from
being pinched when the rear seat is raised to the upright position.
IB1211
IB3127
Safety belt loca-
ted in its belt clip
ProCarManuals.com
Page 127 of 276
125 Interior equipment and trunk
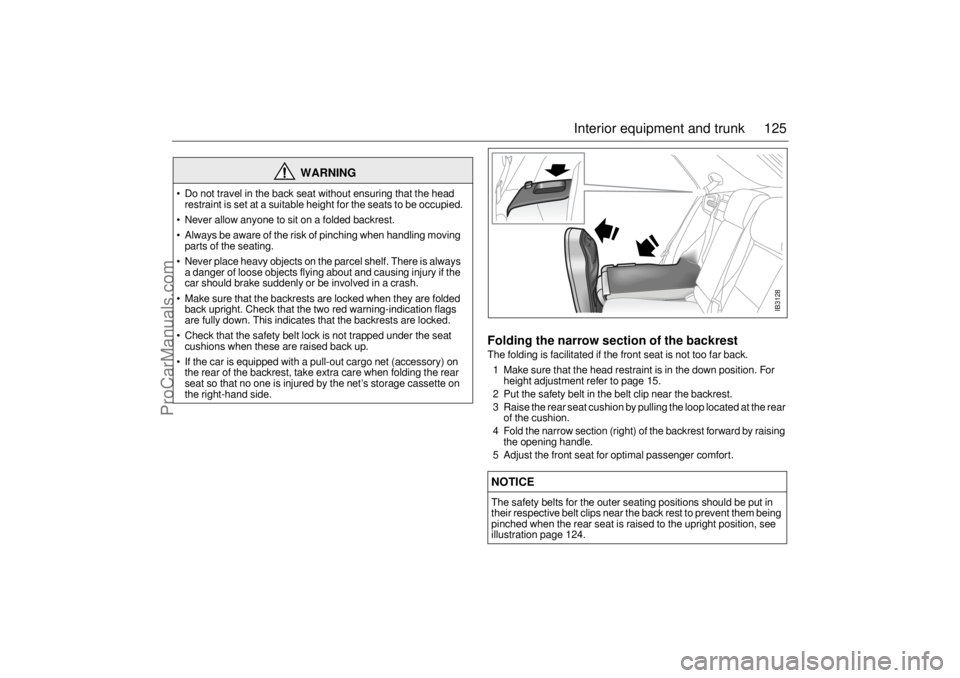
Folding the narrow section of the backrestThe folding is facilitated if the front seat is not too far back.
1 Make sure that the head restraint is in the down position. For
height adjustment refer to page 15.
2 Put the safety belt in the belt clip near the backrest.
3 Raise the rear seat cushion by pulling the loop located at the rear
of the cushion.
4 Fold the narrow section (right) of the backrest forward by raising
the opening handle.
5 Adjust the front seat for optimal passenger comfort.
WARNING
Do not travel in the back seat without ensuring that the head
restraint is set at a suitable height for the seats to be occupied.
Never allow anyone to sit on a folded backrest.
Always be aware of the risk of pinching when handling moving
parts of the seating.
Never place heavy objects on the parcel shelf. There is always
a danger of loose objects flying about and causing injury if the
car should brake suddenly or be involved in a crash.
Make sure that the backrests are locked when they are folded
back upright. Check that the two red warning-indication flags
are fully down. This indicates that the backrests are locked.
Check that the safety belt lock is not trapped under the seat
cushions when these are raised back up.
If the car is equipped with a pull-out cargo net (accessory) on
the rear of the backrest, take extra care when folding the rear
seat so that no one is injured by the net’s storage cassette on
the right-hand side.
NOTICEThe safety belts for the outer seating positions should be put in
their respective belt clips near the back rest to prevent them being
pinched when the rear seat is raised to the upright position, see
illustration page 124.
IB3128
ProCarManuals.com
Page 128 of 276
126 Interior equipment and trunkLoad anchoring
Driving with the trunk lid/tailgate open, see
page 171.
WARNING
Put heavy loads as low down and as
far forward as possible in the luggage
compartment, i.e. against the back of
the rear seat.
Never
overload the cargo net (acces-
sory). If the elastic breaks this may
cause personal injury. Do not use a
cargo net that shows signs of wear.
Never stack cargo so high that any part
of the cargo lies above the edge of the
backrest, if a cargo guard (accessory)
is not being used.
Always tie down the cargo so that it
cannot be thrown forward during
heavy braking or in the event of a
crash.
Unsecured and heavy cargo can
increase the risk of injury during hard
braking, sudden avoidance maneu-
vers and in the event of a crash.
For the best load anchoring, use the
special cargo bolts and load straps
(accessory).
Load the cargo bolts evenly. Never
attach more than one strap to each tie
down eye.
Provide protection on sharp edges to
prevent damage to the load straps.
Never use the elastic floor net (acces-
sory) and elastic side net (accessory)
when the rear seat is folded down.
These nets are only intended to keep
light objects tidy, not for the anchoring
of loads.
If possible, avoid having the rear seat
folded down when driving with a heavy
load because the anchoring possibili-
ties are restricted when the rear seat is
in this position.
That the rear seat is
in the upright position is a basic
requirement for protection against
cargo displacement in the event of
a crash.
Cargo can intrude into the passenger
compartment during a sudden stop or
front crash if the outer safety belts are
not fastened. Check that the two red
warning-indication flags are fully
down. This shows that the backrests
are locked.
WARNING
Match the speed and driving style
according to how the car is loaded.
The driving characteristics of the car
can be affected because the center of
gravity is altered when there is a cargo
in the luggage compartment.
An object weighing 55 lbs. (25 kg) cor-
responds to a weight of 2200 lbs.
(1000 kg) in a head on crash at
32 mph (50 km/h).
Adjust the car’s load (passengers and
luggage) so that the gross vehicle
weight or the axle weight is not
exceeded, see page 252.
ProCarManuals.com
Page 129 of 276
127 Interior equipment and trunk
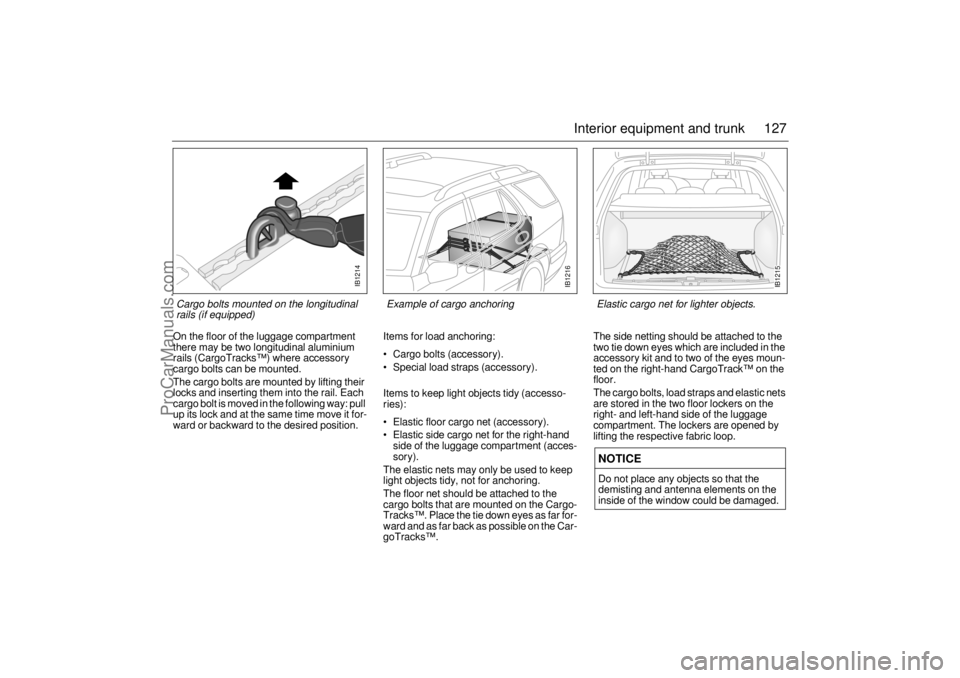
On the floor of the luggage compartment
there may be two longitudinal aluminium
rails (CargoTracks™) where accessory
cargo bolts can be mounted.
The cargo bolts are mounted by lifting their
locks and inserting them into the rail. Each
cargo bolt is moved in the following way: pull
up its lock and at the same time move it for-
ward or backward to the desired position.Items for load anchoring:
Cargo bolts (accessory).
Special load straps (accessory).
Items to keep light objects tidy (accesso-
ries):
Elastic floor cargo net (accessory).
Elastic side cargo net for the right-hand
side of the luggage compartment (acces-
sory).
The elastic nets may only be used to keep
light objects tidy, not for anchoring.
The floor net should be attached to the
cargo bolts that are mounted on the Cargo-
Tracks™. Place the tie down eyes as far for-
ward and as far back as possible on the Car-
goTracks™.The side netting should be attached to the
two tie down eyes which are included in the
accessory kit and to two of the eyes moun-
ted on the right-hand CargoTrack™ on the
floor.
The cargo bolts, load straps and elastic nets
are stored in the two floor lockers on the
right- and left-hand side of the luggage
compartment. The lockers are opened by
lifting the respective fabric loop.
NOTICEDo not place any objects so that the
demisting and antenna elements on the
inside of the window could be damaged.
IB1214
Cargo bolts mounted on the longitudinal
rails (if equipped)
IB1216
Example of cargo anchoring
IB1215
Elastic cargo net for lighter objects.
ProCarManuals.com