oil level SAAB 9-7X 2008 Owners Manual
[x] Cancel search | Manufacturer: SAAB, Model Year: 2008, Model line: 9-7X, Model: SAAB 9-7X 2008Pages: 426, PDF Size: 2.77 MB
Page 163 of 426
A reading in the low pressure zone may be caused
by a dangerously low oil level or other problems
causing low oil pressure.
{CAUTION:
Do not keep driving if the oil pressure is low.
If you do, your engine can become so hot that
it catches �re. You or others could be burned.
Check your oil as soon as possible and have
your vehicle serviced.
Notice:Lack of proper engine oil maintenance may
damage the engine. The repairs would not be covered
by your warranty. Always follow the maintenance
schedule in this manual for changing engine oil.
Security Light
For information
regarding this light
and the vehicle’s
security system, see
Content Theft-Deterrent
on page 2-16.
Cruise Control Light
If your vehicle has
a Driver Information
Center (DIC), this light
will come on when
the cruise control is set.
SeeCruise Control on page 3-11andDIC Warnings
and Messages on page 3-48for more information.
3-41
ProCarManuals.com
Page 168 of 426
Fuel Information Button
r
(Fuel Information):Press this button to scroll
through the fuel range, fuel used, average fuel economy,
and the engine oil life system.
Fuel Range:Press the fuel information button until
RANGE appears on the display. This mode shows the
remaining distance you can drive without refueling. It is
based on fuel economy and the fuel remaining in the fuel
tank. The display will show LOW if the fuel level is low.
The fuel economy data used to determine fuel range is
an average of recent driving conditions. As your driving
conditions change, this data is gradually updated.
Fuel range cannot be reset.
Fuel Used:Press the fuel information button until
FUEL USED appears on the display. This mode shows
the number of gallons or liters of fuel used since the
last reset of this menu item. To reset the fuel used
information, press and hold the select button for
one second while FUEL USED is displayed.
Average Fuel Economy:Press the fuel information
button until AVG. ECON appears on the display.
This mode shows how many miles per gallon (MPG),
kilometers per liter (km/L), or liters per 100 kilometers
(L/100 km) your vehicle is getting based on current
and past driving conditions.Press and hold the select button for one second while
AVG. ECON is displayed to reset the average fuel
economy. Average fuel economy will then be calculated
starting from that point. If the average fuel economy is not
reset, it will be continually updated each time you drive.
Engine Oil Life System:Press the fuel information
button until ENGINE OIL LIFE appears on the display.
The engine oil life system shows an estimate of the
oil’s remaining useful life. It will show 100% when the
system is reset after an oil change. It will alert you
to change your oil on a schedule consistent with your
driving conditions.
Always reset the engine oil life system after an oil
change. To reset the engine oil life system, see
Engine Oil Life System on page 5-22.
In addition to the engine oil life system monitoring the
oil life, additional maintenance is recommended in the
Maintenance Schedule in this manual. SeeEngine Oil
on page 5-18andScheduled Maintenance on page 6-3.
Trip Information Button
3
(Trip Information):Press this button to scroll
through the odometer, trip odometers, tire pressures,
and timer.
3-46
ProCarManuals.com
Page 170 of 426
Customization Button
q
(Customization):Press this button to access
the VEHICLE SETTINGS menu and customize
the settings to your vehicle. SeeDIC Vehicle
Customization on page 3-53for more information.
Select Button
r
(Select):Press the select button to reset certain
DIC functions, turn off or acknowledge messages on
the DIC display, and set your customization settings.
For example, this button will allow you to reset the trip
odometers, turn off the FUEL LEVEL LOW message,
and enables you to scroll through and select the
language in which the DIC information will appear.
DIC Warnings and Messages
Messages are displayed on the DIC to notify the driver
that the status of the vehicle has changed and that
some action may be needed to correct the condition.
Multiple messages may appear one after another.
Some messages may not require immediate action.
Press any of the DIC buttons on the instrument panel
or the trip odometer reset stem on the instrument panel
cluster to acknowledge that you received the messages
and to clear them from the display.Some messages cannot be cleared from the display
because they are more urgent. These messages require
action before they can be removed from the DIC display.
Take any messages that appear on the display seriously
and remember that clearing the messages will only make
the messages disappear, not correct the problem.
The following are the possible messages that can be
displayed and some information about them.
CHANGE ENGINE OIL
This message displays when the engine oil needs to
be changed and service is required for your vehicle.
SeeScheduled Maintenance on page 6-3andEngine
Oil on page 5-18for more information. Also see
Engine Oil Life System on page 5-22for information
on how to reset the message. This message clears
itself after 10 seconds until the next ignition cycle.
CHECK TIRE PRESSURE
This message displays when the pressure in one or
more of the vehicle’s tires needs to be checked.
If a tire pressure message appears on the DIC,
stop as soon as you can. Have the tire pressures
checked and set to those shown on the Tire Loading
Information label. SeeTires on page 5-60,Loading Your
Vehicle on page 4-22, andInflation - Tire Pressure on
page 5-67. The DIC also shows the tire pressure values.
3-48
ProCarManuals.com
Page 172 of 426
FRONT FOG LAMPS ON
This message displays if the fog lamps are turned on.
The message clears after 10 seconds. SeeFog
Lamps on page 3-17andTurn Signal/Multifunction
Lever on page 3-7for more information.
FUEL LEVEL LOW
This message displays and a chime sounds if the fuel
level is low. Refuel as soon as possible. SeeLow
Fuel Warning Light on page 3-44,Filling the Tank on
page 5-7, andFuel on page 5-4for more information.
ICE POSSIBLE
This message may display if the outside temperature
reaches a level where ice could form on the roadway.
Adjust your driving accordingly. If the temperature
rises to a safe level, the message clears. This message
clears itself after 10 seconds, or you can manually
clear it from the DIC display.
KEY FOB # BATTERY LOW
This message displays if a Remote Keyless Entry (RKE)
transmitter battery is low. Replace the battery in the
transmitter. See “Battery Replacement” underRemote
Keyless Entry (RKE) System Operation on page 2-5.
LEFT REAR DOOR AJAR
This message displays and a chime sounds if the driver
side rear door is not fully closed. Stop and turn off
the vehicle, check the door for obstructions, and close
the door again. Check to see if the message still
appears on the DIC.
OIL PRESSURE LOW/STOP ENGINE
Notice:If you drive your vehicle while the engine
oil pressure is low, severe engine damage may
occur. If a low oil pressure warning appears on the
Driver Information Center (DIC), stop the vehicle
as soon as possible. Do not drive the vehicle until
the cause of the low oil pressure is corrected.
SeeEngine Oil on page 5-18for more information.
This message displays if low oil pressure levels
occur. Stop the vehicle as soon as safely possible and
do not operate it until the cause of the low oil pressure
has been corrected. Check the oil as soon as possible
and have your vehicle serviced by your dealer/retailer.
SeeEngine Oil on page 5-18.
3-50
ProCarManuals.com
Page 229 of 426
Hydroplaning
Hydroplaning is dangerous. Water can build up
under your vehicle’s tires so they actually ride on the
water. This can happen if the road is wet enough
and you are going fast enough. When your vehicle is
hydroplaning, it has little or no contact with the road.
There is no hard and fast rule about hydroplaning.
The best advice is to slow down when the road is wet.
Other Rainy Weather Tips
Besides slowing down, other wet weather driving tips
include:
Allow extra following distance.
Pass with caution.
Keep windshield wiping equipment in good shape.
Keep the windshield washer �uid reservoir �lled.
Have good tires with proper tread depth.
SeeTires on page 5-60.
Before Leaving on a Long Trip
To prepare your vehicle for a long trip, consider having
it serviced by your dealer/retailer before departing.
Things to check on your own include:
Windshield Washer Fluid:Reservoir full?
Windows clean — inside and outside?
Wiper Blades:In good shape?
Fuel, Engine Oil, Other Fluids:All levels checked?
Lamps:Do they all work and are lenses clean?
Tires:Are treads good? Are tires in�ated to
recommended pressure?
Weather and Maps:Safe to travel?
Have
up-to-date maps?
4-15
ProCarManuals.com
Page 252 of 426
Making Turns
Notice:Making very sharp turns while trailering
could cause the trailer to come in contact with
the vehicle. Your vehicle could be damaged.
Avoid making very sharp turns while trailering.
When you’re turning with a trailer, make wider turns
than normal. Do this so your trailer won’t strike
soft shoulders, curbs, road signs, trees or other objects.
Avoid jerky or sudden maneuvers. Signal well in
advance.
Turn Signals When Towing a Trailer
The arrows on your instrument panel will �ash whenever
you signal a turn or lane change. Properly hooked up,
the trailer lamps will also �ash, telling other drivers
you’re about to turn, change lanes or stop.
When towing a trailer, the arrows on your instrument
panel will �ash for turns even if the bulbs on the
trailer are burned out. Thus, you may think drivers
behind you are seeing your signal when they are not.
It’s important to check occasionally to be sure the
trailer bulbs are still working.
Driving On Grades
Reduce speed and shift to a lower gearbeforeyou
start down a long or steep downgrade. If you don’t shift
down, you might have to use your brakes so much
that they would get hot and no longer work well.
You can tow in DRIVE (D). You may want to shift the
transmission to THIRD (3) or a lower gear, under heavy
loads or hilly conditions.
When towing at high altitude on steep uphill grades,
consider the following: Engine coolant will boil at a lower
temperature than at normal altitudes. If you turn your
engine off immediately after towing at high altitude
on steep uphill grades, your vehicle may show signs
similar to engine overheating. To avoid this, let the
engine run while parked (preferably on level ground)
with the automatic transmission in PARK (P) for a
few minutes before turning the engine off. If you do
get the overheat warning, seeEngine Overheating
on page 5-30.
4-38
ProCarManuals.com
Page 267 of 426
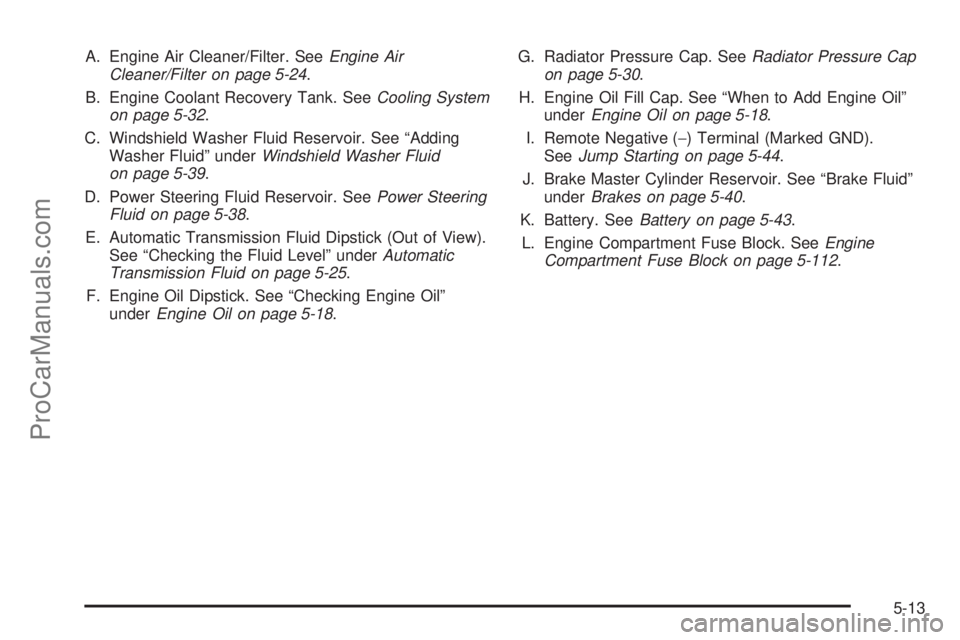
A. Engine Air Cleaner/Filter. SeeEngine Air
Cleaner/Filter on page 5-24.
B. Engine Coolant Recovery Tank. SeeCooling System
on page 5-32.
C. Windshield Washer Fluid Reservoir. See “Adding
Washer Fluid” underWindshield Washer Fluid
on page 5-39.
D. Power Steering Fluid Reservoir. SeePower Steering
Fluid on page 5-38.
E. Automatic Transmission Fluid Dipstick (Out of View).
See “Checking the Fluid Level” underAutomatic
Transmission Fluid on page 5-25.
F. Engine Oil Dipstick. See “Checking Engine Oil”
underEngine Oil on page 5-18.G. Radiator Pressure Cap. SeeRadiator Pressure Cap
on page 5-30.
H. Engine Oil Fill Cap. See “When to Add Engine Oil”
underEngine Oil on page 5-18.
I. Remote Negative (−) Terminal (Marked GND).
SeeJump Starting on page 5-44.
J. Brake Master Cylinder Reservoir. See “Brake Fluid”
underBrakes on page 5-40.
K. Battery. SeeBattery on page 5-43.
L. Engine Compartment Fuse Block. SeeEngine
Compartment Fuse Block on page 5-112.
5-13
ProCarManuals.com
Page 269 of 426
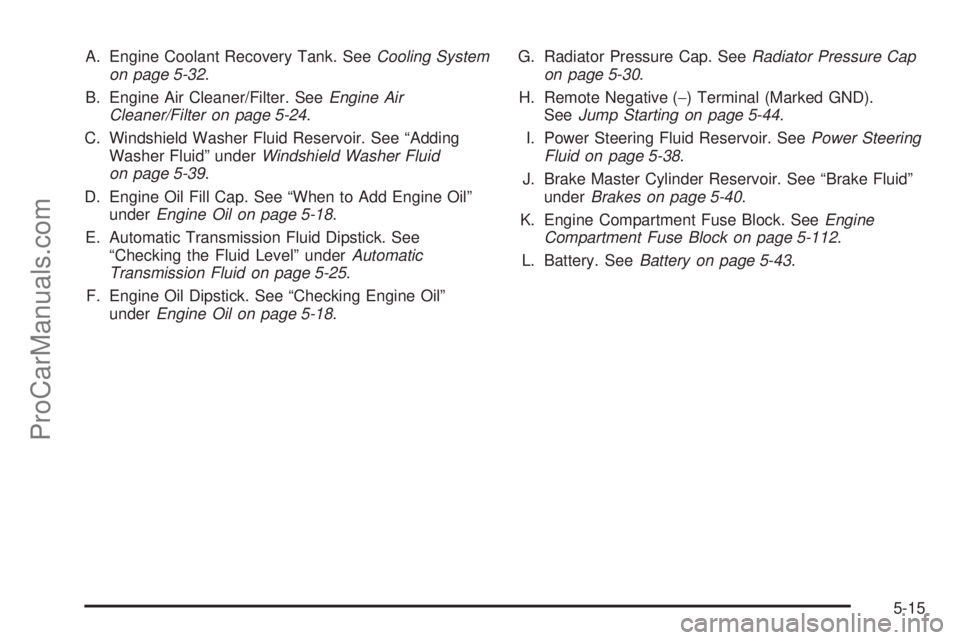
A. Engine Coolant Recovery Tank. SeeCooling System
on page 5-32.
B. Engine Air Cleaner/Filter. SeeEngine Air
Cleaner/Filter on page 5-24.
C. Windshield Washer Fluid Reservoir. See “Adding
Washer Fluid” underWindshield Washer Fluid
on page 5-39.
D. Engine Oil Fill Cap. See “When to Add Engine Oil”
underEngine Oil on page 5-18.
E. Automatic Transmission Fluid Dipstick. See
“Checking the Fluid Level” underAutomatic
Transmission Fluid on page 5-25.
F. Engine Oil Dipstick. See “Checking Engine Oil”
underEngine Oil on page 5-18.G. Radiator Pressure Cap. SeeRadiator Pressure Cap
on page 5-30.
H. Remote Negative (−) Terminal (Marked GND).
SeeJump Starting on page 5-44.
I. Power Steering Fluid Reservoir. SeePower Steering
Fluid on page 5-38.
J. Brake Master Cylinder Reservoir. See “Brake Fluid”
underBrakes on page 5-40.
K. Engine Compartment Fuse Block. SeeEngine
Compartment Fuse Block on page 5-112.
L. Battery. SeeBattery on page 5-43.
5-15
ProCarManuals.com
Page 271 of 426
A. Engine Coolant Recovery Tank. SeeCooling System
on page 5-32.
B. Engine Air Cleaner/Filter. SeeEngine Air
Cleaner/Filter on page 5-24.
C. Windshield Washer Fluid Reservoir. See “Adding
Washer Fluid” underWindshield Washer Fluid
on page 5-39.
D. Engine Oil Fill Cap (Under Engine Cover).
See “When to Add Engine Oil” underEngine
Oil on page 5-18.
E. Engine Oil Dipstick (Out of View). See “Checking
Engine Oil” underEngine Oil on page 5-18.
F. Automatic Transmission Fluid Dipstick.
See “Checking the Fluid Level” underAutomatic
Transmission Fluid on page 5-25.G. Radiator Pressure Cap. SeeRadiator Pressure Cap
on page 5-30.
H. Remote Negative (−) Terminal (Marked GND).
SeeJump Starting on page 5-44.
I. Power Steering Fluid Reservoir. SeePower Steering
Fluid on page 5-38.
J. Brake Master Cylinder Reservoir. See “Brake Fluid”
underBrakes on page 5-40.
K. Engine Compartment Fuse Block. SeeEngine
Compartment Fuse Block on page 5-112.
L. Battery. SeeBattery on page 5-43.
5-17
ProCarManuals.com
Page 272 of 426
Engine Oil
Checking Engine Oil
It is a good idea to check the engine oil every time you
get fuel. In order to get an accurate reading, the oil
must be warm and the vehicle must be on level ground.
The engine oil dipstick handle is a yellow loop.
SeeEngine Compartment Overview on page 5-12
for the location of the engine oil dipstick.
1. Turn off the engine and give the oil several minutes
to drain back into the oil pan. If you do not do this,
the oil dipstick might not show the actual level.
2. Pull out the dipstick and clean it with a paper towel
or cloth, then push it back in all the way. Remove it
again, keeping the tip down, and check the level.
When to Add Engine Oil
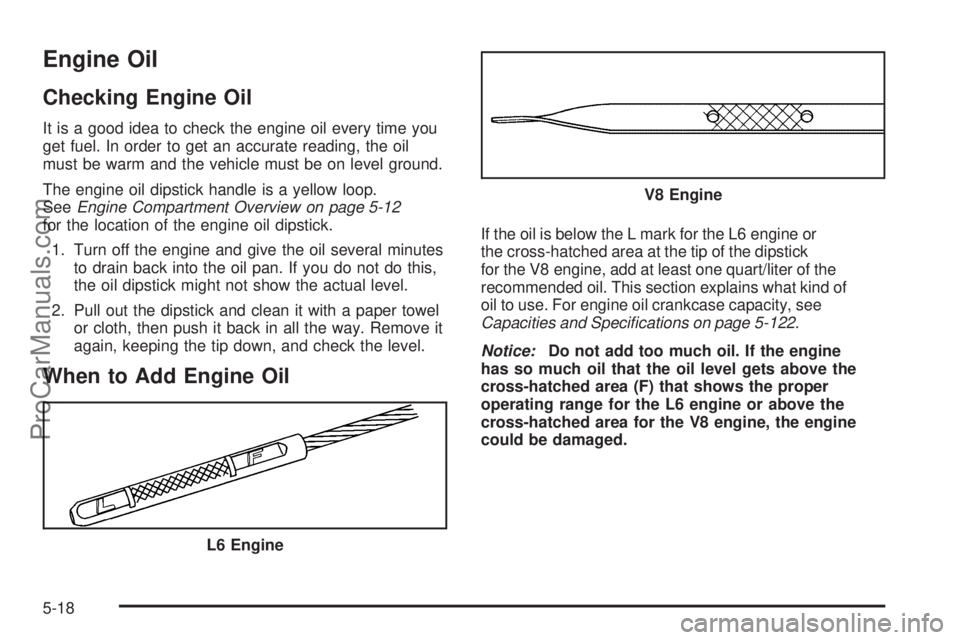
If the oil is below the L mark for the L6 engine or
the cross-hatched area at the tip of the dipstick
for the V8 engine, add at least one quart/liter of the
recommended oil. This section explains what kind of
oil to use. For engine oil crankcase capacity, see
Capacities and Specifications on page 5-122.
Notice:Do not add too much oil. If the engine
has so much oil that the oil level gets above the
cross-hatched area (F) that shows the proper
operating range for the L6 engine or above the
cross-hatched area for the V8 engine, the engine
could be damaged.
L6 Engine
V8 Engine
5-18
ProCarManuals.com