phone SAAB 9-7X 2008 Owners Manual
[x] Cancel search | Manufacturer: SAAB, Model Year: 2008, Model line: 9-7X, Model: SAAB 9-7X 2008Pages: 426, PDF Size: 2.77 MB
Page 71 of 426
Any object, such as an aftermarket seat heater or a
comfort enhancing pad or device, installed under
or on top of the seat fabric, could also interfere with
the operation of the passenger sensing system.
This could either prevent proper deployment of
the passenger airbag(s) or prevent the passenger
sensing system from properly turning off the
passenger airbag(s). SeePassenger Sensing
System on page 1-61.
If you have any questions about this, you should
contact Customer Assistance before you modify
your vehicle. The phone numbers and addresses
for Customer Assistance are in Step Two of
the Customer Satisfaction Procedure in this manual.
SeeCustomer Satisfaction Procedure on page 7-2.
If your vehicle has rollover roof-rail airbags, see
Different Size Tires and Wheels on page 5-79
for additional important information.Q:Because I have a disability, I have to get my
vehicle modi�ed. How can I �nd out whether
this will affect my airbag system?
A:If you have questions, call Customer Assistance.
The phone numbers and addresses for Customer
Assistance are in Step Two of the Customer
Satisfaction Procedure in this manual. See
Customer Satisfaction Procedure on page 7-2.
In addition, your dealer/retailer and the service
manual have information about the location of the
airbag sensors, sensing and diagnostic module
and airbag wiring.
1-67
ProCarManuals.com
Page 112 of 426
Available Services included with
Directions & Connections Plan
All Safe and Sound Plan Services
Driving Directions - Advisor delivered or OnStar
Turn-by-Turn Navigation (If equipped)
Ride Assist
Information and Convenience Services
OnStar Hands-Free Calling
OnStar Hands-Free Calling allows eligible OnStar
subscribers to make and receive calls using voice
commands. Hands-Free Calling is fully integrated into
the vehicle, and can be used with OnStar Pre-Paid
Minute Packages. Hands-Free Calling may also
be linked to a Verizon Wireless service plan in the
U.S. or a Bell Mobility service plan in Canada,
depending on eligibility. To �nd out more, refer to
the OnStar Owner’s Guide in the vehicle’s glove box,
visit www.onstar.com or www.onstar.ca, or speak
with an OnStar advisor by pressing the OnStar button
or calling 1-888-4-ONSTAR (1-888-466-7827).
OnStar Virtual Advisor
OnStar Virtual Advisor is a feature of OnStar
Hands-Free Calling that uses your minutes to access
location-based weather, local traffic reports, and stock
quotes. By pressing the phone button and giving a few
simple voice commands, you can browse through the
various topics. See the OnStar Owner’s Guide for more
information. (Only available in the continental U.S.)
OnStar Steering Wheel Controls
Your vehicle may have a Talk/Mute button that can
be used to interact with OnStar Hands-Free Calling.
SeeAudio Steering Wheel Controls on page 3-91
for more information.
On some vehicles, you may have to hold the button for
a few seconds and give the command “ONSTAR” in
order to activate the OnStar Hands-Free Calling feature.
On some vehicles, the mute button can be used to
dial numbers into voicemail systems, or to dial phone
extensions. See the OnStar Owner’s Guide for more
information.
2-38
ProCarManuals.com
Page 113 of 426
How OnStar Service Works
In order to provide you with OnStar services, your
vehicle’s OnStar system has the capability of recording
and transmitting vehicle information. This information
is automatically sent to an OnStar Call Center at
the time of an OnStar button press, Emergency button
press or if your airbags or AACN system deploys.
The vehicle information usually includes your GPS
location and, in the event of a crash, additional
information regarding the accident that your vehicle
has been involved in (e.g. the direction from which your
vehicle was hit). When you use the Virtual Advisor
feature of OnStar Hands-Free Calling, your vehicle
also sends OnStar your GPS location so that we can
provide you with location-based services.
OnStar service cannot work unless your vehicle is in a
place where OnStar has an agreement with a wireless
service provider for service in that area. OnStar service
also cannot work unless you are in a place where the
wireless service provider OnStar has hired for that area
has coverage, network capacity and reception when the
service is needed, and technology that is compatible
with the OnStar service. Not all services are available
everywhere, particularly in remote or enclosed areas,
or at all times.OnStar service that involves location information about
your vehicle cannot work unless GPS satellite signals
are unobstructed and available in that place as well.
Your vehicle must have a working electrical system
(including adequate battery power) for the OnStar
equipment to operate. There are other problems OnStar
cannot control that may prevent OnStar from providing
OnStar service to you at any particular time or place.
Some examples are damage to important parts of your
vehicle in an accident, hills, tall buildings, tunnels,
weather or wireless phone network congestion.
Your Responsibility
You may need to increase the volume of your radio
to hear the OnStar advisor. If the light next to the
OnStar buttons is red, this means that your system is not
functioning properly and should be checked by a dealer.
If the light appears clear (no light is appearing), your
OnStar subscription has expired. You can always press
the blue OnStar button to con�rm that your OnStar
equipment is active.
2-39
ProCarManuals.com
Page 118 of 426
Using Universal Home Remote
Press and hold the appropriate Universal Home Remote
button for at least half of a second. The indicator light
will come on while the signal is being transmitted.
Erasing Universal Home Remote
Buttons
Erase the programmed buttons when you sell or
terminate your lease.
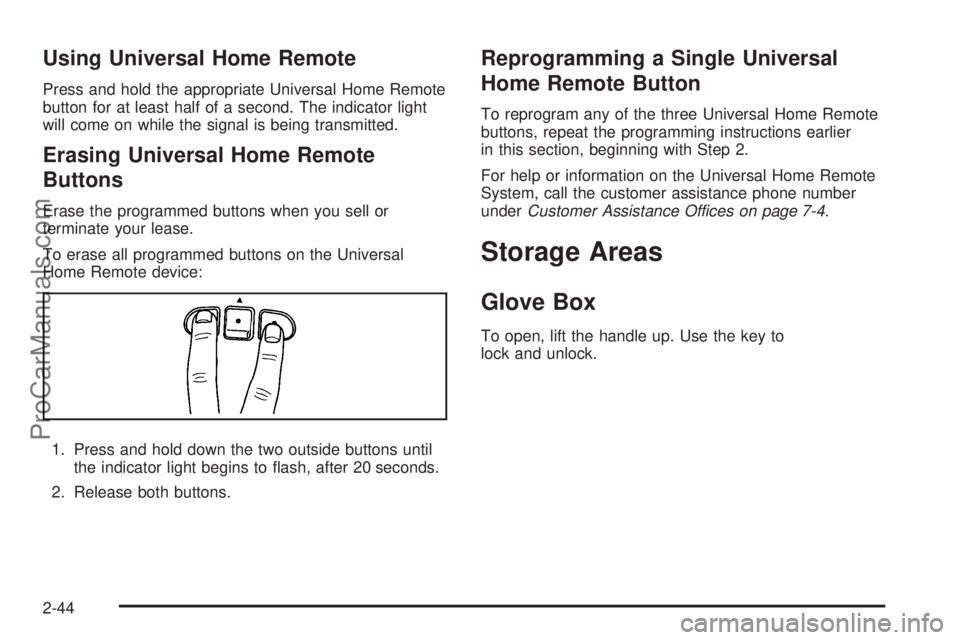
To erase all programmed buttons on the Universal
Home Remote device:
1. Press and hold down the two outside buttons until
the indicator light begins to �ash, after 20 seconds.
2. Release both buttons.
Reprogramming a Single Universal
Home Remote Button
To reprogram any of the three Universal Home Remote
buttons, repeat the programming instructions earlier
in this section, beginning with Step 2.
For help or information on the Universal Home Remote
System, call the customer assistance phone number
underCustomer Assistance Offices on page 7-4.
Storage Areas
Glove Box
To open, lift the handle up. Use the key to
lock and unlock.
2-44
ProCarManuals.com
Page 141 of 426

or a voltage display on the Driver Information Center
(DIC), you may see the voltage move up or down. This is
normal. If there is a problem, an alert will be displayed.
The battery can be discharged at idle if the electrical
loads are very high. This is true for all vehicles. This is
because the generator (alternator) may not be spinning
fast enough at idle to produce all the power that is
needed for very high electrical loads.
A high electrical load occurs when several of the
following loads are on: headlamps, high beams, fog
lamps, rear window defogger, climate control fan at high
speed, heated seats, engine cooling fans, trailer loads,
and loads plugged into accessory power outlets.
EPM works to prevent excessive discharge of the battery.
It does this by balancing the generator’s output and the
vehicle’s electrical needs. It can increase engine idle
speed to generate more power, whenever needed.
It can temporarily reduce the power demands of some
accessories.
Normally, these actions occur in steps or levels, without
being noticeable. In rare cases at the highest levels of
corrective action, this action may be noticeable to the
driver. If so, a Driver Information Center (DIC) message
might be displayed, such as Battery Saver Active or
Service Battery Charging System. If this message is
displayed, it is recommended that the driver reduce the
electrical loads as much as possible. SeeDIC Warnings
and Messages on page 3-48.Battery Run-Down Protection
This feature shuts off the dome, courtesy, and vanity
lamps if they are left on for more than 20 minutes
when the ignition is off. This will keep the battery from
running down.
If the battery run-down protection shuts off the interior
lamps, it may be necessary to do one of the following to
return to normal operation:
Shut off all lamps and close all doors.
Turn the ignition key to RUN.
This feature will also turn off the parking lamps and
headlamps under most circumstances, if they are left on.
If you would like to turn them back on, turn the exterior
lamps knob.
Accessory Power Outlet(s)
With the accessory power outlets, you can plug in
auxiliary electrical equipment such as a cellular
telephone or CB radio.
Your vehicle has three accessory power outlets. There
are two outlets located below the climate controls
and one outlet is on the rear of the center �oor console.
Remove the cover from the outlet to use the outlet.
Be sure to put the cover back on when not using the
accessory power outlet.
3-19
ProCarManuals.com
Page 182 of 426
Audio System(s)
Determine which radio your vehicle has and then
read the pages following to familiarize yourself with
its features.
{CAUTION:
This system provides you with far greater
access to audio stations and song listings.
Giving extended attention to entertainment
tasks while driving can cause a crash and
you or others can be injured or killed. Always
keep your eyes on the road and your mind
on the drive — avoid engaging in extended
searching while driving.
Keeping your mind on the drive is important for
safe driving. SeeDefensive Driving on page 4-2.
Here are some ways in which you can help avoid
distraction while driving.
While your vehicle is parked:
Familiarize yourself with all of its controls.
Familiarize yourself with its operation.
Set up your audio system by presetting your
favorite radio stations, setting the tone, and
adjusting the speakers. Then, when driving
conditions permit, you can tune to your favorite
radio stations using the presets and steering wheel
controls if the vehicle has them.
Notice:Before adding any sound equipment to
your vehicle, such as an audio system, CD player,
CB radio, mobile telephone, or two-way radio, make
sure that it can be added by checking with your
dealer/retailer. Also, check federal rules covering
mobile radio and telephone units. If sound
equipment can be added, it is very important to do
it properly. Added sound equipment may interfere
with the operation of your vehicle’s engine, radio,
or other systems, and even damage them. Your
vehicle’s systems may interfere with the operation
of sound equipment that has been added.
Your vehicle has a feature called Retained Accessory
Power (RAP). With RAP, the audio system can be
played even after the ignition is turned off. SeeRetained
Accessory Power (RAP) on page 2-21for more
information.
Setting the Clock
Press and hold H until the correct hour and AM or PM
displays. Press and hold M until the correct minute
displays. The time can be set with the ignition on or off.
3-60
ProCarManuals.com
Page 185 of 426
The radio only seeks stations with a strong signal that
are in the selected band.
To scan stations, press and hold either arrow for more
than two seconds. SCAN displays and one beep
sounds. The radio goes to a station, plays for a
few seconds, then goes to the next station. Press
either arrow again or one of the pushbuttons to stop
scanning.
To scan preset stations, press and hold either arrow
for more than four seconds. PSCN displays and the
two beeps sound. The radio goes to a preset station,
plays for a few seconds, then goes to the next
preset station. Press either arrow again or one of
the pushbuttons to stop scanning presets.
The radio only scans preset stations with a strong
signal that are in the selected band.
4(Information) (XM™ Satellite Radio Service and
MP3 Features):If the current station has a message,
the information symbol displays. Press this button to
see the message. The message can display the artist,
song title, call in phone numbers, etc.If the entire message is not displayed, parts of the
message appears every three seconds. To scroll
through the message, press and release the information
button. A new group of words display after every
press of this button. Once the complete message
displays, the information symbol disappears until another
new message is received. The last message can be
displayed by pressing the information button. The
last message can be viewed until a new message is
received or a different station is tuned to.
When a message is not available from a station,
No Info displays.
1-6 (Preset Pushbuttons) (Radio with Six-Disc
CD Player:Press this button to play stations that
are programmed on the radio preset pushbuttons.
The radio only seeks preset stations with a strong
signal that are in the selected band.
3-63
ProCarManuals.com
Page 199 of 426
Rear Seat Entertainment (RSE)
System
Your vehicle may have a DVD Rear Seat
Entertainment (RSE) system. The RSE system
includes a DVD player, a video display screen,
two sets of wireless headphones, and a remote
control.
Before You Drive
The RSE system is for rear seat passengers only,
not intended for the driver while driving.
Parental Control
This button is located behind the video screen. Press
this button while a DVD or CD is playing to freeze
the video and mute the audio. The video screen will
display Parental Control ON and the power indicator
light on the DVD player will �ash. It will also disable all
other button operations from the remote control and
the DVD player, with the exception of the eject button.
Press this button again to restore operation of the
DVD player.
This button can also be used to turn the DVD player
power on and automatically resume play if the ignition
is in ON/RUN, ACC/ACCESSORY, or if Retained
Accessory Power (RAP) is active.
Headphones
The RSE system includes two sets of wireless
headphones.
Each set of headphones has an ON/OFF control.
An indicator light will illuminate on the headphones
when they are on. If the light does not illuminate,
the batteries may need to be replaced. See “Battery
Replacement” following for more information.
Each set of headphones has a volume knob.
To adjust the volume, adjust this knob.
The transmitters are located below the video display
screen. The headphones will shut off automatically
if they lose the signal from the system after about
four minutes to save battery power. The signal may
be lost if the system is turned off or if the headphones
are out of range of the transmitters.
When using the wired headphones, if the front seat
passengers play a CD in the Radio with Six-Disc CD
(if equipped) or use XM™ Satellite Radio Service
(if equipped), you will hear the audio for these sources,
instead of the DVD or CD that is currently playing
through the RSE.
Notice:Do not store the headphones in heat or
direct sunlight. This could damage the headphones
and repairs will not be covered by your warranty.
Storage in extreme cold can weaken the batteries.
Keep the headphones stored in a cool, dry place.
3-77
ProCarManuals.com
Page 200 of 426
Battery Replacement
To change the batteries on the headphones,
do the following:
1. Turn the screw to loosen the battery door
located on the left side of the headphones.
Slide the battery door open.
2. Replace the two batteries in the compartment.
Make sure that they are installed correctly,
using the diagram on the inside of the battery
compartment.
3. Replace the battery door and tighten the
door screw.
If the headphones are to be stored for a long period of
time, remove the batteries and keep them in a cool,
dry place.
Stereo RCA Jacks
The RCA jacks are located behind the video screen.
The RCA jacks allow audio and video signals to
be connected from an auxiliary device such as a
camcorder or a video game unit to the RSE system.
Standard RCA cables, not included, are needed
to connect the auxiliary device to the RCA jacks.
The yellow connector inputs video and the red and
white connectors input right and left audio. Refer to
the manufacturer’s instructions for proper connection
of the auxiliary device.To use the auxiliary inputs on the RSE system,
connect an external auxiliary device to the color-coded
RCA jacks and turn both the auxiliary device and
the RSE system power on. If the RSE system had
been previously in the DVD player mode, pressing the
SRCE button on the faceplate or the remote control
will switch the RSE system between the auxiliary device
and the DVD player.
How to Change the Video Format when
in the Auxiliary Mode
The auxiliary input video format is preset to NTSC.
In some countries, the video format may be in the
PAL system. To change the video format, perform
the following:
1. Press the display menu button.
2. Press the down arrow button to highlight the
Video Format option.
3. Press the enter button to select Video Format.
4. Press the right or left arrow button to select
the desired video format.
5. Press the enter button to accept the change.
3-78
ProCarManuals.com
Page 201 of 426
Audio Output
Audio from the DVD player or auxiliary inputs can
be heard through the following possible sources:
Wireless Headphones
Vehicle Speakers
Vehicle wired headphone jacks on the Rear Seat
Audio system (if equipped)
The RSE system always transmits the audio signal to
the wireless headphones, if there is audio available.
See “Headphones” earlier in this section for more
information.
The RSE system is capable of outputting audio to
the vehicle speakers by using the radio. The RSE
system may be selected as an audio source on the radio
if the RSE system power is on. Once the RSE system
is selected as an audio source on the radio, adjust
the speaker volume on the radio, if necessary. If the
RSE system power is not on, the RSE system will
not be an available source on the radio. Refer to the
radio information for the radio that your vehicle has
for more information.The RSE system is capable of outputting audio to the
wired headphone jacks on the rear seat audio system
(if equipped). The RSE system can be selected as
an audio source on the rear seat audio system if the
RSE system power is on. SeeRear Seat Audio (RSA)
on page 3-89for more information.Video Screen
The video screen is located in the overhead console.
To use the video screen, push forward on the release
latch and the screen will fold down. Adjust the screen’s
position as desired. When the video screen is not in
use, push it up into its latched position.
The DVD player and display will continue to operate
when the screen is in the up or the down position.
The video screen contains the transmitters for the
wireless headphones and the remote control. If the
screen is in the closed position, the signals will not be
available for the operation of the headphones or
the remote control.
Notice:Avoid directly touching the video screen,
as damage may occur. See “Cleaning the Video
Screen” later in this section for more information.
3-79
ProCarManuals.com