audio SATURN ASTRA 2009 User Guide
[x] Cancel search | Manufacturer: SATURN, Model Year: 2009, Model line: ASTRA, Model: SATURN ASTRA 2009Pages: 314, PDF Size: 1.94 MB
Page 107 of 314
On some vehicles, if a warning
message appears, the display is
blocked from other functions.
SeeDIC Warnings and Messages
(Base and Uplevel Systems) on
page 4-36for information on
acknowledging the message.
System Settings
To enter the Settings menu:
1. Press SETTINGS on the audio
system.
Audio or System will appear.
2. Press the left arrow button on
the audio system or use the
thumbwheel on the steering
wheel, if the vehicle has one,
to reach menu item System.
After pressing the OK button,
the �rst function of the System
menu is shown.The following functions are
available:
Time, setting hours
Time, setting minutes
Date, setting day
Date, setting month
Date, setting year
Ignition Logic
Language selection
Setting units of measure
Setting Date and Time
To set the date and time:
1. Select time and date from the
Settings menu.
2. Make the desired selections.
The setting is saved when
the menu item is exited.Ignition Logic
If the vehicle has this feature,
seeAudio System(s) on page 6-1
for more information.
Language Selection
To select the display language for
some functions:
1. Select language from the
Settings menu.
2. Make the desired selection.
Setting Units of Measure
To select which units of measure
are to be used:
1. Select units from the
Settings menu.
2. Make the desired selection.
Instruments and Controls 4-33
ProCarManuals.com
Page 108 of 314
Trip Computer
The vehicle may have a trip
computer. The trip computer
provides information on driving data.
This information is continually
recorded and evaluated
electronically. If power has been
interrupted or if the battery voltage
has dropped too low, the values
stored in the trip computer will
be lost.
To access trip computer vehicle
data, do one of the following:
Press the BC button on the audio
system.
Press the left thumbwheel, if your
vehicle has this feature, on the
steering wheel.
Once an audio function has been
selected, the rows of the trip
computer function are displayed.The functions are displayed in the
following order:
Instantaneous Consumption
This display shows the current fuel
economy at a particular moment and
will change frequently as driving
conditions change. This display
shows the instantaneous fuel
economy in miles per gallon (mpg) or
liters per 100 kilometers (l/100 km).
The metric display changes
depending on speed:
Below 8 mph (13 km/h),
displays in l/h.
Above 8 mph (13 km/h),
displays in l/100 km.
This screen cannot be reset.
Average Consumption
This display shows the approximate
average miles per gallon (mpg) or
liters per 100 kilometers (l/100 km).
This number is calculated based on
the number of mpg (l/100 km)
recorded since the last time this
menu item was reset.The measurement can be reset to
zero at any time and restarted.
See “Reset” later in this section.
Trip Consumption
This display shows the number of
gallons (gal) or liters (l) of fuel
used since the last reset.
The measurement can be reset to
zero at any time and restarted.
See “Reset” later in this section.
Average Speed
This display shows the average
speed of the vehicle in miles
per hour (mph) or kilometers per
hour (km/h). This average is
calculated based on the various
vehicle speeds recorded since the
last reset of this value.
The measurement can be reset to
zero at any time and restarted.
See “Reset” later in this section.
4-34 Instruments and Controls
ProCarManuals.com
Page 109 of 314
Distance Travelled
This display shows the current
distance traveled in either
miles (mi) or kilometers (km) since
the last reset.
The measurement can be reset to
zero at any time and restarted.
See “Reset” later in this section.
Range
This display shows the approximate
number of remaining miles (mi)
or kilometers (km) the vehicle can
be driven without refueling.
The message “Range” displays if
less than 31 mi (50 km) can be
driven with the fuel remaining in
the tank. The message “Refuel!”
displays when approximately
19 mi (30 km) can be driven with
the fuel remaining in the tank.With less than 19 mi (30 km)
worth of fuel remaining the range
display will show “- -” once the
“Refuel!” message has been
acknowledged.
SeeDIC Warnings and Messages
(Base and Uplevel Systems) on
page 4-36for information on
acknowledging the message.
The fuel range estimate is based on
an average of the vehicle’s fuel
economy over recent driving history
and the amount of fuel remaining
in the fuel tank. This estimate
will change if driving conditions
change. For example, if driving
in traffic and making frequent stops,
this display may read one number,
but if the vehicle is driven on a
freeway, the number may change
even though the same amount
of fuel is in the fuel tank.This is because different driving
conditions produce different fuel
economies. Generally, freeway
driving produces better fuel
economy than city driving.
Fuel range cannot be reset.
Stop Watch
This display can be used as a timer.
To start or stop the timer, press
the right arrow on the audio system.
To reset the timer, press the left
arrow until the value returns to zero.
If your vehicle has the left
thumbwheel on the steering wheel,
you can start or stop the timer
by pressing the thumbwheel.
Instruments and Controls 4-35
ProCarManuals.com
Page 110 of 314
Reset
The following trip computer
information can be reset:
Average consumption
Trip consumption
Average speed
Distance travelled
To reset the value:
1. Select the desired trip computer
information.
2. Press the OK button on the
audio system, or press the
left thumbwheel, if your vehicle
has this feature, on the steering
wheel:
To reset the current value,
press and hold brie�y.
To reset all values, press for
six seconds.
DIC Warnings and
Messages (Base and
Uplevel Systems)
Messages are displayed on the DIC
to notify the driver that the status
of the vehicle has changed and that
some action may be needed by
the driver to correct the condition.
Multiple messages may appear one
after another.
The DIC monitors some �uid levels,
battery of the Remote Keyless
Entry (RKE) transmitter, the
theft-deterrent system on vehicles
with this feature, the brake light
switch, and important exterior lights,
including wiring and fuses.Some messages may not require
immediate action, but you can
acknowledge that you received the
messages and to clear them
from the display by doing one of the
following:
Press the OK button on the base
level audio system.
Press the multifunction knob, if
your vehicle has this feature,
on the uplevel audio system.
Press the left thumbwheel, if your
vehicle has this feature, on the
steering wheel.
If there are several warning
messages, acknowledge them
one at a time.
4-36 Instruments and Controls
ProCarManuals.com
Page 113 of 314

Remote Door Unlock/Vehicle
Alert
OnStar Vehicle Diagnostic Email
GM Goodwrench On Demand
Diagnostics (if equipped)
OnStar Hands-Free Calling with
30 trial minutes
OnStar Virtual Advisor (U.S. Only)
OnStar Services Included with
Directions & Connections Plan
All Safe and Sound Plan Services
OnStar Turn-by-Turn Navigation
(If equipped) or Driving
Directions - Advisor delivered
RideAssist
Information and Convenience
Services
OnStar Hands-Free Calling
OnStar Hands-Free Calling allows
eligible OnStar subscribers to
make and receive calls using voice
commands. Hands-Free Calling
is fully integrated into the vehicle,
and can be used with OnStar
Pre-Paid Minute Packages. Most
vehicles include 30 trial minutes
good for 60 days. Hands-Free
Calling can also be linked to a
Verizon Wireless service plan in the
U.S. or a Bell Mobility service
plan in Canada, depending on
eligibility. To �nd out more, refer to
the OnStar Owner’s Guide in
the vehicle’s glove box, visit
onstar.com or onstar.ca, or speak
with an OnStar advisor by pressing
the OnStar button or calling
1-888-4-ONSTAR (1-888-466-7827).
OnStar Turn-by-Turn
Navigation
Vehicles with the OnStar
Turn-by-Turn Navigation system
can provide voice-guided driving
directions. Press the OnStar button
to have an OnStar advisor locate
a business or address and download
driving directions to the vehicle.
Voice-guided directions to the
desired destination will play
through the audio system speakers.
See the OnStar Owner’s Guide
for more information.
OnStar Virtual Advisor
OnStar Virtual Advisor is a feature of
OnStar Hands-Free Calling that uses
minutes to access location-based
weather, local traffic reports, and
stock quotes. Press the phone button
and give a few simple voice
commands to browse through the
various topics. See the OnStar
Owner’s Guide for more information.
This feature is only available in the
continental U.S.
Instruments and Controls 4-39
ProCarManuals.com
Page 119 of 314
Infotainment
Audio System(s)
Audio System(s).................6-1
Radio(s).............................6-2
Theft-Deterrent Feature.....6-23
Audio Steering Wheel
Controls..........................6-23
Radio Reception...............6-24
Fixed Mast Antenna..........6-24
Audio System(s)
Determine which radio the vehicle
has and read the following pages to
become familiar with its features.
{CAUTION
Taking your eyes off the road for
extended periods could cause a
crash resulting in injury or death
to you or others. Do not give
extended attention to
entertainment tasks while driving.
This system provides access to
many audio and non audio listings.
To minimize taking your eyes off
the road while driving, do the
following while the vehicle is parked:
Become familiar with the
operation and controls of
the audio system.
Set up the tone, speaker
adjustments, and preset radio
stations.For more information, seeDefensive
Driving on page 8-16.
Notice:Contact your
dealer/retailer before adding any
equipment.
Adding audio or communication
equipment could interfere
with the operation of the vehicle’s
engine, radio, or other systems,
and could damage them.
Follow federal rules covering
mobile radio and telephone
equipment.
Infotainment 6-1
ProCarManuals.com
Page 120 of 314
Radio(s)
System Operation
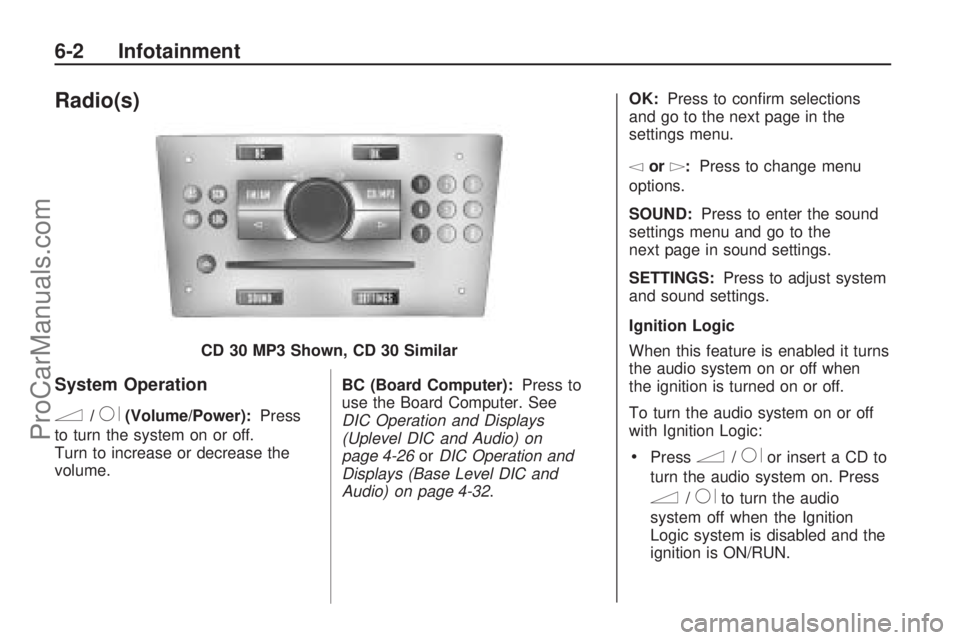
n/R(Volume/Power):Press
to turn the system on or off.
Turn to increase or decrease the
volume. BC (Board Computer):
Press to
use the Board Computer. See
DIC Operation and Displays
(Uplevel DIC and Audio) on
page 4-26 orDIC Operation and
Displays (Base Level DIC and
Audio) on page 4-32. OK:
Press to con�rm selections
and go to the next page in the
settings menu.
\or]: Press to change menu
options.
SOUND: Press to enter the sound
settings menu and go to the
next page in sound settings.
SETTINGS: Press to adjust system
and sound settings.
Ignition Logic
When this feature is enabled it turns
the audio system on or off when
the ignition is turned on or off.
To turn the audio system on or off
with Ignition Logic:
Pressn/Ror insert a CD to
turn the audio system on. Press
n/Rto turn the audio
system off when the Ignition
Logic system is disabled and the
ignition is ON/RUN.
CD 30 MP3 Shown, CD 30 Similar
6-2 Infotainment
ProCarManuals.com
Page 121 of 314
For vehicles with OnStar®, the
audio system will only turn off
if the ignition is OFF and OnStar
is not in use when the Ignition
Logic system is enabled.
The Ignition Logic is preset to turn
off the audio system when the
ignition is turned off. To enable or
disable Ignition Logic:
1. Press SETTINGS until Audio
displays.
2. Press
\until System displays.
3. Press OK until Ign. Logic
ON or Ign. Logic OFF displays.
4. Press
\or]to select the
setting. The setting is saved
automatically.
Press SETTINGS again to
move back one level in
the menu.
Press FM/AM, CD/MP3, or
BC to turn on that feature.Audio displays and the system
starts to play if SETTINGS, FM/AM,
CD/MP3, or BC is not pressed
within �ve seconds after the setting
is saved.
System Display
The following information shows on
the system display:
FM or AM, and the current
station frequency if the radio is
active.
The station name displays if RDS
is activated.
AS displays if the AS level is
activated.
CD displays, and the CD title
number or the CD title name
if the CD player is active.
MP3 displays if the CD is an
MP3 CD.
RDM displays if the CD is being
played in random mode.
The most recent selected audio
source plays when the audio system
is turned on and the display is lit.The outside temperature, time, and
date display when the audio
system is turned off and the ignition
is ON/RUN, seeDriver Information
Center (DIC) on page 4-25.
Audio Settings
The audio settings can be set for
each audio source and are
stored separately for each radio
station and the CD player.
Adjusting the Tone (Bass/Treble)
To adjust the Bass:
1. Press SOUND until Bass
appears.
2. Press
\or]to adjust the level
from -12 through +12. The
setting is saved automatically.
Press SETTINGS again to go
back one level in the menu.
Press FM/AM, CD/MP3, or BC to
display that function.
Infotainment 6-3
ProCarManuals.com
Page 122 of 314

Audio displays and the audio
system starts to play if SETTINGS,
FM/AM, CD/MP3, or BC is not
pressed within �ve seconds after
the setting is saved.
To adjust the Treble:
1. Press SOUND until Treble
appears.
2. Press
\or]to adjust the level
from -12 through +12. The
setting is saved automatically.
Press SETTINGS again to go
back one level in the menu.
Press FM/AM, CD/MP3, or BC to
display that function.Adjusting the Sound Settings
There are preset sound settings
designed for different types of music
To adjust the sound settings
using the SOUND button:
1. Press SOUND until Sound
appears.
2. Press
\or]to select between
Rock, Disco, Classic, Jazz,
Vocal, and Off. The setting is
saved automatically.
Press SETTINGS again to go
back one level in the menu.
Press FM/AM, CD/MP3, or BC to
display that function.
To adjust the sound settings using
the SETTINGS button:
1. Press SETTINGS until Audio
appears.
2. Press OK until Sound appears.3. Press
\or]to select between
Rock, Disco, Classic, Jazz,
Vocal, and Off. The setting is
saved automatically.
Press SETTINGS again to go
back one level in the menu.
Press FM/AM, CD/MP3, or BC to
display that function.
Adjusting the Speakers
(Balance/Fade)
To adjust the Balance using the
SOUND button:
1. Press SOUND until Balance
appears.
2. Press
\or]to adjust the level
from -12 through +12. The
setting is saved automatically.
Press SETTINGS again to go
back one level in the menu.
Press FM/AM, CD/MP3, or BC to
display that function.
6-4 Infotainment
ProCarManuals.com
Page 123 of 314
![SATURN ASTRA 2009 User Guide To adjust the Balance using the
SETTINGS button:
1. Press SETTINGS until Audio
appears.
2. Press OK until Balance appears.
3. Press
\or]to adjust the
level from -12 through +12.
The setting is saved
a SATURN ASTRA 2009 User Guide To adjust the Balance using the
SETTINGS button:
1. Press SETTINGS until Audio
appears.
2. Press OK until Balance appears.
3. Press
\or]to adjust the
level from -12 through +12.
The setting is saved
a](/img/68/58567/w960_58567-122.png)
To adjust the Balance using the
SETTINGS button:
1. Press SETTINGS until Audio
appears.
2. Press OK until Balance appears.
3. Press
\or]to adjust the
level from -12 through +12.
The setting is saved
automatically.
Press SETTINGS again to go
back one level in the menu.
Press FM/AM, CD/MP3, or BC to
display that function.
To adjust the Fade using the
SOUND button:
1. Press SOUND until Fader
appears.
2. Press
\or]to adjust the level
from -12 through +12. The
setting is saved automatically.
Press SETTINGS again to go
back one level in the menu.
Press FM/AM, CD/MP3, or BC to
display that function.To adjust the Fade using the
SETTINGS button:
1. Press SETTINGS until Audio
appears.
2. Press OK until Fader appears.
3. Press
\or]to adjust the level
from -12 through +12. The
setting is saved automatically.
Press SETTINGS again to go
back one level in the menu.
Press FM/AM, CD/MP3, or BC to
display that function.
Speed-Dependant Volume
Control (SDVC)
SDVC automatically adjusts the
volume to compensate for road and
wind noise as the vehicle increases
or decreases speed while driving.
To adjust SDVC:
1. Press SETTINGS until Audio
appears.
2. Press OK until SDVC appears.3. Press
\or]to adjust the level
from 0 through 5. The setting is
saved automatically.
Press SETTINGS again to go
back one level in the menu.
Press FM/AM, CD/MP3, or BC to
display that function.
OnStar
®Volume
For vehicles with OnStar, the OnStar
Volume is used to set the maximum
initial volume level for the OnStar
system when it is turned on.
To set OnStar Volume:
1. Press SETTINGS until Audio
appears.
2. Press OK until OnStar Vol.
appears.
3. Press
\or]to adjust the level
from -12 through 12. The setting
is saved automatically.
Press SETTINGS again to go
back one level in the menu.
Press FM/AM, CD/MP3, or BC to
display that function.
Infotainment 6-5
ProCarManuals.com