lock SATURN ION 2006 Repair Manual
[x] Cancel search | Manufacturer: SATURN, Model Year: 2006, Model line: ION, Model: SATURN ION 2006Pages: 392, PDF Size: 2.8 MB
Page 170 of 392

Adjusting the Speakers (Balance/Fade)
`
BAL/FADE (Balance/Fade):To adjust the balance
or fade, press this button or the tune knob until the
desired speaker control label appears on the display.
Turn the tune knob clockwise or counterclockwise to
adjust the setting. You can also adjust the setting by
pressing either the SEEK, FWD, or REV buttons.
Radio Messages
Calibration Error:The audio system has been
calibrated for your vehicle from the factory. If Calibration
Error appears on the display, it means that the radio
has not been con�gured properly for your vehicle and it
must be returned to your retailer for service.
Playing a CD (Single CD Player)
Insert a CD partway into the slot, label side up. The
player will pull it in and the CD should begin playing.
If the ignition or radio is turned off with a CD in the
player, it will stay in the player. When the ignition or
radio is turned on, the CD will start playing where
it stopped, if it was the last selected audio source.
When a CD is inserted, the CD symbol will appear on
the radio display. As each new track starts to play, the
track number will appear on the display.The CD player can play the smaller 3 inch (8 cm) single
CDs with an adapter ring. Full-size CDs and the
smaller CDs are loaded in the same manner.
If playing a CD-R, the sound quality may be reduced due
to CD-R quality, the method of recording, the quality of
the music that has been recorded, and the way the CD-R
has been handled. There may be an increase in skipping,
difficulty in �nding tracks, and/or difficulty in loading and
ejecting. If these problems occur, check the bottom
surface of the CD. If the surface of the CD is damaged,
such as cracked, broken, or scratched, the CD will not
play properly. If the surface of the CD is soiled, see
Care of Your CDs on page 3-71for more information.
If there is no apparent damage, try a known good CD.
Do not add any label to a CD, it could get caught in the
CD player. If a CD is recorded on a personal computer
and a description label is needed, try labeling the top of
the recorded CD with a marking pen instead.
Notice:If you add any label to a CD, insert more
than one CD into the slot at a time, or attempt to play
scratched or damaged CDs, you could damage the
CD player. When using the CD player, use only CDs
in good condition without any label, load one CD at a
time, and keep the CD player and the loading slot free
of foreign materials, liquids, and debris.
3-52
ProCarManuals.com
Page 173 of 392

Using the Auxiliary Input Jack
Your radio system has an auxiliary input jack located on
the lower right side of the faceplate. This is not an
audio output; do not plug the headphone set into the
front auxiliary input jack. You can however, connect
an external audio device such as an iPod, laptop
computer, MP3 player, CD changer, or cassette tape
player, etc. to the auxiliary input jack for use as another
source for audio listening.
To use a portable audio player, connect a 3.5 mm
(1/8 inch) cable to the radio’s front auxiliary input jack.
When a device is connected, press the radio CD/AUX
button to begin playing audio from the device over
the car speakers.
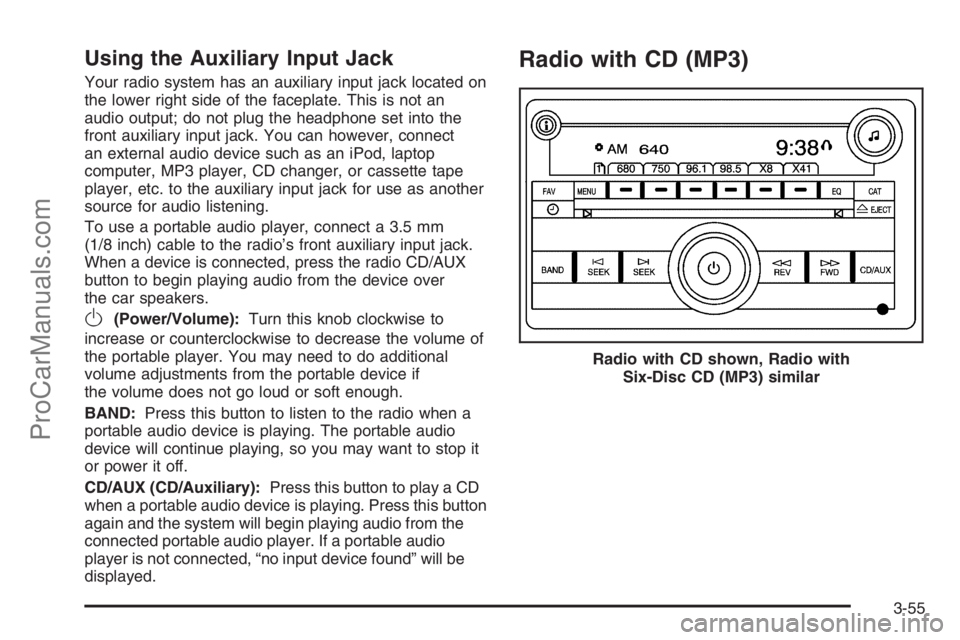
O(Power/Volume):Turn this knob clockwise to
increase or counterclockwise to decrease the volume of
the portable player. You may need to do additional
volume adjustments from the portable device if
the volume does not go loud or soft enough.
BAND:Press this button to listen to the radio when a
portable audio device is playing. The portable audio
device will continue playing, so you may want to stop it
or power it off.
CD/AUX (CD/Auxiliary):Press this button to play a CD
when a portable audio device is playing. Press this button
again and the system will begin playing audio from the
connected portable audio player. If a portable audio
player is not connected, “no input device found” will be
displayed.
Radio with CD (MP3)
Radio with CD shown, Radio with
Six-Disc CD (MP3) similar
3-55
ProCarManuals.com
Page 174 of 392

Radio Data System (RDS)
The audio system has a Radio Data System (RDS).
The RDS feature is available for use only on FM stations
that broadcast RDS information. This system relies
upon receiving speci�c information from these stations
and will only work when the information is available.
While the radio is tuned to an FM-RDS station,
the station name or call letters will appear on the display.
In rare cases, a radio station may broadcast incorrect
information that will cause the radio features to
work improperly. If this happens, contact the
radio station.
XM™ Satellite Radio Service
XM™ is a satellite radio service that is based in
the 48 contiguous United States and in Canada
(if available). XM™ offers over 100 coast-to-coast
channels including music, news, sports, talk,
traffic/weather, and children’s programming. XM™
provides digital quality audio and text information that
includes song title and artist name. A service fee is
required in order to receive the XM™ service. For more
information, contact XM™ at www.xmradio.com or
call 1-800-852-XMXM (9696).
Playing the Radio
O
(Power/Volume):Press this knob to turn the
system on and off.
Turn this knob clockwise to increase or counterclockwise
to decrease the volume.
Finding a Station
BAND:Press this button to switch between AM, FM, or
XM™ (if equipped). The display will show the selection.
f(Tune):Turn this knob to select radio stations.
©SEEK¨:Press the right or left SEEK arrow to go
to the next or to the previous station and stay there.
To scan stations, press and hold either SEEK arrow for a
few seconds until you hear a beep. The radio will go to a
station, play for a few seconds, then go on to the next
station. Press either SEEK arrow again to stop scanning.
The radio will only seek and scan stations with a strong
signal that are in the selected band.
3-56
ProCarManuals.com
Page 176 of 392

Setting the Tone (Bass/Treble)
BASS/MID/TREB (Bass, Midrange, or Treble):
To adjust bass, midrange, or treble, press the tune
knob until the tone control labels appear on the display.
Continue pressing to highlight the desired label, or
press the pushbutton positioned under the desired label.
Turn the tune knob clockwise or counterclockwise to
adjust the highlighted setting. You can also adjust
the highlighted setting by pressing either the SEEK,
FWD, or REV button until the desired levels are
obtained. If a station’s frequency is weak, or if there is
static, decrease the treble.
To quickly adjust bass, midrange, or treble to the middle
position, press the pushbutton positioned under the
BASS, MID, or TREB label for more than two seconds.
You will hear a beep and the level will be adjusted
to the middle position.
To quickly adjust all tone and speaker controls to the
middle position, press the tune knob for more than
two seconds until you hear a beep.
EQ (Equalization):Press this button to select preset
equalization settings.
To return to the manual mode, press the EQ button until
Manual appears on the display or start to manually adjust
the bass, midrange, or treble by pressing the tune knob.
Adjusting the Speakers (Balance/Fade)
BAL/FADE (Balance/Fade):To adjust balance or
fade, press the tune knob until the speaker control labels
appear on the display. Continue pressing to highlight
the desired label, or press the pushbutton positioned
under the desired label. Turn the tune knob clockwise or
counterclockwise to adjust the highlighted setting. You
can also adjust the highlighted setting by pressing either
the SEEK, FWD, or REV button until the desired
levels are obtained.
To quickly adjust balance or fade to the middle position,
press the pushbutton positioned under the BAL or FADE
label for more than two seconds. You will hear a beep
and the level will be adjusted to the middle position.
To quickly adjust all speaker and tone controls to the
middle position, press the tune knob for more than
two seconds until you hear a beep.
3-58
ProCarManuals.com
Page 178 of 392

XM™ Radio Messages
Radio Display
MessageCondition Action Required
XL (Explicit Language
Channels)XL on the radio display,
after the channel name,
indicates content with
explicit language.These channels, or any others, can be blocked at a
customer’s request, by calling 1-800-852-XMXM (9696).
XM Updating Updating
encryption codeThe encryption code in the receiver is being updated, and
no action is required. This process should take no longer
than 30 seconds.
No XM Signal Loss of signal The system is functioning correctly, but the vehicle is in a
location that is blocking the XM™ signal. When you move
into an open area, the signal should return.
Loading XM Acquiring channel audio
(after 4 second delay)The audio system is acquiring and processing audio and
text data. No action is needed. This message should
disappear shortly.
Channel Off Air Channel not in service This channel is not currently in service. Tune to another
channel.
Channel Unavail Channel no longer
availableThis previously assigned channel is no longer assigned.
Tune to another station. If this station was one of the
presets, choose another station for that preset button.
No Artist Info Artist Name/Feature
not availableNo artist information is available at this time on this
channel. The system is working properly.
No Title Info Song/Program Title
not availableNo song title information is available at this time on this
channel. The system is working properly.
3-60
ProCarManuals.com
Page 179 of 392

XM™ Radio Messages (cont’d)
Radio Display
MessageCondition Action Required
No CAT Info Category Name
not availableNo category information is available at this time on this
channel. The system is working properly.
No Information No Text/Informational
message availableNo text or informational messages are available at this
time on this channel. The system is working properly.
CAT Not Found No channel available for
the chosen categoryThere are no channels available for the selected category.
The system is working properly.
XM Theftlocked Theft lock active The XM™ receiver in the vehicle may have previously
been in another vehicle. For security purposes, XM™
receivers cannot be swapped between vehicles. If this
message appears after having your vehicle serviced, check
with your retailer.
XM Radio ID Radio ID label
(channel 0)If tuned to channel 0, this message will alternate with the
XM™ Radio eight digit radio ID label. This label is needed
to activate the service.
Unknown Radio ID not known
(should only be if
hardware failure)If this message is received when tuned to channel 0, there
may be a receiver fault. Consult with your retailer.
Check XM Receivr Hardware failure If this message does not clear within a short period of time,
the receiver may have a fault. Consult with your retailer.
XM Not Available XM Not Available If this message does not clear within a short period of time,
the receiver may have a fault. Consult with your retailer.
3-61
ProCarManuals.com
Page 188 of 392

Using the Auxiliary Input Jack
Your radio system has an auxiliary input jack located on
the lower right side of the faceplate. This is not an audio
output; do not plug the headphone set into the front
auxiliary input jack. You can however, connect an
external audio device such as an iPod, laptop computer,
MP3 player, CD changer, or cassette tape player, etc. to
the auxiliary input jack for use as another source for audio
listening.
To use a portable audio player, connect a 3.5 mm
(1/8 inch) cable to the radio’s front auxiliary input jack.
When a device is connected, press the radio CD/AUX
button to begin playing audio from the device over
the car speakers.
O(Power/Volume):Turn this knob clockwise to
increase or counterclockwise to decrease the volume of
the portable player. You may need to do additional
volume adjustments from the portable device if the
volume does not go loud or soft enough.
BAND:Press this button to listen to the radio when a
portable audio device is playing. The portable audio
device will continue playing, so you may want to stop it or
power it off.
CD/AUX (CD/Auxiliary):Press this button to play a CD
when a portable audio device is playing. Press this button
again and the system will begin playing audio from the
connected portable audio player. If a portable audio
player is not connected, “no input device found” will be
displayed.
Radio Reception
You may experience frequency interference and static
during normal radio reception if items such as cellphone
chargers, vehicle convenience accessories, and
external electronic devices are plugged into the
accessory power outlet. If there is interference or static,
unplug the item from the accessory power outlet.
AM
The range for most AM stations is greater than for FM,
especially at night. The longer range can cause station
frequencies to interfere with each other. For better radio
reception, most AM radio stations will boost the power
levels during the day, and then reduce these levels during
the night. Static can also occur when things like storms
and power lines interfere with radio reception. When this
happens, try reducing the treble on your radio.
FM Stereo
FM stereo will give the best sound, but FM signals
will reach only about 10 to 40 miles (16 to 65 km).
Tall buildings or hills can interfere with FM signals,
causing the sound to fade in and out.
3-70
ProCarManuals.com
Page 191 of 392

Your Driving, the Road, and Your Vehicle..........4-2
Defensive Driving...........................................4-2
Drunken Driving.............................................4-3
Control of a Vehicle........................................4-5
Braking.........................................................4-6
Anti-Lock Brake System (ABS).........................4-7
Braking in Emergencies...................................4-9
Enhanced Traction System (ETS).....................4-9
Limited-Slip Differential..................................4-10
Steering......................................................4-11
Off-Road Recovery.......................................4-13
Passing.......................................................4-14
Loss of Control.............................................4-15
Racing or Other Competitive Driving................4-16
Driving at Night............................................4-17Driving in Rain and on Wet Roads..................4-18
City Driving..................................................4-20
Freeway Driving...........................................4-21
Before Leaving on a Long Trip.......................4-22
Highway Hypnosis........................................4-23
Hill and Mountain Roads................................4-24
Winter Driving..............................................4-26
If Your Vehicle is Stuck in Sand, Mud,
Ice, or Snow.............................................4-30
Rocking Your Vehicle to Get It Out.................4-31
Loading Your Vehicle....................................4-31
Towing..........................................................4-36
Towing Your Vehicle.....................................4-36
Recreational Vehicle Towing...........................4-36
Towing a Trailer...........................................4-39
Section 4 Driving Your Vehicle
4-1
ProCarManuals.com
Page 197 of 392

Anti-Lock Brake System (ABS)
Your vehicle may have the Anti-Lock Brake System
(ABS), an advanced electronic braking system that will
help prevent a braking skid.
If your vehicle has ABS,
this warning light on the
instrument panel will
come on brie�y when
you start your vehicle.
When you start your engine, or when you begin to drive
away, your ABS will check itself. You may hear a
momentary motor or clicking noise while this test is
going on, and you may even notice that your brake
pedal moves or pulses a little. This is normal.Let us say the road is wet and you are driving safely.
Suddenly, an animal jumps out in front of you. You slam
on the brakes and continue braking. Here is what
happens with ABS:
A computer senses that wheels are slowing down. If
one of the wheels is about to stop rolling, the computer
will separately work the brakes at each wheel.
4-7
ProCarManuals.com
Page 198 of 392

ABS can change the brake pressure faster than any
driver could. The computer is programmed to make the
most of available tire and road conditions. This can
help you steer around the obstacle while braking hard.
As you brake, your computer keeps receiving updates
on wheel speed and controls braking pressure
accordingly.Remember: ABS not change the time you need to get
your foot up to the brake pedal or always decrease
stopping distance. If you get too close to the vehicle in
front of you, you will not have time to apply your
brakes if that vehicle suddenly slows or stops. Always
leave enough room up ahead to stop, even though
you have ABS.
Using ABS
Do not pump the brakes. Just hold the brake pedal
down �rmly and let anti-lock work for you. You may feel
a slight brake pedal pulsation or notice some noise,
but this is normal.
4-8
ProCarManuals.com