clock SATURN RELAY 2005 User Guide
[x] Cancel search | Manufacturer: SATURN, Model Year: 2005, Model line: RELAY, Model: SATURN RELAY 2005Pages: 446, PDF Size: 3.03 MB
Page 348 of 446

To replace one of these bulbs, do the following:
1. Open the hood. SeeHood Release on page 5-11
for more information.
2. Remove the headlamp retainer pin (A) by turning it
towards the headlamp assembly and pulling it
straight out.3. Remove the screw (B) from the top of the headlamp
assembly.
4. Pull the assembly away from the vehicle.
5. Disconnect the socket wiring harness connector
from the headlamp assembly.
6. Turn the bulb socket counterclockwise to remove
from the assembly.
7. To replace a headlamp bulb, disconnect the bulb
socket wiring harness and connect to the new bulb
socket.
To replace a sidemarker bulb, pull the old bulb out
and push a new bulb in.
8. Reinstall the bulb socket by inserting into the bulb
assembly and turning it clockwise to secure.
9. Reverse the steps to reinstall the headlamp
assembly.
5-48
ProCarManuals.com
Page 349 of 446

Front Turn Signal, Parking and
Daytime Running Lamps (DRL)
To replace one of these bulbs (A), do the following:
1. Follow the Steps 1 through 4 to remove the
headlamp assembly. SeeHeadlamps and
Sidemarker Lamps on page 5-47for more
information.
2. Turn the bulb socket counterclockwise to remove
from the assembly.
3. Pull the old bulb out from the bulb socket.
4. Replace with a new bulb
5. Reinstall the bulb socket by inserting into the bulb
assembly and turning it clockwise to secure.
6. Reverse the steps to reinstall the headlamp
assembly.
Taillamps, Turn Signal, Stoplamps
and Back-up Lamps
To change a stoplamp/taillamp, turn signal or back-up
lamp bulb, do the following:
1. Open the liftgate. SeeLiftgate on page 2-21for
more information.
2. Remove the two
screws from the
taillamp housing on the
inboard side.
3. Pull out the taillamp housing.
4. Disconnect the wiring harness connector from the
taillamp assembly.
5-49
ProCarManuals.com
Page 350 of 446

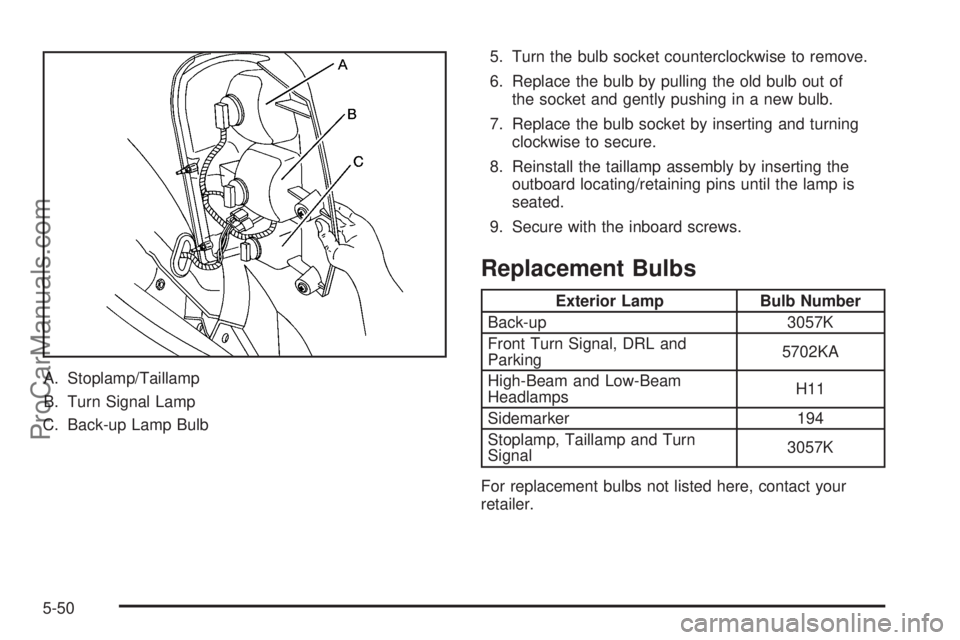
A. Stoplamp/Taillamp
B. Turn Signal Lamp
C. Back-up Lamp Bulb5. Turn the bulb socket counterclockwise to remove.
6. Replace the bulb by pulling the old bulb out of
the socket and gently pushing in a new bulb.
7. Replace the bulb socket by inserting and turning
clockwise to secure.
8. Reinstall the taillamp assembly by inserting the
outboard locating/retaining pins until the lamp is
seated.
9. Secure with the inboard screws.
Replacement Bulbs
Exterior Lamp Bulb Number
Back-up 3057K
Front Turn Signal, DRL and
Parking5702KA
High-Beam and Low-Beam
HeadlampsH11
Sidemarker 194
Stoplamp, Taillamp and Turn
Signal3057K
For replacement bulbs not listed here, contact your
retailer.
5-50
ProCarManuals.com
Page 371 of 446

4. Remove the jack (A) and jacking tools (E) by
loosening and then removing the wing nut (D)
and bracket (C).
5. Separate the plastic pouch from the jack and
remove the jacking tools, including the folding
wrench and extension, from the pouch.
The tools you will be using include the jack (A),
extension (B), and folding wrench (C).
The compact spare tire is located under the rear of the
vehicle. SeeCompact Spare Tire on page 5-87for
more information about the compact spare.To remove the compact spare tire, do the following:
A. Hoist Shaft
B. Hoist Assembly
C. Retainer
D. Compact
Spare TireE. Extension
(Chisel End)
F. Folding Wrench
1. Attach the folding wrench (F) to the extension (E)
and insert the chisel end on an angle through the
hole in the rear bumper and into the hoist shaft (A).
2. Turn the folding wrench counterclockwise to lower
the compact spare tire (D) to the ground. Continue
to turn the wrench so the compact spare tire
can be pulled out from under the vehicle.
5-71
ProCarManuals.com
Page 372 of 446

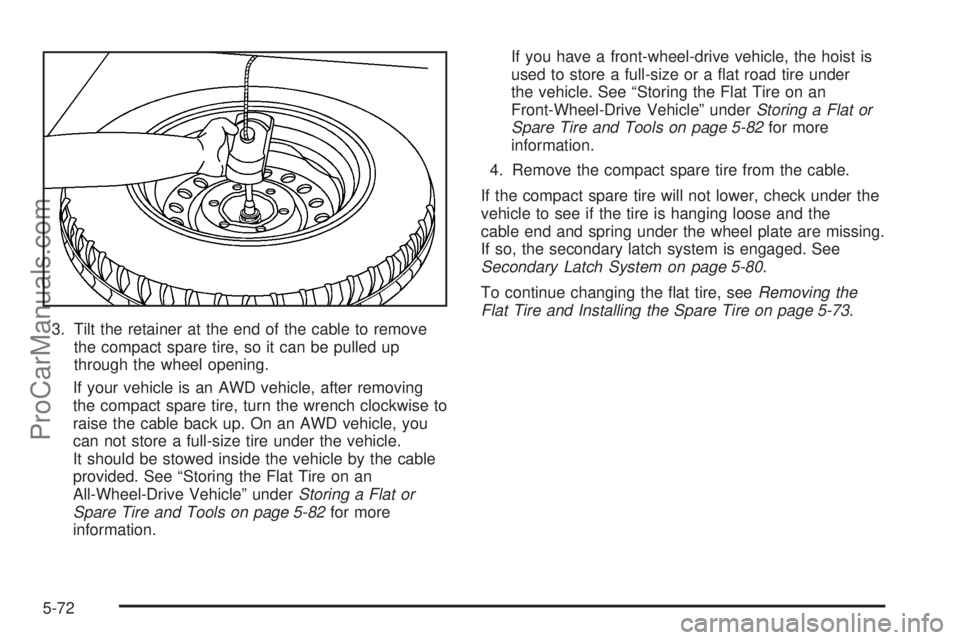
3. Tilt the retainer at the end of the cable to remove
the compact spare tire, so it can be pulled up
through the wheel opening.
If your vehicle is an AWD vehicle, after removing
the compact spare tire, turn the wrench clockwise to
raise the cable back up. On an AWD vehicle, you
can not store a full-size tire under the vehicle.
It should be stowed inside the vehicle by the cable
provided. See “Storing the Flat Tire on an
All-Wheel-Drive Vehicle” underStoring a Flat or
Spare Tire and Tools on page 5-82for more
information.If you have a front-wheel-drive vehicle, the hoist is
used to store a full-size or a �at road tire under
the vehicle. See “Storing the Flat Tire on an
Front-Wheel-Drive Vehicle” underStoring a Flat or
Spare Tire and Tools on page 5-82for more
information.
4. Remove the compact spare tire from the cable.
If the compact spare tire will not lower, check under the
vehicle to see if the tire is hanging loose and the
cable end and spring under the wheel plate are missing.
If so, the secondary latch system is engaged. See
Secondary Latch System on page 5-80.
To continue changing the �at tire, seeRemoving the
Flat Tire and Installing the Spare Tire on page 5-73.
5-72
ProCarManuals.com
Page 373 of 446

Removing the Flat Tire and
Installing the Spare Tire
If the wheel has a center cap, use the handle of the
folding wrench to pry it off. Then, with the other end of
the folding wrench, loosen the nuts.
If your vehicle has the plastic bolt-on wheel covers,
loosen the bolts completely using the folding wrench,
and remove the wheel cover.Once the center cap and/or wheel cover are removed,
use the following steps to remove the �at tire and install
the spare tire.
1. Loosen the wheel nuts
using the folding
wrench, but do not
remove them.
Turn the handle
counterclockwise about
180 degrees, then
�ip the handle back to
the starting position.
This avoids taking
the wrench off the lug
nut for each turn.
5-73
ProCarManuals.com
Page 375 of 446

{CAUTION:
Getting under a vehicle when it is jacked up is
dangerous. If the vehicle slips off the jack you
could be badly injured or killed. Never get
under a vehicle when it is supported only by
a jack.
{CAUTION:
Raising your vehicle with the jack improperly
positioned can damage the vehicle and even
make the vehicle fall. To help avoid personal
injury and vehicle damage, be sure to �t the
jack lift head into the proper location before
raising the vehicle.5. Attach the folding wrench (A) to the jack (B), and
turn the wrench clockwise to raise the jack head
approximately 3 inches (7.6 cm).
5-75
ProCarManuals.com
Page 376 of 446

6. Raise the vehicle by turning the folding wrench
clockwise in the jack. Raise the vehicle far
enough off the ground so there is enough room
for the compact spare tire to �t under the
wheel well.
7. Remove all the wheel nuts and take off the �at tire.
{CAUTION:
Rust or dirt on the wheel, or on the parts to
which it is fastened, can make the wheel nuts
become loose after a time. The wheel could
come off and cause an accident. When you
change a wheel, remove any rust or dirt from
the places where the wheel attaches to the
vehicle. In an emergency, you can use a cloth
or a paper towel to do this; but be sure to use
a scraper or wire brush later, if you need to, to
get all the rust or dirt off.
5-76
ProCarManuals.com
Page 378 of 446

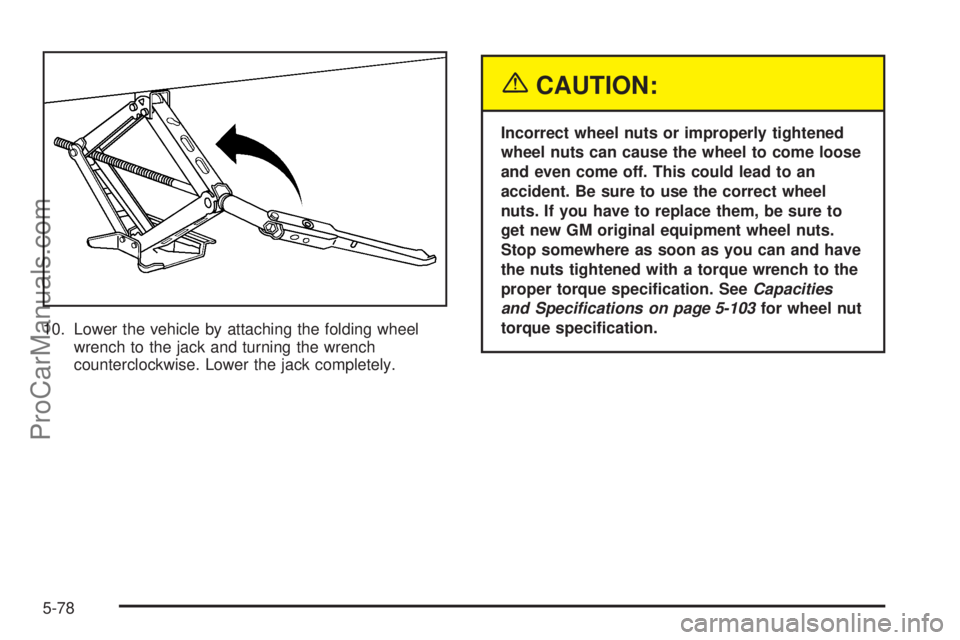
10. Lower the vehicle by attaching the folding wheel
wrench to the jack and turning the wrench
counterclockwise. Lower the jack completely.
{CAUTION:
Incorrect wheel nuts or improperly tightened
wheel nuts can cause the wheel to come loose
and even come off. This could lead to an
accident. Be sure to use the correct wheel
nuts. If you have to replace them, be sure to
get new GM original equipment wheel nuts.
Stop somewhere as soon as you can and have
the nuts tightened with a torque wrench to the
proper torque speci�cation. SeeCapacities
and Specifications on page 5-103for wheel nut
torque speci�cation.
5-78
ProCarManuals.com
Page 381 of 446

To release the spare tire from the secondary latch, do
the following:
1. Place the jack under the vehicle, ahead of the rear
bumper. Position the center lift point of the jack
under the center of the compact spare tire.
2. Turn the folding wrench clockwise to raise the jack
until it lifts the secondary latch device under the
wheel plate.
3. Keep raising the jack until the compact spare tire
stops moving upward and is held �rmly in place.
This lets you know that the secondary latch
has released.4. Lower the jack by turning the folding wrench
counterclockwise. Keep lowering the jack until
the compact spare tire is resting on the folding
wrench.
5. Grasp the compact spare tire with both hands and
pull it out from under the vehicle.
6. Reach under the vehicle and remove the folding
wrench and jack.
Have the hoist assembly inspected as soon as you can.
You will not be able to store a spare or �at tire using
the hoist assembly until it has been repaired or replaced.
5-81
ProCarManuals.com