language SATURN RELAY 2006 Owners Manual
[x] Cancel search | Manufacturer: SATURN, Model Year: 2006, Model line: RELAY, Model: SATURN RELAY 2006Pages: 462, PDF Size: 3.06 MB
Page 2 of 462
SATURN, SATURN Emblem, and the name RELAY are
registered trademarks of Saturn Corporation. GENERAL
MOTORS and GM are registered trademarks of
General Motors Corporation.
This manual includes the latest information at the time it
was printed. We reserve the right to make changes
after that time without further notice.
Keep this manual in the vehicle, so it will be there if it is
needed while you are on the road. If the vehicle is
sold, leave this manual in the vehicle.
Canadian Owners
A French language copy of this manual can be obtained
from your dealer or from:
Helm, Incorporated
P.O. Box 07130
Detroit, MI 48207
How to Use This Manual
Many people read the owner manual from beginning to
end when they �rst receive their new vehicle. If this
is done, it can help you learn about the features
and controls for the vehicle. Pictures and words work
together in the owner manual to explain things.
Index
A good place to quickly locate information about the
vehicle is the Index in the back of the manual. It is an
alphabetical list of what is in the manual and the
page number where it can be found.
Litho in U.S.A.
Part No. 06RELAY A First Printing
©2005 General Motors Corporation. All Rights Reserved.
ii
ProCarManuals.com
Page 194 of 462
DIC Operation and Displays
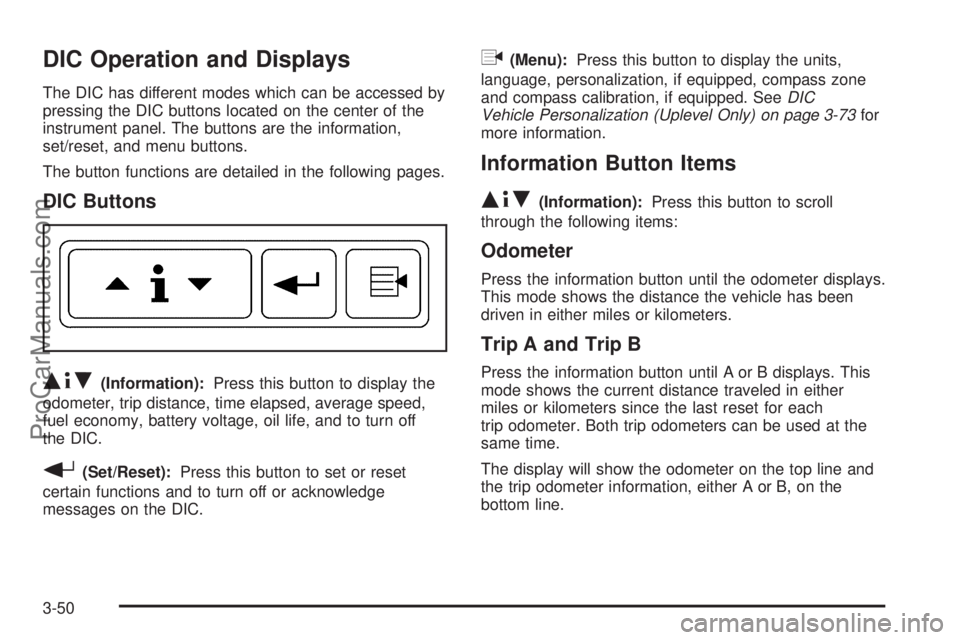
The DIC has different modes which can be accessed by
pressing the DIC buttons located on the center of the
instrument panel. The buttons are the information,
set/reset, and menu buttons.
The button functions are detailed in the following pages.
DIC Buttons
Q4R(Information):Press this button to display the
odometer, trip distance, time elapsed, average speed,
fuel economy, battery voltage, oil life, and to turn off
the DIC.
r(Set/Reset):Press this button to set or reset
certain functions and to turn off or acknowledge
messages on the DIC.
q(Menu):Press this button to display the units,
language, personalization, if equipped, compass zone
and compass calibration, if equipped. SeeDIC
Vehicle Personalization (Uplevel Only) on page 3-73for
more information.
Information Button Items
Q4R
(Information):Press this button to scroll
through the following items:
Odometer
Press the information button until the odometer displays.
This mode shows the distance the vehicle has been
driven in either miles or kilometers.
Trip A and Trip B
Press the information button until A or B displays. This
mode shows the current distance traveled in either
miles or kilometers since the last reset for each
trip odometer. Both trip odometers can be used at the
same time.
The display will show the odometer on the top line and
the trip odometer information, either A or B, on the
bottom line.
3-50
ProCarManuals.com
Page 198 of 462
Menu Button Items
q
(Menu):Press this button to scroll through the
following items:
Units
Press the menu button until UNITS displays. This mode
allows you to select between English or Metric units
of measurement. Once in this mode, press the set/reset
button to select between ENGLISH or METRIC.
Language
Press the menu button until the language screen
displays. This mode allows you to select the language
in which the DIC messages will appear. Once in
this mode, press the set/reset button to select among
the following choices:
English
Francais (French)
Espanol (Spanish)
Personalization (Uplevel Only)
Press the menu button until PERSONAL PROGRAM
displays. Your vehicle may have personalization
capabilities that allow you to program certain features to
a preferred setting for up to two drivers.
Your vehicle may also have customization capabilities
that allow you to program certain features to one
preferred setting. Customization features can only be
programmed to one setting on the vehicle and cannot be
programmed to a preferred setting for up to two drivers.
SeeDIC Vehicle Personalization (Uplevel Only) on
page 3-73for additional information on personal
programming.
Compass Zone (Uplevel Only)
Press the menu button until COMPASS ZONE displays.
Press the set/reset button to change the compass
zone. Zones 1 through 15 are available. The direction
the vehicle is moving will be displayed in the top
right corner of the DIC display.
3-54
ProCarManuals.com
Page 233 of 462

Radio Messages
CAL ERR (Calibration Error):The audio system has
been calibrated for your vehicle from the factory. If
CAL ERR appears on the display, it means that the radio
has not been con�gured properly for your vehicle and
must be returned to your retailer for service.LOCKED:This message is displayed when the
THEFTLOCK
®system has locked up. Take the vehicle
to your retailer for service.
If any error occurs repeatedly or if an error cannot be
corrected, contact your retailer. If the radio displays
an error message, write it down and provide it to your
retailer when reporting the problem.
XM™ Radio Messages
Radio Display
MessageCondition Action Required
XL (Explicit Language
Channels)XL on the radio display,
after the channel name,
indicates content with
explicit language.These channels, or any others, can be blocked at a
customer’s request, by calling 1-800-852-XMXM (9696).
Updating Updating encryption code The encryption code in the receiver is being updated, and
no action is required. This process should take no longer
than 30 seconds.
No Signal Loss of signal The system is functioning correctly, but the vehicle is in a
location that is blocking the XM™ signal. When you move
into an open area, the signal should return.
Loading XM Acquiring channel audio
(after 4 second delay)The audio system is acquiring and processing audio and
text data. No action is needed. This message should
disappear shortly.
3-89
ProCarManuals.com
Page 254 of 462
s(Play/Pause):Press this button to start play of a
disc. Press this button while a disc is playing to
pause it. Press it again to continue playing the disc.
t(Prior Chapter/Track):Press this button to go to
the beginning of the current chapter or track. Press
this button again to return to the previous chapter
or track. This button may not work when the DVD is
playing the copyright information or previews.
u(Next Chapter/Track):Press this button to go to
the beginning of the next chapter or track. This
button may not work when the DVD is playing the
copyright information or the previews.
r(Fast Reverse):Press this button to fast reverse
the DVD and CD. To stop reversing, press the play
or stop button. This button may not work when the DVD
is playing the copyright information or the previews.
[(Fast Forward):Press this button to fast forward
the DVD and CD. To stop fast forwarding, press the play
or stop button. This button may not work when the
DVD is playing the copyright information or the previews.
e(Sound):Press this button to display the current
audio track. Each press will move the DVD to the next
language or commentary. The format and content of
this function will vary for each disc.
{(Subtitles):Press this button to display the current
subtitles. Each press of this button will move the
DVD to the next available subtitle option (English,
Spanish, French, etc., if available). The format
and content of this function will vary for each disc.
AUX (Auxiliary):Press this button to switch the system
between the DVD player and an auxiliary source.
d(Camera):Press this button to display the current
camera angle on DVDs that have this feature. Each
press will move the DVD to the next available camera
angle. The format and content of this function will
vary for each disc.
0 through 9 (Numeric Keypad):The numeric keypad
provides the capability of direct chapter or track
number selection.
\(Clear):Press this button within two seconds after
inputting a numeric selection, to clear all numeric
inputs.
}10 (Multiple Digit Entries):Press this button to
select chapter or track numbers greater than nine. Press
this button before inputting the number.
3-110
ProCarManuals.com
Page 255 of 462
RSE On-Screen Display (OSD) Menu
To use the RSE OSD menu when using a DVD or an
auxiliary device, do the following:
To access this menu, press the display button on the
remote control. Once the menu is on the screen, use the
directional arrows and the enter button to navigate the
screen. This menu will let you select default preferences
for video format, language preference, brightness,
color, contrast, and tint. Not all DVDs support all the
feature defaults in the setup menus. If a feature is not
supported, the defaults will be provided by the DVD
media. To exit this menu, press the display or the return
button on the remote control or wait for the menu to
time out.
The default language selection will apply to all
future DVDs.
To use the RSE OSD menu when using a CD or an
MP3, do the following:
Make sure that a CD or an MP3 is loaded in the RSE
system and that the system is not in auxiliary, then press
the display button on the remote control. Once the
menu is on the screen, use the directional arrows and
the enter button to navigate the screen. This menu
will let you select default preferences for language and
playback settings. To exit this menu, press the
display or the return button on the remote control or
wait for the menu to time out.
Battery Replacement
To change the remote control batteries, do the following:
1. Slide the battery door, located on the back of the
remote control, down.
2. Replace the two AA batteries in the compartment.
Make sure that they are installed correctly, using
the diagram on the inside of the battery
compartment.
3. Close the battery door.
If the remote control is to be stored for a long period of
time, remove the batteries and keep them in a cool,
dry place.
3-111
ProCarManuals.com
Page 256 of 462
Tips and Troubleshooting Chart
Problem Recommended Action
No power. The ignition may not be
in ACCESSORY, RUN,
or RAP.
Disc will not play. The system might be off.
The parental control
button might have been
pressed. The power
indicator lights will �ash.
The system might be in
auxiliary source mode.
Press the AUX button to
switch between the DVD
player and the auxiliary
source. The disc is upside
down or is not compatible.
No sound — Wireless
HeadphonesTurn the headphones on.
Make sure the correct
channel is selected on the
wireless headphones.
Check the batteries. The
volume on the
headphones could be too
low, adjust the volume.
No sound — Wired
HeadphonesMake sure the wired
headphones are plugged
in. Adjust the volume. If
RSA is on, DVD audio will
not be heard.
Problem Recommended Action
No sound — Vehicle
SpeakersIf the DVD system is
being heard through the
vehicle speakers, adjust
the volume on the radio.
Press the CD AUX button
on the radio to make sure
that RSE is enabled. The
rear speakers will mute
when RSA is on.
The picture is distorted
during fast forward or
reverse.This is normal for this
operation.
The picture does not �ll the
screen. There are black
borders on the top and
bottom or on both sides or
it looks stretched out.Video mode may not be
correctly set. See “RSE
OSD” earlier in this
section.
I ejected the disc and tried
to take it out, but it was
pulled back into the slot.Press the eject
button once.
The language in the audio
or on the screen is wrong.Press the main menu
button on the remote
control and change the
audio or language
selection on the DVD
menu. To change the
language preference,
press the display button to
access the RSE OSD
menu. See “RSE OSD”
earlier in this section.
3-112
ProCarManuals.com