remote control SATURN RELAY 2006 Owners Manual
[x] Cancel search | Manufacturer: SATURN, Model Year: 2006, Model line: RELAY, Model: SATURN RELAY 2006Pages: 462, PDF Size: 3.06 MB
Page 1 of 462

Seats and Restraint Systems........................... 1-1
Front Seats
............................................... 1-2
Rear Seats
............................................... 1-6
Safety Belts
.............................................1-22
Child Restraints
.......................................1-42
Airbag System
.........................................1-65
Restraint System Check
............................1-79
Features and Controls..................................... 2-1
Keys
........................................................ 2-3
Doors and Locks
......................................2-11
Windows
.................................................2-26
Theft-Deterrent Systems
............................2-29
Starting and Operating Your Vehicle
...........2-33
Mirrors
....................................................2-43
OnStar
®System
......................................2-44
Universal Home Remote System
................2-46
Storage Areas
.........................................2-50
Instrument Panel............................................. 3-1
Instrument Panel Overview
.......................... 3-4
Climate Controls
......................................3-26
Warning Lights, Gages, and Indicators
........3-33
Driver Information Center (DIC)
..................3-49
Audio System(s)
.......................................3-81Driving Your Vehicle....................................... 4-1
Your Driving, the Road, and Your Vehicle
..... 4-2
Towing
...................................................4-38
Service and Appearance Care.......................... 5-1
Service
..................................................... 5-3
Fuel
......................................................... 5-4
Checking Things Under the Hood
...............5-10
All-Wheel Drive
........................................5-46
Bulb Replacement
....................................5-48
Windshield Wiper Blade Replacement
.........5-52
Tires
......................................................5-53
Appearance Care
.....................................5-88
Vehicle Identi�cation
.................................5-96
Electrical System
......................................5-96
Capacities and Speci�cations
...................5-103
Maintenance Schedule..................................... 6-1
Maintenance Schedule
................................ 6-2
Customer Assistance and Information.............. 7-1
Customer Assistance and Information
........... 7-2
Reporting Safety Defects
...........................7-11
Index................................................................ 1
2006 Saturn RELAY Owner ManualM
ProCarManuals.com
Page 87 of 462

Keys...............................................................2-3
Remote Keyless Entry System.........................2-4
Remote Keyless Entry System Operation...........2-5
Doors and Locks............................................2-11
Door Locks..................................................2-11
Power Door Locks........................................2-12
Delayed Locking...........................................2-13
Automatic Door Lock.....................................2-14
Programmable Automatic Door Unlock.............2-14
Lockout Protection........................................2-14
Dual Sliding Doors........................................2-14
Power Sliding Door (PSD)..............................2-17
Liftgate........................................................2-24
Windows........................................................2-26
Power Windows............................................2-27
Manual Rear Quarter Windows.......................2-27
Power Rear Quarter Windows........................2-28
Sun Visors...................................................2-28
Theft-Deterrent Systems..................................2-29
Content Theft-Deterrent.................................2-29
PASS-Key
®III ..............................................2-31
PASS-Key®III Operation...............................2-31Starting and Operating Your Vehicle................2-33
New Vehicle Break-In....................................2-33
Ignition Positions..........................................2-33
Retained Accessory Power (RAP)...................2-34
Starting the Engine.......................................2-34
Engine Coolant Heater..................................2-35
Automatic Transaxle Operation.......................2-36
Parking Brake..............................................2-39
Shifting Into Park (P).....................................2-40
Shifting Out of Park (P).................................2-41
Parking Over Things That Burn.......................2-41
Engine Exhaust............................................2-42
Running the Engine While Parked...................2-42
Mirrors...........................................................2-43
Outside Power Mirrors...................................2-43
Outside Convex Mirror...................................2-44
Outside Heated Mirrors..................................2-44
OnStar
®System.............................................2-44
Universal Home Remote System......................2-46
Universal Home Remote System Operation......2-47
Section 2 Features and Controls
2-1
ProCarManuals.com
Page 96 of 462

After two remote starts have been provided, the
vehicle’s ignition switch must be turned to RUN and
then back to LOCK using the key before the remote start
procedure can be used again.
If you enter the vehicle after a remote start, and the
engine is running, insert the key into the ignition switch
and turn it to the RUN position to drive the vehicle.
To manually shut off the engine after a remote start, do
any of the following:
Aim the remote keyless entry transmitter at the
vehicle and press the remote start button until
the parking lamps turn off.
Turn on the hazard warning �ashers.
Insert the vehicle’s key into the ignition switch and
turn the switch to RUN and then back to LOCK.
The remote vehicle start feature will not operate if:
The remote start system is disabled. See “REMOTE
START” underDIC Vehicle Personalization (Uplevel
Only) on page 3-73.
The vehicle’s key is in the ignition.
The vehicle’s hood, liftgate or doors are not closed.
The hazard warning �ashers are on.
There is an emission control system malfunction.
The engine coolant temperature is too high.
The oil pressure is low.
Two remote vehicle starts have already been
provided. The maximum number of remote starts or
remote start attempts between ignition cycles
with the key is two.
Remote Start Ready
If your vehicle does not have the remote vehicle start
feature, it may have the remote start ready feature. This
feature allows your retailer to add the manufacturer’s
remote vehicle start feature.
If the keyless entry transmitter has a plus (+) symbol on
the back cover, your vehicle has the remote start
ready feature. You can lock or unlock your vehicle from
approximately 197 feet (60 m) away.
See your dealer if you would like to add the
manufacturer’s remote vehicle start feature to your
vehicle.
2-10
ProCarManuals.com
Page 162 of 462

Interior Lamps Control
The interior lamp control is
located to the right of the
exterior lamp controls
on the instrument panel to
the left of the steering
column.
R(Interior Lamp Override):Turn the outer knob to
this position to have your interior lamps remain off
while any door is open.
1(Door):Turn the outer knob to this position to turn
the interior lamps on while any door is open and
when the ignition key is removed from the ignition.
+(Interior Lamps):Turn the outer knob to
this position to turn the interior lamps on.
Turn the inner knob to adjust the instrument panel
brightness, described earlier in this section.
Dome Lamp
The dome lamp is located in the headliner and has
two buttons to manually turn it on or off. The dome lamp
will come on each time you open a door, unless you
turn on the interior lamps override feature. SeeInterior
Lamps Control on page 3-18.
Entry Lighting
With entry lighting, the interior of your vehicle is
illuminated so that you can see inside before you enter
your vehicle. The lamps will come on for 20 seconds
if you unlock your door using your key or the remote
keyless entry transmitter and the ignition is in LOCK.
After 20 seconds have passed, the interior lamps
will slowly fade out. The lamps will turn off before the
20 seconds if you do one of the following:
Lock all the doors using the key.
Press lock on the power door lock switch.
Press lock on the remote keyless entry transmitter.
When any door is opened, entry lighting is cancelled.
The interior lamps will stay on while any door or
the liftgate is open, and slowly fade out when all doors
and the liftgate are closed.
3-18
ProCarManuals.com
Page 210 of 462

REDUCED POWER STOP WHEN SAFE
This message will display when your vehicle is in an
overheated engine operating mode. This operating mode
allows your vehicle to be driven to a safe place in an
emergency. In this mode, you will notice a signi�cant
loss in power and engine performance. SeeOverheated
Engine Protection Operating Mode on page 5-28for
more information. Anytime this message is on, the
vehicle should be taken to your retailer for service as
soon as possible.
This message will display and a chime will sound only
when the ignition is in RUN. Press any of the DIC
buttons to acknowledge this message and to clear it
from the screen.
This message will continue to display for two seconds if
it has not been acknowledged when the engine is
turned off. It will also re-display for two seconds if the
message has been acknowledged, but the condition still
exists when the engine is turned off.
If the condition still exists, the message will re-appear
when the engine is turned on.
REMOTE START DISABLED
This warning message will come on if a remote start
attempt is unsuccessful. This may be caused if any of
the following conditions are true when a remote
start attempt is made:
The remote start system is disabled through
the DIC.
The key is in the ignition.
The hood or the doors are not closed.
There is an emission control system malfunction.
The engine coolant temperature is too high.
The oil pressure is low.
The hazard warning �ashers are turned on.
The maximum number of remote starts or remote
start attempts between ignition cycles has been
reached.
The content theft-deterrent alarm is on while
attempting to remote start the vehicle.
See “REMOTE START” underDIC Vehicle
Personalization (Uplevel Only) on page 3-73and
“Remote Vehicle Start” underRemote Keyless Entry
System Operation on page 2-5for more information.
3-66
ProCarManuals.com
Page 246 of 462

CD Messages
CHECK CD:If this message appears on the display
and/or the CD comes out, it could be for one of the
following reasons:
It is very hot. When the temperature returns to
normal, the CD should play.
You are driving on a very rough road. When the
road becomes smoother, the CD should play.
The CD is dirty, scratched, wet, or upside down.
The air is very humid. If so, wait about an hour and
try again.
There may have been a problem while burning
the CD.
The label may be caught in the CD player.
If the CD is not playing correctly, for any other reason,
try a known good CD.
If any error occurs repeatedly or if an error cannot be
corrected, contact your retailer. If the radio displays
an error message, write it down and provide it to your
retailer when reporting the problem.
Navigation/Radio System
Your vehicle may have a navigation radio system.
The navigation system has built-in features intended to
minimize driver distraction. Technology alone, no
matter how advanced, can never replace your own
judgment. See the navigation system manual for some
tips to help you reduce distractions while driving.
Rear Seat Entertainment System
Your vehicle may have a DVD Rear Seat Entertainment
(RSE) system. The RSE system includes a DVD player, a
video display screen, auxiliary inputs, two sets of wireless
headphones (if included), and a remote control.
Parental Control
rj
(Parental Control):This button is located behind
the video screen, below the auxiliary jacks. Press this
button while using RSA, or when a DVD or CD is playing
to blank the video screen and to mute the audio. The
power indicator lights on the DVD player will �ash.
Turning on the parental control will also disable all other
button operations from the remote control and the
DVD player, except for the eject button. Press this
button again to restore operation of the RSA, DVD
player, and remote control.
3-102
ProCarManuals.com
Page 249 of 462

Stereo RCA Jacks
The RCA jacks are located behind the video screen on
the DVD console. The RCA jacks allow audio and
video signals to be connected from an auxiliary device
such as a camcorder or a video game unit to the
RSE. The yellow RCA jack is used for video inputs, the
red RCA jack for right audio inputs, and the white
RCA jack for left audio inputs. The system requires
standard RCA cables, not included, to connect the
auxiliary device to the RCA jacks. Refer to the
manufacturer’s instructions for proper usage.To use the auxiliary audio and video inputs, connect an
external auxiliary device such as a camcorder to the
RCA jacks and turn on both the auxiliary device power
and the power on the front of the RSE player.
If a disc is present when the RSE power is turned on,
the player will automatically begin playing the disc
and the user will need to press the AUX button on the
remote control or on the DVD player faceplate to switch
the system between the DVD player and the auxiliary
device. See “DVD Player” and “Remote Control” later in
this section for more information.
Audio Output
Audio from the DVD player or auxiliary devices can be
heard through the following possible sources:
Vehicle Speakers
Wireless Headphones
Wired Headphones (not included)
3-105
ProCarManuals.com
Page 250 of 462

Vehicle Speakers
Only one audio source can be heard through the
vehicle’s speakers at a time.
The RSE system or an auxiliary device can be heard
through all of the vehicle’s speakers when the following
occurs:
A DVD or auxiliary device is playing
The front audio system is on and the CD AUX
button is pressed to enable the RSE system
DVD will appear on the radio display when the RSE
system is on.
To turn the vehicles speakers on and off, press the CD
AUX button on the radio. The audio from the RSE
system can be heard through the wireless headphones
and the vehicles speakers at the same time. The
volume on the radio may vary when switching between
the radio, CD, DVD, MP3, or an auxiliary device.
Video Screen
The video screen is located in the overhead console.
To use the video screen, do the following:
1. Push forward on the release button and the screen
will fold down.
2. Adjust its position as desired.When the video screen is not in use, push it up into its
stowed and latched position.
Notice:Avoid directly touching the video screen,
as damage may occur. See “Cleaning the Video
Screen” later in this section for more information.
DVD Player
The DVD player is located in the overhead console.
The DVD player can be controlled by the buttons on the
DVD player and/or by the buttons on the remote
control. See “Remote Control” later in this section for
more information.
The RSE system DVD player is only compatible with
DVDs of the appropriate region code for the country that
the vehicle was sold. The DVD region code is printed
on the jacket of most DVDs.
Standard audio CDs, CD-R, CD-RW, enhanced CDs,
video CDs, and CD-ROM with MP3 media are supported
by this DVD player. DVD+R, DVD+RW, and copy
protected CDs may or may not be supported by the DVD
player. The DVD player does not support DVD-RAM,
DVD-ROM, DVD-R, DVD-R/W, and DVD audio media.
An error message will appear on the display if this type of
media is inserted into the DVD player.
If an error message appears on the video screen, see
“DVD Messages” later in this section.
3-106
ProCarManuals.com
Page 251 of 462

DVD Player Buttons
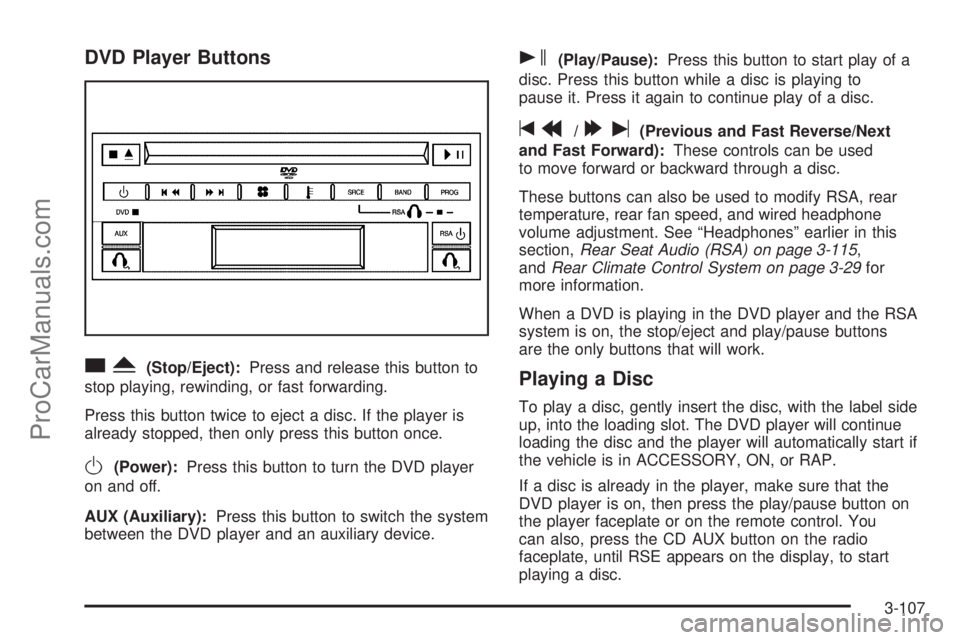
cY(Stop/Eject):Press and release this button to
stop playing, rewinding, or fast forwarding.
Press this button twice to eject a disc. If the player is
already stopped, then only press this button once.
O(Power):Press this button to turn the DVD player
on and off.
AUX (Auxiliary):Press this button to switch the system
between the DVD player and an auxiliary device.
s(Play/Pause):Press this button to start play of a
disc. Press this button while a disc is playing to
pause it. Press it again to continue play of a disc.
tr/[u(Previous and Fast Reverse/Next
and Fast Forward):These controls can be used
to move forward or backward through a disc.
These buttons can also be used to modify RSA, rear
temperature, rear fan speed, and wired headphone
volume adjustment. See “Headphones” earlier in this
section,Rear Seat Audio (RSA) on page 3-115,
andRear Climate Control System on page 3-29for
more information.
When a DVD is playing in the DVD player and the RSA
system is on, the stop/eject and play/pause buttons
are the only buttons that will work.
Playing a Disc
To play a disc, gently insert the disc, with the label side
up, into the loading slot. The DVD player will continue
loading the disc and the player will automatically start if
the vehicle is in ACCESSORY, ON, or RAP.
If a disc is already in the player, make sure that the
DVD player is on, then press the play/pause button on
the player faceplate or on the remote control. You
can also, press the CD AUX button on the radio
faceplate, until RSE appears on the display, to start
playing a disc.
3-107
ProCarManuals.com
Page 252 of 462

Some DVDs will not allow fast forwarding or skipping of
the copyright information or previews. Some DVDs
will begin playing after the previews have �nished. If the
DVD does not begin playing at the main title, refer to
the on-screen instructions.
Stopping and Resuming Playback
To stop playing a disc, press and release the stop
button on the DVD player faceplate or the remote
control.
To resume playback, press the play/pause button on
the DVD player faceplate or the remote control.
The movie should resume play from where it was last
stopped if the disc has not been ejected.
If the disc has been ejected, the disc will resume play at
the beginning of the disc.
Ejecting a Disc
Press the eject button on the DVD player faceplate,
when the disc is stopped, to eject the disc. There is not
an eject button on the remote control.
If a disc is ejected from the player, but not removed,
the DVD player will reload the disc after a short period
of time.
Remote Control
The RSE system will include a remote control (batteries
are included). To use the remote control, aim it at the
transmitter window next to the RSE faceplate and press
the desired button. Direct sunlight or very bright light
may affect the ability of the transmitter to receive signals
from the remote control. If the remote control does
not seem to be working, the batteries may need to be
replaced. See “Battery Replacement” later in this
section. Objects blocking the line of sight will affect the
function of the remote control.
Notice:Storing the remote control in a hot area or
in direct sunlight may damage it, and the repairs
will not be covered by your warranty. Keep the
remote control stored in a cool, dry place.
3-108
ProCarManuals.com