start stop button SATURN RELAY 2006 Owners Manual
[x] Cancel search | Manufacturer: SATURN, Model Year: 2006, Model line: RELAY, Model: SATURN RELAY 2006Pages: 462, PDF Size: 3.06 MB
Page 92 of 462
/(Remote Vehicle Start):If your vehicle has this
feature, you can start the engine from outside the
vehicle. See “Remote Vehicle Start” at the end of this
section for more detailed information.
Q(Lock):To lock all doors and the liftgate, press the
lock button on the remote keyless entry transmitter.
SeePower Door Locks on page 2-12for more details on
the power door lock features. If your vehicle has the
content theft-deterrent system, the remote keyless entry
transmitter’s lock button may arm the system. See
Content Theft-Deterrent on page 2-29for more details.
When you use the remote keyless entry transmitter
to lock your vehicle, the turn signal lamps may �ash to
let you know the command has been received. If
you press the lock button again, within �ve seconds, the
horn will sound and the turn signal lamps may �ash
to let you know the vehicle is already locked. See “FOB
LOCK FEEDBACK” underDIC Vehicle Personalization
(Uplevel Only) on page 3-73for additional information.
"(Unlock):When you press unlock on the remote
keyless entry transmitter, only the driver’s door
will unlock. If you press unlock again within �ve seconds,
all the doors and the liftgate will unlock. If you would
like all the doors to unlock the �rst time you press
unlock, see “FOB UNLOCK ON 1ST PRESS” underDIC
Vehicle Personalization (Uplevel Only) on page 3-73.
If your vehicle has the content theft-deterrent system,
the unlock button on the remote keyless entry
transmitter will disarm the system. SeeContent
Theft-Deterrent on page 2-29for more details.
When you use your remote keyless entry transmitter to
unlock your vehicle the turn signal lamps will �ash to
let you know the command was received.
L(Remote Alarm):When you press the horn button
on the remote keyless entry transmitter, the turn
signal lamps will �ash and the horn will sound. This will
allow you to attract attention, if needed.
Press this button again to stop the alarm from sounding.
2-6
ProCarManuals.com
Page 195 of 462
Each trip odometer can be reset to zero separately by
pressing the set/reset button while the desired trip
odometer is displayed.
There is also a retroactive trip odometer function that
performs the following for each trip odometer:
If the vehicle’s speed has exceeded 3 mph (5 km/h)
during the current ignition cycle, this function will
set the trip odometer to the distance driven
during the current ignition cycle.
If the vehicle’s speed has not exceeded 3 mph
(5 km/h), this function will set the trip odometer
to the distance driven during the previous ignition
cycle plus the distance driven during the current
ignition cycle.
Press and hold the set/reset button for three seconds,
then release the button. The retroactive trip odometer
value will be set into the currently displayed trip
odometer.
Time Elapsed
Press the information button until TIME ELAPSED :00
displays. This mode is like a stopwatch, in that you can
clock the time it takes to get from one point to another.
Each of the �elds for the hours, minutes, and seconds
are two numeric digits.
Once TIME ELAPSED :00 is displayed, press the
set/reset button to start the timing feature. Press the
set/reset button again to stop it. If you will be starting
and stopping your vehicle, during a trip for instance, the
TIME ELAPSED feature will automatically start timing
where it left off when you last stopped. To reset it, press
and hold the set/reset button for approximately
1.5 seconds. The display will return to zero.
Average Speed
Press the information button until AVERAGE SPEED
displays. This mode shows the average speed of the
vehicle in miles per hour (mph) or kilometers per hour
(km/h). This average is calculated based on the various
vehicle speed recorded since the last reset of this value.
To reset the value, press the information button to display
AVERAGE SPEED, then press and hold the set/reset
button. The display will return to zero.
3-51
ProCarManuals.com
Page 205 of 462
HOOD AJAR
If your vehicle has the remote start feature, this
message will display when the hood is not closed
properly. When this message appears, you should make
sure that the hood is closed completely. SeeHood
Release on page 5-11.
This message will display while the ignition is in RUN.
Press any of the DIC buttons to acknowledge this
message and to clear it from the screen.
This message will continue to display for two seconds if
it has not been acknowledged when the engine is
turned off. It will also re-display for two seconds if the
message has been acknowledged, but the condition still
exists when the engine is turned off.
If the condition still exists, the message will re-appear
when the engine is turned on.
KEY FOB BATTERY LOW
This message will display when the battery in the
remote keyless entry transmitter needs to be replaced.
To replace the battery, see “Battery Replacement”
underRemote Keyless Entry System Operation
on page 2-5.
This message will display while the ignition is in RUN.
Press any of the DIC buttons to acknowledge this
message and to clear it from the screen.This message will continue to display for two seconds if
it has not been acknowledged when the engine is
turned off. It will also re-display for two seconds if the
message has been acknowledged, but the condition still
exists when the engine is turned off.
If the condition still exists, the message will re-appear
when the engine is turned on.
KEY IN IGNITION
This message will display and a chime will sound
continuously when the driver’s door is open and the key
is in the ignition and in the accessory or off position.
This message cannot be acknowledged.
This message will disappear and the chiming will stop
when the key is removed from the ignition.
LEFT FRONT TURN LAMP OUT
This message will display when the left front turn signal
bulb needs to be replaced. SeeHeadlamps and
Sidemarker Lamps on page 5-48.
This message will display while the ignition is in RUN.
Press any of the DIC buttons to acknowledge this
message and to clear it from the screen.
3-61
ProCarManuals.com
Page 210 of 462
REDUCED POWER STOP WHEN SAFE
This message will display when your vehicle is in an
overheated engine operating mode. This operating mode
allows your vehicle to be driven to a safe place in an
emergency. In this mode, you will notice a signi�cant
loss in power and engine performance. SeeOverheated
Engine Protection Operating Mode on page 5-28for
more information. Anytime this message is on, the
vehicle should be taken to your retailer for service as
soon as possible.
This message will display and a chime will sound only
when the ignition is in RUN. Press any of the DIC
buttons to acknowledge this message and to clear it
from the screen.
This message will continue to display for two seconds if
it has not been acknowledged when the engine is
turned off. It will also re-display for two seconds if the
message has been acknowledged, but the condition still
exists when the engine is turned off.
If the condition still exists, the message will re-appear
when the engine is turned on.
REMOTE START DISABLED
This warning message will come on if a remote start
attempt is unsuccessful. This may be caused if any of
the following conditions are true when a remote
start attempt is made:
The remote start system is disabled through
the DIC.
The key is in the ignition.
The hood or the doors are not closed.
There is an emission control system malfunction.
The engine coolant temperature is too high.
The oil pressure is low.
The hazard warning �ashers are turned on.
The maximum number of remote starts or remote
start attempts between ignition cycles has been
reached.
The content theft-deterrent alarm is on while
attempting to remote start the vehicle.
See “REMOTE START” underDIC Vehicle
Personalization (Uplevel Only) on page 3-73and
“Remote Vehicle Start” underRemote Keyless Entry
System Operation on page 2-5for more information.
3-66
ProCarManuals.com
Page 211 of 462
REMOTE START ON
If your vehicle has the remote start feature, this
message will display when a remote start is initiated.
See “Remote Vehicle Start” underRemote Keyless Entry
System Operation on page 2-5for more information.
RIGHT FRONT TURN LAMP OUT
This message will display when the right front turn
signal bulb needs to be replaced. SeeHeadlamps and
Sidemarker Lamps on page 5-48.
This message will display while the ignition is in RUN.
Press any of the DIC buttons to acknowledge this
message and to clear it from the screen.
This message will continue to display for two seconds if
it has not been acknowledged when the engine is
turned off. It will also re-display for two seconds if the
message has been acknowledged, but the condition still
exists when the engine is turned off.
If the condition still exists, the message will re-appear
when the engine is turned on.
RIGHT REAR TURN LAMP OUT
This message will display when the right rear turn signal
bulb needs to be replaced. SeeTaillamps, Turn
Signal, Stoplamps and Back-up Lamps on page 5-50.
This message will display while the ignition is in
RUN. Press any of the DIC buttons to acknowledge this
message and to clear it from the screen.
This message will continue to display for two seconds if
it has not been acknowledged when the engine is
turned off. It will also re-display for two seconds if the
message has been acknowledged, but the condition still
exists when the engine is turned off.
If the condition still exists, the message will re-appear
when the engine is turned on.
SERVICE ABS SYSTEM
This message will display when the vehicle’s brakes are
not functioning properly. Have the brake system
serviced by your retailer as soon as possible.
The anti-lock brake system warning light will also
appear on the instrument panel cluster when this
message appears on the DIC. SeeAnti-Lock Brake
System Warning Light on page 3-41.
This message will only display while the ignition is in
RUN. Press any of the DIC buttons to acknowledge this
message and to clear it from the screen.
3-67
ProCarManuals.com
Page 237 of 462
AUTO EQ (Automatic Equalization):Press AUTO EQ
to select the equalization setting while playing a CD.
The equalization will be stored whenever a CD is played.
For more information on AUTO EQ, see “AUTO EQ”
listed previously in this section.
X(Eject):Press this button to eject the CD. EJECT
may be activated with either the ignition or radio off.
Playing a CD(s) (Six-Disc CD Player)
If the ignition or radio is turned off, with a CD in
the player, it will stay in the player. When the ignition or
radio is turned on, the CD will start playing where it
stopped, if it was the last selected audio source.
When a CD is inserted, the CD symbol will appear on
the CD. As each new track starts to play, the track
number will appear on the display.
The CD player can play the smaller 3 inch (8 cm) single
CDs with an adapter ring. Full-size CDs and the
smaller CDs are loaded in the same manner.
If playing a CD-R, the sound quality may be reduced
due to CD-R quality, the method of recording, the quality
of the music that has been recorded, and the way the
CD-R has been handled.There may be an increase in skipping, difficulty in
�nding tracks, and/or difficulty in loading and ejecting. If
these problems occur, check the bottom surface of
the CD. If the surface of the CD is damaged, such as
cracked, broken, or scratched, the CD will not play
properly. If the surface of the CD is soiled, seeCare of
Your CDs and DVDs on page 3-119later in this
section.
If there is no apparent damage, try a known good CD.
Do not add any label to a CD, it could get caught in the
CD player. If a CD is recorded on a personal computer
and a description label is needed, try labeling the top of
the recorded CD with a marking pen instead.
Notice:If you add any label to a CD, insert more
than one CD into the slot at a time, or attempt
to play scratched or damaged CDs, you could
damage the CD player. When using the CD player,
use only CDs in good condition without any
label, load one CD at a time, and keep the CD player
and the loading slot free of foreign materials,
liquids, and debris.
If an error appears on the display, see “CD Messages”
later in this section.
3-93
ProCarManuals.com
Page 239 of 462
If the CD is not removed, after 25 seconds, the CD will be
automatically pulled back into the player. If CD is pushed
back into the player, before the 25 second time period is
complete, the player will sense an error and will try to
eject the CD several times before stopping.
Do not repeatedly press the eject button to eject a CD
after you have tried to push it in manually. The
player’s 25-second eject timer will reset at each press of
eject, causing the player to not eject the CD until the
25-second time period has elapsed.
O/e(Tune):Turn this knob to go to the next or
previous track.
{(Reverse):Press and hold this button to reverse
within the current track.
|(Fast Forward):Press and hold this button to fast
forward through the current track.
RDM (Random):Press this button to hear the tracks in
random, rather than sequential order, on one CD or
all of the loaded CDs.
To use random, do one of the following:
To play the tracks on the CD you are listening to in
random order, press and release this button until
RANDOM DISC PLAY appears on the display.
To play the tracks on all of the CDs that are loaded
in random order, press and release this button until
RANDOM ALL DISCS appears on the display.
To turn off random play, press and release the RDM
button until RANDOM OFF appears on the display
RPT (Repeat):Press this button to hear a track or an
entire CD over again.
To use repeat, do one of the following:
To repeat a track, press and release this button
until REPEAT appears on the display.
To repeat an entire CD, press and release this
button until REPEAT ONE DISC appears on
the display.
To turn off repeated play, press and release the RPT
button until REPEAT OFF appears on the display
tSEEKu:Press the left arrow to go to the start of
the current track, if more than ten seconds have
played. Press the right arrow to go to the next track. If
either arrow is held or pressed more than once, the
player will continue moving backward or forward through
the CD.
3-95
ProCarManuals.com
Page 242 of 462
When play enters a new folder, the display will not
automatically show the new folder name unless
you have chosen the folder mode as the default display.
See the information button later in this section for
more information. The new track name will appear on
the display.
File System and Naming
The song name that will be displayed will be the song
name that is contained in the ID3 tag. If the song name
is not present in the ID3 tag, then the radio will
display the �le name without the extension (such as
.mp3) as the track name.
Track names longer than 32 characters or four pages
will be shortened. The display will not show parts
of words on the last page of text and the extension of
the �lename will not be displayed.
Preprogrammed Playlists
You can access preprogrammed playlists which were
created by WinAmp™, MusicMatch™, or Real
Jukebox™ software, however, you will not have editing
capability. These playlists will be treated as special
folders containing compressed audio song �les.
Playing an MP3
Insert a CD partway into the slot, label side up. The
player will pull it in, and READING will appear on
the display. The CD should begin playing and the CD
symbol will appear on the display.
If the ignition or radio is turned off with a CD in the
player it will stay in the player. When the ignition or radio
is turned on, the CD will start to play where it stopped,
if it was the last selected audio source.
As each new track starts to play, the track number will
appear on the display.
The CD player can play the smaller 3 inch (8 cm) single
CDs with an adapter ring. Full-size CDs and the
smaller CDs are loaded in the same manner.
If playing a CD-R, the sound quality may be reduced
due to CD-R quality, the method of recording, the quality
of the music that has been recorded, and the way the
CD-R has been handled. There may be an increase
in skipping, difficulty in �nding tracks, and/or difficulty in
loading and ejecting. If these problems occur, check
the bottom surface of the CD. If the surface of the CD is
damaged, such as cracked, broken, or scratched, the
CD will not play properly. If the surface of the CD
is soiled, seeCare of Your CDs and DVDs on
page 3-119later in this section.
If there is no apparent damage, try a known good CD.
3-98
ProCarManuals.com
Page 251 of 462
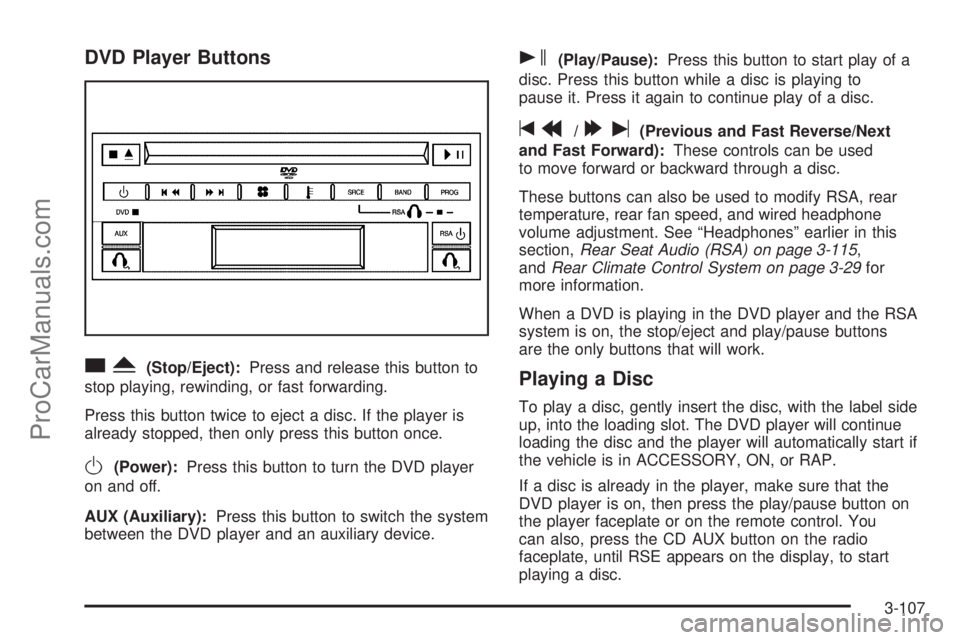
DVD Player Buttons
cY(Stop/Eject):Press and release this button to
stop playing, rewinding, or fast forwarding.
Press this button twice to eject a disc. If the player is
already stopped, then only press this button once.
O(Power):Press this button to turn the DVD player
on and off.
AUX (Auxiliary):Press this button to switch the system
between the DVD player and an auxiliary device.
s(Play/Pause):Press this button to start play of a
disc. Press this button while a disc is playing to
pause it. Press it again to continue play of a disc.
tr/[u(Previous and Fast Reverse/Next
and Fast Forward):These controls can be used
to move forward or backward through a disc.
These buttons can also be used to modify RSA, rear
temperature, rear fan speed, and wired headphone
volume adjustment. See “Headphones” earlier in this
section,Rear Seat Audio (RSA) on page 3-115,
andRear Climate Control System on page 3-29for
more information.
When a DVD is playing in the DVD player and the RSA
system is on, the stop/eject and play/pause buttons
are the only buttons that will work.
Playing a Disc
To play a disc, gently insert the disc, with the label side
up, into the loading slot. The DVD player will continue
loading the disc and the player will automatically start if
the vehicle is in ACCESSORY, ON, or RAP.
If a disc is already in the player, make sure that the
DVD player is on, then press the play/pause button on
the player faceplate or on the remote control. You
can also, press the CD AUX button on the radio
faceplate, until RSE appears on the display, to start
playing a disc.
3-107
ProCarManuals.com
Page 254 of 462
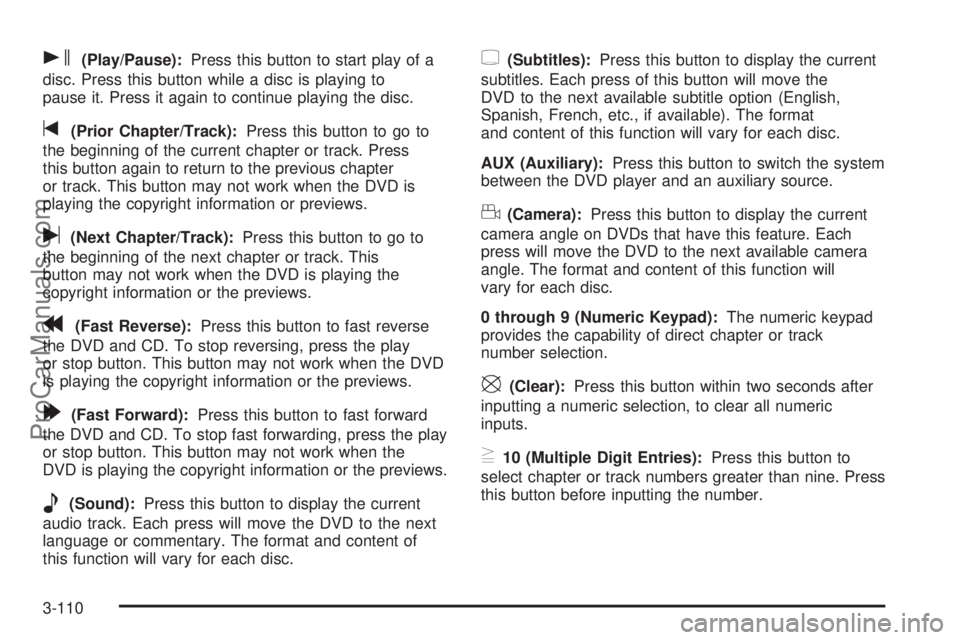
s(Play/Pause):Press this button to start play of a
disc. Press this button while a disc is playing to
pause it. Press it again to continue playing the disc.
t(Prior Chapter/Track):Press this button to go to
the beginning of the current chapter or track. Press
this button again to return to the previous chapter
or track. This button may not work when the DVD is
playing the copyright information or previews.
u(Next Chapter/Track):Press this button to go to
the beginning of the next chapter or track. This
button may not work when the DVD is playing the
copyright information or the previews.
r(Fast Reverse):Press this button to fast reverse
the DVD and CD. To stop reversing, press the play
or stop button. This button may not work when the DVD
is playing the copyright information or the previews.
[(Fast Forward):Press this button to fast forward
the DVD and CD. To stop fast forwarding, press the play
or stop button. This button may not work when the
DVD is playing the copyright information or the previews.
e(Sound):Press this button to display the current
audio track. Each press will move the DVD to the next
language or commentary. The format and content of
this function will vary for each disc.
{(Subtitles):Press this button to display the current
subtitles. Each press of this button will move the
DVD to the next available subtitle option (English,
Spanish, French, etc., if available). The format
and content of this function will vary for each disc.
AUX (Auxiliary):Press this button to switch the system
between the DVD player and an auxiliary source.
d(Camera):Press this button to display the current
camera angle on DVDs that have this feature. Each
press will move the DVD to the next available camera
angle. The format and content of this function will
vary for each disc.
0 through 9 (Numeric Keypad):The numeric keypad
provides the capability of direct chapter or track
number selection.
\(Clear):Press this button within two seconds after
inputting a numeric selection, to clear all numeric
inputs.
}10 (Multiple Digit Entries):Press this button to
select chapter or track numbers greater than nine. Press
this button before inputting the number.
3-110
ProCarManuals.com