mirror SATURN SKY 2007 Owners Manual
[x] Cancel search | Manufacturer: SATURN, Model Year: 2007, Model line: SKY, Model: SATURN SKY 2007Pages: 384, PDF Size: 2.47 MB
Page 1 of 384

Seats and Restraint Systems
....................... 7
Front Seats
.............................................. 8
Safety Belts
............................................ 12
Child Restraints
...................................... 28
Airbag System
........................................ 43
Restraint System Check
......................... 56
Features and Controls
................................ 59
Keys
....................................................... 60
Doors and Locks
.................................... 66
Windows
................................................ 71
Theft-Deterrent Systems
......................... 73
Starting and Operating Your Vehicle
....... 77
Mirrors
.................................................... 93OnStar®System
..................................... 94
Storage Areas
........................................ 99
Convertible Top
.................................... 100
Instrument Panel
....................................... 105
Instrument Panel Overview
................... 108
Climate Controls
................................... 122
Warning Lights, Gages, and Indicators
.... 127
Driver Information Center (DIC)
............ 144
Audio System(s)
................................... 158
Driving Your Vehicle
................................. 191
Your Driving, the Road, and Your
Vehicle
.............................................. 192
Towing
................................................. 230
2007 Saturn SKY Owner ManualM
1
ProCarManuals.com
Page 59 of 384

Keys.............................................................. 60
Remote Keyless Entry (RKE) System.......... 62
Remote Keyless Entry (RKE)
System Operation.................................... 63
Doors and Locks.......................................... 66
Manual Door Locks..................................... 66
Power Door Locks....................................... 67
Delayed Locking.......................................... 67
Automatic Door Lock................................... 68
Automatic Door Unlock................................ 68
Trunk.......................................................... 68
Windows....................................................... 71
Power Windows.......................................... 72
Sun Visors.................................................. 72
Theft-Deterrent Systems............................... 73
Content Theft-Deterrent............................... 73
PASS-Key
®III+........................................... 75
PASS-Key®III+ Operation........................... 75
Starting and Operating Your Vehicle........... 77
New Vehicle Break-In.................................. 77
Ignition Positions......................................... 78
Retained Accessory Power (RAP)............... 79Starting the Engine..................................... 80
Automatic Transmission Operation............... 82
Manual Transmission Operation................... 85
Parking Brake............................................. 86
Shifting Into Park (P)
(Automatic Transmission)......................... 87
Shifting Out of Park (P)............................... 89
Parking Your Vehicle
(Manual Transmission)............................. 89
Parking Over Things That Burn................... 90
Engine Exhaust........................................... 91
Running the Engine While Parked............... 92
Mirrors........................................................... 93
Manual Rearview Mirror.............................. 93
Manual Rearview Mirror with OnStar
®......... 93
Outside Power Mirrors................................. 93
OnStar
®System............................................ 94
Storage Areas............................................... 99
Glove Box................................................... 99
Cupholder(s)............................................... 99
Center Console Storage Area.................... 100
Convertible Top.......................................... 100
Section 2 Features and Controls
59
ProCarManuals.com
Page 72 of 384

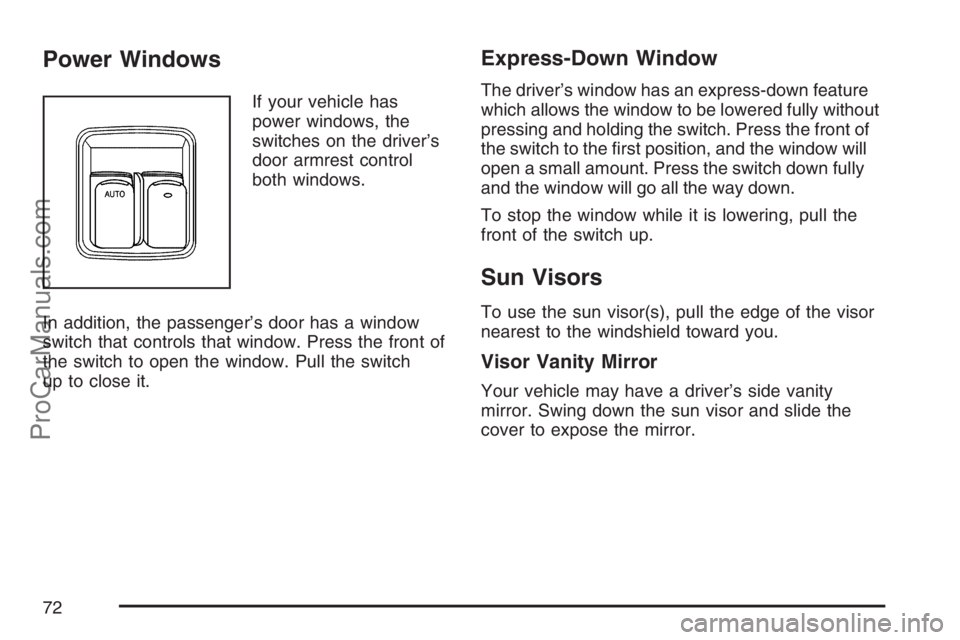
Power Windows
If your vehicle has
power windows, the
switches on the driver’s
door armrest control
both windows.
In addition, the passenger’s door has a window
switch that controls that window. Press the front of
the switch to open the window. Pull the switch
up to close it.
Express-Down Window
The driver’s window has an express-down feature
which allows the window to be lowered fully without
pressing and holding the switch. Press the front of
the switch to the �rst position, and the window will
open a small amount. Press the switch down fully
and the window will go all the way down.
To stop the window while it is lowering, pull the
front of the switch up.
Sun Visors
To use the sun visor(s), pull the edge of the visor
nearest to the windshield toward you.
Visor Vanity Mirror
Your vehicle may have a driver’s side vanity
mirror. Swing down the sun visor and slide the
cover to expose the mirror.
72
ProCarManuals.com
Page 93 of 384

Mirrors
Manual Rearview Mirror
When you are sitting in a comfortable driving
position, adjust the mirror so you can see clearly
behind your vehicle. Grip the mirror in the
center to move it up or down and side to side.
The day/night adjustment allows you to adjust
the mirror to avoid glare from the lamps behind
you. Move the lever to the right for nighttime
use and to the left for daytime use.
Manual Rearview Mirror
with OnStar
®
When you are sitting in a comfortable driving
position, adjust the mirror so you can see clearly
behind your vehicle. Grip the mirror in the
center to move it up or down and side to side.
The day/night adjustment allows you to adjust
the mirror to avoid glare from the lamps behind
you. Move the lever to the right for nighttime
use and to the left for daytime use.
There may also be three OnStar
®buttons located
at the bottom of the mirror face. SeeOnStar®
System on page 94for more information.
Outside Power Mirrors
The controls for the
outside power mirrors
are located on the
driver’s door.
Move the selector switch located below the
four-way control pad to the left or right to
choose either the driver’s side or passenger’s
side mirror.
To adjust a mirror, use the arrows located on
the four-way control pad to move the mirror in
the desired direction. Adjust each outside mirror
so that a little of the vehicle and the area behind
it can be seen while sitting in a comfortable
driving position.
93
ProCarManuals.com
Page 102 of 384

Lowering the Manual Convertible Top
1. Park on a level surface and set the parking
brake. Shift an automatic transmission into
PARK (P). Shift a manual transmission
into FIRST (1) or REVERSE (R).
2. Make sure the ignition is turned off.
3. Push the trunk release button located in
the glove box, or on the remote keyless
entry, if equipped.
4. Lift the trunk.
5. The convertible top front latch, located above
the inside rearview mirror, must be unlatched.
Pull the latch down and turn it counterclockwise
to unlatch it.
Leave the latch open and turned to prevent
damage.
6. Pull rearward on the side edge (B) of the
convertible top and pull it off of the windshield
frame.
7. Push the convertible top down into the
trunk (D).
102
ProCarManuals.com
Page 105 of 384

Instrument Panel Overview........................ 108
Hazard Warning Flashers.......................... 110
Other Warning Devices............................. 110
Horn.......................................................... 110
Tilt Wheel.................................................. 110
Turn Signal/Multifunction Lever.................. 111
Turn and Lane-Change Signals................. 112
Headlamp High/Low-Beam Changer.......... 112
Flash-to-Pass............................................ 112
Windshield Wipers..................................... 113
Windshield Washer.................................... 114
Cruise Control........................................... 115
Headlamps................................................ 118
Headlamps on Reminder........................... 119
Daytime Running Lamps (DRL)................. 119
Fog Lamps................................................ 120
Instrument Panel Brightness...................... 120
Entry/Exit Lighting...................................... 120
Mirror Reading Lamps............................... 120
Battery Run-Down Protection..................... 121
Accessory Power Outlet(s)........................ 121
Ashtray(s) and Cigarette Lighter................ 122Climate Controls......................................... 122
Climate Control System............................. 122
Outlet Adjustment...................................... 126
Warning Lights, Gages, and Indicators..... 127
Instrument Panel Cluster........................... 128
Speedometer and Odometer...................... 129
Tachometer............................................... 129
Safety Belt Reminder Light........................ 129
Passenger Safety Belt Reminder Light....... 130
Airbag Readiness Light............................. 130
Passenger Airbag Status Indicator............. 131
Charging System Light.............................. 133
Brake System Warning Light..................... 134
Anti-Lock Brake System Warning Light...... 135
Electronic Stability Control (ESC)/
Traction Control System (TCS) Indicator/
Warning Light (2.0L Engine Only)............. 136
Engine Coolant Temperature
Warning Light........................................ 137
Malfunction Indicator Lamp........................ 138
Oil Pressure Light..................................... 141
Section 3 Instrument Panel
105
ProCarManuals.com
Page 120 of 384

Fog Lamps
The fog lamp button
is located on the
instrument panel,
to the left of the
steering wheel.
The ignition must be on to turn your fog lamps on.
Push the button to turn the fog lamps on. An
indicator light on the instrument panel cluster will
come on when the fog lamps are on. Push the
button again to turn the fog lamps off.
The parking lamps will automatically turn on and
off when the fog lamps are turned on and off.
The fog lamps will turn off while the high-beam
headlamps are turned on.
Some localities have laws that require the
headlamps to be on along with the fog lamps.
Instrument Panel Brightness
The control for this feature is located on the
instrument panel to the left of the steering wheel.
Turn the thumbwheel up to brighten the lights
or down to dim them.
Entry/Exit Lighting
The lamps inside your vehicle will go on when you
open any door. These lamps will fade out after
about 20 seconds after all of the doors have been
closed or when the ignition is turned on. These
lamps will also go on when you press the
trunk release, unlock symbol button or the horn
symbol on the keyless entry system transmitter.
The lamps inside your vehicle will stay on for about
20 seconds after your key is removed from the
ignition to provide an illuminated exit.
Mirror Reading Lamps
Your vehicle has reading lamps on the rearview
mirror. Push the button to turn the reading
lamps on and off.
120
ProCarManuals.com
Page 207 of 384

Watch for traffic signs, pavement markings, and
lines. If you can see a sign up ahead that might
indicate a turn or an intersection, delay your
pass. A broken center line usually indicates it is
all right to pass, providing the road ahead is
clear. Never cross a solid line on your side of
the lane or a double solid line, even if the road
seems empty of approaching traffic.
Do not get too close to the vehicle you want to
pass while you are awaiting an opportunity. For
one thing, following too closely reduces your
area of vision, especially if you are following a
larger vehicle. Also, you will not have adequate
space if the vehicle ahead suddenly slows or
stops. Keep back a reasonable distance.
When it looks like a chance to pass is coming
up, start to accelerate but stay in the right lane
and do not get too close. Time your move so
you will be increasing speed as the time comes
to move into the other lane. If the way is clear to
pass, you will have a running start that more
than makes up for the distance you would lose
by dropping back. And if something happens to
cause you to cancel your pass, you need only
slow down and drop back again and wait for
another opportunity.
If other vehicles are lined up to pass a slow
vehicle, wait your turn. But take care that
someone is not trying to pass you as you pull
out to pass the slow vehicle. Remember to
glance over your shoulder and check the
blind spot.
Check your vehicle’s mirrors, glance over your
shoulder, and start your left lane change signal
before moving out of the right lane to pass.
When you are far enough ahead of the passed
vehicle to see its front in your vehicle’s inside
mirror, activate the right lane change signal and
move back into the right lane. Remember that
your vehicle’s passenger side outside mirror is
convex. The vehicle you just passed may seem
to be farther away from you than it really is.
Try not to pass more than one vehicle at a time
on two-lane roads. Reconsider before passing
the next vehicle.
Do not overtake a slowly moving vehicle too
rapidly. Even though the brake lamps are not
�ashing, it may be slowing down or starting
to turn.
If you are being passed, make it easy for the
following driver to get ahead of you. Perhaps
you can ease a little to the right.
207
ProCarManuals.com
Page 208 of 384

Loss of Control
Let us review what driving experts say about what
happens when the three control systems — brakes,
steering, and acceleration — do not have enough
friction where the tires meet the road to do what the
driver has asked.
In any emergency, do not give up. Keep trying to
steer and constantly seek an escape route or
area of less danger.
Skidding
In a skid, a driver can lose control of the vehicle.
Defensive drivers avoid most skids by taking
reasonable care suited to existing conditions, and
by not overdriving those conditions. But skids
are always possible.
The three types of skids correspond to your
vehicle’s three control systems. In the braking skid,
your wheels are not rolling. In the steering or
cornering skid, too much speed or steering in a
curve causes tires to slip and lose cornering force.
And in the acceleration skid, too much throttle
causes the driving wheels to spin.A cornering skid and an acceleration skid are
best handled by easing your foot off the
accelerator pedal.
If your vehicle starts to slide, ease your foot off
the accelerator pedal and quickly steer the
way you want the vehicle to go. If you start
steering quickly enough, your vehicle may
straighten out. Always be ready for a second skid
if it occurs.
Of course, traction is reduced when water, snow,
ice, gravel, or other material is on the road.
For safety, you will want to slow down and adjust
your driving to these conditions. It is important
to slow down on slippery surfaces because
stopping distance will be longer and vehicle control
more limited.
While driving on a surface with reduced traction,
try your best to avoid sudden steering, acceleration,
or braking, including reducing vehicle speed by
shifting to a lower gear. Any sudden changes could
cause the tires to slide. You may not realize the
surface is slippery until your vehicle is skidding.
Learn to recognize warning clues — such as
enough water, ice, or packed snow on the road to
make a mirrored surface — and slow down when
you have any doubt.
208
ProCarManuals.com
Page 209 of 384

Remember: Any Anti-Lock Brake System (ABS)
helps avoid only the braking skid.
If the ABS is ever disabled, in a braking skid,
where the wheels are no longer rolling, release
enough pressure on the brakes to get the wheels
rolling again. This restores steering control.
Push the brake pedal down steadily when you
have to stop suddenly. As long as the wheels are
rolling, you will have steering control.
Driving at Night
Night driving is more dangerous than day driving.
One reason is that some drivers are likely to
be impaired — by alcohol or drugs, with night
vision problems, or by fatigue.
Here are some tips on night driving.
Drive defensively.
Do not drink and drive.
Adjust the inside rearview mirror to reduce the
glare from headlamps behind you.
Since you cannot see as well, you may need
to slow down and keep more space between
you and other vehicles.
Slow down, especially on higher speed roads.
Your vehicle’s headlamps can light up only so
much road ahead.
In remote areas, watch for animals.
If you are tired, pull off the road in a safe
place and rest.
No one can see as well at night as in the daytime.
But as we get older these differences increase.
A 50-year-old driver may require at least twice as
much light to see the same thing at night as a
20-year-old.
What you do in the daytime can also affect your
night vision. For example, if you spend the
day in bright sunshine you are wise to wear
sunglasses. Your eyes will have less trouble
adjusting to night. But if you are driving, do not
wear sunglasses at night. They may cut down on
glare from headlamps, but they also make a
lot of things invisible.
You can be temporarily blinded by approaching
headlamps. It can take a second or two, or
even several seconds, for your eyes to re-adjust
to the dark.
209
ProCarManuals.com