CD player SATURN VUE 2004 User Guide
[x] Cancel search | Manufacturer: SATURN, Model Year: 2004, Model line: VUE, Model: SATURN VUE 2004Pages: 392, PDF Size: 2.9 MB
Page 165 of 392

2l(Next):Press this pushbutton to go to the
next track. If this pushbutton is held or pressed more
than once, the player will continue moving forward
through the current directory.
4:Press this pushbutton to enter playlist mode.
Use the tune knob to cycle through the available
playlists. Playlist X will appear on the display. Use
the 1 and 2 pushbuttons to cycle through songs in
a particular playlist. Press the 4 pushbutton again to
exit playlist mode.
If a CD is a mixed mode, containing standard CD audio
and MP3 compressed audio, the radio will assign the
standard CD audio to a directory, which is listed as
ROM audio directory.
O(Tune):Turn this knob to quickly change tracks
on the CD.
4(Information):Press this button to see the elapsed
time of the track and the current track time. To change
the default on the display, track name, artist name, album
name, �le name, or directory, press this button to scroll
through each display. Once the desired display is shown,
press and hold the RCL button for �ve seconds. The
selected display will now be the default.
rCAT[:Press either arrow to change directories.
CD Messages
If any error message appears on the display and/or the
CD comes out, it could be for one of the following
reasons:
It is very hot. When the temperature returns to
normal, the CD should play.
You are driving on a very rough road. When the
road becomes smoother, the CD should play.
The CD is dirty, scratched, wet, or upside down.
The air is very humid. If so, wait about an hour
and try again.
The format of the CD may not be compatible.
See “MP3 Format” earlier for more information.
There may have been a problem while burning
the CD.
The label may be caught in the CD player.
If the CD is not playing correctly, for any other reason,
try a known good CD.
If any error occurs repeatedly or if an error cannot be
corrected, contact your retailer. If the radio displays
an error message, write it down and provide it to your
retailer when reporting the problem.
3-61
ProCarManuals.com
Page 168 of 392

Stereo RCA Jacks
The RCA jacks are located behind the video screen on
the overhead console. The RCA jacks allow audio or
video signals to be connected from an auxiliary device
such as a camcorder or a video game unit to the
RSE. Adapter connectors or cables may be required to
connect the auxiliary device to the RCA jacks. Refer
to the manufacturer’s instructions for proper usage.
The RCA jacks are color coded to match typical home
entertainment system equipment. The yellow jack
(right) is for the video input. The white jack (middle) is
for the left audio input. The red jack (left) is for the right
audio input.Power for auxiliary devices is not supplied by the
radio system.
To use the auxiliary function, connect a camcorder or a
video game unit to the RCA jacks and turn on the
auxiliary device. If you want to view a DVD, insert the
DVD into the DVD radio. The system will automatically
switch to DVD and start to play. To switch between
the auxiliary device and the DVD, press the AUX button
on the DVD player or the SRCE button on the remote
control. See “DVD Radio” and “Remote Control” later in
this section for more information.
Audio Output
Only one audio source can be heard through the
speakers at one time.
The only way to listen to the audio through the vehicle
speakers is if the front seat passengers select DVD
Family Mode using the AUX button on the radio.
There are three modes to the RSE system:
RSE:This is the default, when a DVD is inserted, the
rear speakers will be muted. The rear seat passengers
will be able to hear audio through the wireless
headphones. The front seat passengers will be able to
listen to the radio by pressing the AM FM button, or
listen to XM™ Satellite Radio Service (if equipped) by
pressing the AUX button, through the front speakers.
3-64
ProCarManuals.com
Page 170 of 392

DVD Radio
The DVD radio is located in the center of the
instrument panel.
The DVD radio is controlled by the buttons on the
remote control. See “Remote Control” later in this
section for more information.
The DVD radio is only compatible with DVDs authorized
for use in the United States and Canada (Region
Code 1). The DVD region code is printed on the jacket
of most DVDs. Most audio CDs, CD-R, CD-RW, and
MP3s can also be played by the DVD radio.
If an error message appears on the video screen or the
radio, see “DVD Display Error Messages” and “DVD
Radio Error Messages” later in this section.
DVD Radio Buttons
To use the radio, see Radio with CD (MP3) under
Radio with CD (Base Level) on page 3-45orRadio
with CD (MP3) on page 3-49for more information.
RSE:Press this button to pause the DVD. Press this
button again to play the DVD.
Press and hold this button for more than two seconds
to turn off the RSE system.
AUX (Auxiliary):When a DVD is playing, press this
button to switch between RSE and DVD family.
To listen to a DVD through the headphones, press
this button.
When a CD is playing, press this button to switch
between playing a CD or listening to XM™ Satellite
Radio Service (if equipped).
Z(Eject/Load):Press this button to eject a DVD or
CD. If a DVD or CD is ejected, but not removed, the
player will automatically pull it back in after 30 seconds.
3-66
ProCarManuals.com
Page 171 of 392

Playing a Disc
To play a disc, gently insert the disc, with the label side
up, into the loading slot. The DVD player will continue
loading the disc and the player will automatically start.
If a DVD is already in the radio, press the play/pause
button on the remote control to start playing the
disc, when the DVD system is active.
Vehicle speaker volume, bass, treble, etc. may be
adjusted by pushing the tune knob. See the radio that is
currently in your vehicle for more information on using
the tune knob.
Some DVDs will not allow fast forwarding or skipping of
the copyright information or the previews. Some
DVDs will begin playing after the previews have �nished,
although there may be a delay of up to 30 seconds. If
the DVD does not begin playing the movie automatically,
press the RSE button on the radio. If the DVD still
does not play, refer to the on-screen instructions.
The DVD player may not accept some paper labeled
media.
The DVD player can only be powered on by pressing
the RSE button on the radio or by inserting a DVD.
Playing an MP3 CD
The CD player has the ability to recognize up to
20 directories, and up to 99 �les per directory to
a miximum of 254 total MP3 selections on a CD.
Mixed media CD’s are not supported.
Stopping and Resuming Playback
To stop playing a disc, press the stop button on the
remote control.
To resume playback, press the play/pause button on
the remote control. The movie should resume play from
where it last stopped if the disc has not been ejected
and the stop button has not been pressed twice on
the remote control. If the disc has been ejected or the
stop button has been pressed twice on the remote
control, the disc will resume playing at the beginning
of the disc.
Ejecting a Disc
Press the eject button on the radio to eject the disc.
If a disc is ejected from the radio, but not removed, the
radio will reload the disc after a short period of time.
The disc will be stored in the radio. The radio will
not resume play of the disc automatically.
3-67
ProCarManuals.com
Page 172 of 392

Remote Control
To use the remote control, aim it at the transmitter
window below the video screen and press the desired
button. Direct sunlight or very bright light may affect the
ability of the RSE transmitter to receive signals from
the remote control. If the remote control does not seem
to be working, the batteries may need to be replaced.
See “Battery Replacement” later in this section. Objects
blocking the line of sight may also affect the function
of the remote control.
The DVD player can only be turned on by pressing the
RSE button on the radio.
Notice:Storing the remote control in a hot area or
in direct sunlight may damage it, and the repairs
would not be covered by your warranty. Keep
the remote control stored in a cool, dry place.
Remote Control Buttons
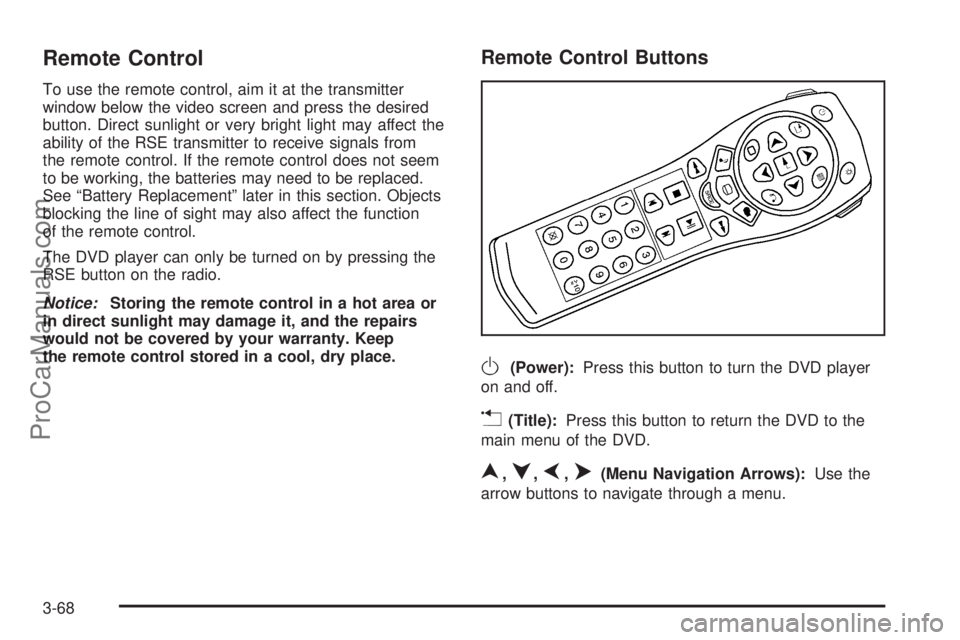
O(Power):Press this button to turn the DVD player
on and off.
v(Title):Press this button to return the DVD to the
main menu of the DVD.
n,q,p,o(Menu Navigation Arrows):Use the
arrow buttons to navigate through a menu.
3-68
ProCarManuals.com
Page 173 of 392

z(Set-up Menu):Press this button to adjust the
color, tint, brightness, contrast, and display mode
(normal, full, or zoom). The dynamic range compression
feature can be used to reduce loud audio and increase
low audio produced by some DVDs.
e(Audio):Press this button to display a menu that
will only appear when a DVD is playing. The format and
content of this function will vary for each disc.
r(Fast Reverse):Press this button to fast reverse
the DVD or CD. To stop fast reversing, press this button
again. This button may not work when the DVD is
playing the copyright information or the previews.
SRCE (Source):Press this button to switch between
the DVD player and an auxiliary source.
c(Stop):Press this button to stop playing, rewinding,
or fast forwarding a DVD or CD. Press this button
twice to return to the beginning of the DVD.
t(Previous Track/Chapter):Press this button to
return to the start of the current track or chapter.
Press this button again to go to the previous track or
chapter. This button may not work when the DVD
is playing the copyright information or the previews.1 through 0 (Numeric Keypad):The numeric keypad
provides the capability of direct chapter, title, and
track number selection.
}10 (Double Digit Entries):Press the button, to
select chapter, title, and track numbers greater than 9.
Press this button before inputting the number.
\(Clear):Press this button, within three seconds
after inputting a numeric selection to clear all numeric
inputs.
P(Illumination):Press this button to turn the remote
control backlight on. The backlight will time out after
about 7 to 10 seconds if no other button is pressed while
the backlight is on.
y(Main DVD Menu):Press this button to access
the DVD menu. The DVD menu is different on every
DVD. Use the up, down, left, and right arrow buttons to
move the cursor around the DVD menu. After making
a selection press the enter button. This button only
operates when using a DVD.
r(Enter):Press this button to select the choices
that are highlighted in any menu.
3-69
ProCarManuals.com
Page 175 of 392

DVD Display Error Messages
The video screen may display one of the following:
Disc Format Error:This message is displayed when
a disc is inserted upside down, not readable, or if
the disc format is not compatible. The disc will be
automatically ejected from the radio.
Region Code Error:This message will be displayed,
if the disc is not a Region Code 1. The disc will be
automatically ejected from the radio.
No Disc:This message will be displayed, if no disc
is present when the eject, RSE, or AUX button is
pressed on the radio.
DVD Radio Error Messages
No Disc:This message will be displayed, if no disc
is present when the eject, RSE, or AUX button is
pressed on the radio.
DVD Distortion
Video distortion may occur when operating cellular
phones, scanners, CB radios, Global Position Systems
(GPS)*, two-way radios, mobile fax, or walkie talkies.
It may be necessary to turn off the DVD player
when operating one of these devices in or near the
vehicle.
*Excludes the OnStar
®System.
Cleaning the DVD Player
When cleaning the outside DVD faceplate and buttons,
use only a clean cloth dampened with clean water.
Cleaning the Video Screen
When cleaning the video screen, use only a clean cloth
dampened with clean water. Use care when directly
touching or cleaning the screen, as damage may result.
3-71
ProCarManuals.com
Page 179 of 392

Care of Your CDs and DVDs
Handle discs carefully. Store them in their original cases
or other protective cases and away from direct sunlight
and dust. If the surface of a disc is soiled, dampen
a clean, soft cloth in a mild, neutral detergent solution
and clean it, wiping from the center to the edge.
Be sure never to touch the side without writing when
handling discs. Pick up discs by grasping the outer
edges or the edge of the hole and the outer edge.
Care of Your CD and DVD Player
The use of CD lens cleaners for CDs is not advised,
due to the risk of contaminating the lens of the CD optics
with lubricants internal to the CD mechanism.
Fixed Mast Antenna
The �xed mast antenna can withstand most car
washes without being damaged. If the mast should
ever become slightly bent, straighten it out by hand.
If the mast is badly bent, replace it.
Check occasionally to make sure the mast is still
tightened to the antenna base located on the hood of
the vehicle. If tightening is required, tighten by hand.
XM™ Satellite Radio Antenna
System
The XM™ Satellite Radio antenna is located on the roof
of your vehicle. Keep this antenna clear of snow and
ice build up for clear radio reception.
The performance of the XM™ system may be affected if
the sunroof is open.
Loading items onto the roof of your vehicle can interfere
with the performance of the XM™ system. Make sure
that the XM™ satellite antenna is not obstructed.
3-75
ProCarManuals.com
Page 377 of 392

A
About Driving Your Vehicle.................................... ii
Accessory Power Outlets.................................3-20
Activating the Theft-Deterrent Feature................3-72
Adding a Snow Plow or Similar Equipment.........4-54
Adding Windshield Washer Fluid.......................5-40
Additives, Fuel................................................. 5-6
Add-On Electrical Equipment............................5-98
Adjusting the Speakers
(Balance/Fade)............................3-45, 3-47, 3-53
After Off-Road Driving.....................................4-30
Air Cleaner/Filter, Engine.................................5-21
Air Conditioning..............................................3-21
Airbag
Readiness Light..........................................3-28
Airbag Sensing and Diagnostic Module (SDM)...... 7-7
Airbag Systems..............................................1-48
Adding Equipment to Your Airbag-Equipped
Vehicle...................................................1-57
How Does an Airbag Restrain?......................1-54
Servicing Your Airbag-Equipped Vehicle..........1-56
What Makes an Airbag In�ate?......................1-54
What Will You See After an
Airbag In�ates?........................................1-55
When Should an Airbag In�ate?....................1-53
Where Are the Airbags?...............................1-50All-Wheel Drive...............................................5-51
All-Wheel-Drive (AWD) System.........................4-12
AM ...............................................................3-74
AM-FM Radio.................................................3-43
Antenna, Fixed Mast.......................................3-75
Antenna, XM™ Satellite Radio
Antenna System..........................................3-75
Anti-lock Brake System (ABS)............................ 4-8
Anti-Lock Brake, System Warning Light..............3-31
Appearance Care............................................5-89
Care of Safety Belts....................................5-92
Chemical Paint Spotting...............................5-95
Cleaning the Inside of Your Vehicle................5-89
Cleaning the Outside of Your Vehicle..............5-92
Finish Damage............................................5-95
Sheet Metal Damage...................................5-95
Underbody Maintenance...............................5-95
Vehicle Care/Appearance Materials................5-96
Weatherstrips..............................................5-92
Approaching a Hill..........................................4-22
Audio Output..................................................3-64
Audio System(s).............................................3-42
AM-FM Radio.............................................3-43
Care of Your CD and DVD Player..................3-75
Care of Your CDs and DVDs........................3-75
Fixed Mast Antenna.....................................3-75
Radio with CD....................................3-45, 3-49
1
ProCarManuals.com
Page 379 of 392

Care of
Safety Belts................................................5-92
Your CD and DVD Player.............................3-75
Your CDs and DVDs....................................3-75
Cargo Lamp...................................................3-19
CD Messages........................................3-49, 3-61
Center Console Storage Area...........................2-36
Center High-Mounted Stoplamp (CHMSL)...........5-58
Chains, Tire...................................................5-76
Changing a Tire When Trailer Towing................4-61
Check
Engine Light...............................................3-35
Checking Coolant............................................5-30
Checking Engine Oil........................................5-15
Checking Things Under the Hood......................5-10
Chemical Paint Spotting...................................5-95
Child Restraints
Child Restraint Systems...............................1-34
Infants and Young Children...........................1-31
Lower Anchorages and Top Tethers for
Children (LATCH System)..........................1-40
Older Children.............................................1-28
Securing a Child Restraint Designed
for the LATCH System..............................1-42
Securing a Child Restraint in a Rear
Seat Position...........................................1-42
Securing a Child Restraint in the Right
Front Seat Position...................................1-45Child Restraints (cont.)
Top Strap...................................................1-37
Top Strap Anchor Location............................1-39
Where to Put the Restraint...........................1-36
Cleaning
Inside of Your Vehicle..................................5-89
Outside of Your Vehicle................................5-92
Underbody Maintenance...............................5-95
Weatherstrips..............................................5-92
Cleaning Aluminum Wheels..............................5-94
Cleaning Exterior Lamps/Lenses.......................5-93
Cleaning Fabric/Carpet....................................5-89
Cleaning Glass Surfaces..................................5-91
Cleaning Interior Plastic Components.................5-91
Cleaning the DVD Player.................................3-71
Cleaning the Mirror.................................2-31, 2-33
Cleaning the Top of the Instrument Panel...........5-91
Cleaning the Video Screen...............................3-71
Cleaning Tires................................................5-94
Cleaning Vinyl................................................5-91
Cleaning Windshield and Wiper Blades..............5-94
Climate Control System...................................3-21
Air Filter, Passenger Compartment.................3-23
Clutch, Hydraulic.............................................5-28
Compact Spare Tire........................................5-88
Compass Calibration...............................2-30, 2-32
Compass Operation.........................................2-32
Compass Variance..................................2-30, 2-32
3
ProCarManuals.com