key SATURN VUE 2008 Owner's Guide
[x] Cancel search | Manufacturer: SATURN, Model Year: 2008, Model line: VUE, Model: SATURN VUE 2008Pages: 412, PDF Size: 2.78 MB
Page 181 of 412

Setting the Clock
With Date Display
Radio with Single CD or Radio with
CD (MP3)
These radios have aHbutton for setting the time
and date.
To set the time and date, follow these instructions:
1. Turn the ignition key to ACC/ACCESSORY
or ON/RUN. Press the
Oknob, located in
the center of the radio, to turn the radio on.
2. Press the
Hbutton and the HR, MIN, MM, DD,
YYYY (hour, minute, month, day, and year) displays.
3. Press the pushbutton located under any one of the
labels to be changed. Every time the pushbutton is
pressed again, the time or the date if selected,
increases by one.
Another way to increase the time or date, is to
press the right
¨SEEK arrow or\FWD
button.
To decrease the time or date, press the
left
©SEEK arrow orsREV button, or turn
the
fknob, located on the upper right side
of the radio.The date does not automatically display. To see the
date press the
Hbutton while the radio is on. The date
display times out after a few seconds and goes back
to the normal radio and time display.
To change the time default setting from 12 hour to
24 hour or to change the date default setting from
month/day/year to day/month/year, follow these
instructions:
1. Press the
Hbutton and then the pushbutton
located under the forward arrow label. Once the time
12H and 24H, and the date MM/DD/YYYY (month,
day, and year) and DD/MM/YYYY (day, month, and
year) displays.
2. Press the pushbutton located under the desired
option.
3. Press the
Hor MENU button again to apply the
selected default, or let the screen time out.
3-53
ProCarManuals.com
Page 182 of 412

Radio with Six-Disc CD (MP3)
This type of radio has a MENU button instead of
the
Hbutton to set the time and date.
To set the time and date, follow these instructions:
1. Turn the ignition key to ACC/ACCESSORY
or ON/RUN. Press the
Oknob, located in
the center of the radio, to turn the radio on.
2. Press the MENU button. Once the clock option is
displayed.
3. Press the pushbutton located under that label.
The HR, MIN, MM, DD, YYYY displays.
4. Press the pushbutton located under any one of the
labels to be changed. Every time the pushbutton is
pressed again, the time or the date if selected,
increases by one.
Another way to increase the time or date, is to
press the right
¨SEEK arrow or\FWD
button.
To decrease the time or date, press the
left
©SEEK arrow orsREV button,
or turn the
fknob, located on the upper right
side of the radio.The date does not automatically display. To see the
date press the MENU button and then the
Hbutton
while the radio is on. The date display times out after a
few seconds and goes back to the normal radio and
time display.
To change the time default setting from 12 hour to
24 hour or to change the date default setting from
month/day/year to day/month/year, follow these
instructions:
1. Press the
Hbutton and then the pushbutton
located under the forward arrow label. Once the time
12H and 24H, and the date MM/DD/YYYY (month,
day, and year) and DD/MM/YYYY (day, month, and
year) displays.
2. Press the pushbutton located under the desired
option.
3. Press the
Hor MENU button again to apply the
selected default, or let the screen time out.
3-54
ProCarManuals.com
Page 218 of 412

Controlling your vehicle is the key to successful off-road
driving. One of the best ways to control your vehicle
is to control your speed. Here are some things to keep
in mind. At higher speeds:
You approach things faster and you have less time
to scan the terrain for obstacles.
You have less time to react.
You have more vehicle bounce when you drive over
obstacles.
You will need more distance for braking, especially
since you are on an unpaved surface.
{CAUTION:
When you are driving off-road, bouncing and
quick changes in direction can easily throw
you out of position. This could cause you to
lose control and crash. So, whether you are
driving on or off the road, you and your
passengers should wear safety belts.
Scanning the Terrain
Off-road driving can take you over many different kinds
of terrain. You need to be familiar with the terrain and
its many different features. Here are some things to
consider.
Surface Conditions:Off-roading can take you over
hard-packed dirt, gravel, rocks, grass, sand, mud, snow,
or ice. Each of these surfaces affects the steering,
acceleration, and braking of your vehicle in different
ways. Depending upon the kind of surface you are on,
you may experience slipping, sliding, wheel spinning,
delayed acceleration, poor traction, and longer braking
distances.
Surface Obstacles:Unseen or hidden obstacles can
be hazardous. A rock, log, hole, rut, or bump can startle
you if you are not prepared for them. Often these
obstacles are hidden by grass, bushes, snow, or even
the rise and fall of the terrain itself. Here are some
things to consider:
Is the path ahead clear?
Will the surface texture change abruptly up ahead?
Does the travel take you uphill or downhill?
There is more discussion of these subjects later.
Will you have to stop suddenly or change direction
quickly?
4-18
ProCarManuals.com
Page 242 of 412

Dinghy Towing
Front-wheel-drive and all-wheel-drive vehicles may be
dinghy towed from the front. You can also tow these
vehicles by placing them on a platform trailer with all
four wheels off of the ground. For other towing options,
see “Dolly Towing” following in this section.
For vehicles being dinghy towed, the vehicle should be
run at the beginning of each day and at each RV fuel stop
for about �ve minutes. This will ensure proper lubrication
of transmission components.To tow your vehicle from the front with all four wheels
on the ground:
1. Position and attach the vehicle to tow it behind the
recreational vehicle.
2. Turn the ignition key to ACC/ACCESSORY.
3. Shift the transmission to NEUTRAL (N).
4. Turn fog lamps and all accessories off.
5. Remove the IGN SW fuse from the Instrument
Panel Fuse Block. SeeInstrument Panel Fuse
Block on page 5-97.
Notice:If you tow your vehicle without performing
each of the steps listed under “Dinghy Towing,”
you could damage the automatic transmission.
Be sure to follow all steps of the dinghy towing
procedure prior to and after towing your vehicle.
Notice:If your vehicle has a four-speed automatic
transmission, it can be dinghy towed from the front
for unlimited miles at 65 mph (105 km/h). If you
exceed 65 mph (105 km/h) while towing your vehicle,
it could be damaged. The repairs would not be
covered by your warranty. Never exceed 65 mph
(105 km/h) while towing your vehicle.
Once you have reached your destination:
1. Set the parking brake.
2. Shift the transmission to PARK (P).
4-42
ProCarManuals.com
Page 243 of 412

3. Reinstall the IGN SW fuse into the Instrument
Panel Fuse Block.
4. Turn the ignition key to LOCK/OFF and remove the
key from the ignition.
Notice:Too much or too little �uid can damage the
transmission. Be sure that the transmission �uid
is at the proper level before towing with all four
wheels on the ground.
Notice:Don’t tow a vehicle with the front drive
wheels on the ground if one of the front tires is a
compact spare tire. Towing with two different
tire sizes on the front of the vehicle can cause
severe damage to the transmission.
Dolly Towing (All-Wheel-Drive Vehicles)
All-wheel-drive vehicles should not be towed with two
wheels on the ground. To properly tow these vehicles,
they should be placed on a platform trailer with all four
wheels off of the ground or dinghy towed from the front.
Dolly Towing (Front-Wheel-Drive
Vehicles)
Front-wheel-drive VUE Red Line vehicles should not
be towed with two wheels on the ground. To properly
tow these vehicles, they should be placed on a platform
trailer with all four wheels off of the ground or dinghy
towed from the front.To tow your front-wheel-drive vehicle from the front with
two wheels on the ground, do the following:
1. Put the front wheels on a dolly.
2. Move the shift lever to PARK (P).
3. Set the parking brake and then remove the key.
4. Clamp the steering wheel in a straight-ahead
position with a clamping device designed for towing.
5. Secure the vehicle to the dolly.
6. Release the parking brake.
4-43
ProCarManuals.com
Page 258 of 412

California Proposition 65 Warning
Most motor vehicles, including this one, contain and/or
emit chemicals known to the State of California to
cause cancer and birth defects or other reproductive
harm. Engine exhaust, many parts and systems
(including some inside the vehicle), many �uids, and
some component wear by-products contain and/or emit
these chemicals.
California Perchlorate Materials
Requirements
Certain types of automotive applications, such as airbag
initiators, seat belt pretensioners, and lithium batteries
contained in remote keyless entry transmitters, may
contain perchlorate materials. Special handling may
be necessary. For additional information, see
www.dtsc.ca.gov/hazardouswaste/perchlorate.
Doing Your Own Service Work
{CAUTION:
You can be injured and your vehicle could be
damaged if you try to do service work on a
vehicle without knowing enough about it.
Be sure you have sufficient knowledge,
experience, the proper replacement parts,
and tools before you attempt any vehicle
maintenance task.
Be sure to use the proper nuts, bolts,
and other fasteners. English and metric
fasteners can be easily confused. If you
use the wrong fasteners, parts can later
break or fall off. You could be hurt.
If you want to do some of your own service work,
you should use the proper service manual. It tells you
much more about how to service your vehicle than
this manual can. To order the proper service manual,
seeService Publications Ordering Information on
page 7-15.
5-4
ProCarManuals.com
Page 273 of 412

How to Reset the Engine Oil Life
System
The Engine Oil Life System calculates when to change
the engine oil and �lter based on vehicle use. Whenever
the oil is changed, reset the system so it can calculate
when the next oil change is required. If a situation occurs
where you change the oil prior to a change engine oil light
being turned on, reset the system.
After changing the engine oil, reset the system:
1. Turn the ignition key to ON/RUN with the engine off.
2. Fully press and release the accelerator pedal three
times within �ve seconds.
If the change engine oil light is not on, the system
is reset.
If the light comes on again and stays on for 30 seconds
at the next ignition cycle, it did not reset. You will need to
reset the system again.
What to Do with Used Oil
Used engine oil contains certain elements that can be
unhealthy for your skin and could even cause cancer.
Do not let used oil stay on your skin for very long. Clean
your skin and nails with soap and water, or a good
hand cleaner. Wash or properly dispose of clothing or
rags containing used engine oil. See the manufacturer’s
warnings about the use and disposal of oil products.
Used oil can be a threat to the environment. If you
change your own oil, be sure to drain all the oil from
the �lter before disposal. Never dispose of oil by putting
it in the trash, pouring it on the ground, into sewers,
or into streams or bodies of water. Instead, recycle it by
taking it to a place that collects used oil. If you have
a problem properly disposing of used oil, ask your
dealer/retailer, a service station, or a local recycling
center for help.
5-19
ProCarManuals.com
Page 285 of 412

Check the level in the surge tank when the cooling
system has cooled down. If the coolant is not at the
proper level, repeat Steps 1 through 3 and reinstall the
pressure cap. If the coolant still is not at the proper level
when the system cools down again, see your retailer.
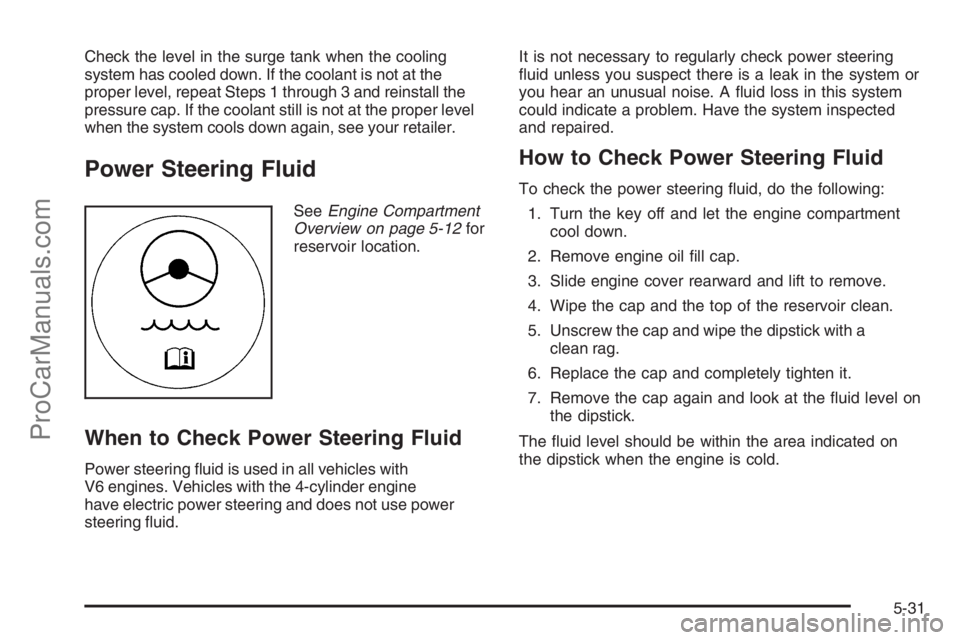
Power Steering Fluid
SeeEngine Compartment
Overview on page 5-12for
reservoir location.
When to Check Power Steering Fluid
Power steering �uid is used in all vehicles with
V6 engines. Vehicles with the 4-cylinder engine
have electric power steering and does not use power
steering �uid.It is not necessary to regularly check power steering
�uid unless you suspect there is a leak in the system or
you hear an unusual noise. A �uid loss in this system
could indicate a problem. Have the system inspected
and repaired.
How to Check Power Steering Fluid
To check the power steering �uid, do the following:
1. Turn the key off and let the engine compartment
cool down.
2. Remove engine oil �ll cap.
3. Slide engine cover rearward and lift to remove.
4. Wipe the cap and the top of the reservoir clean.
5. Unscrew the cap and wipe the dipstick with a
clean rag.
6. Replace the cap and completely tighten it.
7. Remove the cap again and look at the �uid level on
the dipstick.
The �uid level should be within the area indicated on
the dipstick when the engine is cold.
5-31
ProCarManuals.com
Page 294 of 412

7. Do not let the other end touch metal. Connect it to
the positive (+) terminal of the good battery. Use a
remote positive (+) terminal if the vehicle has one.
8. Now connect the black negative (−) cable to the
negative (−) terminal of the good battery. Use a
remote negative (−) terminal if the vehicle has one.
Do not let the other end touch anything until the
next step. The other end of the negative (−) cable
does not go to the dead battery. It goes to a heavy,
unpainted metal engine part or to a remote
negative (−) terminal on the vehicle with the
dead battery.
9. Connect the other end of the negative (−) cable
away from the dead battery, but not near engine
parts that move. The electrical connection is just
as good there, and the chance of sparks getting
back to the battery is much less.
10. Now start the vehicle with the good battery and run
the engine for a while.
11. Press the unlock symbol on the remote keyless
entry transmitter to disarm your security system,
if equipped.
12. Try to start the vehicle that had the dead battery.
If it will not start after a few tries, it probably needs
service.Notice:If the jumper cables are connected or
removed in the wrong order, electrical shorting may
occur and damage the vehicle. The repairs would
not be covered by your warranty. Always connect
and remove the jumper cables in the correct
order, making sure that the cables do not touch
each other or other metal.
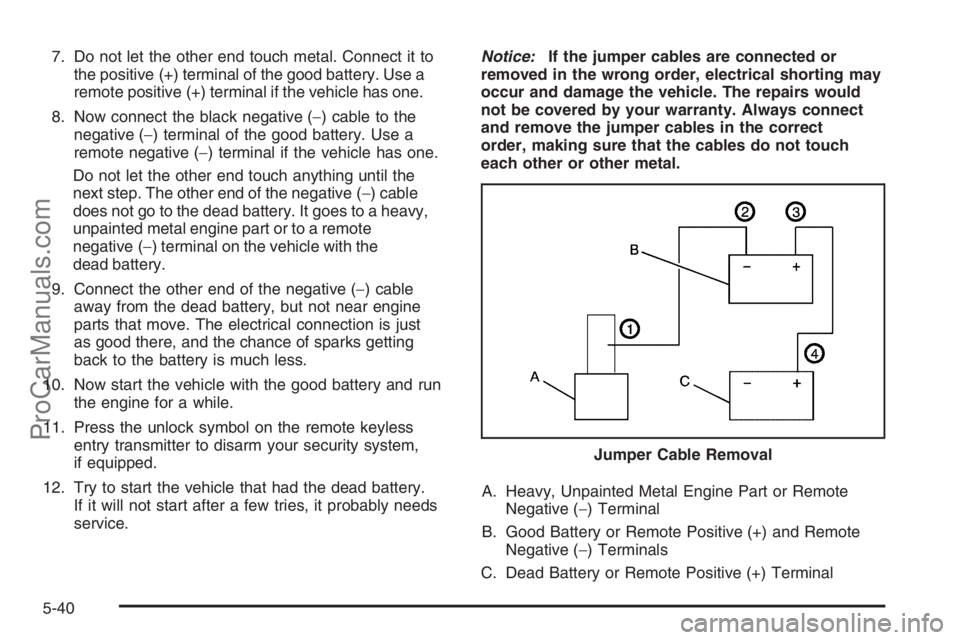
A. Heavy, Unpainted Metal Engine Part or Remote
Negative (−) Terminal
B. Good Battery or Remote Positive (+) and Remote
Negative (−) Terminals
C. Dead Battery or Remote Positive (+) TerminalJumper Cable Removal
5-40
ProCarManuals.com
Page 318 of 412

TPMS Sensor Matching Process
Each TPMS sensor has a unique identi�cation code.
Any time you replace one or more of the TPMS sensors
or rotate the vehicle’s tires, the identi�cation codes
will need to be matched to the new tire/wheel position.
The sensors are matched, to the tire/wheel positions,
in the following order: driver side front tire, passenger
side front tire, passenger side rear tire, and driver
side rear tire using a TPMS diagnostic tool. See your
dealer/retailer for service.
The TPMS sensors can also be matched to each
tire/wheel position by increasing or decreasing the tire’s
air pressure. When increasing the tire’s pressure, do
not exceed the maximum in�ation pressure indicated on
the tire’s sidewall. To decrease the tire’s air-pressure
use the pointed end of the valve cap, a pencil-style
air pressure gage, or a key.
You have two minutes to match each tire and wheel
position. If it takes longer than two minutes to match any
tire and wheel position, the matching process stops
and you will need to start over.The TPMS matching process is outlined below:
1. Set the parking brake.
2. Turn the ignition switch to ON/RUN with the
engine off.
3. Press and hold the RKE transmitter’s Lock and
Unlock buttons at the same time, for about
three seconds. The horn will sound twice to
indicate the receiver is ready for the sensor
matching process to begin.
4. Start with the driver side front tire. The driver side
turn signal lamp comes on.
5. Remove the valve cap from the tire’s valve
stem. Activate the TPMS sensor by increasing or
decreasing the tire’s air pressure for �ve seconds, or
until a horn chirp sounds. The horn chirp, which may
take up to 30 seconds to sound, con�rms that the
sensor identi�cation code has been matched to the
tire/wheel position.
5-64
ProCarManuals.com