oil pressure SATURN VUE 2009 User Guide
[x] Cancel search | Manufacturer: SATURN, Model Year: 2009, Model line: VUE, Model: SATURN VUE 2009Pages: 386, PDF Size: 2.3 MB
Page 269 of 386

{CAUTION
Steam and scalding liquids from a
hot cooling system can blow out
and burn you badly. They are
under pressure, and if you turn
the coolant surge tank pressure
cap — even a little — they can
come out at high speed. Never
turn the cap when the cooling
system, including the coolant
surge tank pressure cap, is hot.
Wait for the cooling system and
coolant surge tank pressure cap
to cool if you ever have to turn
the pressure cap.
{CAUTION
Adding only plain water to the
cooling system can be dangerous.
Plain water, or some other liquid
such as alcohol, can boil before
the proper coolant mixture will.
The vehicle’s coolant warning
system is set for the proper
coolant mixture. With plain water
or the wrong mixture, the engine
could get too hot but you would
not get the overheat warning. The
engine could catch �re and you or
others could be burned. Use a
50/50 mixture of clean, drinkable
water and DEX-COOL
®coolant.
Notice:In cold weather, water
can freeze and crack the engine,
radiator, heater core and other
parts. Use the recommended
coolant and the proper coolant
mixture.
{CAUTION
You can be burned if you spill
coolant on hot engine parts.
Coolant contains ethylene glycol
and it will burn if the engine parts
are hot enough. Do not spill
coolant on a hot engine.
1. You can remove the coolant
surge tank pressure cap when
the cooling system, including the
coolant surge tank pressure cap
and upper radiator hose, is no
longer hot.
Turn the pressure cap slowly
counterclockwise about
one-quarter of a turn. If you hear
a hiss, wait for that to stop.
Service and Appearance Care 5-21
ProCarManuals.com
Page 270 of 386

This will allow any pressure still
left to be vented out the
discharge hose.
2. Then keep turning the pressure
cap slowly, and remove it.
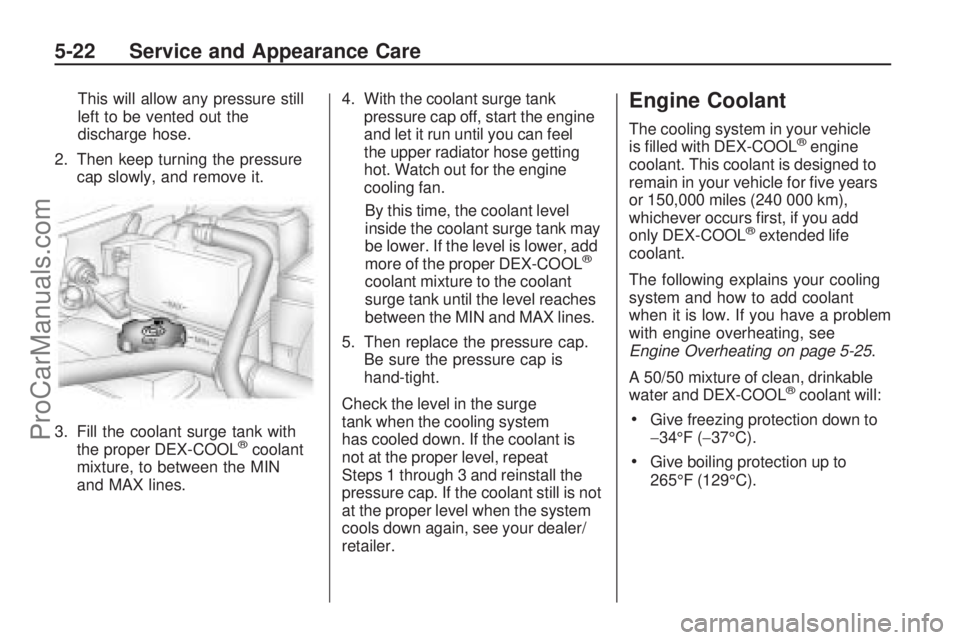
3. Fill the coolant surge tank with
the proper DEX-COOL
®coolant
mixture, to between the MIN
and MAX lines.4. With the coolant surge tank
pressure cap off, start the engine
and let it run until you can feel
the upper radiator hose getting
hot. Watch out for the engine
cooling fan.
By this time, the coolant level
inside the coolant surge tank may
be lower. If the level is lower, add
more of the proper DEX-COOL
®
coolant mixture to the coolant
surge tank until the level reaches
between the MIN and MAX lines.
5. Then replace the pressure cap.
Be sure the pressure cap is
hand-tight.
Check the level in the surge
tank when the cooling system
has cooled down. If the coolant is
not at the proper level, repeat
Steps 1 through 3 and reinstall the
pressure cap. If the coolant still is not
at the proper level when the system
cools down again, see your dealer/
retailer.
Engine Coolant
The cooling system in your vehicle
is �lled with DEX-COOL®engine
coolant. This coolant is designed to
remain in your vehicle for �ve years
or 150,000 miles (240 000 km),
whichever occurs �rst, if you add
only DEX-COOL
®extended life
coolant.
The following explains your cooling
system and how to add coolant
when it is low. If you have a problem
with engine overheating, see
Engine Overheating on page 5-25.
A 50/50 mixture of clean, drinkable
water and DEX-COOL
®coolant will:
Give freezing protection down to
−34°F (−37°C).
Give boiling protection up to
265°F (129°C).
5-22 Service and Appearance Care
ProCarManuals.com
Page 295 of 386

Bead:The tire bead contains
steel wires wrapped by steel
cords that hold the tire onto
the rim.
Bias Ply Tire
:A pneumatic
tire in which the plies are laid
at alternate angles less than
90 degrees to the centerline of
the tread.
Cold Tire Pressure
:The
amount of air pressure in a tire,
measured in pounds per square
inch (psi) or kilopascals (kPa)
before a tire has built up heat
from driving. SeeInflation - Tire
Pressure on page 5-49.
Curb Weight
:The weight of a
motor vehicle with standard
and optional equipment including
the maximum capacity of fuel,
oil, and coolant, but without
passengers and cargo.DOT Markings
:A code
molded into the sidewall of a
tire signifying that the tire is in
compliance with the U.S.
Department of Transportation
(DOT) motor vehicle safety
standards. The DOT code
includes the Tire Identi�cation
Number (TIN), an alphanumeric
designator which can also
identify the tire manufacturer,
production plant, brand, and date
of production.
GVWR
:Gross Vehicle Weight
Rating. SeeLoading the Vehicle
on page 4-28.
GAWR FRT
:Gross Axle Weight
Rating for the front axle. See
Loading the Vehicle on
page 4-28.
GAWR RR
:Gross Axle Weight
Rating for the rear axle. See
Loading the Vehicle on
page 4-28.Intended Outboard Sidewall
:The side of an asymmetrical tire,
that must always face outward
when mounted on a vehicle.
Kilopascal (kPa)
:The metric
unit for air pressure.
Light Truck (LT-Metric) Tire
:A tire used on light duty trucks
and some multipurpose
passenger vehicles.
Load Index
:An assigned
number ranging from 1 to 279
that corresponds to the load
carrying capacity of a tire.
Maximum In�ation Pressure
:The maximum air pressure to
which a cold tire can be in�ated.
The maximum air pressure is
molded onto the sidewall.
Maximum Load Rating
:The
load rating for a tire at the
maximum permissible in�ation
pressure for that tire.
Service and Appearance Care 5-47
ProCarManuals.com
Page 321 of 386

Do not clean the vehicle using:
A knife or any other sharp object
to remove a soil from any interior
surface.
A stiff brush. It can cause damage
to the vehicle’s interior surfaces.
Heavy pressure or aggressive
rubbing with a cleaning cloth. Use
of heavy pressure can damage
the interior and does not improve
the effectiveness of soil removal.
Laundry detergents or
dishwashing soaps with
degreasers can leave residue
that streaks and attracts dirt. For
liquid cleaners, about 20 drops
per gallon (3.78 L) of water is a
good guide. Use only mild,
neutral-pH soaps.
Too much cleaner that saturates
the upholstery.
Organic solvents such as naptha,
alcohol, etc. that can damage the
vehicle’s interior.
Fabric/Carpet
Use a vacuum cleaner with a soft
brush attachment frequently to
remove dust and loose dirt. A
canister vacuum with a beater bar in
the nozzle may only be used on �oor
carpet and carpeted �oor mats. For
any soil, always try to remove it �rst
with plain water or club soda. Before
cleaning, gently remove as much of
the soil as possible using one of the
following techniques:
For liquids: gently blot the
remaining soil with a paper towel.
Allow the soil to absorb into the
paper towel until no more can be
removed.
For solid dry soils: remove as
much as possible and then
vacuum.
To clean:
1. Saturate a lint-free, clean white
cloth with water or club soda.
2. Wring the cloth to remove excess
moisture.3. Start on the outside edge of the
soil and gently rub toward the
center. Continue cleaning, using
a clean area of the cloth each
time it becomes soiled.
4. Continue to gently rub the soiled
area until the cleaning cloth
remains clean.
5. If the soil is not completely
removed, use a mild soap
solution and repeat the cleaning
process that was used with
plain water.
If any of the soil remains, a
commercial fabric cleaner or spot
lifter may be necessary. When a
commercial upholstery cleaner or
spot lifter is to be used, test a small
hidden area for colorfastness �rst.
If the locally cleaned area gives any
impression that a ring formation may
result, clean the entire surface.
After the cleaning process has been
completed, a paper towel can be
used to blot excess moisture from
the fabric or carpet.
Service and Appearance Care 5-73
ProCarManuals.com
Page 340 of 386

MaintenanceI—Use
Maintenance Iif the Change Engine
Oil light displays within 10 months
since the vehicle was purchased or
Maintenance IIwas performed. Maintenance
II—Use
Maintenance IIif the previous
service performed was
Maintenance I. Always use Maintenance
IIwhenever the light
displays 10 months or more since
the last service or if the light has not
come on at all for one year.
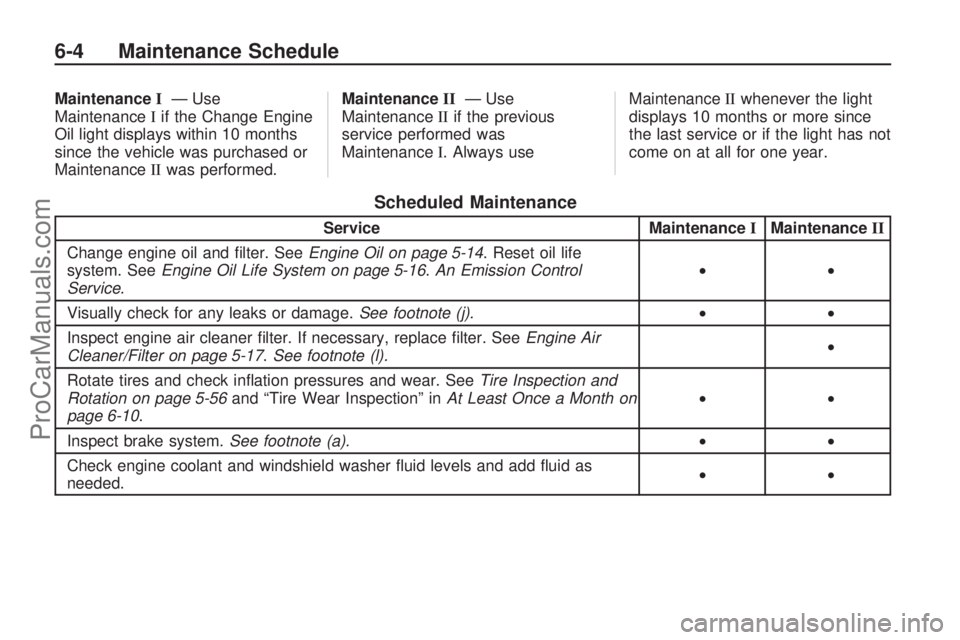
Scheduled Maintenance
Service MaintenanceIMaintenance II
Change engine oil and �lter. See Engine Oil on page 5-14. Reset oil life
system. See Engine Oil Life System on page 5-16 .An Emission Control
Service. ••
Visually check for any leaks or damage. See footnote (j). ••
Inspect engine air cleaner �lter. If necessary, replace �lter. See Engine Air
Cleaner/Filter on page 5-17 .See footnote (l). •
Rotate tires and check in�ation pressures and wear. See Tire Inspection and
Rotation on page 5-56 and “Tire Wear Inspection” in At Least Once a Month on
page 6-10. ••
Inspect brake system. See footnote (a). ••
Check engine coolant and windshield washer �uid levels and add �uid as
needed. ••
6-4 Maintenance Schedule
ProCarManuals.com
Page 345 of 386

(g)Check system for interference or
binding and for damaged or missing
parts. Replace parts as needed.
Replace any components that have
high effort or excessive wear.
(h)Severe service is when the
vehicle is mainly driven under one
or more of these conditions:
�In heavy city traffic where the
outside temperature regularly
reaches 90°F (32°C) or higher.
�In hilly or mountainous terrain.
�When doing frequent trailer
towing.
�Uses such as found in taxi,
police, or delivery service.(i)Drain, flush, and refill cooling
system. This service can be
complex; you should have your
dealer/retailer perform this service.
See Engine Coolant on page 5-22 for
what to use. Inspect hoses. Clean
radiator, condenser, pressure cap,
and filler neck. Pressure test the
cooling system and pressure cap.
(j)A fluid loss in any vehicle system
could indicate a problem. Have
the system inspected and repaired
and the fluid level checked. Add
fluid if needed.
(k)Or every 12 months, whichever
occurs first. If you drive regularly
under dusty conditions, the filter may
require replacement more often.(l)If driving regularly under dusty
conditions, inspect the filter at each
engine oil change.
(m)Change the fluid the first
time the vehicle is serviced after
100,000 miles (166 000 km) and
when the vehicle is serviced after
each subsequent 50,000 miles
(83 000 km).
(n)Visually inspect belt for fraying,
excessive cracks, or obvious
damage. Replace belt if necessary.
Maintenance Schedule 6-9
ProCarManuals.com
Page 346 of 386

Owner Checks and
Services
These owner checks and services
should be performed at the intervals
speci�ed to help ensure vehicle
safety, dependability, and emission
control performance. Your
dealer/retailer can assist with these
checks and services.
Be sure any necessary repairs are
completed at once. Whenever
any �uids or lubricants are added to
the vehicle, make sure they are
the proper ones, as shown in
Recommended Fluids and
Lubricants on page 6-13.
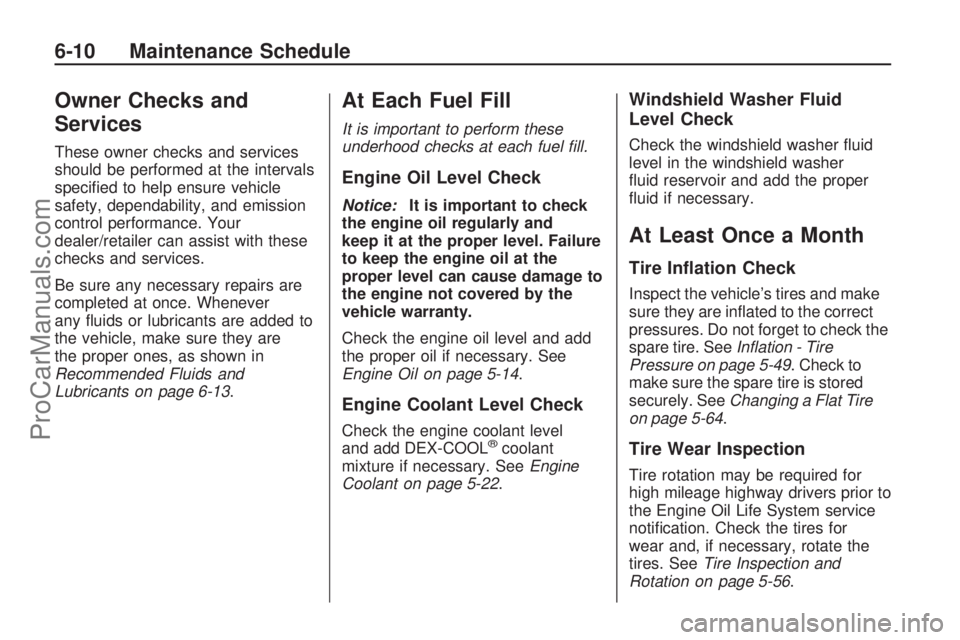
At Each Fuel Fill
It is important to perform these
underhood checks at each fuel fill.
Engine Oil Level Check
Notice:It is important to check
the engine oil regularly and
keep it at the proper level. Failure
to keep the engine oil at the
proper level can cause damage to
the engine not covered by the
vehicle warranty.
Check the engine oil level and add
the proper oil if necessary. See
Engine Oil on page 5-14.
Engine Coolant Level Check
Check the engine coolant level
and add DEX-COOL®coolant
mixture if necessary. SeeEngine
Coolant on page 5-22.
Windshield Washer Fluid
Level Check
Check the windshield washer �uid
level in the windshield washer
�uid reservoir and add the proper
�uid if necessary.
At Least Once a Month
Tire In�ation Check
Inspect the vehicle’s tires and make
sure they are in�ated to the correct
pressures. Do not forget to check the
spare tire. SeeInflation - Tire
Pressure on page 5-49. Check to
make sure the spare tire is stored
securely. SeeChanging a Flat Tire
on page 5-64.
Tire Wear Inspection
Tire rotation may be required for
high mileage highway drivers prior to
the Engine Oil Life System service
noti�cation. Check the tires for
wear and, if necessary, rotate the
tires. SeeTire Inspection and
Rotation on page 5-56.
6-10 Maintenance Schedule
ProCarManuals.com
Page 380 of 386

Highway Hypnosis................4-24
Hill and Mountain Roads.......4-24
Hood
Checking Things Under.....5-10
Release..........................5-11
Horn .................................... 3-5
How to Wear Safety Belts
Properly..........................1-14
I
Ignition Positions..................2-16
Infants and Young Children,
Restraints........................1-26
In�ation - Tire Pressure.........5-49
Instrument Panel
Brightness.......................3-14
Cluster............................3-27
Overview........................... 3-4
Storage Area....................2-42
Introduction........................... 6-1
J
Jump Starting......................5-31
K
Keyless Entry, Remote
Operation.......................... 2-4
Keyless Entry System............ 2-3
Keys.................................... 2-2
L
Labeling, Tire Sidewall..........5-44
Lamp
Malfunction Indicator.........3-35
Lamps
Daytime Running (DRL).....3-13
Dome .............................3-14
Front Turn Signal and
Parking Lamps..............5-40
License Plate...................5-41
Reading..........................3-15
Lap-Shoulder Belt................1-19
LATCH System for Child
Restraints........................1-31
Liftgate
Carbon Monoxide............... 2-9
Lighting
Entry..............................3-14Lights
Airbag Readiness.............3-29
All-Wheel Drive Disabled....3-40
Antilock Brake System
(ABS) Warning..............3-32
Brake System Warning......3-31
Change Engine Oil...........3-38
Charging System..............3-31
Cruise Control..................3-38
Daytime Running Lamps
Indicator.......................3-39
Door Ajar.........................3-40
Engine Coolant
Temperature Warning.....3-34
Exterior Lamps.................3-12
Flash-to-Pass..................... 3-7
Fog Lamp ........................3-38
Gate Ajar.........................3-40
Highbeam On...................3-39
High/Low Beam Changer..... 3-7
Low Fuel Warning.............3-41
Low Washer Fluid
Warning.......................3-40
Oil Pressure.....................3-37
Passenger Airbag Status
Indicator.......................3-30
i-6 INDEX
ProCarManuals.com
Page 382 of 386

Oil
Change Engine Oil Light....3-38
Engine............................5-14
Engine Oil Life System......5-16
Pressure Light..................3-37
Older Children, Restraints......1-23
Online Owner Center.............. 7-4
OnStar, Privacy....................7-17
OnStar
®System, see
OnStar®Manual...............2-33
Operation, Universal Home
Remote System................2-37
Outlet Adjustment.................3-24
Outlets
Accessory Power..............3-16
Outside
Convex Mirror..................2-30
Heated Mirrors.................2-30
Power Mirrors..................2-29
Owner Checks and Services . . . 6-10
Owners, Canadian.................... ii
P
Paint, Damage.....................5-78
Park
Shifting Into.....................2-25
Shifting Out of..................2-27Parking
Over Things That Burn......2-27
Parking Brake......................2-24
Passenger Airbag Status
Indicator..........................3-30
Passenger Compartment Air
Filter...............................3-24
Passenger Sensing System . . . 1-51
Passing..............................4-11
PASS-Key
®III+ Electronic
Immobilizer......................2-13
PASS-Key
®III+ Electronic
Immobilizer Operation........2-14
Perchlorate Materials
Requirements, California...... 5-4
Phone
Bluetooth
®.......................3-81
Power
Door Locks........................ 2-8
Electrical System..............5-80
Reduced Engine Light.......3-39
Retained
Accessory (RAP)...........2-17
Seat................................. 1-4
Steering Fluid...................5-26
Windows.........................2-10
Power Steering Warning
Lights.............................3-33Pregnancy, Using Safety
Belts...............................1-23
Privacy...............................7-16
Navigation System............7-17
OnStar............................7-17
Radio Frequency
Identi�cation (RFID).......7-17
Proposition 65 Warning,
California.......................... 5-4
R
Radio Frequency
Identi�cation (RFID),
Privacy............................7-17
Radio(s).............................3-67
Radios
Navigation/Radio System,
see Navigation Manual . . . 3-81
Reception........................3-92
Setting the Clock..............3-65
Theft-Deterrent.................3-91
Rainsense™ II Wipers............ 3-8
Reading Lamps...................3-15
Rear Door Security Locks....... 2-8
Rear Seat Armrest...............2-44
Rear Vision Camera (RVC)....2-31
Rear Window Washer/Wiper.... 3-9
i-8 INDEX
ProCarManuals.com