SATURN VUE 2010 Owners Manual
Manufacturer: SATURN, Model Year: 2010, Model line: VUE, Model: SATURN VUE 2010Pages: 398, PDF Size: 4.02 MB
Page 301 of 398

Vehicle Care 10-35
Taillamps, Turn Signal,
Stoplamps, and Back-Up
Lamps
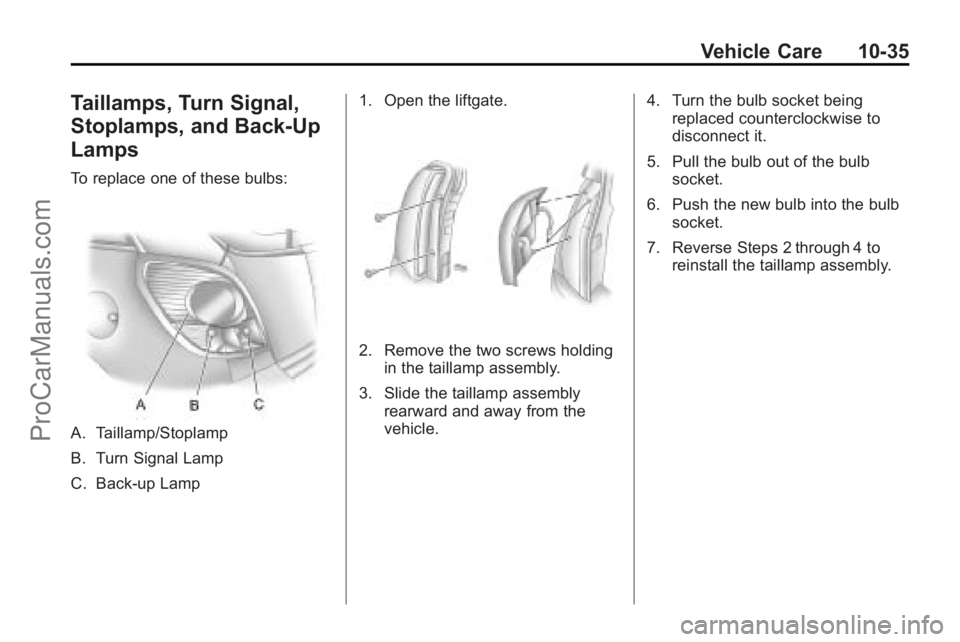
To replace one of these bulbs:
A. Taillamp/Stoplamp
B. Turn Signal Lamp
C. Back-up Lamp1. Open the liftgate.
2. Remove the two screws holding
in the taillamp assembly.
3. Slide the taillamp assembly rearward and away from the
vehicle. 4. Turn the bulb socket being
replaced counterclockwise to
disconnect it.
5. Pull the bulb out of the bulb socket.
6. Push the new bulb into the bulb socket.
7. Reverse Steps 2 through 4 to reinstall the taillamp assembly.
ProCarManuals.com
Page 302 of 398

10-36 Vehicle Care
License Plate Lamp
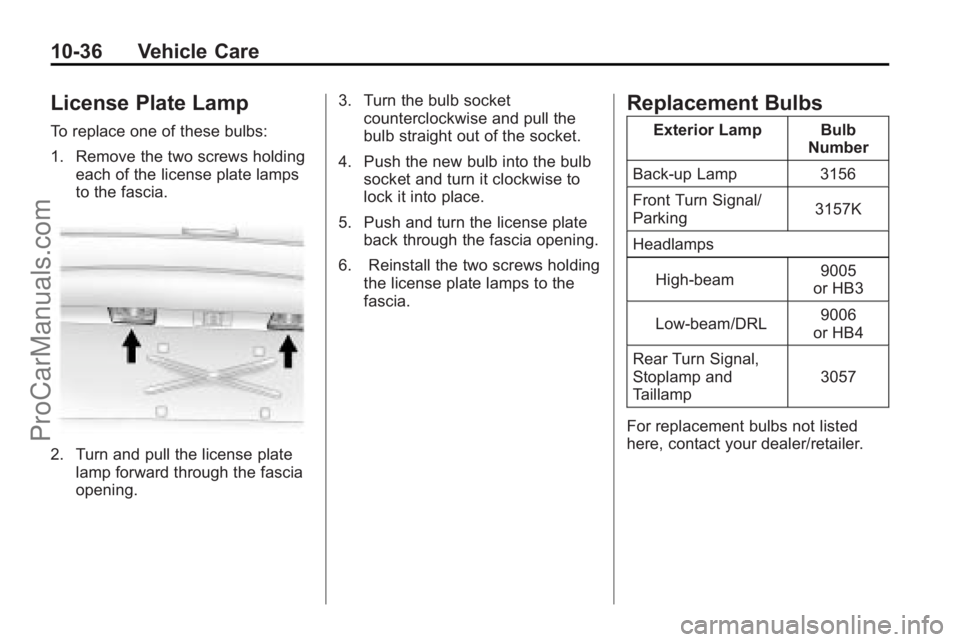
To replace one of these bulbs:
1. Remove the two screws holdingeach of the license plate lamps
to the fascia.
2. Turn and pull the license plate
lamp forward through the fascia
opening. 3. Turn the bulb socket
counterclockwise and pull the
bulb straight out of the socket.
4. Push the new bulb into the bulb socket and turn it clockwise to
lock it into place.
5. Push and turn the license plate back through the fascia opening.
6. Reinstall the two screws holding the license plate lamps to the
fascia.
Replacement Bulbs
Exterior Lamp Bulb Number
Back-up Lamp 3156
Front Turn Signal/
Parking 3157K
Headlamps High-beam 9005
or HB3
Low-beam/DRL 9006
or HB4
Rear Turn Signal,
Stoplamp and
Taillamp 3057
For replacement bulbs not listed
here, contact your dealer/retailer.
ProCarManuals.com
Page 303 of 398

Vehicle Care 10-37
Electrical System
Electrical System
Overload
The vehicle has fuses and circuit
breakers to protect against an
electrical system overload.
When the current electrical load is
too heavy, the circuit breaker opens
and closes, protecting the circuit
until the current load returns to
normal or the problem is fixed.
This greatly reduces the chance of
circuit overload and fire caused by
electrical problems.
Fuses and circuit breakers protect
the following in the vehicle:
.Headlamp Wiring
.Windshield Wiper Motor
.Power Windows and other
Power Accessories
Headlamp Wiring
An electrical overload may cause
the lamps to go on and off, or in
some cases to remain off. Have the
headlamp wiring checked right
away if the lamps go on and off or
remain off.
Windshield Wipers
If the wiper motor overheats due to
heavy snow or ice, the windshield
wipers will stop until the motor cools
and will then restart.
Although the circuit is protected
from electrical overload, overload
due to heavy snow or ice, may
cause wiper linkage damage.
Always clear ice and heavy snow
from the windshield before using the
windshield wipers.
If the overload is caused by an
electrical problem and not snow or
ice, be sure to get it fixed.
Fuses and Circuit
Breakers
The wiring circuits in the vehicle are
protected from short circuits by
fuses. This greatly reduces the
chance of circuit overload and fire
caused by electrical problems.
There are two fuse blocks—the
engine compartment fuse block, and
the instrument panel fuse block.
To identify and check fuses and
relays, refer to the Fuse Usage
Chart on the inside surface of the
fuse panel door.
ProCarManuals.com
Page 304 of 398

10-38 Vehicle Care
Engine Compartment
Fuse Block
The engine compartment fuse block
is located on the driver side of the
engine compartment, near the
battery.
Notice:Spilling liquid on any
electrical components on the
vehicle may damage it. Always
keep the covers on any electrical
component.
Fuses Usage
FAN MAIN Cooling Fan Main
REAR/WPR Rear Wiper Motor
FAN AUX Cooling Fan
Auxiliary Fuses
Usage
ECM/
TCM/SGCM Engine Control
Module/
Transmission
Control Module/
Serial Data Gateway
Communication
Module
ProCarManuals.com
Page 305 of 398

Vehicle Care 10-39
FusesUsage
ECM Engine Control
Module
ENG-3 Engine 3
ENG-2 Engine 2
ENG-1 Engine 1
HYBRID BEC Not Used
RUN Run
S/ROOF Sunroof Module
HTD/SEAT Heated Seat Control
Module
BCM Body Control
Module
STRTR Starter Motor WPR Windshield Wiper
4WD/ESCM All-Wheel Drive
System
ABS Antilock Brake
System Module Fuses
Usage
A/C CLTCH Air Conditioning
Compressor
BLWR MTR Blower Motor AMP Amplifier
HORN Horn
ABS Antilock Brake
System Module
I/P BEC Instrument Panel
Bussed Electrical
Center
FRT FOG Front Fog Lamps
I/P BEC Instrument Panel
Bussed Electrical
Center
DRL Daytime Running
Light
T/LAMP RT Right Marker and
Parking Lamps
T/LAMP LT Left Marker and
Parking Lamps Fuses
Usage
TRLR
T/LAMP Trailer Parking
Lamps
HDLP HI LT Passenger Side
High-Beam
Headlamp
STOP LP Stoplamps DEFOG Defroster Fog
HDLP
LO RT Driver Side
Low-Beam
Headlamp
HDLP
LO LT Passenger Side
Low-Beam
Headlamp
HDLP HI RT Driver Side
High-Beam
Headlamp
OSRVM HTR Outside Rearview
Mirror Heating
ProCarManuals.com
Page 306 of 398

10-40 Vehicle Care
RelaysUsage
FAN
MAIN RLY Cooling Fan Main
Relay
FAN
CTRL RLY Cooling Fan
Control Relay
FAN
AUX RLY Cooling Fan
Auxiliary Relay
PWR/
TRN RLY Engine Control
Module/CAM,
Canister, Injectors,
Electronic Throttle
Control Relay
STRTR RLY Starter Relay RUN RLY Run Relay
A/C
CLTCH RLY Air Conditioning
Compressor Relay
WPR
SPD RLY Windshield Wiper
Speed Relay Relays
Usage
HORN RLY Horn Relay WPR
CNTRL RLY Windshield Wiper
Control Relay
T/LAMP RLY Parking Lamp Relay
HDLP
HI RLY High-Beam
Headlamp Relay
HDLP
LO RLY Low‐Beam
Headlamp Relay
FRT
FOG RLY Front Foglamp
Relay
STOP
LP RLY Stoplamp Relay
DEFOG RLY Defogger RelayInstrument Panel Fuse
Block
The instrument panel fuse block is
located on the passenger side of the
lower console.
Pull the latch of the fuse box cover
straight back to access the fuses.
ProCarManuals.com
Page 307 of 398

Vehicle Care 10-41
Fuses Usage
PWR SEAT Power Seat
PASS
P/WIN Passenger Side
Power Window Fuses Usage
DRIV
P/WIN Driver Side Power
Window
S/ROOF Sunroof Module Fuses Usage
CIGAR Cigarette Lighter
ECM/TCM Engine Control
Module (ECM)/
Transmission
Control
Module (TCM)
FSCM Fuel Storage Control
Module
ISRVM Inside Rearview
Mirror
CLUSTER Instrument Panel
Cluster
AIR BAG Airbag System
OSRVM Outside Rearview
Mirror
KEY CAP Key Capture
Solenoid
WHL S/W Steering Wheel
Switch
ProCarManuals.com
Page 308 of 398

10-42 Vehicle Care
Fuses Usage
F/DR LCK Front Driver
Door Lock
APO2 Accessory Power
Outlet 2
BCM (VB3) Body Control
Module (BCM) (VB3)
DR LCK Door Lock
BCM (VB6) Body Control
Module (VB6)
BCM (VB4) Body Control
Module (VB4)
BCM (VB5) Body Control
Module (VB5)
TRL Trailer
AIRCON Air Conditioner AUDIO Audio Fuses Usage
BCM (VB7) Body Control
Module (VB7)
IGN SW Ignition Switch
AIR BAG Air Bag System
WASHER Washer Pump
APO1 Accessory Power
Outlet 1
FSCM Fuel Storage Control
Module
RR CLR Rear Closure
BCM (VB2) Body Control
Module (VB2)
DRL Daytime Running
Light
BCM (VB1) Body Control
Module (VB1)
ONSTAR OnStar
®
Relays Usage
RELAY
ACC/RAP Accessory, Retained
Accessory Power
(RAP) Relay
RELAY RUN/
CRANK Run/Crank Relay
ProCarManuals.com
Page 309 of 398

Vehicle Care 10-43
Wheels and Tires
Tires
Your new vehicle comes with
high-quality tires made by a
leading tire manufacturer. If you
ever have questions about your
tire warranty and where to
obtain service, see your vehicle
Warranty booklet for details.
For additional information refer
to the tire manufacturer.
{WARNING
Poorly maintained and improperly
used tires are dangerous.
.Overloading your tires can
cause overheating as a result
of too much flexing. You
could have an air-out and a
serious accident. SeeVehicle
Load Limits on page 9‑22.
.Underinflated tires pose the
same danger as overloaded
tires. The resulting accident
could cause serious injury.
Check all tires frequently to
maintain the recommended
pressure. Tire pressure
should be checked when your
tires are cold. See Tire
Pressure on page 10‑50.
(Continued)
WARNING (Continued)
.Overinflated tires are more
likely to be cut, punctured
or broken by a sudden
impact—such as when you
hit a pothole. Keep tires at
the recommended pressure.
.Worn, old tires can cause
accidents. If your tread is
badly worn, or if your tires
have been damaged,
replace them.
See Tire Pressure for High-Speed
Operation
on page 10‑52for
inflation pressure adjustment for
high speed driving.
ProCarManuals.com
Page 310 of 398

10-44 Vehicle Care
Tire Sidewall Labeling
Useful information about a tire
is molded into its sidewall.
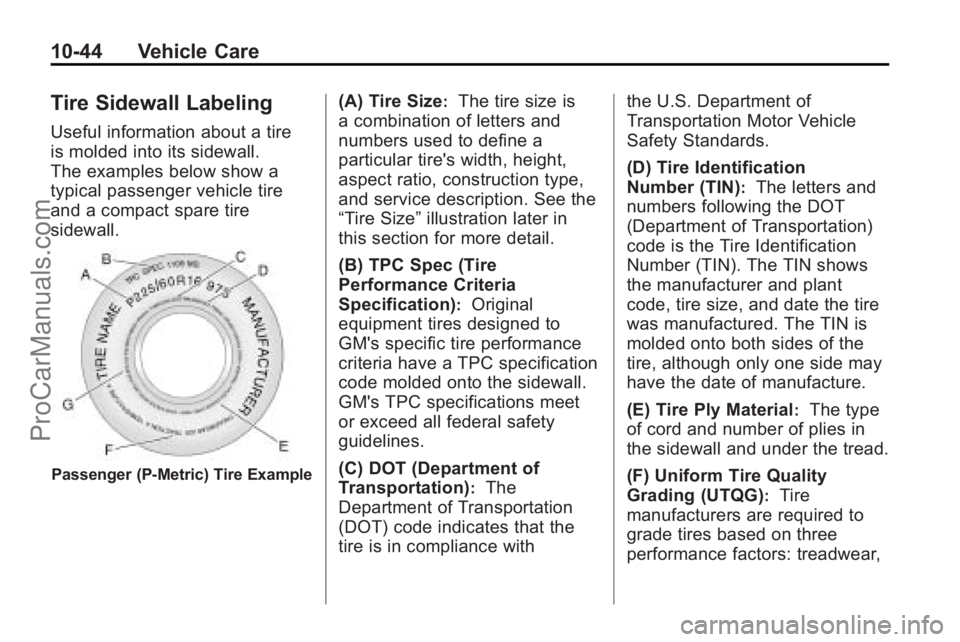
The examples below show a
typical passenger vehicle tire
and a compact spare tire
sidewall.
Passenger (P‐Metric) Tire Example
(A) Tire Size:The tire size is
a combination of letters and
numbers used to define a
particular tire's width, height,
aspect ratio, construction type,
and service description. See the
“Tire Size” illustration later in
this section for more detail.
(B) TPC Spec (Tire
Performance Criteria
Specification)
:Original
equipment tires designed to
GM's specific tire performance
criteria have a TPC specification
code molded onto the sidewall.
GM's TPC specifications meet
or exceed all federal safety
guidelines.
(C) DOT (Department of
Transportation)
:The
Department of Transportation
(DOT) code indicates that the
tire is in compliance with the U.S. Department of
Transportation Motor Vehicle
Safety Standards.
(D) Tire Identification
Number (TIN)
:The letters and
numbers following the DOT
(Department of Transportation)
code is the Tire Identification
Number (TIN). The TIN shows
the manufacturer and plant
code, tire size, and date the tire
was manufactured. The TIN is
molded onto both sides of the
tire, although only one side may
have the date of manufacture.
(E) Tire Ply Material
:The type
of cord and number of plies in
the sidewall and under the tread.
(F) Uniform Tire Quality
Grading (UTQG)
:Tire
manufacturers are required to
grade tires based on three
performance factors: treadwear,
ProCarManuals.com